Let’s get one thing straight right out of the gate: making a stable, plant-based emulsion is not magic. It is fluid dynamics, protein chemistry, and mechanical shear force. I have ruined more batches of vegan mayonnaise and weeping aiolis than I care to admit, mostly because I used to think I was somehow smarter than basic thermodynamics. Spoiler alert: I wasn’t.
During the week, my kitchen operates on ruthless efficiency. Time is money, and I will shamelessly use every clever shortcut in the book to get a meal on the table before my will to live expires. But the weekend? The weekend is when we slow down. That is when we become absolute, unapologetic perfectionists. If you are tired of your plant-based sauces separating into sad, oily puddles of despair, you have come to the right place. Instead of hiding behind pretentious recipe jargon, we are going to break down the actual, verifiable physics of aquafaba.
You do not need a culinary degree to pull this off. You just need to understand the molecular parameters of your ingredients and how to wield your equipment properly. This is the kind of foundational knowledge capable of transforming your daily cooking from a stressful chore into pure kitchen artistry. Grab a coffee, roll up your sleeves, and let’s dive into the definitive masterclass on formulating unbreakable vegan emulsions.
The Molecular Anatomy of Aquafaba: Why Bean Juice is Liquid Gold
If you are unfamiliar with the term, aquafaba is the viscous liquid left over from cooking chickpeas (or the brine inside a standard can of garbanzo beans). For decades, we poured this liquid down the drain, completely unaware that we were discarding a structural powerhouse. To understand why aquafaba can flawlessly replace egg whites in complex culinary applications, we have to look at its microscopic composition.
The Protein and Polysaccharide Matrix
Unlike whole eggs, which rely heavily on lecithin and a dense network of complex proteins, aquafaba is actually characterized by a surprisingly low dry matter content—typically hovering between 5% and 8%. However, what it lacks in sheer mass, it makes up for in highly functional biological structures.
The emulsifying and foaming properties of aquafaba are primarily driven by low-molecular-weight proteins, specifically albumins, which measure at or below 16 to 25 kilodaltons (kDa). Because these proteins are so small and agile, they can rapidly migrate to the boundary between water and oil during blending. Once there, they unfold and encapsulate the microscopic oil droplets, lowering the interfacial tension and preventing the oil from immediately merging back together.
But proteins alone cannot hold a thick, luscious mayonnaise together. This is where the carbohydrates step in. Aquafaba is rich in water-soluble polysaccharides—complex sugar chains composed of D-glucose, D-galactose, and L-arabinose. These polysaccharides do not act as emulsifiers themselves; rather, they act as the ultimate structural bodyguards. By drastically increasing the viscosity of the continuous water phase, these carbohydrates create physical roadblocks (steric hindrance) that stop the dispersed oil droplets from colliding and coalescing.
Saponins: Nature’s Amphiphilic Surfactants
The unsung heroes of aquafaba are saponins. Saponins are naturally occurring chemical compounds that possess a highly unique amphiphilic structure. This means they have a split personality: one end of the molecule is a water-soluble glycoside (hydrophilic), and the other end is a lipid-soluble aglycone (hydrophobic).
When you introduce oil to aquafaba and apply mechanical shear, the saponins immediately embed their fat-loving tails into the oil droplets while leaving their water-loving heads firmly anchored in the chickpea brine. They act as non-ionic surfactants, bridging the hostile gap between two completely immiscible liquids. Without saponins, your vegan mayonnaise would break before it ever made it to the refrigerator.
The Thermodynamics of Plant-Based Emulsions
Creating an emulsion is essentially forcing two things that hate each other—oil and water—to coexist peacefully. In the context of a thick vegan mayonnaise or aioli, we are creating what food scientists call a High Internal Phase Emulsion (HIPE).
The High Internal Phase Emulsion (HIPE) Ratio
In a standard liquid dressing, the oil and water might be somewhat balanced. But in a HIPE, the dispersed oil phase is packed so tightly together that the droplets physically deform against one another, creating a semi-solid, spoonable texture. For aquafaba to achieve maximum stability as a HIPE, the ideal oil phase volume (Φ) must sit precisely between 65% and 75%.
In practical kitchen terms, this translates to the golden ratio: roughly 1 part aquafaba to 3 parts (or up to 4 parts) neutral oil. If you drop the oil volume too low, the emulsion remains a thin, runny liquid. If you push the oil volume past 80%, the limited amount of water and protein in the aquafaba can no longer stretch to encapsulate the fat, and the entire system violently shatters into a greasy mess.
The 25°C Thermal Sweet Spot
Here is where most home cooks fail spectacularly. Traditional egg yolk mayonnaise is relatively forgiving when it comes to temperature. Aquafaba is not. Understanding the thermal thresholds of your ingredients is the ultimate secret to stabilizing modern emulsions without needing industrial laboratory equipment.
Recent scientific evaluations of aquafaba emulsions reveal that 25°C (77°F)—essentially standard room temperature—is the absolute optimal thermal environment for both foaming and emulsion stability. If you pull a can of chickpeas out of the refrigerator at 4°C and immediately try to blend it with cold oil, you are going to struggle. At low temperatures, the albumin proteins are rigid and tightly coiled. They lack the kinetic energy required to rapidly unfold and coat the newly sheared oil droplets.
Conversely, if your aquafaba or oil is too hot (above 40°C), you risk prematurely denaturing the proteins and thinning out the polysaccharide matrix, leading to rapid phase separation. Before you even touch your blender, ensure that your aquafaba, your oil, and your acid are all resting comfortably at exactly 25°C.
Pre-Processing: The Aquafaba Reduction Protocol
I am going to let you in on a professional secret: straight-from-the-can aquafaba is a massive gamble. Because canning processes vary wildly between manufacturers, the water-to-seed ratio is never perfectly consistent. You might open one can and find a thick, gelatinous liquid, while the next can yields something resembling dirty tap water.
To guarantee success, you must standardize your aquafaba by reducing it on the stove. Studies demonstrate that reheating and reducing aquafaba to between 50% and 70% of its original liquid volume exponentially improves its functional emulsifying properties.
The Chemistry of Reduction
When you simmer aquafaba in a wide saucepan, you aren’t just evaporating excess water to concentrate the proteins and saponins. By simmering the liquid, you are actually accelerating the maillard reaction between the proteins and carbohydrates.
This mild thermal treatment induces the formation of covalent conjugates—meaning the proteins and polysaccharides literally bond together into highly stable, amphiphilic biopolymers. These heat-induced conjugates are significantly stronger than the raw proteins, resulting in an emulsion that can maintain its structural integrity for up to 60 days under proper storage conditions. Once reduced, pour the liquid into a clean jar and let it cool completely to that critical 25°C mark before proceeding.
The Immersion Blender: Mastering High-Shear Mechanics
You can try to whisk an aquafaba emulsion by hand if you want a grueling forearm workout and a 50% chance of failure, but I highly advise against it. You can use a food processor, but the wide bowl geometry often leads to a looser, runnier sauce. The undisputed champion of the modern emulsion is the immersion blender (also known as a stick blender).
The Physics of the Localized Vortex
An immersion blender does not whip air into a mixture like a stand mixer does; it operates on the principle of high-shear, localized turbulence. When you submerge the bell guard of an immersion blender into a narrow, cylindrical beaker, the high-speed rotating blades create a focused, high-pressure vortex.
This vortex aggressively pulls the oil downward into the heavier aquafaba phase, subjecting the immiscible liquids to intense mechanical shear force. The blades literally shred the oil into microscopic droplets while simultaneously smashing the aquafaba proteins against them. Because the shear is completely localized inside the small bell guard, the initial nucleation (the birth of the emulsion) happens incredibly fast—usually within the first 15 to 55 seconds.
The Non-Negotiable Rule of Safe Kitchenware
Let me pause here for a crucial public service announcement. I have absolutely zero tolerance for cheap, toxic kitchenware. If you are currently using a flimsy, bargain-bin immersion blender with a peeling non-stick bell guard or a plastic shaft that looks like it has seen better days, throw it in the trash immediately.
When you are generating thousands of RPMs of high-shear friction, the last thing you want is microplastics, endocrine disruptors, or flaking mystery-metal coatings being pulverized directly into your pristine vegan mayonnaise. It is disgusting, it is dangerous, and it completely defeats the purpose of cooking wholesome food from scratch. As I always say, banishing toxic kitchen gear is the absolute first step to taking your food seriously. Invest in a heavy-duty, culinary-grade immersion blender with a solid stainless-steel shaft and blade assembly. It will not rust, it will not leach chemicals, and it will actually survive the intense torque required to formulate a 75% oil HIPE.
The Definitive Step-by-Step Emulsification Masterclass
We have covered the molecular biology, the thermodynamics, and the mechanical physics. Now, we execute. Follow these parameters exactly, and you will produce a thick, glossy, unbreakable vegan emulsion every single time.
Phase 1: The Base Formulation
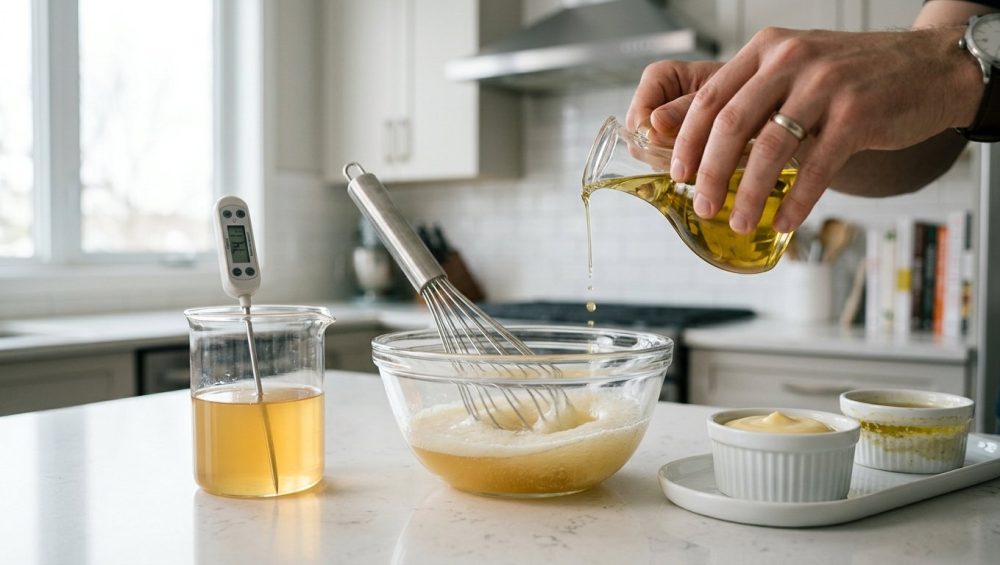
In a tall, narrow, cylindrical beaker (a wide-mouth mason jar works perfectly, as it snugly fits the head of most immersion blenders), combine your room-temperature (25°C) base ingredients:
- 3 Tablespoons (approx. 45ml) of Reduced Aquafaba: This is your concentrated protein and saponin base.
- 1 Tablespoon of Acid: Distilled white vinegar, apple cider vinegar, or fresh lemon juice. The acid is not just for flavor; it lowers the pH closer to the isoelectric point of the chickpea proteins, altering their charge and encouraging them to unfold at the interface.
- 1 Teaspoon of Dijon Mustard: Do not skip this. The mucilage in the mustard acts as a powerful secondary stabilizer to help prevent emulsion breakage during the high-shear blending phase.
- Salt: A generous pinch to enhance flavor and slightly alter the ionic strength of the water phase.
Phase 2: The Initial Nucleation
Submerge your stainless-steel immersion blender all the way to the bottom of the beaker. The bell guard must be completely flat against the floor of the jar, trapping the aquafaba base inside the blade chamber. Turn the blender on to its lowest speed setting. Blend the base ingredients completely undisturbed for about 20 to 30 seconds until the mixture becomes highly frothy and opaque. Do not move the blender up and down yet.
Phase 3: The Slow Drizzle
With the blender still running on low speed and firmly planted at the bottom of the jar, begin incorporating your neutral oil (such as canola, grapeseed, or sunflower oil). You will need roughly 3/4 cup to 1 cup of oil total to hit the optimal 75% HIPE ratio.
One of the most devastating beginner cooking mistakes is dumping all the oil into the beaker at once. You must drizzle the oil in a painfully slow, thread-like stream. A good rule of thumb is to pour at a rate of roughly 1/4 cup per minute. As the oil hits the localized vortex at the bottom of the jar, you will see a thick, white, creamy emulsion begin to form and slowly creep up the sides of the beaker.
Phase 4: The Vertical Integration
Once you have incorporated about two-thirds of your oil, the emulsion at the bottom will be incredibly thick, but there will likely be a layer of unmixed oil sitting on top. Only at this point should you slowly tilt the immersion blender and gently move it up and down. This vertical motion acts as a mechanical pump, drawing the remaining free oil down into the high-shear zone. Continue blending just until the last drop of oil is incorporated and the mayonnaise is glossy and stiff enough to hold a peak. Then, immediately stop.
Advanced Troubleshooting: Rescuing Broken and Weeping Emulsions
Even with a flawless understanding of the science, the kitchen is an unpredictable environment. Sometimes, despite your best efforts, things go wrong. When it comes to surviving kitchen disasters, knowing how to pivot and re-emulsify a broken sauce is your greatest asset. Do not throw your failed ingredients in the trash.
Diagnosing Syneresis (Weeping)
If your emulsion initially thickens but then suddenly loses its solidity, begins to “fizz,” or starts weeping water at the edges, you have experienced syneresis. This is almost always caused by over-shearing.
While the immersion blender is a fantastic tool, running it for too long or at too high of a speed creates excessive shear stress. This aggressive mechanical force physically shreds the delicate starch molecules and polysaccharide chains that provide the viscosity of the aquafaba. Once the carbohydrates are destroyed, the water phase thins out, the oil droplets collide, and the emulsion breaks. If you want to avoid these frustrating rookie kitchen mistakes, you must respect the physical limits of your starch molecules and stop blending the exact second the oil is fully incorporated.
The Hydrocolloid Rescue Method
If your emulsion breaks into a greasy, separated puddle, you can easily rescue it. In a clean beaker, add one fresh tablespoon of room-temperature aquafaba and a half-teaspoon of mustard. Submerge your clean immersion blender. Turn it on, and instead of pouring in plain oil, slowly drizzle your “fail mayo” into the new base. The fresh proteins and mucilage will rapidly encapsulate the broken oil droplets, reforming the emulsion perfectly.
For those who want absolute, bulletproof insurance against weeping—especially if you are making sauces for a large weekend dinner party—you can turn to modern food science. If you really want to dive into the chemistry of hydrocolloids, you will find that a microscopic pinch of xanthan gum (around 0.1% by weight) added to the aquafaba base before blending will drastically alter the outcome. Xanthan gum acts as a hyper-efficient thickener in the continuous aqueous phase, locking the water molecules into a rigid microscopic gel network. This prevents any possibility of droplet collision, rendering your vegan emulsion practically indestructible, even under high heat or prolonged refrigeration.
Mastering the aquafaba emulsion is a rite of passage. It requires patience, precision, and a healthy respect for the laws of physics. But once you understand how to manipulate the thermal parameters, control the high-shear vortex, and harness the amphiphilic power of chickpea proteins, you will never look at a can of beans the same way again. Now get into the kitchen, ditch the toxic gear, and start blending.


