Listen up, kitchen warriors. According to recent industry statistics, roughly 36% of Americans cook at home on a daily basis. That means every single night, millions of people are out there setting off smoke detectors, aggressively over-salting their soups, and turning beautiful, expensive cuts of meat into dry, chewy shoe leather. If you are one of them, pour yourself a glass of wine, put down the takeout menu, and take a deep breath.
You do not need a pretentious culinary degree or a kitchen staffed with French-speaking sous-chefs to make mind-blowing food. You just need to understand a little bit of basic food science and have a few clever tricks up your sleeve. Cooking is not about being flawless; it is about knowing how to pivot when things inevitably go sideways. Weekday cooking is all about efficiency—time is money, and we don’t have hours to waste crying over split sauces.
Let’s dive into an exhaustive, no-fluff masterclass on the seven most common beginner cooking mistakes, the actual science behind why they happen, and exactly how you can rescue your dinner before it ends up in the trash.
Mistake 1: The Dead Sea Effect (Over-Salting)
We have all been there. You are simmering a beautiful Sunday stew, you add a “pinch” of salt, and suddenly the lid falls off the shaker. Or perhaps you forgot that the bacon, the broth, and the Parmesan cheese were all highly salted ingredients, and your reduction sauce has boiled down into a briny liquid that rivals the salinity of the Dead Sea.
The Science of the Screw-Up
Salt is the most critical ingredient in your kitchen. As culinary expert Samin Nosrat famously preaches, salt enhances flavor, fat carries it, and acid balances it. But when you over-salt, you overwhelm the taste receptors on your tongue, completely masking the nuanced flavors of your aromatics and proteins. Furthermore, as liquids simmer and evaporate, the salt does not evaporate with them. A perfectly seasoned soup will become aggressively salty if you let it reduce by half.
The Potato Myth Busted
Let me stop you right here: Do not throw a raw potato into your pot. For generations, an old wives’ tale has circulated claiming that dropping a raw potato into an over-salted soup will act like a magical, salt-seeking sponge. This is scientifically false. Culinary scientists and food myth-busters have rigorously tested this theory. Potatoes do not possess the ability to selectively absorb sodium via reverse osmosis. What actually happens is that the potato absorbs water and salt in equal equilibrium. When you pull the potato out, you haven’t reduced the concentration of salt in the pot; you have simply reduced the total volume of your soup and cooked yourself a very salty potato.
The Actual Fixes
If you want to save your dinner, you need to rely on actual chemistry and palate manipulation:
- Dilution (The Obvious Fix): The only true way to lower the sodium concentration is to add more volume. Add a splash of unsalted broth, a pour of heavy cream, or plain water. If you add water, be prepared to introduce more aromatics (like garlic or herbs) so the dish doesn’t taste watered down.
- Bulk It Up: If you are making a soup or stew, toss in a handful of uncooked rice, pasta, or beans. These ingredients will absorb the salty liquid to cook, effectively increasing the overall volume of the dish and diluting the salt ratio.
- The Acid/Fat Distraction: If you cannot add more liquid, you must trick your palate. Acid is salt’s alter ego. A generous squeeze of fresh lemon juice or a splash of apple cider vinegar will introduce a sharp, bright flavor that competes with the sodium on your taste buds, masking the perception of saltiness. Fat works similarly. Stirring in a knob of unsalted butter, a dollop of sour cream, or a splash of heavy cream will coat your tongue, creating a physical lipid barrier that dulls the harshness of the salt.
- A Pinch of Sugar: Savory and sweet compete with one another. A tiny pinch of white sugar or a drizzle of honey can round out the harsh edges of a salty dish. Just go slowly; you are making dinner, not dessert.
Mistake 2: The Shoe Leather Special (Overcooked, Dry Meat)
You bought a beautiful, expensive steak or a gorgeous chicken breast. You followed the recipe’s cooking time exactly. You pulled it off the stove, sliced into it, and discovered a gray, dry, chalky disaster.
The Science of the Screw-Up
Welcome to the frustrating reality of “carryover cooking.” Meat does not magically stop cooking the exact second you remove it from the heat source. When you sear a piece of meat, the exterior gets incredibly hot (often over 300°F to achieve the Maillard reaction), while the center remains cooler. When you move the meat to a cutting board, the laws of thermodynamics dictate that the intense heat from the outer layers will continue to migrate inward toward the cooler center.
This means the internal temperature of your meat can rise anywhere from 5°F to 22°F after it leaves the pan, depending on the thickness of the cut and the intensity of the heat. If you wait to pull a chicken breast out of the oven until the center registers 165°F, the carryover heat will push it to 175°F or higher while it rests, completely tightening the muscle fibers and squeezing out all the moisture.
The Fix
Let’s be brutally honest: You cannot un-cook a piece of meat. Once the proteins have contracted and expelled their moisture, the damage to the cellular structure is done. But you can fake it.
- Shred and Sauce: If you have turned a chicken breast or pork chop into drywall, do not serve it whole. Shred it aggressively with two forks or chop it into fine bite-sized pieces. Then, drown it in a rich, fatty, flavorful sauce. Toss it in barbecue sauce, simmer it in salsa for tacos, or fold it into a heavy cream gravy. The fat and liquid in the sauce will artificially lubricate the dry meat fibers, making it palatable again.
- The Broth Bath: Slice the overcooked meat as thinly as humanly possible (against the grain to shorten the tough muscle fibers). Submerge the slices in a warm, flavorful broth or au jus for a few minutes before serving.
How to Avoid It Next Time
Buy a digital instant-read meat thermometer. Stop guessing. Stop poking the meat with your finger. Pull your proteins off the heat before they reach their target temperature. For a medium-rare steak (target 130°F), pull it at 120°F. For chicken (target 165°F), pull it at 155°F. Let the meat rest undisturbed for 10 minutes so the carryover cooking can finish the job and the internal juices can redistribute.
Mistake 3: The Teflon Tragedy (Food Sticking to the Pan)
You are trying to flip a delicate piece of fish or a perfectly seasoned chicken thigh, but it is welded to the bottom of the skillet. In a panic, you scrape at it with a spatula, tearing the protein to shreds and leaving half your dinner cemented to the metal.
The “No-Go” Rule on Toxic Gear
Before we fix the food, we need to have a serious talk about your equipment. If your food is sticking because you are using a cheap, scratched, peeling non-stick pan, take that pan and throw it directly into the garbage. I have zero patience for toxic kitchenware. Cheap non-stick pans are coated with PTFE (Teflon) and historically utilized PFOA and PFAS—forever chemicals that are an absolute nightmare for your health and the environment.
When you heat a cheap non-stick pan past 500°F (which happens in minutes if the pan is empty), the coating begins to break down and off-gas toxic fumes. Worse, when that black coating starts peeling and flaking into your scrambled eggs, you are literally ingesting chemical plastic. Do not compromise here. Invest in high-quality, durable gear: a heavy-bottomed stainless steel skillet, a well-seasoned cast-iron pan, or a carbon steel wok. They will last a lifetime, they won’t poison you, and when used correctly, they are naturally non-stick.
The Science of the Screw-Up
If you are using a proper stainless steel or cast iron pan and your food is sticking, you committed one of two cardinal sins: your pan was too cold, or you got impatient.
When cold protein hits hot metal, the proteins immediately form chemical bonds with the microscopic pores in the metal. If the pan isn’t hot enough to instantly vaporize the moisture on the surface of the food, the food sinks into those pores and acts like superglue. Furthermore, if you overcrowd the pan, the temperature plummets, causing the food to release its internal juices and steam rather than sear.
The Fix
- Walk Away (The Patience Protocol): If you try to flip a piece of meat and it resists, stop pulling. When the Maillard reaction (the chemical reaction between amino acids and reducing sugars that gives browned food its distinctive flavor) completes its cycle, the proteins will naturally release themselves from the metal. Give it another 60 to 90 seconds.
- The Deglazing Rescue: If the food is hopelessly stuck and starting to burn, remove the pan from the heat. Pour in a splash of cold liquid—white wine, chicken broth, or even water. The sudden drop in temperature and the burst of steam will violently break the bonds between the food and the metal. Use a wooden spoon to scrape up all those delicious caramelized brown bits (the fond). Congratulations, you just accidentally made a phenomenal pan sauce.
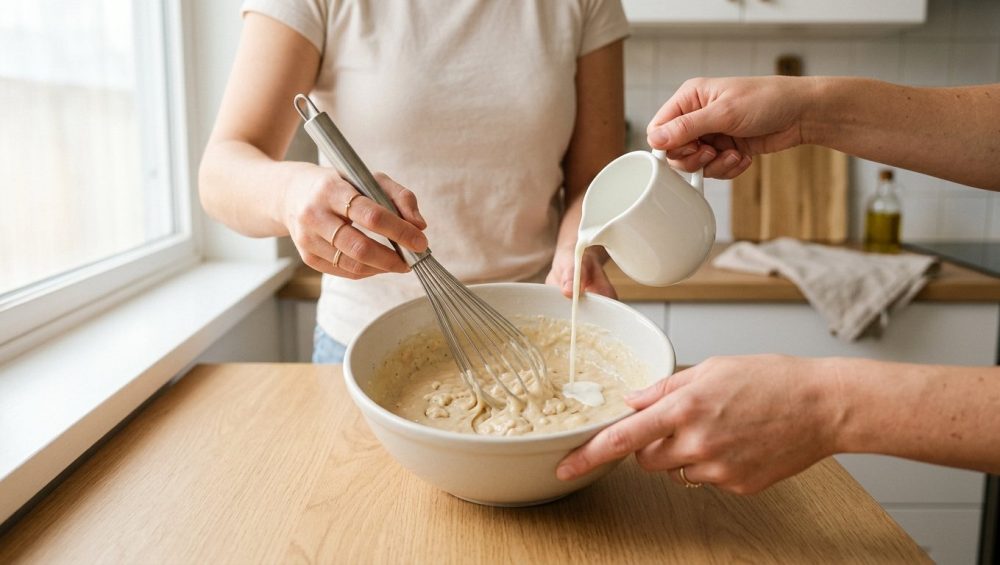
Mistake 4: The Greasy Puddle (Broken or Separated Sauces)
It is Sunday morning. You are trying to be fancy and make Eggs Benedict. You are whisking your Hollandaise sauce, feeling like a culinary genius, when suddenly, the silky yellow sauce transforms into a horrifying, curdled, grainy mess swimming in a puddle of melted butter. Your sauce has “broken.”
The Science of the Screw-Up
Sauces like Hollandaise, mayonnaise, and vinaigrettes are emulsions. In the natural world, oil and water despise each other and refuse to mix. Emulsification is the culinary art of forcing these two enemies to play nice. By breaking the fat down into microscopic droplets and suspending them in water, you create a thick, creamy texture.
To keep them from separating, you need an emulsifier—a molecule with a water-loving (hydrophilic) head and a fat-loving (lipophilic) tail, such as the lecithin found in egg yolks or the mucilage in mustard.
An emulsion breaks for three reasons:
- Temperature Shock: You heated the sauce too quickly or let it get too hot, causing the egg proteins to coagulate (scramble) and squeeze out the fat.
- Fat Overload: You poured the oil or melted butter in way too fast. The emulsifier couldn’t coat the fat droplets fast enough, causing the fat to pool together.
- Too Cold: You used cold ingredients that refused to bond.
The Fix
Do not throw it down the sink. You can perform sauce surgery and resurrect a broken emulsion in seconds.
- The “Splash of Water” Trick: If the sauce is just starting to look greasy around the edges, stop adding fat immediately. Add one tablespoon of warm water (or a squeeze of lemon juice) and whisk like your life depends on it. The extra liquid gives the fat droplets more room to disperse, often snapping the emulsion back together instantly.
- The “Fresh Start” Method: If the sauce has completely separated into a chunky, oily disaster, grab a clean bowl. Crack a fresh egg yolk into it (or add a tablespoon of Dijon mustard for vinaigrettes). Add a tiny splash of warm water. Now, taking your broken, nasty sauce, slowly drizzle it into the fresh egg yolk while whisking vigorously. The fresh emulsifier will grab onto the broken ingredients and rebuild the matrix from scratch.
- The Brute Force Approach: If you are making a vinaigrette or a mayonnaise, dump the broken mess into a blender or hit it with an immersion blender. The mechanical sheer force of the blades will smash the fat droplets into such tiny pieces that they are forced to re-suspend.
Mistake 5: The Hellfire Accident (Too Spicy)
You wanted to add a “little kick” to your chili or curry, so you added a dash of cayenne pepper. Then you tasted it, and your soul temporarily left your body. Your mouth is on fire, your eyes are watering, and the dish is entirely inedible.
The Science of the Screw-Up
The culprit here is capsaicin, the active chemical compound found in chili peppers. When you eat spicy food, capsaicin binds to the TRPV1 receptors in your mouth—the exact same nerve endings that detect physical, boiling-hot temperatures. Your brain literally thinks your mouth is on fire, which is why you start sweating and tearing up.
Here is the most important chemical fact you must memorize: Capsaicin is lipophilic (fat-soluble) and highly alkaline. It is NOT water-soluble.
If you try to cool your mouth down by chugging a glass of ice water, you are making a massive mistake. The water will simply wash the capsaicin around your mouth, spreading the oil to new receptors and making the burning sensation infinitely worse.
The Fix
To neutralize a chemical fire, you need chemical solutions.
- The Dairy Rescue: Dairy is the ultimate capsaicin killer. Milk and yogurt contain a protein called casein. Casein acts like a chemical detergent; it surrounds the capsaicin molecules, breaks their bond with your pain receptors, and washes them safely down your throat. If your soup, curry, or sauce is too spicy, heavily stir in heavy cream, full-fat coconut milk, sour cream, plain yogurt, or butter.
- The Acid Attack: Because capsaicin is an alkaline molecule, you can partially neutralize it by introducing an acid. Squeeze fresh lime or lemon juice over the dish, or stir in a splash of rice vinegar. The low pH of the acid will combat the high pH of the capsaicin, dulling the heat.
- The Sugar Shield: Sugar doesn’t chemically destroy capsaicin, but it overloads your neural pathways. By introducing a strong sweet flavor (like honey, brown sugar, or maple syrup), you distract your brain from the pain signals.
- Starchy Sponges: Serve the dish over a massive mound of plain, unseasoned white rice, potatoes, or bread. The bland starches act as a physical buffer, diluting the concentration of the spice in every bite.
Mistake 6: The Starch Swamp (Mushy Pasta or Rice)
You walked away from the stove to answer an email, and when you returned, your perfectly al dente pasta had turned into a flaccid, gummy mess. Or worse, your pot of fluffy white rice has collapsed into a wet, sticky, oatmeal-like paste.
The Science of the Screw-Up
When you cook a starch (like rice or pasta) in water, you are executing a process called starch gelatinization. As the water heats up, the tightly packed crystalline starch granules inside the grain begin to absorb moisture. They swell up like microscopic water balloons.
If you cook them perfectly, the balloons are full and tender. If you add too much water, cook them too long, or aggressively stir the pot (which causes mechanical friction), those water balloons burst. When they burst, they release amylopectin—a highly branched starch molecule—directly into the water, creating a thick, gluey gel network. That is why your rice looks like wallpaper paste.
The Fix for Mushy Rice
You cannot un-burst a starch granule, but you can manipulate food chemistry to harden it back up through a process called starch retrogradation.
- The Cooling Cure: The moment you realize your rice is mushy, get it out of the hot pot immediately. Spread it out in a thin, even layer on a large metal baking sheet. Put the baking sheet directly into the refrigerator or freezer. As the temperature of the rice drops rapidly, the amylose starch molecules will automatically begin to reorganize and re-crystallize, forcing the grains to firm up and expel some of that excess moisture.
- Pivot to Fried Rice: Once the rice is cold and firm, do not try to serve it as a side dish. It will never be perfectly fluffy. Instead, toss it into a ripping hot skillet with a little oil, soy sauce, and veggies to make fried rice. The high heat of the oil will crisp the exterior of the firmed-up grains, completely hiding your mistake.
The Fix for Mushy Pasta
Mushy pasta cannot be saved by cooling, but it can be saved by a change in texture.
- The Crispy Skillet Method: Drain the mushy pasta immediately and rinse it under cold water to halt the cooking process. Heat a generous glug of olive oil or butter in a wide skillet over medium-high heat. Toss the pasta into the skillet and let it sit undisturbed until the bottom gets golden, brown, and crispy. The crunchy, fried texture will completely mask the fact that the inside is overcooked.
- The Frittata Pivot: Mix the overcooked pasta with a few beaten eggs, some heavy cream, and a mountain of grated Parmesan cheese. Pour the mixture into a skillet and bake it until set. You have just made a traditional Italian pasta frittata, and your guests will think you are a rustic culinary genius.
Mistake 7: The Charred Catastrophe (Burning the Bottom of the Pot)
You are simmering a thick tomato sauce, a hearty chili, or a batch of caramelized onions. You get distracted, and suddenly you smell the acrid, unmistakable scent of carbon. You rush to the stove and realize the bottom inch of your food has completely burned and fused to the pot.
The Science of the Screw-Up
This happens for two reasons: poor heat distribution and gravity. Thick liquids like chili and tomato sauce do not circulate heat efficiently via convection the way thin broths do. The heavy particulates (sugars, tomatoes, proteins) sink to the bottom of the pot and sit directly over the heat source. If the heat is too high and you fail to stir frequently, those sugars undergo rapid pyrolysis—they burn and turn into pure, bitter carbon.
The Fix
This is a high-stakes rescue mission. If you do this correctly, you can save 90% of the food. If you panic, the entire batch is ruined.
- The “Do Not Scrape” Rule: This is the most critical instruction in this entire article. When you realize the bottom is burnt, DO NOT STIR THE POT. DO NOT SCRAPE THE BOTTOM. The burnt carbon is currently glued to the metal. If you take a spoon and scrape it, you will mix those bitter, ashy carbon flakes throughout the entire dish, ruining every single bite.
- The Transfer: Remove the pot from the heat immediately. Take a clean pot and place it next to the burnt one. Very gently, pour or ladle the unburnt top layers of the food into the new pot. The moment you feel resistance or see black specks, stop. Sacrifice the bottom inch of the food to the culinary gods. Leave it in the burnt pot and throw it in the sink to soak.
- The Flavor Mask: Even if you didn’t scrape the bottom, the unburnt food in your new pot might have absorbed a faint smoky, bitter aroma. To counteract this, you need to balance the flavor profile. Add a splash of acid (like a teaspoon of balsamic vinegar or apple cider vinegar) to cut through the smokiness. Then, add a pinch of sugar or a dollop of honey to neutralize the bitter alkaline notes of the char. Taste it. If it still tastes a little hollow, add a tablespoon of butter; the fat will coat the tongue and further mask the burnt memory.
Cooking is not about perfection. It is about confidence, adaptability, and knowing that every disastrous mistake is just an opportunity to deploy a little kitchen science. So the next time you aggressively over-salt your soup or break a beautiful sauce, don’t panic. Grab your whisk, trust the chemistry, and fix it like a pro. Dinner is saved.


