The Weekend Project: Conquering the Gluten-Free Brick
Listen, I do not have a culinary degree, and I have absolutely zero patience for pretentious chef-speak or towering white toques. What I do care about is the undeniable fact that gluten-free baking, for the uninitiated, usually results in something that closely resembles a loofah made of sand. During the week, my cooking philosophy is strictly “time is money.” I want maximum flavor with minimum active prep time so I can actually sit down and enjoy my evening. But on the weekend? I transform into an obsessive, white-knuckled perfectionist. If we are going to bake gluten-free bread, we are going to do it right.
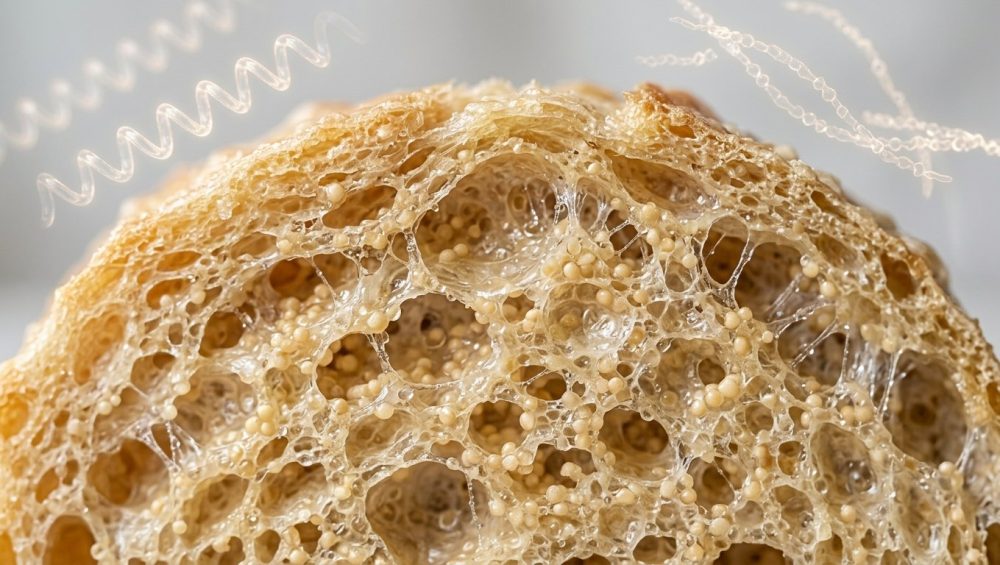
For years, home cooks have accepted dry, crumbly, throat-scratching alternative baked goods as a necessary evil of allergy-conscious diets. But you do not have to live like this. Professional-level results are entirely achievable in a standard home kitchen, provided you understand the actual science of what is happening inside your mixing bowl. We are demystifying modern recipes by looking at the raw, unapologetic chemistry of hydrocolloids. These microscopic miracle workers are the only thing standing between you and a gorgeous, flexible, towering loaf of bread. Grab your digital scale and a strong cup of coffee, because we are diving deep into the molecular mechanics of modern baking.
The Molecular Reality of the Crumb: Why We Need Hydrocolloids
To understand why gluten-free baking is so notoriously difficult, you have to understand what you are missing. In traditional baking, gluten (formed by the proteins glutenin and gliadin) acts as a microscopic, highly elastic net. As yeast ferments and produces carbon dioxide gas, this protein net catches the bubbles, stretching and expanding without tearing. It provides the chew, the structure, and the elasticity.
When you remove wheat from the equation, you are left with a blend of alternative starches and flours—like rice, tapioca, and potato. These ingredients have absolutely no inherent structural elasticity. They cannot trap gas. If you simply mix them with water and yeast, the gas bubbles will rise, burst right through the surface, and leave you with a dense, flat puck. If you have been baking without structural replacements, you are basically ruining your dinners before the pan even hits the oven.
Enter hydrocolloids. By definition, hydrocolloids are hydroxyl group (-OH) rich molecules that form strong hydrogen bonds with water molecules. In gluten-free doughs, they act as structuring agents that actively mimic the viscoelastic properties of a gluten network. They do this through two primary mechanisms: moisture retention and starch entrapment. Hydrocolloids form a stable polymeric network that physically entraps granules of starch and delays the release of amylose. When added to gluten-free formulations, they significantly increase both the elastic and viscous moduli of the dough, denoting a much stronger structure capable of entrapping gas.
The “No-Go” Rule: A Mandatory PSA on Toxic Bakeware
Before we even start measuring out our expensive, highly-engineered hydrocolloids, we need to have a serious conversation about your hardware. I have a strict, non-negotiable rule in my kitchen, and I am relentlessly passionate about banishing toxic kitchen gear from your home. I absolutely despise cheap, flimsy bakeware.
If you are pouring your painstakingly hydrated, scientifically balanced dough into a scratched-up, peeling non-stick pan from a discount bin, you are sabotaging your own bake. Traditional non-stick coatings (like PTFE) can begin to degrade and off-gas at the high temperatures required for bread baking. Furthermore, cheap, thin metal pans have terrible thermal mass, leading to uneven heat distribution, burnt crusts, and gummy, underbaked centers.
Throw away the mystery-metal garbage. Invest in heavy-gauge aluminized steel, bare cast iron, or thick, tempered glass. These materials offer the superior thermal conductivity and heat retention required to drive the necessary thermal energy into your dough, forcing the starches to gelatinize properly. Your health, and your bread, deserve better than flaking Teflon.
Xanthan Gum: The Bacterial Miracle of Viscosity
Now, let us meet the heavy hitters of the hydrocolloid world, starting with the most ubiquitous: xanthan gum. Xanthan gum is a complex polysaccharide created through the natural fermentation of simple sugars by the bacteria Xanthomonas campestris. It has been a staple in the food industry for decades, and for good reason.
The Chemistry of the Double Helix
From a rheological standpoint (the science of how materials flow and deform), xanthan gum is fascinating. When introduced to an aqueous environment, the xanthan molecule embraces a rigid double-helix conformation. This structural rigidity allows it to beautifully mimic the elastic resistance of gluten. It dramatically increases the apparent viscosity of the dough, making it sticky, binding the disparate starches together, and giving the matrix the necessary elasticity to trap expanding gases.
Hydration Ratios and Activation Temperatures
One of the most critical quirks of xanthan gum is its activation temperature. Unlike many other thickening agents that require heat to trigger their gelling properties, xanthan gum is activated at any temperature. It does not care if your water is ice cold or boiling hot; the second it touches liquid, it forms a gel. This is why it will instantly clump into a slimy, unyielding nightmare if you drop it directly into wet ingredients. You must always whisk it thoroughly into your dry flours first to ensure even dispersion.
Dosage is everything with xanthan. Because its network is so rigid, using too much will turn your bread into an unchewable, gummy disaster, and you will inevitably need to rescue a ruined dinner. Conversely, using too little will result in a crumbly mess. The scientifically validated sweet spot for xanthan gum in gluten-free baking is between 0.5% and 2% by weight of your total flour. In volumetric terms, this usually translates to roughly ¼ teaspoon to 1 full teaspoon per cup of gluten-free flour, depending on whether you are making delicate cookies or a robust sandwich loaf.
Psyllium Husk: The Room-Temperature Shapeshifter
If xanthan gum provides the rigid backbone of gluten-free baking, psyllium husk provides the soul. Sourced from the husks of the Plantago ovata plant seed, psyllium is a natural, plant-based fiber that has revolutionized modern allergy-friendly baking. Once you understand how to harness its power, you will feel like you’ve finally stopped burning dinner every night.
The Power of Arabinoxylans
The magic of psyllium husk lies in its molecular composition. It is incredibly rich in arabinoxylans, which are complex carbohydrates heavily armed with hydroxyl groups. These hydroxyl groups are essentially molecular magnets for water. Psyllium has an astonishing water-holding capacity, absorbing up to ten times its own weight in moisture. When hydrated, it forms a highly stable, sticky, and lightly stretchy gel at room temperature.
This room-temperature gelation is why psyllium is the undisputed king of dough handling. It creates a stretchy, foldable dough that you can actually knead, shape, and braid. It gives gluten-free dough the tactile “feel” of traditional wheat dough, pulling the ingredients together into a cohesive, workable mass.
Mathematical Hydration and Thermal Degradation
However, psyllium husk has a distinct thermal vulnerability. While it provides incredible structure at room temperature during the proofing stage, psyllium gel begins to break down and lose its structural integrity at around 180°F (82°C). Right when your bread is reaching its maximum oven spring, the psyllium network starts to weaken. This is why psyllium is rarely used entirely on its own in large, airy loaves; it requires the structural support of starches or a secondary hydrocolloid (like xanthan) to hold the crumb upright as the bread cools.
Precision is paramount when working with psyllium. The golden rule for dosing is to use exactly 5% whole psyllium husk by weight compared to your total gluten-free flour. For example, if your recipe calls for 400 grams of flour, you need 20 grams of whole psyllium husks. If you are using finely ground psyllium husk powder instead of whole husks, you must reduce that weight to 85% of the original amount (which would be 17 grams), because the increased surface area of the powder absorbs water much more aggressively.
Furthermore, you must provide the psyllium with enough water to fully hydrate, or it will steal moisture from your starches. The scientifically optimal hydration ratio specifically for the psyllium component is 4.5 grams (±20%) of additional water for every 1 gram of psyllium husk used.
HPMC (Hydroxypropyl Methylcellulose): The Thermo-Reversible Wizard
If you want to bake a loaf of gluten-free bread that defies gravity, you need to familiarize yourself with Hydroxypropyl Methylcellulose (HPMC). HPMC is a modified, non-ionic cellulose ether that behaves like an absolute wizard in the oven. I love to decode pretentious recipe jargon, so let’s just call it a heat-activated structural shield.
The Magic of Heat-Activated Gelation
Most hydrocolloids (like xanthan or guar) experience a decrease in viscosity as their temperature rises. HPMC does the exact opposite. It possesses the unique capacity to form a thermo-reversible gel. It is perfectly soluble and relatively fluid in cold water, but when it is heated above 60°C (140°F), it forms a strong, highly elastic gel network.
Think about the thermodynamics of a baking loaf of bread. As the internal temperature of the dough rises, the yeast goes into overdrive, producing a massive final burst of carbon dioxide gas (the oven spring). In a standard gluten-free loaf, the delicate starch cell walls often rupture under this pressure, causing the bread to collapse into a crater. But if you have HPMC in the matrix, right as the dough hits that critical 60°C threshold, the HPMC gels. It drastically increases the viscosity of the dough, fortifies the boundaries of the expanding gas cells, and physically prevents moisture from migrating out of the bread. This results in a lighter, fluffier texture with significantly higher specific volume than breads baked without it.
Dosage and Hydration Optimization
Because HPMC relies on this complex thermal reaction, getting the ratios right is crucial. Extensive response surface methodology studies have shown that the optimal formulation for HPMC in a standard gluten-free flour blend is 1.5% to 2% by weight (or 1.5 kg per 100 kg of flour).
However, HPMC is highly sensitive to total dough hydration. Studies indicate that the specific volume of HPMC-fortified bread peaks at an optimum total hydration level of around 80% to 100%. If you push the hydration too far beyond 100% with HPMC alone, the specific volume actually begins to decrease.
Guar Gum: The Short-Bake Specialist
Guar gum, extracted from the seeds of the guar bean, is a galactomannan polysaccharide that frequently appears in commercial gluten-free blends. While it is a capable thickener, it is important to understand its limitations compared to the heavyweights we just discussed.
Rheological testing shows that guar gum produces a significantly weaker structural network than both xanthan gum and HPMC. It also struggles to retain moisture efficiently during prolonged exposure to high heat. Because of this, guar gum is generally not the ideal primary binder for large, yeasted breads that require long baking times.
However, guar gum shines in short-bake, moderate-temperature applications. If you are baking cookies, muffins, or quick breads, guar gum is an excellent choice. It provides just enough viscosity to keep the batter cohesive without turning the final product overly gummy. Understanding when to deploy guar instead of xanthan is a crucial skill, and it is an essential stepping stone to mastering modern recipes. When substituting guar for xanthan in these shorter bakes, you generally need to use slightly more of it—often up to 2.5 times the amount of xanthan called for in the recipe.
The Golden Rules of Gluten-Free Hydration
If you take nothing else away from this masterclass, let it be this: you cannot hydrate a gluten-free dough the way you hydrate a wheat dough. A traditional wheat-based bread dough typically requires around 60% hydration (meaning 60 grams of water for every 100 grams of flour). If you apply that same 60% ratio to a gluten-free dough packed with hydrocolloids, you will create a weaponized, unchewable brick.
Gluten-free doughs routinely require over 100% hydration. Why? Because your hydrocolloids and your starches are locked in a ruthless, microscopic battle for available water. Hydrocolloids have an incredibly high water-holding capacity, meaning they rapidly absorb the liquid in your bowl, which actively delays the migration of water into the starch granules.
Furthermore, the hydrocolloid network physically entraps the starch granules, restricting their ability to swell. Because the starches are trapped and starved of water, significantly greater thermal energy is required to overcome these barriers and disrupt the starch crystallites during baking. If you under-hydrate the dough, the hydrocolloids will steal all the water, leaving the starches ungelatinized, resulting in a gritty, dry, crumbly texture. You must flood the system with enough water to satisfy both the hydrocolloids and the starches. Internalizing this single mathematical revelation will eliminate kitchen chaos for good.
Synergistic Blending: Engineering the Ultimate Crumb
No single hydrocolloid is perfect. Xanthan can be too rigid, psyllium degrades at high heat, and HPMC can be difficult to source. The true secret of modern gluten-free baking lies in synergistic blending. When you combine different hydrocolloids, their properties interact in ways that far exceed their individual capabilities.
Take the combination of HPMC and Xanthan Gum. When these two are blended, the resulting dough exhibits extraordinary thermal resistance. Scientific evaluations of gluten-free batters show that an HPMC-Xanthan blend pushes the end-set temperature (the point at which the starches finally gelatinize and the structure sets) to a staggering maximum of 147.84°C (298°F). This delayed setting time allows the bread to achieve maximum oven spring and volume before the crust hardens and locks the structure in place.
Alternatively, blending Psyllium Husk with Xanthan Gum creates the ultimate hybrid dough. The psyllium provides the incredibly pliable, foldable room-temperature handling that allows you to physically shape boules and baguettes. Then, as the bread bakes and hits 180°F—the exact moment the psyllium gel begins to fail—the xanthan gum is there to act as a high-heat scaffolding, holding the crumb open and supporting the rise until the starches fully gelatinize. Understanding these synergistic combinations are the simple secrets for kitchen artistry that elevate a home cook to an expert baker.
Troubleshooting the Crumbly Mess: A Masterclass in Failure Analysis
Even with a firm grasp of the chemistry, things can go sideways. When your loaf emerges from the oven looking less like an artisan masterpiece and more like a tragic science experiment, you need to know how to diagnose the failure. Conducting this failure analysis is your key to mastering the art of the home kitchen.
Symptom 1: The Gummy, Wet Interior
If the outside of your bread is beautifully browned but the inside slices like a wet sponge, you have committed one of two sins. The first is hydrocolloid overdose. If you heavy-handed the xanthan gum, the viscosity became so high that the moisture physically could not evaporate during the bake. The second, and more common sin, is slicing the bread while it is still hot. Remember HPMC? It is a thermo-reversible gel. If you cut into the bread while it is still 200°F inside, the gel has not reversed, the starches have not retrograded, and you will destroy the crumb structure. You must let gluten-free bread cool completely—often for several hours—before slicing.
Symptom 2: The Shattering Brick
If your bread is incredibly dense, fails to rise, and shatters into dry crumbs when you bite it, you are suffering from severe under-hydration. As we discussed, gluten-free dough needs upwards of 100% hydration to function. If your dough felt like traditional, firm wheat dough before it went into the oven, it was too dry. Gluten-free bread dough should look and feel more like a thick, sticky cake batter or a highly hydrated ciabatta.
Symptom 3: The Collapsed Crater
If your bread rose beautifully in the pan but collapsed into a dense crater the moment it hit the oven, you over-proofed it. This is a classic beginner mistake. Traditional wheat recipes often tell you to let the dough “proof until doubled in size.” Do not do this with gluten-free dough. Because it lacks an extensible gluten network, a gluten-free dough cannot physically support a 100% increase in volume at room temperature. The hydrocolloid network will stretch to its breaking point, and the sheer thermal shock of the oven will cause the over-inflated gas cells to rupture. Proof your gluten-free dough until it has increased in volume by about 50%, and then rely on the oven spring (and your heat-activated HPMC) to do the rest of the lifting.
Baking without gluten is not a curse; it is simply a different branch of chemistry. By respecting the precise hydration ratios, understanding the thermal activation points of your hydrocolloids, and refusing to compromise on the quality of your equipment, you can engineer baked goods that rival anything pulled from a Parisian bakery. Now, go calibrate your digital scale, throw away that peeling non-stick loaf pan, and get to work.


