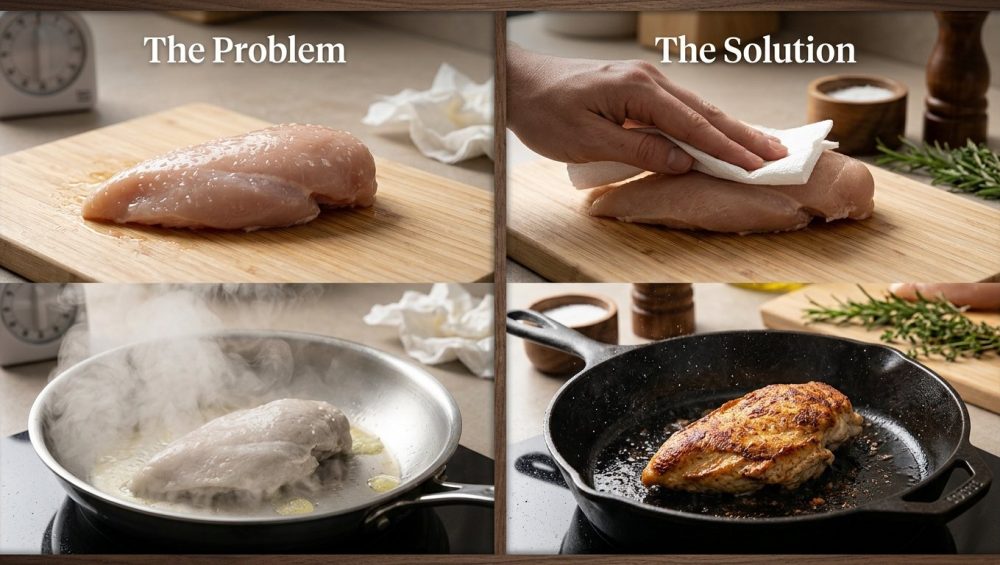
Picture this: You’ve just finished a long, soul-crushing Tuesday at work. You drag yourself into the kitchen, determined to make one of those gorgeous, golden-brown, restaurant-quality chicken breasts you always see on your social media feeds. You heat up some oil, pull a chicken breast straight from its plastic packaging, and confidently toss it into the pan.
Instead of a satisfying, aggressive sizzle, you hear a pathetic, sputtering hiss. Within two minutes, your chicken is sitting in a murky, bubbling puddle of grey liquid. You are no longer searing; you are boiling. You are eating sad, steamed poultry.
Welcome to the club. This is one of the most common beginner cooking mistakes that plagues weekend culinary hobbyists and exhausted weeknight cooks alike. But here is the incredibly good news: you do not need a culinary degree, a massive kitchen remodel, or a private chef to fix this. You just need to understand a tiny bit of kitchen physics and reach for the most underrated, zero-cost tool in your pantry: a paper towel.
Let’s skip the pretentious chef-speak and get straight to the meat of the issue. Here is your definitive, no-nonsense masterclass on why surface moisture is the absolute enemy of a good pan-sear, and how a simple pat-down will completely revolutionize your daily cooking.
The Pale Chicken Epidemic (And Why It’s Not Your Fault)
The Crime of the Sad, Grey Sear
We have all been victims of the pale chicken epidemic. You know exactly what I am talking about. The meat looks anemic. The texture is rubbery on the outside and stringy on the inside. There is absolutely zero crust, which means there is absolutely zero depth of flavor.
When meat isn’t properly seared, you miss out on the complex, savory, roasted notes that make restaurant food taste so incredibly good. Instead, you are left with a bland protein block that desperately requires a heavy sauce just to be palatable. But before you blame your own cooking skills or assume you just don’t have “the touch,” you need to understand that the deck has been heavily stacked against you by the commercial meat industry.
You Don’t Need a Culinary Degree, Just a Towel
Home cooks frequently assume that professional chefs possess some mystical, closely-guarded secret for achieving that perfect, caramelized crust on a piece of meat. They assume it requires a $5,000 French stove or a pantry full of exotic ingredients. It doesn’t. The “secret” is astonishingly boring: professional kitchens are militant about moisture management. They know that you cannot brown water. If you want to cook like an expert in your standard home kitchen, your first step is to stop treating your frying pan like a hot tub.
The Grocery Store Sabotage: Plumped, Pumped, and Water-Chilled
The “Retained Water” Scam
To truly understand why your chicken is swimming in your skillet, we have to look at how it gets to your supermarket in the first place. The vast majority of commercial chicken sold in the United States is subjected to a process called “water-chilling.”
After the chickens are processed, they must be rapidly cooled to a safe temperature to prevent bacterial growth. The cheapest, fastest way for massive industrial facilities to do this is to dump thousands of birds into a gigantic, communal vat of ice-cold, chlorinated water [11].
Here is the infuriating part: during this communal ice bath, the chicken acts like a sponge. It absorbs a massive amount of that chilled water. In fact, standard commercial poultry can absorb anywhere from 8% to 12% of its body weight in this liquid [11] [12]. When you look at the fine print on a package of cheap chicken, you will often see a tiny disclaimer that reads: “May contain up to 10% retained water.”
Think about the economics of this for a second. Chicken is sold by the pound. You are literally paying premium meat prices for artificially injected tap water. And worse, when you throw that waterlogged chicken into a hot pan, all of that retained liquid violently cooks out. If your weeknight poultry always turns out dry, it is largely because this artificial water weight forcefully evacuates the muscle fibers under heat, taking the natural juices with it and leaving the meat parched and steaming in its own puddle.
The USDA is finally cracking down on this deceptive practice. Under new regulatory guidelines rolling out through 2025, with a strict enforcement deadline of July 1, 2026, poultry processors are being forced to rigorously document and accurately label the exact percentage of retained water in their products [13] [20]. But even with better labeling, the water is still there, waiting to ruin your dinner.
Air-Chilled vs. Water-Chilled Chicken: An Exhaustive Breakdown
If you want an immediate, massive upgrade to your cooking, start buying “Air-Chilled” chicken.
Instead of being dunked in a communal water vat, air-chilled chickens are passed through a series of environmentally controlled, purified cold-air chambers [16]. Because they are never submerged, they absorb exactly zero added water [16].
The benefits of air-chilled chicken are undeniable:
- You get what you pay for: You are paying for pure chicken meat, not a 10% water tax [15].
- Superior Flavor: The natural flavor of the meat isn’t diluted by chlorinated water [15].
- Faster, Better Searing: Because the meat isn’t weeping excess liquid into your pan, it browns significantly faster and develops a much crispier skin [16].
- Hygiene: Moving birds through cold air individually drastically reduces the risk of cross-contamination compared to tossing them all into the same communal bath [15].
Yes, air-chilled poultry costs slightly more per pound. But when you factor in the fact that you aren’t paying for evaporated water, the price gap narrows considerably. It is the single easiest ingredient upgrade you can make.
The Science of the Sear: Why Water is the Enemy
The Thermodynamics of Your Frying Pan
Let’s talk about the physics of your kitchen, because transforming your daily cooking requires a basic understanding of heat transfer.
When you preheat a heavy skillet, you are building up a reservoir of thermal energy. Your goal is to transfer that intense heat directly into the surface of the meat. However, water has an incredibly high specific heat capacity—meaning it takes a massive amount of energy just to raise its temperature. Furthermore, the “latent heat of vaporization” (the energy required to turn liquid water into steam) is absolutely staggering [5].
When you place a wet piece of chicken into a hot pan, the thermal energy from your burner completely bypasses the meat. Instead, it is entirely hijacked by the surface water. The pan’s temperature plummets as it exhausts all its energy trying to boil off the puddle.
The 212-Degree Roadblock (Boiling Point Physics)
Here is the most critical rule of kitchen physics you will ever learn: As long as there is liquid water present on the surface of your food, the temperature of that surface can never, ever exceed 212°F (100°C) [5] [7].
It does not matter if your stove is set to the fiery depths of hell. It does not matter if your oil is smoking. The physical laws of thermodynamics dictate that the water will absorb the heat and evaporate, locking the temperature of the meat’s surface at exactly 212°F until every last drop of moisture is gone [7].
Why does this matter? Because 212°F is the temperature of boiling water. It is not the temperature of browning meat.
Demystifying the Maillard Reaction (Without the Pretentious Chef-Speak)
To get that gorgeous, golden-brown, flavor-packed crust, you need to trigger the Maillard reaction.
The Maillard reaction is a complex chemical romance between amino acids (proteins) and reducing sugars that occurs under high heat. When these compounds interact, they undergo a cascading series of reactions that create hundreds of brand-new, highly complex flavor molecules [9]. It is the exact same chemical process that turns pale dough into a crusty loaf of bread, and roasted coffee beans into a rich morning brew [7].
But here is the catch: The Maillard reaction is highly temperature-dependent. While it can technically happen at microscopic rates at lower temperatures, it only kicks into high gear and produces noticeable browning when the surface temperature of the food rapidly exceeds 285°F (140°C) [3] [10].
Do you see the problem?
- The Maillard reaction requires 285°F+ [3].
- Surface water caps your temperature at 212°F [3].
If your chicken is wet, it is physically impossible for it to brown [3]. The meat will sit in the pan, boiling and steaming at 212°F until it is completely overcooked and rubbery on the inside, long before the surface ever has a chance to reach the 285°F threshold required for flavor development [5].
This is why paper towels are not just a suggestion; they are a scientific necessity.
The Toxic Pan Trap: Why Your Cookware is Making It Worse
The “No-Go” Rule on Mystery Metals and Peeling Non-Stick
I have zero patience for cheap, toxic kitchenware, and neither should you. If you are struggling to get a good sear, there is a very high probability that your cookware is actively working against you.
Many beginner cooks rely exclusively on cheap, lightweight non-stick pans (usually coated in Teflon/PTFE) because they are terrified of their food sticking to the pan. But traditional non-stick pans are an absolute disaster for searing meat for two reasons:
- They are usually made of thin, cheap aluminum that possesses terrible thermal mass. The moment you drop a cold piece of chicken into them, the pan’s temperature crashes, and it takes forever to recover.
- They cannot safely handle the high heat required for the Maillard reaction. Heating traditional non-stick coatings past 500°F causes them to degrade, releasing toxic fumes and shedding “forever chemicals” into your food.
The era of cheap, toxic non-stick is thankfully coming to an end. A massive wave of global legislation is currently sweeping the cookware industry. Starting January 1, 2025, states like Minnesota and California (for certain categories) began strictly enforcing bans on intentionally added PFAS (per- and polyfluoroalkyl substances) in cookware [4] [8]. By January 1, 2026, Colorado, the European Union, and several other jurisdictions are implementing sweeping bans that will effectively make traditional PFAS-laden non-stick pans illegal to manufacture or sell [2] [6].
If entire governments are legally banning your frying pan because it is a biohazard, it is time to throw it in the trash. I am fiercely passionate about banishing toxic kitchen gear from your home. You cannot achieve professional results with disposable, chemically dubious tools.
Safe, Heavy-Duty Alternatives That Actually Retain Heat
To sear properly, you need cookware with high thermal mass—materials that can absorb a massive amount of heat and hold onto it stubbornly when cold food is introduced.
Your best friends in the kitchen are:
- Carbon Steel Skillets: The unsung hero of the professional kitchen. They become naturally non-stick over time through seasoning, they handle blistering heat without warping, and they last for generations.
- Cast Iron: Heavy, cheap, and practically indestructible. A pre-heated cast iron skillet will not drop its temperature when you add a chicken breast.
- Multi-Clad Stainless Steel: The ultimate workhorse for creating beautiful pan sauces (fond). Yes, there is a learning curve to prevent sticking, but the browning capabilities are unmatched.
The Masterclass: How to Properly Prep and Sear Your Poultry
We have covered the science, the industry scams, and the equipment. Now, let’s get into the actual technique. If you want a flawless, golden crust on your chicken every single time, follow these steps religiously.
Step 1: The Aggressive Pat-Down
Take your chicken out of the packaging. Do not rinse it under the sink. (Rinsing raw poultry does nothing but violently splash campylobacter and salmonella bacteria all over your clean countertops. Stop doing it.)
Pull off a generous amount of heavy-duty paper towels. Wrap the chicken and press down firmly. You are not just lightly dabbing the meat like you are powdering your nose; you need to aggressively blot it. Press the paper towels into all the nooks and crannies. Flip it over and do the bottom. Do the sides.
The surface of the meat should feel tacky and completely matte to the touch. If it still looks glossy or wet, get a fresh paper towel and do it again.
Step 2: The Dry Brine (Your Secret Weapon)
If you are just surviving a frantic Tuesday night, you can season your freshly dried chicken and throw it right into the pan. But if you have even 30 minutes of foresight, you need to utilize the magic of dry brining.
Once the meat is patted dry, generously season it with kosher salt (and whatever other dry spices you prefer). Place the chicken on a wire rack set inside a baking sheet, and leave it uncovered in the refrigerator.
Here is what happens: The salt draws out the remaining surface moisture. Initially, the meat will look wet again. But as it sits in the highly circulated, incredibly dry air of your refrigerator, that moisture is reabsorbed into the meat, pulling the salt deep into the muscle fibers. The salt denatures the proteins inside, guaranteeing a juicy interior, while the constant airflow of the fridge turns the exterior surface into a dry, leathery pellicle. This is the ultimate setup for a perfect sear.
Step 3: Temperature Management and Pan Preheating
Place your heavy skillet (cast iron, carbon steel, or stainless steel) on the stove over medium-high heat. Do not put the oil in yet. Let the dry metal heat up for several minutes.
You want the pan to be thoroughly hot before the fat is introduced. Once the pan is properly heated, add a high-smoke-point oil (like avocado oil, grapeseed oil, or clarified butter/ghee). Let the oil heat up for about 15 to 30 seconds until it begins to shimmer and flow like water. You want it right on the verge of smoking, but not burning.
Step 4: The Unbothered Sear (Leave It Alone!)
Carefully lay your bone-dry chicken into the hot oil, laying it away from you so it doesn’t splash hot fat onto your shirt. You should immediately hear a loud, aggressive sizzle. That is the sound of success.
Now comes the hardest part for beginners: Take a massive step back, and leave it alone.
Do not poke it. Do not press down on it with your spatula to “squeeze the juices out” (a tragic mistake). Do not try to lift the edge to peek at the color. Just let the heat do its job.
When meat hits a hot stainless steel or carbon steel pan, the proteins instantly bind to the metal. This is completely normal. As the Maillard reaction progresses and the exterior moisture is driven off, the proteins will undergo structural changes, caramelize, and form a rigid crust. Once that crust is fully formed, the meat will naturally release its grip on the pan. Mastering stick-free searing on stainless steel simply requires the patience to let the chemistry run its course. If you try to flip the chicken and it feels glued to the skillet, it is telling you it is not ready. Wait another 60 seconds.
Paper Towels vs. The Alternatives: What Actually Works?
The Case for Heavy-Duty Paper Towels
I am usually a massive advocate for sustainability and reducing single-use kitchen waste, but when it comes to drying raw meat, high-quality, heavy-duty paper towels are non-negotiable.
You need a brand that won’t disintegrate and leave gross little white paper lint fibers stuck to your raw chicken. The beauty of the paper towel is its disposability. You extract the moisture, and you immediately throw the biohazard into the trash.
Reusable Kitchen Towels: A Bacteria Hazard?
Do not use your nice linen or cotton dish towels to dry raw poultry. I cannot stress this enough. Unless you have a dedicated stack of utility rags that you plan to immediately boil in bleach water on the sanitary cycle of your washing machine, you are asking for trouble.
Drying raw chicken with a reusable towel and then leaving that damp, bacteria-soaked cloth sitting on your counter or hanging from your oven handle is a masterclass in cross-contamination. Stick to the paper.
The Fridge-Drying Method (For the Weekend Overachiever)
If you absolutely refuse to use paper towels, your only other viable option is time. As mentioned in the dry brining section, leaving the meat completely uncovered on a wire rack in the refrigerator for 12 to 24 hours will aggressively dehydrate the surface. The ambient humidity in a modern refrigerator is extremely low, making it an excellent (albeit slow) dehydrator.
Troubleshooting the Sear: When Things Still Go Wrong
Let’s say you patted the chicken dry, you preheated the pan, and things still went sideways. Here are the usual suspects.
Pan Crowding: The Quickest Way to Ruin Dinner
This is the second most common mistake home cooks make. You have a standard 10-inch skillet, and you try to cram four massive chicken breasts into it at the exact same time.
Even if you dried the meat perfectly, chicken is still roughly 75% water internally. As the meat cooks, the muscle fibers contract and squeeze out internal juices. If the pan is crowded, there is no open surface area for those juices to quickly evaporate. Instead, the liquid pools around the meat, the pan’s temperature crashes, and you are right back to boiling your dinner.
If you want to master simple weeknight dinners, you must respect the concept of personal space in the pan. Leave at least an inch of empty space between every piece of meat. If you are cooking for a family, either use a massive 12-to-14-inch skillet, or swallow your pride and cook in batches.
Oil Choices: Smoke Points Matter
You cannot sear effectively with extra virgin olive oil or whole butter. The Maillard reaction requires temperatures around 300°F to 400°F in the pan. The milk solids in whole butter will burn and turn black at 350°F. Unrefined extra virgin olive oil will begin to smoke, degrade, and taste like bitter ash at similar temperatures.
Save your expensive olive oil for finishing dishes and making vinaigrettes. For searing, you need neutral, high-smoke-point fats. Avocado oil (smoke point 520°F), grapeseed oil (420°F), or clarified butter/ghee (450°F) are your best options for delivering pure, unadulterated heat to the meat without setting off your smoke detectors.
The Sticking Issue (And Why You Shouldn’t Panic)
If your chicken is sticking aggressively even after a crust has formed, your pan temperature was likely too low when you added the meat, or your pan wasn’t clean to begin with.
Always ensure your stainless steel or carbon steel is thoroughly preheated before the oil goes in. A good test for stainless steel is the “water drop test.” Flick a tiny drop of water into the dry, heating pan. If it immediately fizzles and evaporates, it’s not hot enough. If the water drop forms a perfect, cohesive bead that glides effortlessly across the surface like a hockey puck (thanks to the Leidenfrost effect), your pan is perfectly preheated and ready for oil.
Elevating Your Weeknight Routine
Prep Hacks for the Exhausted Cook
The biggest hurdle to good weeknight cooking is exhaustion. When it is 6:30 PM on a Wednesday, nobody wants to deal with raw chicken juice and salt grinders.
Do yourself a favor: process your proteins the minute you get home from the grocery store on Sunday. Take the chicken out of the packaging, pat it aggressively dry with paper towels, season it with salt, and store it in an airtight container (or loosely covered) in the fridge. By the time Tuesday rolls around, the meat is fully brined, the surface is bone dry, and you can go from the fridge to a sizzling pan in under 10 minutes.
Translating the Paper Towel Trick to Other Proteins
The beautiful thing about culinary science is that physics does not discriminate. The rules of moisture and heat apply to absolutely everything in your kitchen.
Once you internalize the fact that surface moisture is the enemy of browning, it will transform your daily meals across the board.
- Steak: Pat it dry. A wet ribeye will never develop that steakhouse crust.
- Scallops: Scallops are notorious for retaining water. Dry them ruthlessly with paper towels, or they will steam into rubbery erasers.
- Pork Chops: Dry them, salt them, and watch them caramelize.
- Tofu: Press the water out, then pat the surface completely dry before it hits the hot oil for a shatteringly crisp exterior.
Cooking is not magic. It is just the application of heat to food. When you control the moisture, you control the heat. When you control the heat, you unlock the flavor. So, throw away those toxic peeling non-stick pans, stop buying water-logged poultry, and go grab a roll of paper towels. You’ve got this.


