Listen, I know exactly why you are here. You spent your entire Sunday afternoon lovingly tending to a massive pot of chicken bones, vegetables, and herbs. You envisioned ladling out bowls of liquid gold—a broth so pristine, clear, and deeply flavorful that it could cure the common cold and impress your most judgmental relatives. But then you strained it, and what did you get? A murky, greasy, gray-brown liquid that looks suspiciously like leftover dishwater.
Don’t panic, and put down the takeout menu. I am your Sassy Sous-Chef, and I am here to tell you that making crystal-clear chicken broth is not dark magic reserved for Michelin-starred kitchens. It does not require a culinary degree, and it certainly doesn’t require you to sacrifice your sanity. It all comes down to basic mechanics, a little bit of thermodynamics, and learning how to control your stove.
In my early days of cooking, I committed every culinary crime imaginable. I cranked the heat to maximum because I was impatient, completely oblivious to the fact that impatience is the enemy of good soup. It is one of the most common rookie kitchen mistakes that home cooks make. But once you understand the science of what is actually happening inside that pot, you will never make cloudy broth again. Grab your favorite mug, pour yourself something strong, and let’s dive into the definitive masterclass on keeping your homemade chicken broth perfectly clear.
The Anatomy of a Proper Chicken Broth (And Why We Care)
Before we can fix your cloudy broth, we need to understand what we are actually brewing. When you toss a chicken carcass, some carrots, celery, onions, and herbs into a pot of water, you are initiating a complex chemical extraction process.
First, let’s establish some ground rules. You will often hear the terms “stock,” “broth,” and “bone broth” thrown around interchangeably. I have zero patience for pretentious recipe jargon, so let’s keep it beautifully simple:
- Broth is generally made with meat and vegetables, cooked for a shorter amount of time, and is seasoned. It’s light and ready to eat.
- Stock is made primarily from bones and connective tissue, cooked for a much longer time to extract collagen, and is usually left unseasoned so it can be used as a versatile base for other recipes.
- Bone Broth is essentially just stock that has a trendy marketing team behind it.
For the sake of this masterclass, whether you are making a meat-heavy broth or a bone-heavy stock, the rules for keeping it clear are exactly the same.
When you heat bones and meat in water, several things happen. The collagen in the connective tissues slowly breaks down and converts into gelatin, which gives a great stock its luxurious, lip-smacking mouthfeel. At the same time, flavor compounds from the meat and vegetables dissolve into the water. Unlike making a quick pan sauce, where you are actively turning burnt bits into sauce by deglazing a screaming-hot skillet, making broth is an exercise in gentle, prolonged coaxing.
However, along with the good stuff (flavor and gelatin), you are also extracting the bad stuff: blood, fat, and soluble proteins (specifically albumin). These impurities are the primary culprits behind a cloudy broth. If you do not manage them correctly through temperature control, they will ruin your liquid gold.
The Science of Cloudiness: Meet the Enemy, Emulsification
To defeat the enemy, you must know the enemy. The scientific term for your murky, dishwater broth is an emulsion.
In the culinary world, emulsification is usually a wonderful thing. It is the mechanical process of forcing two liquids that absolutely hate each other—like oil and water—to hold hands and blend together into a smooth, unified mixture. When you vigorously whisk olive oil into lemon juice to make a vinaigrette, or when you blend egg yolks with oil to make mayonnaise, you are creating an emulsion.
But in the context of chicken broth, emulsification is a catastrophic failure.
Your stockpot is filled with water, and as the chicken cooks, it releases liquid fat (schmaltz). Left to its own devices, fat will naturally float to the top of the water because it is less dense. However, if you crank up the heat and allow the pot to reach a rolling boil, you introduce violent mechanical agitation.
Those massive, rapidly popping bubbles act exactly like the blades of a blender. They violently tear the floating fat into microscopic droplets and forcefully disperse them throughout the water. Once those fat droplets are microscopic, they become permanently suspended in the liquid. Furthermore, the violent boiling action pulverizes the coagulated proteins (the gray scum that rises to the top) and the starches from your vegetables, blending them right into the fat-water suspension.
The result? A permanently cloudy, greasy, heavy liquid that tastes muddled and feels greasy on the palate. If you have ever walked away from the stove and come back to find that your pasta pot boils over in a frothy, starchy rage, imagine what that same violent energy is doing to the delicate fats and proteins in your chicken stock. It is absolute destruction.
Boiling vs. Simmering: A Masterclass in Heat Control
The secret to clear broth is painfully simple, yet it is the one thing weekend culinary warriors struggle with the most: You must never, ever let your broth boil.
Let’s look at the exact thermodynamics of your stove, because words like “boil” and “simmer” are often misunderstood.
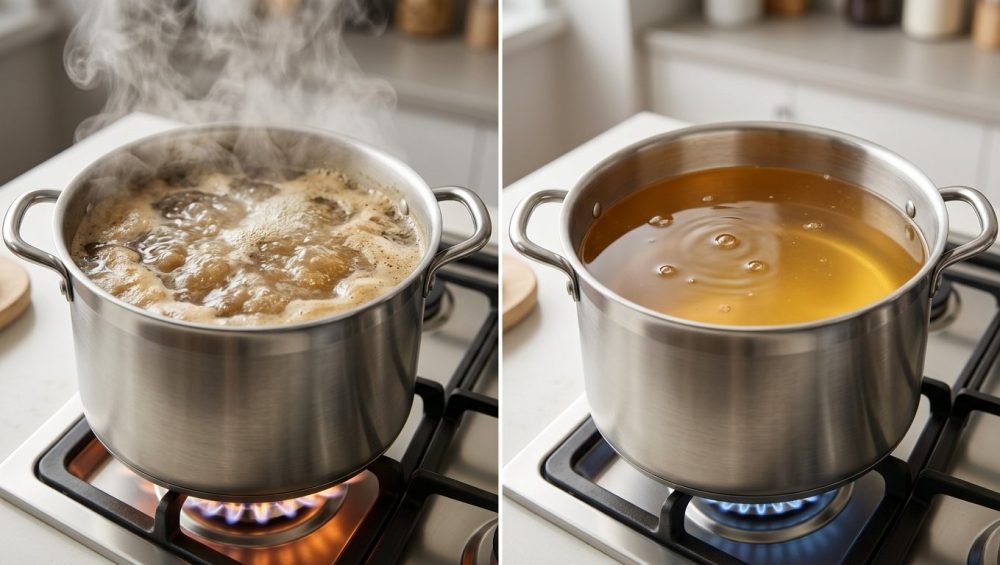
The Rolling Boil (212°F / 100°C):
At sea level, water reaches its boiling point at 212°F. At this temperature, the liquid is in a state of rolling turbulence. Large, aggressive bubbles continuously break the surface, creating heavy steam and vigorous movement. Boiling is fantastic for cooking dried pasta or blanching green beans quickly. It is an absolute death sentence for chicken broth.
The Gentle Simmer (185°F to 205°F / 85°C to 96°C):
Simmering is a much gentler cooking process. When a liquid is simmering, you will see small, delicate bubbles slowly rising from the bottom of the pot and gently breaking the surface. The surface of the liquid should look calm, with only occasional, lazy movement. In professional kitchens, we call this “a smile.” The pot should just be smiling at you.
Why does this matter? A gentle simmer provides enough thermal energy to slowly melt the collagen into gelatin and extract the flavor compounds from the meat and vegetables, but it lacks the violent mechanical agitation required to emulsify the fats and pulverize the proteins. The fat is allowed to peacefully float to the top in large, distinct pools, where it can be easily skimmed away.
The Step-by-Step Guide to Crystal-Clear Liquid Gold
Now that you understand the chemistry and the physics, let’s put it into practice. This is my foolproof, step-by-step methodology for producing a broth so clear you can read a newspaper through it.
Step 1: The Cold Water Start
This is the most critical step, and it is entirely based on protein science. You must always start your broth with cold water—never hot, and certainly never boiling.
Why? Because of a protein complex called albumin, which is heavily present in raw meat and bones. Albumin is highly soluble in cold water. When you submerge your chicken in cold water and heat it gradually, the albumin slowly dissolves out of the meat and into the liquid.
As the temperature of the water slowly rises, the albumin begins to denature and coagulate. Scientific studies using microcalorimetry show that the denaturation of albumin begins around 154°F (68°C) and peaks around 169°F (76°C). As these proteins coagulate, they act like a microscopic magnetic net, gathering up stray particles, blood, and fine impurities as they rise to the surface.
If you drop your chicken into hot or boiling water, the sudden heat shock instantly sears the exterior of the meat and coagulates the surface proteins too quickly. This seals the impurities inside the meat, preventing the albumin from dissolving into the water to do its filtering job. The result is a cloudy stock that lacks depth of flavor. Start cold, always.
Step 2: The Initial Skim
As your cold pot slowly heats up over medium-low heat, you will notice a grayish-brown foam beginning to form on the surface. This is the coagulated albumin and impurities we just talked about.
Before the pot even reaches a simmer, you must meticulously skim this scum off the top. If you allow the pot to simmer before removing the scum, the convection currents of the water will pull that dirty foam back down into the broth, clouding it permanently.
Do not try to do this with a regular spoon. You need the right tool for the job. A stainless steel spider skimmer or a fine-mesh skimmer is non-negotiable here. Stand by your stove for the first 30 minutes, watch the pot like a hawk, and gently lift the foam away as it appears.
Step 3: The Gentle Simmer
Once the pot reaches that critical 185°F to 205°F range, it will begin to “smile”. You should see one or two small bubbles breaking the surface every few seconds.
At this point, you turn your burner down to its lowest possible setting to maintain this exact temperature. Depending on your stove, you may even need to move the pot partially off the burner to keep the heat low enough.
Now, you walk away. Leave it alone for 4 to 6 hours. Do not stir it. Stirring agitates the ingredients, breaks apart the fragile vegetables, and suspends starches in the liquid. Just let the gentle heat do its slow, magical work.
Step 4: Straining with Precision
Once your broth has simmered to perfection, it is time to separate the liquid from the solids. This is where many home cooks ruin hours of hard work.
Set a large, heavy-bottomed bowl or a clean pot in your sink. Place a fine-mesh strainer over it, and line the strainer with a double layer of damp cheesecloth. Using a ladle, gently scoop the broth out of the cooking pot and pour it through the cheesecloth.
The Cardinal Rule of Straining: Do not, under any circumstances, press down on the solids in the strainer to extract more liquid.
I know it is tempting. You want every last drop of flavor. But the moment you press down on those boiled carrots, onions, and chicken bones with the back of a ladle, you force starchy vegetable puree and emulsified fats right through the mesh and into your pristine liquid. Think about what happens when you overcrowd a sheet pan in the oven and your roasted veggies are mushy and steamed instead of crisp. Pressing boiled vegetables has a similarly disastrous, mushy effect on your broth. Accept the slight loss of liquid volume in exchange for absolute clarity.
Step 5: The Chill and Skim
Your strained broth is now clear, but it still has a layer of liquid fat (schmaltz) floating on top. While some fat is delicious, too much will make your soup feel heavy and greasy.
Do not try to skim the liquid fat while the broth is hot; it is an exercise in futility. Instead, let the broth cool at room temperature for an hour, then transfer it to the refrigerator overnight.
As the broth chills, the gelatin will set up (it will look like chicken Jell-O, which means you did an amazing job extracting the collagen), and the fat will rise to the top and solidify into a hard, opaque white disc. The next morning, you can simply lift this disc of fat right off the top with a spoon. Save that schmaltz for roasting potatoes later!
Advanced Techniques for the Perfectionist: The Egg White Raft
Let’s say you messed up. You got distracted by a phone call, the heat was too high, the pot boiled, and now you have a cloudy, emulsified disaster. Or perhaps you are hosting a fancy dinner party and you want to serve a classic Consommé—a broth so perfectly clarified it looks like amber glass.
Enter the “Raft” technique. This is an old-school, brilliant French culinary trick that uses the power of protein coagulation to filter an already-cloudy broth.
To make a raft, you mix raw egg whites, a little bit of cold water, and optionally some lean ground chicken or crushed eggshells in a bowl. You take your cold, cloudy broth and place it on the stove. Vigorously whisk the egg white mixture into the cold broth, and then turn the heat to medium.
As the broth heats up, you must stir constantly to prevent the egg whites from scrambling on the bottom of the pot. As the temperature approaches that magical 154°F to 169°F range, the egg whites will begin to denature and coagulate. Because egg whites are pure albumin, they form a massive, sponge-like protein net.
Stop stirring immediately. The coagulated egg whites will float to the top, forming a thick, solid crust—the “raft.” As the broth gently simmers beneath the raft, the convection currents push the cloudy liquid up through the porous egg whites. The raft acts as a biological Brita filter, trapping every microscopic particle of fat, starch, and impurity.
After simmering for 30 minutes, you carefully poke a hole in the center of the raft to ladle out the perfectly clarified consommé underneath. It is an absolute showstopper, and mastering it is a massive flex when you are practicing the art of food plating for your guests.
Equipment Matters: Ditch the Toxic Junk
I cannot write a masterclass on heat control without addressing the elephant in the kitchen: your cookware.
You cannot maintain a delicate, perfectly calibrated 190°F simmer if you are using a cheap, flimsy, thin-bottomed aluminum pot. Thin cookware creates aggressive hot spots. One side of the pot will be stone-cold, while the other side is boiling violently and scorching the bones at the bottom.
Furthermore, I have a strict, zero-tolerance policy for toxic kitchen gear. If you are boiling acidic ingredients (like tomatoes or wine in a brown stock) in a cheap non-stick pot, you are asking for trouble. When cheap Teflon or mystery-coating pans start losing their slip, they don’t just stop working—they actively peel, flake, and leach forever chemicals (PFAS) directly into the food you are feeding your family. I despise them.
If you want to cook like an expert, you need to invest in a high-quality, heavy-bottomed stockpot. Look for fully clad, tri-ply stainless steel, or a large enameled cast-iron Dutch oven. These materials possess massive thermal mass. They absorb heat slowly from the burner and distribute it perfectly evenly across the entire base and up the sides of the pot.
Once a heavy stainless steel pot reaches a simmer, it holds that temperature with incredible stability, making your job as a cook infinitely easier. A premium stockpot is not a luxury; it is a fundamental pillar of a beautifully organized dream kitchen. Buy it once, take care of it, and it will outlive you.
Troubleshooting Your Broth Disasters
Even with the best instructions, things can go sideways. Here are the most common issues my readers run into, and the brutally honest truth about how to fix them.
“My broth is perfectly clear, but it tastes like hot water.”
First, did you add salt? Unsalted homemade broth tastes incredibly bland compared to the sodium-bombs you buy in a carton at the grocery store. Add a heavy pinch of kosher salt and a squeeze of fresh lemon juice (acid brightens the flavor). If it still tastes weak, you simply used too much water and not enough bones. To fix it, put the strained broth back on the stove and simmer it uncovered until the liquid reduces and the flavors concentrate.
“My broth turned into a solid block of meat jelly in the fridge!”
Congratulations! Do not throw it away! This means you executed the technique flawlessly. That jelly is pure, extracted collagen that has converted into gelatin. It is incredibly nutritious and will give your soups a rich, velvety texture. The moment you heat it up on the stove, it will melt back into a liquid.
“I simmered it perfectly, but it is still cloudy. Why?”
Did you use too many starchy vegetables? Potatoes and parsnips break down easily and release starches that cloud the water. Stick to the classic mirepoix: onions, carrots, and celery. Did you stir the pot while it was cooking? I told you not to do that. Stirring breaks up the ingredients and clouds the water.
“The chicken meat I pulled out of the broth is chalky, dry, and tasteless.”
Yes, it is. That is the entire point of making broth. You have successfully transferred all the moisture, fat, and flavor from the chicken into the water. If your chicken always turns out dry when you are trying to roast it for dinner, that is a technique issue we need to fix. But when making stock, the meat is supposed to sacrifice its soul to the liquid. Toss the spent meat, or give it to your very lucky dog.
The Final Word from the Sassy Sous-Chef
Making a crystal-clear, deeply flavorful chicken broth is the ultimate rite of passage for the home cook. It is the foundation of incredible soups, risottos, and pan sauces.
Remember the golden rules: Start with cold water, skim the scum early, never let it boil, never stir it, and never press the solids when straining. Respect the ingredients, respect the thermodynamics, and have a little patience.
Even if you mess up and your broth turns out a little cloudy, don’t beat yourself up. It will still taste infinitely better than anything you can buy in a cardboard box at the supermarket. But follow these steps, and by next Sunday, you will be staring into a pot of liquid gold, wondering why you ever thought cooking was difficult. Now go turn on your stove, keep the heat low, and make something amazing.


