Look, I get it. You bought a pack of boneless, skinless chicken breasts with the absolute best of intentions. You planned a healthy, efficient weekday meal. You heated up a pan, tossed the meat in, and waited until it “looked done.” But when you finally sat down at the table and sliced into it, you were met with a texture that can only be described as culinary drywall. You didn’t cook dinner; you manufactured a choking hazard. You found yourself chewing the same bite for three minutes, eventually needing a glass of water just to wash down the chalky, stringy fibers.
If you are tired of repeating the same rookie kitchen mistakes night after night, it is time for a reality check. You do not need to go to culinary school to fix this, and you certainly do not need to resign yourself to a lifetime of terrible poultry. What you actually need is a fundamental understanding of thermal dynamics, cellular biology, and basic chemistry. The reason your chicken always turns out dry is not because the universe hates you; it is because you are unknowingly subjecting delicate muscle fibers to a violent, uncontrolled thermodynamic reaction. We are going to strip away the pretentious chef-speak and look at the hard, objective data. By the time you finish reading this, you will have the scientifically validated prep techniques and exact thermal thresholds required to cook mind-blowing, perfectly juicy chicken every single time.
The Biology of the Bird: Understanding Avian Muscle Fibers
To stop ruining your food, you first have to understand what meat actually is. Raw meat is essentially a sponge made of protein. Specifically, it is composed of roughly 75% water, 20% protein, and 5% fat, carbohydrates, and minerals. But not all muscle tissue is created equal, and understanding this biological reality is the first step to surviving kitchen disasters in your home kitchen.
The Contractile Proteins: Myosin and Actin
At the microscopic level, muscle fibers are made up of tiny, repeating units called sarcomeres. These sarcomeres are the engines of muscle contraction, and they rely primarily on two vital proteins: myosin and actin. Myosin represents the thick filaments within the muscle structure, while actin represents the thin filaments. In a living animal, these filaments slide past one another to contract and release the muscle. In a dead animal—which is what you are cooking—these proteins dictate exactly how much moisture the meat can hold when exposed to heat. The interplay between myosin and actin is the absolute core of meat science. When you apply thermal energy to these proteins, their complex, coiled structures begin to unfold and break down, a process known as denaturation. How you manage this denaturation process is the sole difference between a Michelin-quality meal and a desiccated hockey puck.
Why Chicken Breasts Are So Unforgiving
Avian muscle fiber types are broadly categorized by their metabolic function and contraction speed. Chickens spend the vast majority of their lives walking around on the ground. Because their legs and thighs bear weight and require sustained endurance, those muscles are composed of slow-twitch, oxidative red fibers. These red fibers are packed with myoglobin (an oxygen-binding protein) and intramuscular fat, which acts as a built-in buffer against overcooking.
The pectoralis major—the chicken breast—is an entirely different biological mechanism. Chickens only use their breast muscles for short, explosive bursts of energy, like frantically flapping their wings to escape a predator. Consequently, breast meat is composed almost entirely of fast-twitch, glycolytic white fibers. These fibers contain virtually no myoglobin and, crucially, almost zero intramuscular fat. Without the insulating protection of fat and connective tissue to lubricate the muscle fibers, white meat is incredibly susceptible to rapid moisture loss. There is no margin for error. If you push the temperature too high, there is no rendering fat to save you.
The Thermodynamics of Meat: What Happens When Heat Hits
Cooking is not magic; it is applied physics. When you drop a cold, raw piece of chicken into a hot skillet, you are initiating a massive transfer of thermal energy. As the heat travels from the surface of the meat toward the center, it forces the proteins through a series of irreversible structural changes. Turning dinnertime into a peaceful daily habit requires managing these temperatures with clinical precision.
The Myosin Denaturation Phase (104°F to 122°F / 40°C to 50°C)
The transformation of raw meat begins relatively early. As the internal temperature of the chicken crosses the 104°F (40°C) threshold, the thick myosin filaments begin to denature. Their tightly coiled structures start to gently unwind. As the temperature climbs toward 122°F (50°C), a striking change occurs: the unfolded myosin molecules begin to coagulate and reconnect in a new configuration.
This specific chemical reaction causes the sarcomeres to shrink in diameter. This is the “good” kind of cooking. The shrinkage of the myosin alters the meat’s texture, transforming it from a raw, translucent, and squishy state into an opaque, pleasantly firm, and tender structure. At this stage, the cellular walls are still largely intact, and the vast majority of the water remains securely trapped inside the protein matrix. If we could magically stop the cooking process right here and safely eat the chicken, it would be incredibly juicy.
The Actin Denaturation Phase (150°F / 66°C): The Danger Zone
Here is where the tragedy unfolds. As the thermal energy continues to penetrate the meat, the internal temperature eventually reaches 150°F (66°C). At this precise thermal threshold, the thin actin filaments begin to denature. Unlike myosin, which shrinks gently in diameter, actin reacts to heat by shrinking violently in length.
Imagine taking a soaking wet towel and twisting it as hard as you possibly can. That is exactly what is happening to the muscle cells inside your chicken breast. The actin fibers become incredibly firm, shorten longitudinally, and ruthlessly squeeze the cellular water out of the protein matrix. The data on this is undeniable: the moment meat hits 150°F (66°C), the amount of moisture loss literally doubles compared to where it was at 120°F (49°C). By the time the meat reaches 160°F to 163°F (71°C to 73°C), the actin denaturation is so severe that the meat fibers have completely toughened, and the liquid expelled increases dramatically. You have crossed the point of no return.
The Moisture Loss Mechanism: Why Your Chicken Shrinks
Have you ever noticed a puddle of white, cloudy liquid forming in the pan or on your cutting board when you cook chicken? That is not fat rendering. That is a mixture of water and soluble proteins (like albumin) that have been forcibly evicted from the muscle cells due to actin contraction. Once that moisture is squeezed out of the cellular structure and evaporated by the heat of the pan, it is gone forever. You cannot put the water back into the sponge. Your chicken visibly shrinks in size, loses its structural integrity, and takes on the dreaded chalky, stringy texture that ruins your meal.
The Scientific Solution: The 5% Equilibrium Brine
When you are trying to execute simple weeknight dinners, you need a reliable method to insure your meat against inevitable moisture loss. The absolute best way to do this is by structurally altering the proteins before they ever touch the heat.
Why Traditional Marinades Are a Waste of Time
Let me save you some time and money: stop soaking your chicken breasts in expensive concoctions of olive oil, lemon juice, and herbs for 24 hours. Traditional marinades are a culinary scam. The molecular structure of fats and complex flavor compounds is simply too large to pass through the semi-permeable cell membranes of dense muscle tissue. At best, a marinade will penetrate one or two millimeters into the surface of the meat. You are not tenderizing the chicken; you are just giving it a superficial, highly acidic bath that often turns the exterior to mush while leaving the interior completely untouched.
The Chemistry of Osmosis and Protein Alteration
There is only one ingredient in your kitchen that is chemically capable of penetrating deep into the cellular structure of meat: salt (Sodium Chloride). When you submerge poultry in a properly calibrated saltwater solution, two vital scientific mechanisms occur: osmosis and protein denaturation.
Initially, the high-salinity environment draws a small amount of moisture out of the meat. But as the salt dissolves into tiny sodium and chloride ions, they easily diffuse deep into the muscle tissue. Once inside, the magic happens. The chloride ions bind to the tightly coiled myosin protein filaments, giving them a strong negative electrical charge. Because like charges repel, the protein filaments literally push away from each other, unwinding and loosening the muscle structure. This creates a relaxed, gel-like protein matrix that acts as a highly absorbent sponge, allowing the cells to draw in the surrounding water and trap it. A properly brined chicken breast will actually gain 10% to 15% of its original weight in retained moisture. When heat is eventually applied, this excess hydration acts as a buffer. Even when the actin inevitably contracts, there is so much extra water trapped inside the swollen cells that the meat remains juicy.
The Exact Formula: 60 Grams of NaCl to 1 Liter of H2O
Do not just throw a handful of salt into a bowl of water and hope for the best. Cooking is science, and science requires precision. To achieve optimal moisture retention without turning your dinner into an inedible salt lick, you must utilize a 5% salinity equilibrium brine.
The formula is exact: 60 grams of Kosher salt (NaCl) completely dissolved in 1 liter (1000 grams) of water. This precise chemical ratio provides the exact osmotic pressure required to break down the myosin and hydrate the cellular structure. If you use too little salt, the electrostatic repulsion will not occur. If you use too much, you will aggressively cure the meat, drawing moisture out and turning the texture hammy and dense.
How to Execute the Perfect Brine Without Wasting Time
As a busy home cook, time is your most valuable asset. You do not have 12 hours to wait for a massive, whole bird to slowly reach osmotic equilibrium in the refrigerator. To speed up the physics of diffusion, you must increase the surface-area-to-volume ratio of the meat. Take your chicken breasts and slice them horizontally into even, half-inch cutlets. Submerge these thinner cutlets in the chilled 5% salinity brine. Because the distance to the center of the meat is drastically reduced, the chloride ions can fully penetrate the tissue in just 30 to 60 minutes. You can prep this immediately when you get home from work, go change your clothes, and by the time you return to the kitchen, the cellular structure of the poultry has been perfectly optimized for thermal processing.
Rethinking the Heat: The 165°F Lie and Safe Pasteurization
You cannot rescue a ruined dinner once the proteins have entirely seized up, which is why we need to have a serious conversation about temperature. For decades, the USDA has hammered a singular, terrifying rule into the minds of the public: you must cook all poultry to an internal temperature of 165°F (74°C) or you will contract Salmonella and perish. This well-intentioned but highly misleading guideline is the single biggest reason your chicken tastes like sawdust.
The USDA Guidelines vs. Culinary Reality
The 165°F (74°C) mandate is an idiot-proof safety net designed by government regulators for the lowest common denominator. It is a foolproof way to ensure that even the most careless cook cannot possibly serve undercooked meat. But from a culinary and scientific perspective, cooking a lean, fast-twitch muscle to 165°F is absolute overkill. As we already established, the critical actin denaturation phase—where moisture loss doubles—begins at 150°F (66°C). By the time your chicken reaches the government-mandated 165°F, the muscle fibers have violently contracted, all the cellular hydration has been squeezed out into the pan, and the proteins have coagulated into a tough, dry mass.
The Time-Temperature Pasteurization Curve
Here is the scientific reality that the FDA rarely advertises: bacterial death is not a sheer cliff; it is a time-temperature curve. Pasteurization is a function of both how hot the environment is and how long the pathogen is exposed to that heat.
The reason the USDA loves the number 165°F is that at this specific temperature, a 7-log10 reduction of Salmonella (meaning 99.99999% of the bacteria are destroyed) occurs instantaneously—in less than 10 seconds. It is immediate death for the pathogens. However, you can achieve the exact same 7-log10 reduction of Salmonella at significantly lower temperatures, provided you hold the meat at that temperature for a longer duration.
According to peer-reviewed food safety data, if you bring a chicken breast up to 155°F (68°C), it only takes roughly 45 to 50 seconds to achieve the exact same level of complete pasteurization. If you hit 157°F (69.4°C), the required holding time drops to a mere 31 seconds. You do not need to obliterate the meat at 165°F to make it safe to eat.
Carryover Cooking Dynamics: Why You Must Pull at 155°F (68°C)
This brings us to the most crucial thermal management technique in your arsenal: carryover cooking. When you are searing a chicken breast, the exterior of the meat is in direct contact with a pan that is likely sitting at 400°F (204°C). The center of the meat, meanwhile, is slowly creeping up to 150°F.
When you remove the chicken from the heat source, the cooking process does not magically stop. The immense kinetic energy stored in the scorching outer layers of the meat continues to travel inward, seeking thermal equilibrium. If you pull the chicken off the skillet the exact second the core hits 155°F (68°C), the internal temperature will continue to coast upward by another 3 to 5 degrees over the next several minutes. It will easily hit 158°F to 160°F while resting on the cutting board, comfortably holding above the necessary pasteurization threshold for well over the required 45 seconds. You get perfectly safe, fully pasteurized chicken that never crosses into the extreme actin-denaturation danger zone.
The Mandatory Rest Period: Let the Juices Redistribute
Pulling the meat at 155°F is only half the battle. If you immediately take a knife and slice into that piping hot chicken breast, you will ruin all your hard work. At high temperatures, the muscle fibers are tight, and the internal liquids are thin, highly pressurized, and desperate to escape. Slashing the meat open provides an immediate exit route, and the juices will bleed out all over your cutting board. You must let the meat rest for at least five to eight minutes. As the temperature slowly equalizes and begins to drop, the muscle fibers relax, and the viscous cellular fluids slightly thicken, anchoring themselves back into the protein matrix.
The Gear: Ditch the Toxic Pans and Cook Like a Pro
You cannot execute professional-level thermal management if you are using garbage equipment. I am absolutely militant about banishing toxic kitchen gear from your home, and nothing offends me more than the cheap, peeling non-stick skillets that currently haunt the cabinets of most amateur cooks.
The Danger of Peeling Teflon and Cheap Non-Stick
If you are trying to sear a beautiful, brined chicken breast in a $15, paper-thin aluminum pan coated in flaking black Teflon, you are setting yourself up for failure on two fronts. First, you are actively ingesting per- and polyfluoroalkyl substances (PFAS)—”forever chemicals” that accumulate in your body and never leave. Second, cheap aluminum pans have zero thermal mass. The moment you place cold meat into a thin non-stick pan, the temperature of the metal plummets. Instead of getting a hard, aggressive sear, the pan goes cold, the meat releases its juices, and you end up sadly boiling the chicken in its own grey liquid.
The Only Skillets You Actually Need
To cook like an expert, you need equipment that can absorb, hold, and evenly distribute massive amounts of thermal energy. You need a heavy-bottomed, fully clad tri-ply stainless steel skillet or a thick carbon steel pan. These materials possess the necessary density to maintain high heat even when cold meat is introduced. Furthermore, by learning to properly preheat the metal, you can utilize the Leidenfrost effect—creating a microscopic barrier of vaporized moisture—which is the secret to stick-free searing on stainless skillets.
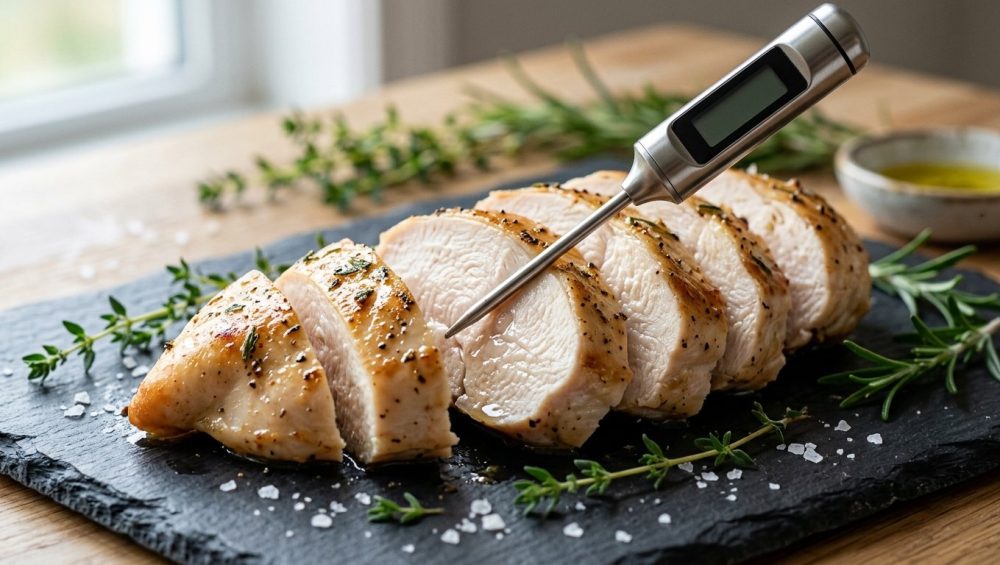
Alongside a proper pan, you must own a high-quality, fast-reading digital meat thermometer. Cooking by “feel,” poking the meat with your finger, or slicing it open to check the color are archaic, inaccurate methods used by amateurs. A digital thermometer provides objective, real-time data, allowing you to pull the meat at exactly 155°F (68°C) without any guesswork. It is a non-negotiable tool.
Putting It All Together: The Foolproof Weeknight Workflow
Even if you have a beautifully organized dream kitchen, poor timing will ruin the meal. Efficiency is everything. Here is the exact, step-by-step workflow to guarantee perfect chicken every single time.
Pre-Game Prep: Efficiency is Everything
- The Brine: Dissolve exactly 60g of Kosher salt into 1L of water. Slice your chicken breasts horizontally into even cutlets to increase the surface area. Submerge the cutlets in the 5% brine for 30 to 45 minutes.
- The Dry Down: Remove the chicken from the brine and aggressively pat it dry with paper towels. This is critical. Moisture on the surface of the meat is the absolute enemy of the Maillard reaction (the chemical process that causes browning and creates complex flavors). Because water requires a massive amount of thermal energy to evaporate—a concept known as the latent heat of vaporization—any surface moisture will prevent the meat from exceeding 212°F (100°C) until it boils off. If the meat is wet, it will steam instead of sear.
The Searing Process: Heat, Fat, and Patience
- Preheat the Pan: Place your stainless steel or carbon steel skillet on medium-high heat. Let the metal absorb the energy for a few minutes.
- Add the Fat: Once the pan is hot, add a high-smoke-point oil (like avocado or grapeseed oil). Wait until the oil shimmers and just begins to wisp with smoke.
- The Drop: Carefully lay the dried chicken cutlets into the pan, laying them away from your body so the hot oil doesn’t splash you.
- Do Not Touch It: The proteins will immediately bond to the metal. Leave it alone. As the Maillard reaction occurs and the surface dehydrates and browns, the proteins will naturally release from the pan.
- The Flip and Temp: Flip the chicken once a deep golden-brown crust has formed. Immediately grab your digital thermometer. Insert the probe horizontally into the thickest part of the cutlet.
Troubleshooting Common Chicken Disasters
The real secret to conquering weeknight cooking anxiety is knowing how to control the heat. If your chicken is browning too quickly on the outside but the internal temperature is only 110°F, your pan is too hot. Drop the heat to medium-low to allow the thermal energy to gently penetrate to the center without incinerating the crust.
Watch the thermometer like a hawk. The moment the internal temperature flashes 155°F (68°C), pull the chicken out of the pan immediately. Transfer it to a cutting board, tent it loosely with foil, and let the carryover cooking dynamics finish the pasteurization process. Wait at least five minutes before slicing.
Conclusion: You Are Now a Poultry Master
Cooking incredible food does not require innate talent, and it certainly does not require a culinary degree. It requires a willingness to abandon outdated myths, ditch toxic equipment, and respect the fundamental laws of thermodynamics and cellular biology. By utilizing a precise 5% equilibrium brine to restructure the myosin, and by strictly pulling your meat at 155°F to avoid the catastrophic actin denaturation zone, you completely eliminate the variables that cause dry, chalky meat. Once you master this, the art of effortless hosting becomes second nature. Armed with a digital thermometer, a heavy stainless skillet, and a little bit of science, you are now fully equipped to conquer the kitchen and serve flawlessly juicy chicken every single time.


