Listen, we need to have a serious talk about the poultry you are serving in your home. If your chicken breasts require a generous slathering of mayonnaise, gravy, or sheer willpower just to swallow without choking, you are doing it wrong. I say this with love, but I also say it as someone who refuses to eat another piece of chalky, overcooked, sad chicken.
According to the latest 2025 and 2026 projections from the USDA, the average American is expected to consume a staggering 102.8 pounds of broiler chicken per capita this year. That makes chicken the undisputed, reigning champion of the American dinner table. But if we are eating over a hundred pounds of this bird every single year, why are so many of us still settling for dry, fibrous, flavorless meat?
The answer is simple: most home cooks fundamentally misunderstand how heat and muscle fibers interact. You throw a raw, unseasoned chicken breast into a hot pan, cross your fingers, and hope for the best. That is not cooking; that is gambling. And in the kitchen, the house always wins. If you want to consistently produce restaurant-quality, mind-blowingly juicy poultry, you need to stop leaving things to chance and start relying on culinary science.
Today, we are going to dive deep into the absolute magic of dry brining. This is not some pretentious, complicated chef trick that requires a culinary degree or a sous-vide machine. It is a wildly simple, hands-off technique that will completely transform your weekday meals. By the end of this masterclass, you will understand exactly how to manipulate the chemistry of your food to guarantee perfection every single time.
The Anatomy of a Chicken Disaster: Why Your Poultry Tastes Like Sawdust
To understand the cure, you first have to understand the disease. Why does chicken dry out so easily in the first place?
Raw meat is essentially a sponge made up of approximately 75% water, 20% protein, and 5% fat and carbohydrates. The proteins in a chicken breast, specifically myosin and actin, are structured like tightly bundled, microscopic ropes. In their raw, relaxed state, these protein ropes hold onto that 75% water content quite comfortably.
However, the moment you introduce heat, a violent physical reaction occurs. As the temperature of the meat rises, those protein ropes begin to contract and shrink. Imagine taking a soaking wet sponge and squeezing it as hard as you can in your fist. That is exactly what the muscle fibers are doing to the water inside the chicken. By the time the internal temperature of a chicken breast reaches 165°F (the FDA recommended safe minimum), those protein bundles have squeezed out a massive amount of their natural moisture.
This moisture loss is an inevitable part of the cooking process, but the severity of it is entirely up to you. When you cook an untreated piece of meat, it has zero defense mechanisms against this contraction. The water is forced out, pooling sadly in your pan, leaving behind a dense, stringy matrix of overcooked protein. It is one of the most classic rookie kitchen mistakes that plagues home cooks everywhere. You cannot stop heat from shrinking protein, but you absolutely can change the physical structure of that protein before it ever hits the pan.
What is Dry Brining? (And Why Wet Brining is Dead to Me)
If you have ever watched a Thanksgiving cooking show, you have probably heard of brining. For decades, the culinary world pushed “wet brining,” which involves completely submerging your poultry in a massive bucket of heavily salted water, often flavored with aromatics, sugar, and spices.
Let me be perfectly clear: I absolutely despise wet brining.
Yes, wet brining technically works. The salty water penetrates the meat, and through the magic of osmosis, the chicken absorbs some of that liquid. In laboratory tests, a chicken breast soaked in a 6% wet brine for eight hours can increase its raw weight by up to 10%. But here is the dirty little secret that wet-brine enthusiasts conveniently ignore: a massive percentage of that absorbed water is immediately lost during the cooking process anyway.
Furthermore, wet brining introduces a host of logistical nightmares. Who has the refrigerator space to house a five-gallon bucket of raw chicken water? It is a sloshy, unsanitary mess waiting to spill all over your fresh produce. Worse yet, wet brining actively works against your culinary goals. It waterlogs the surface of the meat, making it nearly impossible to achieve a proper, crispy sear. You are essentially boiling the exterior of your chicken in its own absorbed water before it can ever begin to brown.
Enter dry brining.
Dry brining is the elegant, lazy, scientifically superior alternative. It involves aggressively salting the bare surface of the raw meat and letting it rest, uncovered, in the refrigerator for anywhere from a few hours to a couple of days. There are no buckets, no sloshing water, and no diluted flavors. You use nothing but salt, time, and the natural moisture already present inside the bird. Once you understand the underlying mechanics, you will easily decode pretentious recipe jargon and realize that dry brining is just applied physics.
The Science of Osmosis: A No-Nonsense Chemistry Lesson
So, how does rubbing salt on a dry piece of meat make it juicier? It sounds entirely counterintuitive. Doesn’t salt draw moisture out? Yes, it does. But that is only step one of a brilliant three-step chemical waltz. Let us break down the exact timeline of a dry brine so you can see the magic happening in real-time.
Step 1: Extraction (The First 30 Minutes)
When you first apply kosher salt to the surface of a raw chicken breast, the salt immediately gets to work. Through the process of osmosis—where water moves from an area of low solute concentration to an area of high solute concentration—the salt aggressively pulls the natural juices out of the muscle fibers. If you look at your chicken after 15 to 30 minutes, you will panic. The surface will be covered in beads of liquid. It will look like you are ruining your dinner. Do not panic. This is exactly what is supposed to happen.
Step 2: Dissolution (Hours 1 to 2)
As those natural juices pool on the surface of the meat, they begin to interact with the solid salt crystals. The salt completely dissolves into the extracted chicken juice. What you have just created is a highly concentrated, natural liquid brine that is sitting directly on the surface of the meat. Unlike a wet brine, which uses tap water, this micro-brine is made of 100% pure, undiluted chicken flavor.
Step 3: Reabsorption (Hours 2 to 24)
This is where the patience pays off. Once the salt has dissolved into the surface moisture, the concentration gradient flips. The salty liquid is now drawn back deep into the muscle fibers of the meat. The chicken literally drinks its own seasoned juices back up. Because this process requires zero active effort on your part, it is a phenomenal way to cure cooking anxiety while prepping meals ahead of time.
Protein Denaturation: The Real Magic Trick
If dry brining only seasoned the meat deeply, it would still be worth doing. But the real reason dry brining yields incredibly juicy chicken has nothing to do with adding water, and everything to do with altering the physical structure of the meat itself.
Remember those tightly bundled protein ropes (myosin and actin) we talked about earlier? When the dissolved salt ions penetrate the muscle fibers, they carry an electrical charge that disrupts the physical bonds holding those proteins together. The salt effectively forces the tightly wound protein bundles to relax, unwind, and loosen up. In the scientific community, this process is known as protein denaturation.
Why does this matter? Because an unwound, relaxed protein matrix behaves very differently under heat than a tightly bundled one. When you cook a dry-brined chicken breast, the denatured proteins cannot contract nearly as violently as they normally would. Instead of squeezing together and forcing the water out, the relaxed protein strands actually form a web that traps the moisture inside the muscle tissue.
The results are not just anecdotal; they are mathematically proven. In controlled gravimetric trials, dry-brined whole-muscle proteins demonstrated up to 30% less total moisture loss during the cooking process compared to unbrined controls. Furthermore, because the meat is retaining its natural, undiluted juices rather than absorbing tap water, the chicken tastes profoundly more “chicken-y.” It is a massive upgrade that will help you master simple weeknight dinners with absolutely zero extra stress.
The Crispy Skin Equation: Mastering the Maillard Reaction
For those of us who love roasting skin-on chicken thighs or whole birds, dry brining offers a secondary, equally spectacular benefit: shatteringly crisp skin.
The enemy of crispy skin is moisture. If the surface of your chicken is wet when it enters the oven or hits the pan, the heat energy must first be used to boil and evaporate that surface water before the temperature of the skin can rise high enough to brown. This steaming effect results in rubbery, flabby, unappetizing skin.
When you dry brine poultry, you leave it uncovered in the refrigerator. Modern refrigerators are essentially giant dehumidifiers. They constantly circulate cold, incredibly dry air. Over the course of 12 to 24 hours, this dry air pulls the moisture out of the chicken’s skin, leaving it feeling tight, tacky, and almost leathery to the touch.
Because the skin is entirely devoid of surface moisture when it finally hits the heat, the browning process begins almost instantaneously. This browning is known as the Maillard reaction—a complex chemical interaction between amino acids and reducing sugars that creates hundreds of new flavor compounds. Clinical colorimetry tests have shown that dry-brining can accelerate surface browning onset by an astonishing 42%. If you truly want to master the Maillard reaction, surface dehydration is an absolute, non-negotiable prerequisite.
The Gear Check: Ditch the Toxic Junk Before You Cook
Now, before we get to the step-by-step masterclass, I need to have a very serious, mildly aggressive word with you about the equipment you are using to cook your beautiful, dry-brined chicken. Because all the food science in the world will not save you if you are searing your poultry in a scratched, peeling, toxic nightmare of a frying pan.
As your resident Sassy Sous-Chef, I have a strict “no-go” rule on garbage kitchenware. I am talking specifically about cheap, non-stick Teflon pans.
If you are still cooking on a non-stick pan that has visible scratches, flakes, or a dull finish, you need to throw it in the trash immediately. I am not being dramatic; I am looking out for your health. Non-stick coatings are made from polytetrafluoroethylene (PTFE), a synthetic fluoropolymer that belongs to a class of chemicals known as PFAS (per- and polyfluoroalkyl substances). These are widely referred to as “forever chemicals” because they do not break down in the environment or in the human body.
Recent studies published in 2025 by the University of North Carolina and various environmental health organizations have highlighted just how horrifying these degraded pans actually are. A single broken patch or scratch in a PTFE coating can release up to 2.3 million micro- and nanoparticles of plastic directly into your food in just 30 seconds of cooking. Let me repeat that: millions of toxic microplastics are leaching into the dinner you are feeding your family.
Furthermore, if you accidentally overheat a dry Teflon pan past 500°F (which is incredibly easy to do when trying to sear a chicken breast), the coating begins to thermally decompose. This decomposition releases toxic perfluorinated gases into your kitchen air. Inhaling these fumes causes a recognized medical condition known as “polymer fume fever,” commonly referred to as “Teflon flu,” which causes severe chills, fever, and respiratory distress. In fact, 2024 and 2025 saw a noticeable spike in reported cases of Teflon flu across the United States.
Stop poisoning yourself for the sake of an easy cleanup. It is time to graduate to adult cookware. If you are serious about banishing toxic kitchen gear, you need to invest in high-quality stainless steel, carbon steel, or enameled cast iron. Yes, these pans require a slight learning curve, but once you learn how to properly heat your pan and prevent protein adhesion, you will achieve a golden, crusty sear that a cheap non-stick pan could never dream of producing.
The Masterclass: How to Dry Brine Like a Pro
Alright, the science lesson is over, and the safety briefing is complete. It is time to get our hands dirty. Here is the definitive, step-by-step guide to dry brining your chicken.
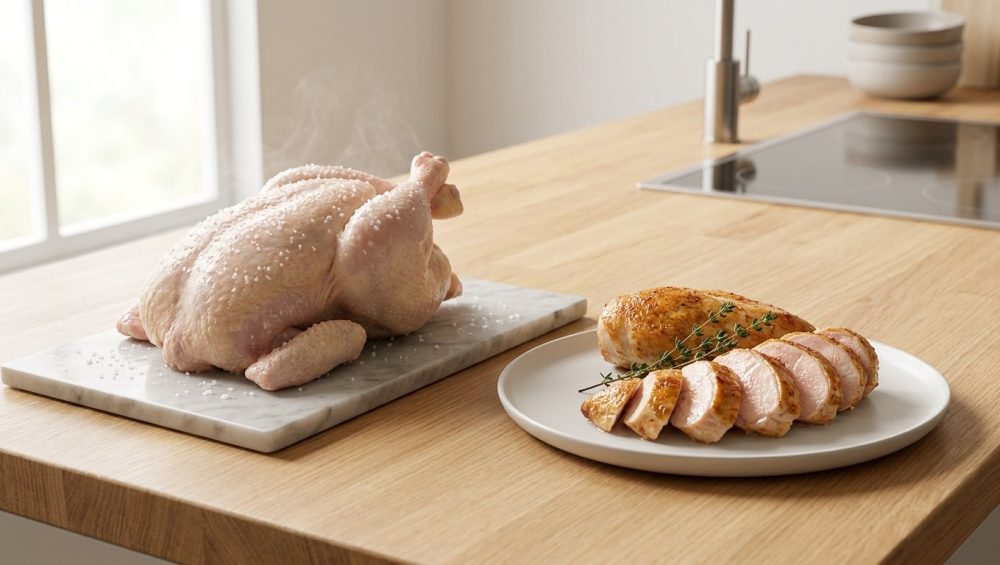
Step 1: The Great Drying
Remove your raw chicken from its packaging and aggressively pat it dry with paper towels. I mean really get in there. You want to remove as much surface moisture as humanly possible before the salt even touches the meat.
Step 2: The Salt Ratio
The biggest mistake people make when dry brining is using the wrong amount or the wrong type of salt. You cannot use iodized table salt for this. Table salt is too dense, tastes metallic, and is incredibly easy to over-apply. You must use Kosher salt. Diamond Crystal is the industry standard because its hollow, flaky structure adheres beautifully to meat and dissolves quickly.
If you want to be incredibly precise (which I highly recommend), you should use between 0.75% and 1.25% of the meat’s total weight in salt. For example, if you have a 1,000-gram pack of chicken thighs, you should use roughly 10 grams of kosher salt. If you do not own a kitchen scale—which is one of the essential tools every beginner needs—a good rule of thumb is about 1/2 teaspoon of Morton Kosher Salt, or 1 full teaspoon of Diamond Crystal Kosher Salt, per pound of meat.
Sprinkle the salt evenly over all sides of the chicken, holding your hand about 10 to 12 inches above the meat to ensure an even, snow-like distribution.
Step 3: Elevation and Airflow
Do not just throw the salted chicken onto a flat plate. The bottom of the meat will sit in its own juices, become soggy, and ruin the texture. You must place the chicken on a wire cooling rack set inside a rimmed baking sheet. This setup allows the dry refrigerator air to circulate a full 360 degrees around the meat. If you find that your pans twist and pop in the oven under high heat, you should read up on why your baking sheets keep warping and upgrade to heavy-gauge aluminized steel.
Step 4: The Waiting Game
Place the entire tray into the refrigerator, completely uncovered. Do not wrap it in plastic wrap, or you will defeat the entire purpose of surface dehydration.
How long should you wait?
- The “Express” Brine (2 to 4 hours): If you are in a rush on a Tuesday night, even a few hours will yield noticeable benefits. The salt will penetrate the outer layers, and you will achieve about 85% of the moisture retention benefits.
- The Sweet Spot (12 to 24 hours): This is the gold standard for chicken pieces (breasts, thighs, wings). The salt has fully penetrated to the center of the meat, the proteins are completely denatured, and the skin is beautifully dried out.
- The Whole Bird (24 to 48 hours): If you are roasting a whole chicken or turkey, give it a full two days. The density of the breast meat requires extra time for the salt ions to migrate all the way to the bone.
Cooking the Brined Bird: Bringing It All Together
When it is finally time to cook, remove the chicken from the fridge. You will notice that the flesh looks slightly darker, firmer, and completely dry to the touch.
Do not rinse the chicken. I cannot stress this enough. Rinsing the meat will reintroduce the exact moisture we just spent 24 hours trying to eliminate, and it will wash dangerous raw poultry bacteria all over your sink.
Because the surface is already dry, the chicken is ready to go straight into a hot pan or a preheated oven. If you are pan-searing, use a heavy stainless steel or cast iron skillet. Get the pan ripping hot, add a high-smoke-point oil (like avocado or grapeseed), and lay the chicken down away from you to prevent splattering. You will be amazed at how quickly and evenly it develops a rich, mahogany crust.
Finally, use a digital meat thermometer. Dry brining provides an incredible buffer against overcooking, but it is not a magical forcefield. Pull your chicken breasts right at 160°F (they will carry over to 165°F while resting) and your thighs at 175°F. Let the meat rest for at least 5 to 10 minutes before slicing. If you follow these exact steps, I promise you will confidently survive the kitchen and produce poultry that rivals your favorite local bistro.
Frequently Asked Questions (Troubleshooting Your Brine)
Even with a foolproof method, questions always pop up. Here are the most common dry-brining concerns I hear from readers, answered with absolute scientific clarity.
Can I dry brine frozen chicken?
Absolutely not. Salt cannot penetrate frozen cellular structures. The entire process relies on the salt extracting liquid, dissolving, and being reabsorbed. If the water inside the chicken is frozen solid, osmosis cannot occur. You must safely and completely thaw your poultry in the refrigerator before applying your dry brine.
Will my pan sauce or gravy be too salty?
This is a very valid concern. Because all the salt you applied is now trapped inside the meat, the pan drippings will be highly seasoned. If you plan to deglaze the pan to make a sauce, use unsalted butter and low-sodium broth. Taste your sauce before adding any additional seasoning. Nine times out of ten, the residual salt from the chicken drippings is more than enough to perfectly season the gravy.
Can I add other spices to my dry brine?
Yes, but with a caveat. You can absolutely mix black pepper, dried herbs, garlic powder, or citrus zest into your salt before rubbing it on the bird. However, remember that spices do not penetrate meat. Only salt (and to a lesser extent, sugar) has a molecular structure small enough to diffuse deep into muscle fibers. The herbs and spices will remain on the surface of the chicken, creating a wonderfully flavorful crust, but they will not flavor the interior of the meat.
Is it possible to over-brine the meat?
Yes. If you leave a chicken breast sitting in salt for four or five days, the proteins will break down too much. The meat will transition from tender to unpleasantly mushy, taking on a cured, ham-like texture. Stick to the 12 to 24-hour window for standard cuts, and max out at 48 hours for whole birds.
Final Thoughts from the Sassy Sous-Chef
Cooking is not about innate talent or possessing some mystical “chef’s intuition.” It is about understanding the fundamental rules of heat, moisture, and chemistry, and then using those rules to your advantage.
Dry brining is the ultimate testament to working smarter, not harder. By spending literally two minutes salting a piece of chicken on a Wednesday night, you are guaranteeing yourself a flawless, stress-free dinner on Thursday. You are protecting your expensive groceries from the harsh realities of heat, and you are elevating your home cooking to a level you probably didn’t think was possible.
So throw away that peeling Teflon pan, buy a box of good kosher salt, and give your chicken the respect it deserves. Your tastebuds—and your dinner guests—will thank you.


