
Picture this: You’ve spent the last three hours meticulously slicing raw fish, battling a bamboo rolling mat, and trying to keep sticky rice off your eyebrows. You proudly present a platter of beautiful homemade maki rolls to your friends. But by the time everyone actually sits down, pours a glass of wine, and takes a bite, it happens. The dreaded chew. The nori, which was supposed to be a delicate, crisp wrapper, has mutated into an unyielding layer of ocean-flavored rubber. You watch in horror as your guests politely gnaw at their food like golden retrievers with a new chew toy.
If you are tired of making seven rookie kitchen mistakes every time you try to host, you are in the right place. Grab a glass of whatever gets you through the evening, because we are going to fix this. We are going to dive deep into the moisture-transfer science of seaweed, the thermodynamics of rice, and how to entirely bypass the stress of rolling sushi by hosting a DIY hand roll (temaki) station.
Recent statistics from 2025 and 2026 show a massive cultural shift in how we entertain. A Talker Research survey revealed that 72% of people now prefer staying in with friends over going out to a restaurant. We are moving away from the rigid “experience economy” and entering the “belonging economy,” where people crave intimate, low-stress connections. But here is the catch: nearly 70% of hosts still report feeling intense performance pressure to make everything look flawless. It’s time to stop treating your kitchen like a Michelin-starred battleground. A meaningful dinner party doesn’t mean you have to do all the work. By making your guests assemble their own food, you inherently force everyone to slow down, connect, and eat mindfully.
The Science of the Sog: Why Your Nori Turns into Rubber
Let’s get one thing straight: soggy seaweed isn’t a reflection of your worth as a human being; it is simply a matter of physics. If you want to stop serving rubbery sushi, you need to understand the moisture migration matrix.
The Moisture Migration Matrix (Water Activity)
In the food science world, we talk a lot about “water activity” (Aw). This isn’t just the total moisture content of a food; it is the amount of free water available to migrate into other things (or breed bacteria).
Commercial nori is essentially a dehydrated sheet of red algae (specifically the Porphyra species). During the manufacturing process, the seaweed is washed, shredded, pressed into paper-like sheets, and aggressively dried, bringing its water activity down to an incredibly low level. This extreme dehydration is what gives a fresh sheet of nori that satisfying, brittle snap.
However, nori contains high amounts of a polysaccharide called porphyran. Porphyran is highly hydrophilic, meaning it is absolutely desperate to absorb moisture from its environment. When you take a bone-dry, moisture-starved sheet of nori and slap a generous layer of warm, steaming, highly-hydrated sushi rice right on top of it, you create a microscopic flash flood. The free water from the rice instantly migrates into the nori. The porphyran hydrates, swells, and transforms the brittle sheet into a pliable, leathery, and ultimately chewy membrane.
The Anatomy of Nori: Crispy by Nature, Chewy by Nurture
Think of nori like a culinary sponge. If you pre-make your sushi rolls an hour before your guests arrive, that sponge has sixty full minutes to soak up the humidity from the rice. By the time the roll hits the soy sauce, the structural integrity of the seaweed is completely compromised.
If you want the seaweed to snap when you bite into it, the time between the rice touching the nori and the nori touching your teeth must be measured in seconds, not minutes. This is one of those foolproof cooking secrets that separates the weekend hobbyist from the seasoned home cook.
The Temperature Trap: Why Cold Rice is a Culinary Crime
Now that we know warm rice ruins dry seaweed, you might be thinking, “Oh, I’ll just use ice-cold rice!” Stop right there. Put down the spatula. We need to have a serious talk about temperature, because cold sushi rice is an absolute culinary crime.
Starch Retrogradation and the Fridge Factor
If you want to decode pretentious recipe jargon, let’s look at “starch retrogradation.” Sushi rice is a short-grain Japanese variety (like Koshihikari) that is specifically chosen for its unique ratio of two starches: amylose and amylopectin. Short-grain rice is very high in amylopectin, which is what makes it beautifully sticky and cohesive when cooked.
When you cook rice, the starch granules absorb water, swell, and gelatinize, becoming soft and pliable. But when you put that cooked rice into the refrigerator, a thermodynamic nightmare occurs. The cold environment causes the starch molecules to rapidly realign and crystallize, squeezing out the water they previously absorbed. This process is called retrogradation, and it is the reason why leftover fridge rice feels like you are chewing on chalky little pebbles.
The Ideal Sushi Rice Temperature
So, if the rice can’t be steaming hot (because it ruins the nori) and it can’t be refrigerator-cold (because it turns into gravel), what is the sweet spot?
Body temperature.
Perfect sushi rice (shari) should be served at exactly body temperature, roughly 98°F (37°C). At this temperature, the starches remain relaxed and pliable, the rice grains cling to each other without turning to mush, and the volatile aromatic compounds in the vinegar seasoning are released perfectly onto your palate. Warm rice feels buttery in the mouth and enhances the flavor of the cold, raw fish you place on top of it.
The Masterclass: Crafting the Perfect Sushi Rice (Shari)
You cannot build a magnificent house on a crumbling foundation, and you cannot have a mind-blowing sushi night with garbage rice. Let’s walk through the exact steps to making shari that will make your guests weep with joy.
Sourcing the Right Grain
Do not try to make sushi with jasmine, basmati, or standard long-grain white rice. They do not have the correct amylopectin levels, and they will fall apart. You must buy short-grain Japanese rice. Look for bags labeled “sushi rice,” or specifically seek out varieties like Koshihikari or Sasanishiki.
The Wash, The Soak, and The Cook
- The Wash: You must wash your rice to remove the excess surface starch (amylose) left over from the milling process. If you skip this, your rice will turn into a gummy paste. Place the rice in a fine-mesh strainer or a designated wash bowl. Gently massage the grains under cold running water until the water runs mostly clear. Do not aggressively scrub them, or you will fracture the grains.
- The Soak: Once washed, let the rice soak in cool, clean water for 30 minutes at room temperature. This allows the core of the grain to hydrate, ensuring it cooks evenly from the inside out without bursting.
- The Cook: The ideal ratio is typically 1.15 parts water to 1 part rice by weight, but always check your specific package directions.
A Sassy PSA on Toxic Cookware
Before we move on to seasoning, we need to have a serious chat about your gear. I am formally banishing toxic kitchen gear from your life, starting with that cheap, scratched-up, Teflon-coated $20 rice cooker you bought in college.
Traditional non-stick coatings (PTFE/PFAS) degrade over time, especially when you are aggressively scooping sticky rice out of them. Once that coating scratches, it leaches forever chemicals right into your food. We do not serve a side of neurotoxins at our dinner parties.
If you are upgrading, invest in a high-quality stainless steel or ceramic-coated rice cooker (brands like Zojirushi, Aroma stainless, or GreenLife ceramic are excellent, safe choices). Alternatively, a heavy-bottomed stainless steel pot on the stove works beautifully because it provides even heat distribution without the toxic chemical baggage. Building a safe, minimalist kitchen setup means prioritizing materials that won’t slowly poison you.
The Vinegar Seasoning (Awase-zu) and the Hangiri
Once your pristine, non-toxic rice is cooked, it needs to be seasoned immediately while it is still piping hot. Heat keeps the starches mobile, allowing the seasoning to penetrate the grain.
The seasoning mixture (awase-zu) is a blend of rice vinegar, sugar, and salt. You can buy this pre-mixed, or make it yourself (roughly 4 tablespoons rice vinegar, 2 tablespoons sugar, and 1 teaspoon salt per 2 cups of uncooked rice, gently heated until dissolved).
This is where the most crucial piece of sushi equipment comes into play: the hangiri.
A hangiri is a wide, shallow, flat-bottomed wooden tub, traditionally made from Japanese cypress (sawara). Why wood? Because as you dump the hot rice into the tub and gently slice the vinegar mixture into it using a wooden paddle (shamoji), the unvarnished cypress actively absorbs the excess moisture from the hot rice.
If you try to season your rice in a glass or metal mixing bowl, the moisture has nowhere to go. It pools at the bottom, leaving you with a soggy, acidic swamp. The wide surface area of the hangiri also allows the rice to cool rapidly to that vital body temperature. Plus, let’s be honest, having a beautiful cedar tub sitting on your island is one of those aesthetic kitchen upgrades that instantly makes you look like a culinary genius.
Pro Tip: As you fold the vinegar into the rice, fan it with a paper fan (or a magazine, I won’t judge). The rapid evaporation of the surface moisture is what gives restaurant sushi rice that beautiful, glossy sheen. Once mixed and cooled to body temp, drape a damp towel over the hangiri to keep the rice from drying out while you set up the rest of the party.
The DIY Temaki Station: The Ultimate Mindful Sushi Night
You know the science. You have the perfect body-temperature rice. Now, how do we actually host this thing without losing our minds? Enter the DIY Temaki (Hand Roll) Station.
Why Temaki Solves the Soggy Nori Problem
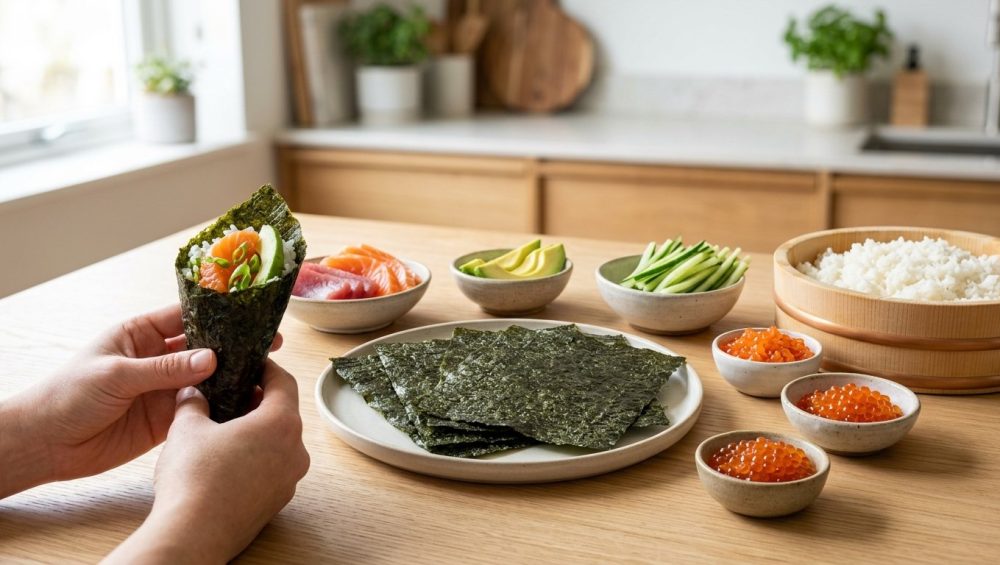
Temaki are casual, cone-shaped hand rolls that are assembled and eaten immediately. By turning your dinner party into a DIY temaki station, you completely eliminate the moisture transfer problem. The nori stays bone-dry until the exact moment your guest places the rice on it. They roll it, they bite it, it snaps. Perfection.
Furthermore, you are outsourcing the most stressful part of the dinner party—the actual cooking and assembling—to your guests. You don’t have to worry about how to save ruined meals or fix broken maki rolls that fell apart on the cutting board. Your only job is to prep the ingredients and look fabulous while drinking your wine.
The “Make-and-Eat-Immediately” Philosophy
There is a profound psychological benefit to a temaki party. We live in a world of distracted eating. But when you have to physically hold a delicate sheet of seaweed, carefully portion out warm rice, select your fish, and wrap it up by hand, you are forced to be present.
The “make-and-eat-immediately” rule naturally paces the meal. Guests eat one roll, chat, sip their drink, and then leisurely assemble another. It breaks the ice, encourages conversation, and transforms dinner from a passive consumption event into an interactive, mindful ritual.
Staging Your Ingredients: A Stress-Free Hosting Strategy
A successful temaki night is 90% prep and 10% execution. Your goal is to have everything chopped, sliced, and plated before the first guest rings the doorbell.
Prep Zones and Mise en Place
To master the art of food plating for a crowd, you need to set up distinct zones on your dining table or kitchen island.
- The Foundation Zone: This is where your hangiri of warm rice lives, alongside a stack of crisp nori sheets and a few wooden rice paddles.
- The Protein Zone: Platter your raw fish, cooked shrimp, or marinated tofu over a bed of ice (covered in plastic wrap) to keep them food-safe and chilled throughout the evening.
- The Veggie & Crunch Zone: Small, beautiful bowls filled with julienned cucumbers, avocado slices, microgreens, and tempura flakes.
- The Flavor Zone: Ramekins of soy sauce, pickled ginger, wasabi, and spicy mayo.
Sourcing Safe, Sustainable Seafood
If you are serving raw fish, do not just buy a random salmon fillet from the discount bin at the supermarket. You need fish that is graded for raw consumption. Look for “sushi-grade” or “sashimi-grade” Saku blocks (pre-trimmed, uniformly shaped blocks of fish that are flash-frozen at sea to kill parasites).
If you are intimidated by raw fish, skip it! A temaki party is incredibly versatile. You can serve:
- Tempura shrimp or baked dynamite crab.
- Teriyaki glazed chicken strips.
- Spicy canned tuna mixed with kewpie mayo and sriracha (a highly underrated, cheap, and delicious option).
- For a plant-based crowd: soy-marinated shiitake mushrooms, roasted sweet potato batons, and tamagoyaki (Japanese rolled omelet).
The Supporting Cast: Veggies, Sauces, and Crunches
Texture is everything in a hand roll. You already have the warm, soft rice and the crisp snap of the nori. Now you need internal crunch.
- Vegetables: Cut your cucumbers and carrots into matchsticks (julienne). Slice avocados right before serving and hit them with a tiny squeeze of lemon juice to prevent oxidation.
- Sauces: Put your spicy mayo and eel sauce (unagi tare) into cheap plastic squeeze bottles. It makes the guests feel like professional chefs when they drizzle it over their creations.
- The Crunch: Buy a bag of tenkasu (tempura flakes) or toasted sesame seeds to sprinkle inside the roll for a highly addictive textural contrast.
Keeping Nori Crispy: Storage and Serving Secrets
We have gone to great lengths to ensure our rice doesn’t ruin our nori, but ambient humidity is still the enemy.
Desiccants and Toasting
When you buy a package of high-quality roasted seaweed (yaki-nori), it will come with a little silica gel packet. Do not throw this away until the package is empty! That desiccant is working overtime to keep the water activity low.
Only take out the exact amount of nori you need for the first 20 minutes of the party. Keep the rest sealed in the bag. If you live in a humid climate and your nori starts to feel a little limp, you can revive it. Briefly wave the sheet of nori high over an open gas stove flame for about two to three seconds. The ambient heat will flash-evaporate the surface moisture and restore its brittle snap.
The Half-Sheet Rule for Hand Rolls
Standard nori comes in large square sheets (about 7.5 x 8 inches). This is too big for a temaki roll. You need to cut the sheets in half.
Simply fold the nori sheet in half along its natural seam and press the crease firmly. It should snap cleanly in two, leaving you with two rectangular pieces. When your guests are ready to eat, they will hold the rectangle in their non-dominant hand, place a golf-ball-sized dollop of rice on the left third of the sheet, add their fillings diagonally, and roll it up into a tight little cone.
Conclusion: Reclaiming the Dinner Party
Hosting a dinner party shouldn’t require a culinary degree, a panic attack, or a week of scrubbing burnt pans. By understanding the simple science of moisture transfer and starch thermodynamics, you can elevate a basic meal into an unforgettable culinary experience.
A DIY temaki station is the ultimate hack for the modern home cook. It respects the integrity of the ingredients, keeping the rice warm and the seaweed perfectly crisp. More importantly, it shifts the focus away from your performance as a host, and places it squarely on the shared experience of the table.
You aren’t just feeding people; you are curating an environment where everyone can unplug, get their hands a little messy, and laugh over lopsided sushi rolls. That is how you turn a chaotic evening into a peaceful daily habit of gathering and connecting. So go buy a beautiful wooden hangiri, source some great fish, and let your guests do the rolling. Your sanity—and your seaweed—will thank you.






