
The French Fry Fallacy: Why We Accept Mediocrity
Let us have a brutally honest conversation about the state of home-cooked french fries. If you are like most weekend culinary hobbyists, your relationship with making fries at home is fraught with anxiety, logistical nightmares, and ultimate disappointment. You have likely been conditioned to believe that achieving the shatteringly crisp, golden-hued, fluffy-centered perfection of a restaurant-quality fry requires a commercial deep fryer, a degree from a French culinary institute, and a willingness to turn your kitchen into a grease-slicked hazard zone.
Because of this deeply ingrained culinary myth, we settle for mediocrity. We buy bags of frozen, factory-extruded potato sticks and bake them into sad, desiccated submission. Or worse, we attempt the traditional restaurant frying method at home, only to end up with limp, greasy, structurally compromised potato wedges that taste like regret.
The traditional protocol for perfect fries—championed by every pretentious culinary textbook—is the infamous blanch-and-double-fry method. It dictates that you must first rinse the cut potatoes to remove surface starch. Then, you must blanch them in simmering water (or low-temperature oil) to cook the interior. After that, you must meticulously drain and cool them, often requiring a stint in the freezer to retrograde the starches. Finally, you must plunge them into a roaring 375°F (190°C) vat of oil for a second fry to develop the crust.
Who has the time, the counter space, or the sheer willpower for this on a random Tuesday night? If you are already fighting a dull knife just to prep your root vegetables, the last thing you want to endure is a three-hour, multi-stage cooking process that leaves your stovetop looking like a crime scene.
But what if I told you that everything you have been taught about deep-frying potatoes is completely unnecessary for the home cook? What if you could bypass the boiling, the freezing, the double-frying, and the violent, terrifying splatter of dropping wet potatoes into boiling fat? You can. The secret lies in a brilliant, scientifically validated technique that sounds like absolute culinary heresy: the cold-oil start. By submerging raw potatoes in ambient-temperature oil and gradually bringing the entire system up to frying temperature, you can manipulate the thermodynamics of the potato to do all the hard work for you.
The Science of the Sag: What Makes a Fry Limp?
To understand why the cold-oil method is a stroke of absolute genius, we first have to understand the enemy. Why do home-cooked fries go limp in the first place? The answer lies in a microscopic battle between water, starch, and pectin.
The Steam-Trap Effect
A raw potato is essentially a biological water balloon. It is composed of roughly 80 percent water, held together by a rigid matrix of plant cell walls. When you drop a raw, wet piece of potato directly into a pot of 350°F (177°C) oil, you initiate a violent, chaotic thermal reaction.
The surface of the potato is instantly hit with massive heat. The surface moisture vaporizes in a fraction of a second, expanding in volume by over a thousand times, which causes the terrifying bubbling and splattering that makes amateur cooks fear deep frying. Because the exterior is dehydrated so rapidly, the starches on the surface immediately gelatinize and then harden into a rigid crust.
Here is the fatal flaw: while the outside is forming a hard shell, the interior of the potato is still trying to catch up. The heat slowly penetrates the core, turning the massive amount of internal water into steam. But because the exterior crust has already sealed shut, that internal steam has nowhere to go. It becomes trapped inside the fry.
As long as the fry remains in the hot oil, the internal pressure keeps the fry looking plump and crispy. However, the moment you remove the fry from the oil and it begins to cool, the thermodynamics reverse. The trapped steam condenses back into liquid water. That liquid water permeates the rigid exterior crust from the inside out, turning your beautiful, crispy shell into a soggy, wet sponge within minutes. This is the steam-trap effect, and it is the primary reason your fries suffer structural failure.
Pectin, Starch, and the Anatomy of a Russet
Not all potatoes are created equal, and understanding their chemical makeup is non-negotiable if you want to achieve fry perfection. Potatoes are generally categorized on a spectrum from waxy to starchy. Waxy potatoes, like red potatoes or fingerlings, have high moisture content and low starch. They hold their shape beautifully in a potato salad, but if you try to fry them, their lack of starch and excess water will guarantee a greasy, floppy disaster. You don’t need a digital kitchen scale to know that a high-starch potato simply feels denser, drier, and more substantial in your hand.
For the ultimate french fry, you must use a high-starch potato, specifically the Russet Burbank. Russets have a low moisture content and are packed with large starch granules. These starch granules are composed of two primary molecules: amylose and amylopectin. Amylose is a long, straight-chain molecule that cooks up dry and fluffy, while amylopectin is a highly branched molecule that tends to become gummy and sticky when heated. Russets have a remarkably high ratio of amylose, which is exactly what gives a perfect fry its cloud-like, baked-potato interior.
But starch is only half the story. The cells of the potato are glued together by a carbohydrate polymer called pectin. In its raw state, pectin is firm and rigid. When heated, pectin breaks down, allowing the potato cells to separate and become tender. However, potatoes also contain an enzyme called pectin methylesterase (PME). When activated by gentle heat (between 140°F and 158°F, or 60°C to 70°C), PME chemically alters the pectin, cross-linking it with calcium ions and actually strengthening the cell walls.
In traditional cooking, dropping a potato into boiling water or hot oil rapidly bypasses this enzyme-activation window, causing the pectin to break down completely and turn the potato to mush. We need a method that respects the starch, manages the water, and exploits the pectin.
Enter the Cold Oil Start: A Thermodynamic Miracle
The cold-oil frying method, popularized by culinary legends like Joël Robuchon and rigorously tested by modern food scientists, completely flips the script on deep frying. It is not a shortcut born of laziness; it is an objective improvement based on the laws of thermodynamics.
Bypassing the Double-Fry Dogma
The traditional double-fry method attempts to solve the steam-trap effect by breaking the cooking process into two distinct stages. The first fry (or blanch) is done at a lower temperature (around 325°F/163°C). This allows the heat to penetrate to the center of the fry, cooking the starches and evaporating some of the water without browning the exterior. The fries are then removed, cooled, and dropped into a second, much hotter vat of oil (375°F/190°C) to rapidly dehydrate the surface and form a crust.
The cold-oil method achieves this exact same two-stage thermal progression, but it does so in a single, uninterrupted, highly efficient step. By placing the raw potatoes into a pot of ambient-temperature oil (around 70°F/21°C) and then applying heat, you are forcing the oil and the potatoes to rise in temperature together.
The Gradual Gelatinization Process
As the burner transfers heat to the heavy pot, the oil temperature begins a slow, steady climb. Because the potatoes are submerged from the very beginning, their internal temperature rises in perfect synchronization with the oil.
When the oil reaches the 136°F to 158°F (58°C to 70°C) window, a magical sequence of events occurs. First, the pectin methylesterase (PME) enzyme is activated. It begins cross-linking the pectin in the potato’s cell walls, building a microscopic structural scaffold that will prevent the fry from disintegrating later in the process. You don’t even need a meat thermometer to monitor this internal temperature; the steady physics of the heating oil handle the timing naturally.
Simultaneously, the starch granules inside the potato begin to absorb whatever local moisture is available and swell—a process known as starch gelatinization. Because the oil is not yet hot enough to instantly dehydrate the surface and form a crust, the potato’s internal water is free to gently boil off. As the oil temperature climbs past 212°F (100°C), the subsurface water evaporates steadily, escaping as a constant stream of tiny bubbles rather than a violent, splattering explosion.
By the time the oil finally reaches the Maillard browning zone—around 300°F to 350°F (150°C to 177°C)—the interior of the potato is already fully cooked, and the vast majority of the problematic moisture has been gracefully evacuated. Only then does the exterior pectin network and gelatinized starch harden into a glass-like crust. Because the internal moisture is already gone, there is no steam left to trap. The result is a fry that stays shatteringly crisp long after it has cooled.
The Essential Gear: No Toxic Junk Allowed
I have zero patience for cheap, disposable kitchenware, and neither should you. When you are dealing with large volumes of boiling oil, your equipment is a matter of both culinary success and physical safety. If you are attempting to deep fry in a scratched-up, mystery-metal pot coated in peeling Teflon, we need to have a serious intervention.
The Heavy-Gauge Cast-Iron Dutch Oven
For the cold-oil method to work flawlessly, you need a vessel with massive thermal capacity. Thin, cheap aluminum or stainless steel pots heat up far too quickly and unevenly. The same flimsy metal that makes your baking sheets warp under the broiler will create dangerous hot spots on the stove, causing the oil to heat erratically and potentially scorch the potatoes before their internal moisture has time to escape.
You must use a heavy-gauge cast-iron Dutch oven, preferably enameled, though bare cast iron works exceptionally well too. Cast iron is a poor conductor of heat, but it is an unparalleled retainer of heat. It absorbs the thermal energy from your burner and radiates it into the oil smoothly and consistently, ensuring a perfectly gradual temperature climb.
Furthermore, a Dutch oven has high, straight walls. Even though the cold-oil method eliminates the violent splatter of traditional frying, the oil will still bubble vigorously as the water evaporates. High walls provide a crucial safety margin to prevent the oil from boiling over onto an open flame. And when you are done, cleaning up a high-quality enameled or seasoned cast-iron pot is as simple as wiping it out and giving it a quick, gentle pass with a chainmail scrubber to remove any residual starch.
High-Oleic Cooking Oil: The Unsung Hero
You cannot use just any fat for a process that involves bringing oil from room temperature up to 350°F over the course of 25 minutes. You need a highly stable, refined cooking oil with a high smoke point and a neutral flavor profile.
When oils are exposed to prolonged heat, they undergo thermal degradation, breaking down through hydrolysis, oxidation, and polymerization. This breakdown produces free fatty acids, which lower the smoke point, create acrid, bitter flavors, and fill your kitchen with obnoxious smoke. Unrefined oils, like extra-virgin olive oil or unrefined coconut oil, contain particulate matter and flavorful compounds that will burn long before the oil itself degrades.
Leave those toxic aerosol cooking sprays and cheap, highly oxidized seed oils on the supermarket shelf. For this method, you should invest in a high-oleic oil. High-oleic oils have been specifically bred or processed to contain higher amounts of monounsaturated fats, making them incredibly stable under prolonged heat.
Refined avocado oil is the gold standard, boasting a staggering smoke point of 520°F (271°C). Refined safflower oil (510°F/266°C), high-oleic peanut oil (450°F/232°C), and high-oleic canola oil (475°F/246°C) are also exceptional choices. They will survive the gradual heating process without breaking a sweat, ensuring your fries taste like pure, roasted potato rather than burnt, degraded fat.
The Step-by-Step Masterclass: Cold-Oil Frying
Now that we have dismantled the myths and established the science, it is time to execute. This method is shockingly simple, but it demands strict adherence to a few key rules. Do not rush the process, and do not interfere with the physics.
Phase 1: The Prep and Submersion
Begin by selecting large, firm Russet potatoes. You can peel them if you prefer a classic, uniform look, but leaving the skin on adds a wonderful rustic texture and a slight earthy bitterness that balances the richness of the oil.
Cut the potatoes into uniform batons, roughly 3/8-inch thick. Uniformity is critical here; if you have wildly varying sizes, the thin fries will turn to bitter, burnt shards before the thick fries have finished expelling their moisture. Scoop up your perfectly uniform batons with a stainless steel bench scraper and drop them straight into your heavy Dutch oven.
In traditional frying, you must rigorously rinse and dry the potatoes to remove surface starch. In the cold-oil method, this is entirely optional. Because the oil starts cold, the surface starches do not immediately seize and burn. However, if you choose to rinse them, you must dry them with absolute fanaticism using a clean kitchen towel. Any excess surface water will disrupt the oil-to-potato ratio and prolong the boiling phase.
Place the cut potatoes into the cold Dutch oven. Pour your high-oleic oil directly over the potatoes just until they are completely submerged. You do not need a massive vat of oil; the oil should only cover the potatoes by about half an inch. This typically requires around 1.5 to 2 quarts of oil, depending on the diameter of your pot.
Phase 2: The Gradual Climb
Place the Dutch oven on the stove and turn the burner to medium-high heat. Now comes the hardest part for any anxious home cook: do absolutely nothing.
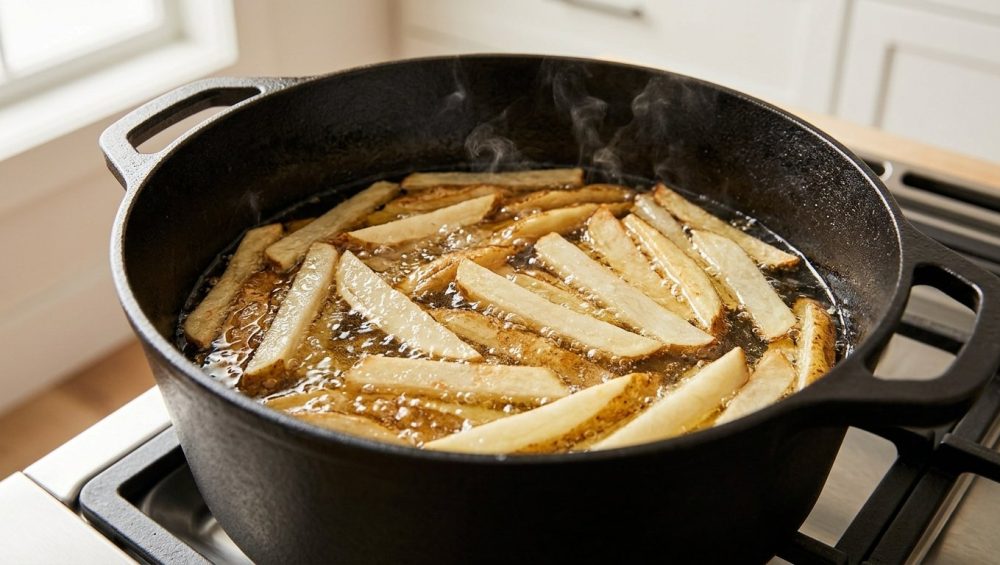
As the oil heats up, it will begin to bubble gently, and then vigorously. The pot will look less like a deep fryer and more like a rolling, violent boil. The oil will turn cloudy as the starches gelatinize and the water escapes.
During this phase—which usually lasts between 15 and 20 minutes—the potatoes are undergoing massive structural changes. Their pectin is breaking down, and they are incredibly fragile. If you shove a spatula in there and start stirring, you will snap the fries into a hundred miserable little pieces. Leave them alone. The rolling action of the boiling water escaping from the potatoes is enough to keep them from sticking to the bottom of the cast-iron pot.
Phase 3: The Golden Finish and Extraction
Around the 20-minute mark, you will notice a distinct shift in the behavior of the pot. The violent, rolling boil will begin to subside, transitioning into a tighter, more aggressive sizzle. This is the acoustic signal that the vast majority of the water has evaporated.
Simultaneously, the fries will begin to float to the surface of the oil, and the oil will clarify. The exterior crust has finally begun to set, and the Maillard reaction—the chemical reaction between amino acids and reducing sugars that gives browned food its distinctive flavor—is taking over.
Now, and only now, can you gently agitate the fries. Use a wooden spoon or a pair of long tongs to gently separate any batons that may have fraternized during the boil. Continue frying for another 5 to 10 minutes until the fries achieve a deep, golden-brown hue.
When they reach the perfect color, do not turn off the heat just yet. You must extract the fries while the oil is still roaring hot. Fish them out gently using a stainless steel spider skimmer to leave the hot oil behind.
Set up your draining station in advance using a bare aluminum sheet pan lined with a single layer of paper towels. But do not just dump the fries on the paper towels. Paper towels absorb oil, but they also trap steam against the bottom of the food. Top the pan with a wire cooling rack so air can circulate beneath the fries, preventing soggy bottoms. As soon as the fries hit the rack, shower them aggressively with fine sea salt. The residual surface lipids are still hot and liquid, acting as the perfect glue to bind the salt to the crust.
Troubleshooting the Cold-Oil Method
Even a fail-proof, scientifically backed method can fall victim to human error. If your cold-oil fries are not the best thing you have ever eaten, you likely committed one of two cardinal sins.
Why Did My Fries Turn Out Greasy?
The most common complaint from skeptics of this method is the assumption that starting potatoes in cold oil will result in a greasy, oil-logged mess. This is a fundamental misunderstanding of frying physics. Food does not absorb oil simply by sitting in it; it absorbs oil when the internal pressure of the food drops, creating a vacuum that pulls surface oil inward.
During the cooking process, the outward pressure of the escaping steam physically prevents the oil from penetrating the potato. Oil absorption only happens at the very end of the cooking process, when the fry is removed from the heat and begins to cool.
If your fries are greasy, it is because you allowed the oil temperature to plummet at the end of the cook, or worse, you turned the burner off while the fries were still submerged. You must maintain high heat right up until the moment of extraction. The oil needs to be at its maximum temperature (around 350°F) when you pull the fries out, ensuring the crust is fully set and the surface oil drains off instantly.
The Crowding Conundrum
In traditional deep frying, overcrowding the pot is a death sentence. Dropping too much cold, wet food into hot oil drops the temperature drastically, ruining the crust and resulting in greasy food.
The cold-oil method is incredibly forgiving of overcrowding, but it still has limits. Because you are starting cold, you don’t have to worry about crashing the temperature. However, you do have to worry about water volume. If you pack the Dutch oven to the brim with potatoes, the sheer volume of water attempting to evaporate all at once can cause the oil to foam up and boil over the sides of the pot.
As a strict rule, never fill your Dutch oven more than halfway with the potato-and-oil mixture. You must leave at least two to three inches of clearance at the top of the pot to accommodate the violent bubbling phase. If you need to make fries for a massive crowd, do it in two separate pots, or resign yourself to doing two batches (which, admittedly, requires letting the oil cool back down to room temperature between runs).
The Verdict: Reclaiming Your Time and Your Sanity
Cooking should not be a performative exercise in masochism. You do not need to subject yourself to the exhausting, multi-stage rigmarole of commercial kitchens just to enjoy a phenomenal side dish on a weeknight.
The cold-oil start is a testament to the power of working smarter, not harder. By understanding the thermodynamics of starch gelatinization, pectin breakdown, and steam evaporation, you can bypass the traditional rules entirely. You save time, you eliminate the terrifying splatter of hot oil, you reduce your cleanup to a single pot, and you produce a french fry that is structurally superior to 90 percent of the restaurants in your city.
Stop settling for limp, soggy oven-baked compromises. Secure a heavy cast-iron pot, buy a bag of starchy Russets, and let the physics of ambient oil do the heavy lifting. You are a home cook, not a line cook—it is time you started cooking like the boss of your own kitchen.






