
The Michelin Tire Dilemma: Why We Keep Ruining Perfectly Good Shrimp
There is a special place in culinary purgatory for people who cook shrimp until it resembles a pencil eraser. You know exactly what I am talking about. You come home after a long day, exhausted but determined to make a quick, elegant weeknight dinner. You buy a beautiful pound of expensive crustacean, toss it into a skillet, and somehow, within three minutes, you have managed to transform a delicate, sweet protein into a chewy, rubbery Michelin tire.
It is a tragedy, really, especially considering how much of this stuff we eat. In the United States alone, commercial fishermen land millions of pounds of seafood annually, and shrimp consistently ranks as one of the top three most consumed seafood products in the nation. We are driving a domestic shrimp market that is projected to reach a staggering $17.83 billion by 2026 and $28 billion by 2034. We are buying it in droves, yet the vast majority of home cooks are completely butchering the execution on a nightly basis.
Listen up, buttercup: you do not need a culinary degree from Le Cordon Bleu to make restaurant-quality seafood in your own kitchen. What you actually need is a basic understanding of thermal physics, a little bit of chemistry, and the discipline to step away from the stove before things go sideways. Shrimp is the ultimate weeknight protein because it cooks in literal minutes, but that speed is a double-edged sword. The margin of error is virtually nonexistent. If you look away to check your phone, you have already overcooked dinner.
Today, we are going to fix this once and for all. We are going to dive deep into the rapid protein coagulation of shellfish, decode the visual alphabet of doneness, and introduce you to a ridiculously simple 15-minute alkaline brine that will guarantee plump, juicy, snappy shrimp every single time.
The Science of Shrimp: Why Rapid Protein Coagulation is Your Enemy
To understand why your sautéed shrimp keeps turning out like a dog chew toy, we have to put on our lab coats and look at the biological structure of the animal. Cooking is not magic; it is applied chemistry and thermodynamics.
Muscle Fibers and the Lack of Connective Tissue
Terrestrial animals—like cows and pigs—have to walk around on land, fighting gravity. As a result, their muscles are loaded with thick, tough connective tissue (collagen) that requires long, slow cooking times to break down into gelatin. Shrimp, on the other hand, live in a buoyant aquatic environment. They do not need heavy connective tissue to support their body weight. Their muscle structure is incredibly delicate, composed primarily of short, easily digestible fibers called myosin and actin.
Because of this delicate structure, seafood inherently possesses a much higher moisture content than beef or poultry. When you apply heat to a shrimp, you are not trying to break down tough collagen; you are simply trying to gently warm and set those short muscle fibers without squeezing all the natural water out of them.
Heat and Moisture Loss: The 140°F Tipping Point
When raw protein is exposed to heat, it undergoes a process called coagulation. The tightly folded protein molecules begin to unwind (denature) and then link up with each other, forming a new, solid structure. In a perfectly cooked shrimp, this protein web sets just enough to turn the flesh opaque and provide a pleasant, snappy bite.
However, the temperature window for this perfect state is microscopic. The sweet spot for shrimp doneness is an internal temperature of roughly 120°F to 125°F. At this stage, the proteins have coagulated beautifully, and the meat remains tender and juicy. But the moment the internal temperature creeps past 130°F, and especially as it hits the dreaded 140°F mark, myosin denaturation goes into absolute overdrive.
At 140°F, the protein web rapidly shrinks and tightens, acting like a microscopic sponge being violently wrung out by an invisible hand. All that precious internal moisture is aggressively expelled into the pan. The structural integrity of the meat collapses into a dense, tightly wound knot of dry fibers. You might be tempted to carefully monitor this with a gadget, but unless you have lightning-fast reflexes, your meat thermometer is lying to you by the time it accurately registers the core temperature of such a tiny, fast-cooking ingredient. By the time the dial hits 125°F, the carryover cooking will push it well past 140°F, and your dinner is officially ruined.
The Alkaline Advantage: The Baking Soda Brine That Changes Everything
If the margin for error is so incredibly small, how do professional kitchens pump out hundreds of perfectly snappy shrimp dishes every night without a single rubbery casualty? They cheat. And by cheat, I mean they use chemistry to stack the deck in their favor.
Enter the alkaline dry brine. This is the single greatest weeknight seafood hack in existence, and it is going to fundamentally change the way you cook.
How a Higher pH Prevents Protein Bonding
Baking soda (sodium bicarbonate) is an alkaline substance, meaning it has a high pH (around 8.5). When you toss raw shrimp in a tiny amount of baking soda, you raise the pH on the surface of the meat. This shift in alkalinity does something truly magical to the physical structure of the shrimp: it alters the electrical charge of the muscle proteins.
By changing the charge, the baking soda physically prevents the myosin proteins from bonding too tightly to one another when exposed to the high heat of your skillet. If the proteins cannot tightly link and contract, they cannot wring out their internal moisture. The result? The shrimp acts as a moisture vault, retaining its natural juices and cooking up with a distinctly plump, crisp, and snappy texture that mimics the finest restaurant seafood.
The Precise Ratios for Your Weeknight Brine
You cannot just dump a mountain of baking soda onto your seafood, unless you want your dinner to taste like a metallic, soapy science experiment. Precision is key here.
The golden ratio, extensively tested and verified by culinary institutions like America’s Test Kitchen and Serious Eats, is as follows: For every one pound of raw, peeled shrimp, use exactly 1 teaspoon of kosher salt and 1/4 teaspoon of baking soda.
Simply toss the shrimp with the salt and baking soda in a bowl, ensuring they are evenly coated. Then, walk away. Let them sit in the refrigerator for exactly 15 to 30 minutes. This short resting period is the ultimate multitasking window, making it a flawless addition to your chaotic cooking routine. While the chemistry works its magic, you have exactly enough time to chop your aromatics, boil your pasta, and get your skillet screaming hot.
Visual Cues: The Alphabet of Doneness (The ‘C’ vs. ‘O’ Rule)
Because using a thermometer on a shrimp is an exercise in futility, you have to learn to cook with your eyes. Shrimp are incredibly communicative ingredients; they will literally spell out their doneness for you if you know how to read them. As the proteins coagulate and contract, the physical shape of the shrimp changes drastically.
Memorize the alphabet of doneness: the “U”, the “C”, and the “O”.
“U” is for Undercooked (and Unsafe)
When a shrimp first hits the hot pan, it is a translucent, unappetizing gray (unless you are cooking certain wild red varieties). As the heat begins to penetrate, the shrimp will start to curl very slightly, forming a lazy, open “U” shape.
At this stage, the exterior might be starting to turn pink, but if you look closely at the thickest part of the back, the flesh is still glossy and translucent. Do not pull them yet. If you bite into a “U” shaped shrimp, the texture will be unpleasantly soft, mushy, and entirely undercooked.
“C” is for Cooked (and Congratulations)
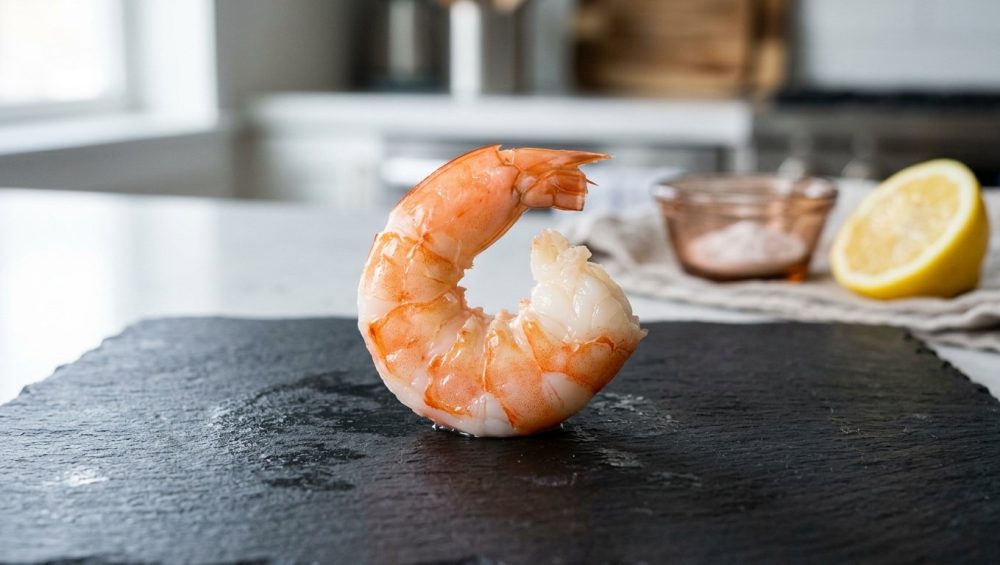
This is the holy grail. As the internal temperature crosses the 120°F threshold, the proteins contract just enough to pull the head and the tail toward each other, forming a perfect, loose “C” shape.
Visually, the shrimp has undergone a complete transformation. The entire body is now a vibrant pink and orange, and the flesh has turned completely opaque white with a dull, matte finish, having lost all of its raw glossiness. If you gently press the thickest part of the shrimp with your tongs, it will feel firm to the touch but will still yield with a springy, tender bounce. The moment you see the “C,” you must immediately remove them from the heat.
“O” is for Overcooked (and Oh, No)
If you turn your back to pour a glass of wine, the “C” will rapidly collapse into an “O”. The proteins have now reached that catastrophic 140°F tipping point. The extreme contraction forces the tail to tightly curl inward until it touches or overlaps the head, forming a closed circle or a tight “O” shape.
At this point, the shrimp is bright, stark white, and heavily shrunken. You might even see a white, gooey substance leaking out of the sides—this is albumin, a liquid protein that has been violently squeezed out of the muscle fibers. If you press an “O” shaped shrimp, it will feel incredibly stiff, bouncing back aggressively like a rubber ball. You have officially ruined dinner.
The Right Gear: Ditch the Toxic Pans and Sear Like a Pro
I have zero patience for pretentious chef-speak, but I have even less patience for terrible kitchen equipment. You can buy the most expensive, sustainably sourced wild Gulf shrimp on the market, but if you drop it into a cheap, warped pan, you are setting yourself up for failure.
The Danger of Cheap Non-Stick Coatings
Let us get one thing straight: you cannot get a proper, flavorful sear on a cheap Teflon pan. Traditional non-stick coatings are designed for low-to-medium heat applications, like scrambling eggs or flipping pancakes. When you crank the heat to high—which is absolutely required for a fast, aggressive shrimp sear—those cheap chemical coatings begin to degrade, off-gas, and eventually peel directly into your food.
If you are cooking on a scratched, peeling surface, you are actively ruining your nonstick pans while simultaneously ingesting mystery chemicals. Throw them in the trash where they belong.
What to Use Instead: Carbon Steel and Stainless
To cook shrimp correctly, you need a pan with excellent thermal mass—something that gets screaming hot and stays screaming hot when a pound of cold, wet seafood is dropped into it.
Your best friends here are a heavy-bottomed tri-ply stainless steel skillet, a well-seasoned cast iron pan, or a traditional carbon steel wok. These materials can handle the blistering heat required to trigger the Maillard reaction (the chemical process that creates that beautiful, savory brown crust on the outside of your food) without instantly dropping in temperature.
Are you terrified of your delicate seafood tearing in a stainless steel pan? Don’t be. The secret is proper preheating and utilizing the Leidenfrost effect. If you heat your pan properly until a drop of water dances and glides across the surface like a mercury bead, you create a microscopic barrier of steam that prevents sticking. If you skip this preheating step, your food always sticks, tearing your beautiful shrimp to shreds.
Step-by-Step Masterclass: Flawless Sautéed Shrimp Every Single Time
We have covered the biology, the chemistry, the visual cues, and the metallurgy. Now, let us put it all together into a foolproof, step-by-step masterclass for your next weeknight dinner.
Step 1: The Thaw (Don’t You Dare Use the Microwave)
Most of the shrimp you buy at the grocery store—even the stuff sitting on ice behind the seafood counter—was flash-frozen on the boat. Buying bags of frozen shrimp is actually the smartest, most economical choice for a home cook.
However, how you thaw them dictates your success. Never, under any circumstances, put frozen shrimp in the microwave. You will partially cook the outside while the inside remains frozen solid. Instead, place the frozen shrimp in a colander and submerge them in a large bowl of cold tap water. They will safely thaw in about 15 to 20 minutes.
Step 2: The Alkaline Brine (15 Minutes to Plumpness)
Once thawed, peel the shrimp (leave the tails on if you want a built-in handle for eating, or remove them if you are tossing them into a pasta). Place the raw, peeled shrimp into a bowl.
Apply the magic ratio: 1 teaspoon of kosher salt and 1/4 teaspoon of baking soda per pound of shrimp. Toss them vigorously until every single shrimp is coated in the invisible alkaline shield. Place the bowl in the fridge for 15 minutes.
Step 3: The Pat Down (Moisture is the Enemy of Sear)
After 15 minutes, remove the shrimp from the fridge. Here is a critical, non-negotiable step: you must aggressively dry the shrimp with paper towels.
The Maillard reaction cannot occur in the presence of surface moisture. If your shrimp are wet when they hit the hot oil, the water will instantly vaporize into steam. Instead of searing, your shrimp will effectively boil in the pan, resulting in a pale, flabby exterior. Pat them down until they are bone dry.
Step 4: The Hot, Fast Sear (Clock Management)
Place your stainless steel or carbon steel pan over medium-high heat. Let it preheat thoroughly. Once hot, add a tablespoon of a high-smoke-point fat, like avocado oil, ghee, or clarified butter.
Carefully place the dried shrimp into the pan in a single, even layer. Do not dump them in a giant pile. If you overcrowd the pan, the temperature will plummet, and you will ruin the sear.
Let them sit completely undisturbed for about 1 to 2 minutes. Do not poke them, do not prod them, and do not shake the pan. Let the crust develop.
Step 5: The Immediate Evacuation
Flip the shrimp. The seared side should have a beautiful golden-brown crust. Now, watch them like a hawk. You are looking for the alphabet of doneness. The moment the translucent gray turns completely opaque and the bodies curl into that perfect, loose “C” shape, cut the heat.
Do not just turn off the burner and leave the pan on the stove. The residual heat in the heavy metal will continue to cook the shrimp (carryover cooking), turning your perfect “C” into a tragic “O” within sixty seconds. Immediately transfer the shrimp to a cool serving platter or directly into your finished sauce.
Troubleshooting Common Shrimp Disasters
Even with the best intentions, things can go awry in the heat of battle. Here are the most common weeknight shrimp disasters and exactly how to fix them.
“Why is my pan suddenly full of watery liquid?”
You got greedy and overcrowded the pan. When you put too much cold protein into a skillet at once, the thermal mass of the pan is overwhelmed. The temperature drops drastically, preventing a sear. Instead, the shrimp release their internal moisture, and you end up boiling them in a shallow pool of their own juices. This is exactly why your pan sauces are watery and lack depth when you attempt to deglaze the skillet later. Cook in batches if you have to.
“Why does my garlic taste bitter and burnt?”
You added the garlic at the same time as the shrimp. Shrimp takes about 3 to 4 minutes to cook entirely. Minced garlic, when exposed to high searing heat, will turn brown and acrid in about 30 seconds. If you throw them into the pan simultaneously, your garlic always burns long before the seafood is done. Always add your delicate aromatics during the final 30 seconds of cooking, just as you are about to pull the pan off the heat.
“Why are my shrimp mushy and slimy, even when they are fully cooked?”
You bought chemically treated shrimp. Many mass-market shrimp producers inject their product with Sodium Tripolyphosphate (STP) to make them retain water and weigh more at the checkout counter. STP gives shrimp a bizarre, artificial, soapy, and mushy texture that no amount of cooking can fix. Always check the ingredient label on the bag. It should list one ingredient: Shrimp. If you see STP or any other unpronounceable preservatives, put the bag down and walk away.
“Why do my fresh herbs turn black when I garnish the dish?”
You chopped your delicate herbs with a dull blade, crushing the cell walls instead of cleanly slicing them. This causes rapid oxidation, which is exactly why your fresh herbs get slimy and look like wet grass clippings on top of your beautiful meal. Keep your knives honed and sharp. And while we are on the subject, ditch the rock-hard bamboo cutting boards; they are ruining your knives faster than you can sharpen them.
Conclusion: Reclaiming Your Weeknight Seafood Dinners
Cooking spectacular, restaurant-quality seafood at home does not require expensive gadgets, complicated techniques, or hours of prep work. It simply requires you to respect the ingredient. Shrimp is a delicate, fast-cooking protein that demands your undivided attention for exactly three minutes.
By utilizing a quick alkaline baking soda brine, ditching your toxic non-stick pans for proper heat-retaining metal, and learning to read the visual “C” shape cue, you have effectively bulletproofed your weeknight dinners. You are no longer guessing; you are executing with precision.
So the next time you are standing in the kitchen on a Tuesday night, exhausted and tempted to just order greasy takeout, remember the science. Thaw the shrimp, toss them in the brine, get your skillet screaming hot, and watch for the “C”. You are a capable home cook, and it is time you started eating like one. Now pour yourself a glass of crisp white wine, plate up your perfectly snappy shrimp, and pat yourself on the back. You have earned it.






