
Listen up, weekend warriors. We need to have a serious, unvarnished talk about brunch. I know exactly what you want. You want to be the ultimate, effortless host. You want to invite your friends over, pour some perfectly chilled mimosas, and casually flip eggs while laughing at someone’s mildly inappropriate joke. You want your kitchen to feel like a high-end bistro where the food just magically appears. But let’s be brutally honest: most home-cooked omelet bars are a chaotic, stressful nightmare that end with your guests politely chewing on what can only be described as a wet, yellow rubber tire.
According to recent 2026 industry data, brunch continues to grow at an explosive rate, with over 80% of operators reporting an increase in brunch menu demand and diners heavily valuing the leisurely, experiential weekend gathering. People want that restaurant-quality morning indulgence at home. They want the customization, the fresh ingredients, and the luxury of a meal that bridges the gap between breakfast and lunch. But what they usually get when a home cook attempts an omelet station is a spongy, overcooked egg pouch weeping a sad, gray puddle of vegetable water onto their plate.
It is a culinary tragedy, and it stops today. You do not need a culinary degree to fix this. You do not need to spend years working the line at a diner. You just need a little bit of applied science, a ruthless prep strategy, and the right gear. Today, we are going to dive incredibly deep into the chemistry of why eggs turn rubbery, how to properly manage moisture, and exactly how to execute a fast-paced, build-your-own omelet station without losing your mind—or ruining the main ingredient. Grab your coffee, or your champagne, I don’t judge. Science time, nerds.
The Culinary Science of the Weep: Why Eggs Turn into Rubber Tires
If you want to stop serving bouncy castle material for breakfast, you have to understand what is actually happening in the pan on a molecular level. Eggs are an absolute marvel of culinary chemistry, but they are also incredibly unforgiving if you disrespect their thermal boundaries. When you blindly blast an egg with high heat, you are engaging in chemical warfare against delicate proteins.
Meet Ovalbumin: The Drama Queen of Proteins
Let’s break down the anatomy of the egg. Egg whites are roughly 90% water and 10% protein. The most prominent and temperamental protein in that mix is ovalbumin. In their raw, natural state, these proteins are folded up like tiny, tightly wound balls of yarn floating peacefully in a watery suspension. They are stabilized by weak chemical bonds that keep them compact and fluid.
When you apply heat, thermal energy causes these protein molecules to vibrate rapidly. The weak bonds break, and the proteins begin to denature—meaning they uncoil, unfold, and stretch out. As they stretch, they bump into neighboring unfolded proteins and form new, stronger bonds (including hydrogen and disulfide bonds), creating a complex, three-dimensional web. This web traps the surrounding water inside its matrix. This is the magical process of coagulation. This is what turns a slippery liquid egg into a soft, tender, opaque curd.
But ovalbumin is dramatic, and it does not know when to stop. If you apply too much heat, those protein strands don’t just hold hands to form a gentle net; they aggressively cross-link and squeeze together in an absolute panic.
Syneresis: The Culinary Word for “You Ruined It”
When the protein network tightens too much due to excessive heat, it physically wrings out the trapped moisture like a wet sponge being crushed in a fist. This process is scientifically known as syneresis. In the culinary world, we just call it “weeping.”
If you’ve ever noticed a pool of watery, yellowish liquid forming around your eggs on the plate, congratulations, you’ve witnessed syneresis firsthand. You have essentially dehydrated the protein structure while simultaneously drowning the plate. This is the exact mechanism that causes eggs to become dense, tough, and rubbery. The water that was supposed to keep the egg tender is now ruining your toast, and the protein that was supposed to be fluffy is now tough enough to patch a bicycle tire. If you want to fix watery scrambled eggs or omelets, you have to respect the thermal limits of the protein. There is no shortcut around the physics of the egg.
The Magic Numbers: 140°F to 158°F (The Coagulation Zone)
Here is the only temperature math you need to care about today. Memorize it. Egg whites begin to thicken and turn cloudy at around 140°F (60°C) and will fully set into a tender solid by 149°F (65°C). Egg yolks, which contain more fat and different proteins, need a slightly higher temperature, coagulating between 149°F and 158°F (70°C).
If your pan is ripping hot and you blast the eggs past 160°F (71°C), you are instantly triggering that aggressive protein cross-linking. The secret to a tender, melt-in-your-mouth omelet is maintaining a moderate, heavily controlled heat that allows the eggs to gently coagulate within that 140°F to 158°F sweet spot. We want the proteins to form a relaxed, comfortable net, not a microscopic straightjacket. This requires patience, a watchful eye, and the understanding that carryover cooking will continue to raise the internal temperature of the egg even after it leaves the pan.
Gear Up or Go Home: The Station Setup
You can have the best technique in the world, you can memorize all the protein coagulation temperatures, but if you are cooking on garbage equipment, you are going to get garbage results. A fast-paced omelet station requires pans that offer reliable heat distribution, predictable thermal mass, and flawless release. You cannot be fighting with a sticky pan when you have four hungry guests waiting in line.
The “No-Go” Rule on Toxic Cookware
Let me be crystal clear, because this is a hill I will gladly die on: I absolutely despise cheap, toxic kitchenware. If you are currently cooking on a scratched, peeling, mystery-metal pan that you bought at a discount store five years ago, throw it in the trash right now. I don’t care if it was a gift. Traditional PTFE (Teflon) coatings degrade when overheated, and once they start flaking into your food, you are literally serving your guests a side of synthetic polymers. Not exactly the mindful, health-conscious brunch vibe we are going for.
Furthermore, using aerosol sprays ruin nonstick coatings even faster. Those propellants and emulsifiers bake a sticky, invisible residue onto the surface of the pan that completely destroys the slip over time. You are left with a pan that is both toxic and sticky—the absolute worst of both worlds.
The Champions: PFOA-Free Ceramic Nonstick vs. Carbon Steel
For a high-volume omelet bar where you are pumping out eggs back-to-back, you have exactly two acceptable choices for your cooking vessels: a high-quality PFOA-free ceramic nonstick skillet, or a well-seasoned carbon steel pan. Let’s break down the science of both.
Ceramic nonstick pans (often utilizing advanced sol-gel, silica-based technology) are fantastic for beginners and those who want zero friction. They are completely free of PFAS “forever chemicals” and offer an incredibly slick surface that makes rolling an omelet feel like amateur hour. The caveat? Ceramic coatings have significantly lower thermal conductivity than bare metal (sitting around 1–30 W/m·K compared to the aluminum core’s 205 W/m·K). This means they rely heavily on their underlying aluminum core to distribute the heat evenly. You must treat them gently—no metal utensils, no abrasive sponges, and absolutely no high heat. This is actually a blessing in disguise, since we already established that high heat ruins eggs anyway. Just be aware that even the best ceramic pans have a shorter lifespan than bare metal, often losing their peak slickness after a year or two of heavy use. They are a consumable tool, but a highly effective one for egg cookery.
If you are a serious home cook who wants a “buy it for life” tool, carbon steel is your ultimate best friend. It is favored by professional chefs in busy diners and high-end French brigades for a reason. It is composed of roughly 99% iron and 1% carbon, making it highly durable, relatively lightweight, and incredibly responsive to temperature changes. When you properly season your carbon steel, you are utilizing the science of polymerization. Thin layers of oil are heated past their smoke point, breaking down and bonding with the metal to create a hard, naturally non-stick patina that rivals any synthetic coating on the market. It requires a bit more maintenance and a strict hand-washing routine, but it will never leach toxic chemicals into your breakfast, and it will outlive you.
Spatulas and Heat Management Tools
Your pan is only half of the equation; your utensils matter just as much. Ditch the rigid plastic flippers that melt on the edges and the wooden spoons that are too clunky to get under a delicate curd. To properly agitate the eggs and gently roll the omelet, you need a heat-resistant silicone spatula with a flexible, thin edge. It needs to bend to the contour of the pan. Alternatively, if you are working with a seasoned carbon steel skillet, you can use a flexible fish spatula to easily slide under the delicate egg base without tearing it. The thin metal tines of a fish turner offer unmatched precision when you need to execute a flawless fold.
Moisture Management: Prepping the Fillings
The absolute biggest rookie mistake in omelet history—the one that ruins more brunches than anything else—is throwing raw, water-logged vegetables straight into the egg mixture while it cooks. This is culinary sabotage. It is a fundamental misunderstanding of water content and heat transfer.
The Enemy Within: Watery Vegetables
Let’s look at the usual suspects of the omelet bar: mushrooms, tomatoes, and spinach. These vegetables are essentially delicious little water balloons. Spinach is about 91% water. Mushrooms are roughly 92% water. Tomatoes sit at a staggering 94% water.
If you introduce these cold, raw, moist fillings directly into the cooking egg, you create multiple catastrophic failure pathways. First, the cold mass of the fillings drops the pan’s surface temperature locally, delaying coagulation and creating a weak, porous curd that traps steam instead of sealing it. Second, and more importantly, as the vegetables heat up, their cellular walls break down and they release their intracellular water directly into the eggs. This free water physically dilutes the egg mixture. It disrupts the cross-linking of the egg’s myosin and actin proteins, reducing the gel strength of the omelet by up to 38%. The result? A soggy, weeping, structurally compromised mess that falls apart on the plate.
The Pre-Cook Strategy
To prevent soggy sautéed mushrooms and watery spinach from ruining your dish, you must aggressively manage their moisture before the guests even arrive. This is non-negotiable.
- Mushrooms: Do not just toss them in oil. Sauté them in a dry pan first. This allows the heat to draw out and evaporate their internal moisture without them acting like sponges soaking up fat. Once they have shrunk and browned, then add your butter, salt, and herbs to finish.
- Spinach: Quickly wilt it down in a skillet. Let it cool slightly, and then physically squeeze the excess liquid out of it using a clean kitchen towel or a fine mesh strainer. You will be shocked by how much green water pours out.
- Tomatoes: Never use the wet, jelly-like center. Core them, remove the gelatinous, seed-heavy centers (which hold the majority of the water), and dice only the firm outer flesh.
All of your vegetable fillings should be pre-cooked, seasoned, and held at room temperature or slightly warm in your station setup.
Cheese Considerations
Cheese is the glorious, melty glue that holds a great omelet together, but not all cheese is created equal, and how you buy it matters immensely. Please, for the love of all things holy, ditch the pre-shredded cheese.
Those convenient little plastic bags of shredded cheddar are heavily coated in cellulose (wood pulp) and anti-caking agents to prevent clumping during shipping and storage. That same powder coating prevents the cheese from melting smoothly together. Instead of a luscious, gooey center, you get a grainy, oily, separated texture inside your delicate eggs. Buy a block of high-quality Gruyère, sharp cheddar, or Fontina, and shred it yourself on a box grater. It takes exactly two minutes, saves you money, and completely changes the texture of the final dish.
The Masterclass: Executing the Omelet Bar Like a Pro
Hosting a build-your-own omelet station should be a fun, interactive experience, not a frantic race against the clock where you end up sweating over a stove while everyone else has fun. The secret to a stress-free morning is treating your kitchen counter like a professional restaurant line.
The Assembly Line Setup
Mise en place (everything in its place) is your best friend. Every single ingredient needs to be prepped, chopped, cooked, and placed in individual, aesthetically pleasing, easy-to-reach bowls before the first guest even walks into the kitchen. Line up your pre-cooked proteins (crispy bacon bits, crumbled sausage, diced ham), your moisture-managed veggies, your freshly grated cheeses, and a bowl of fresh herbs (like chives, dill, or parsley).
By the way, to keep fresh herbs from wilting on the counter while they wait to be used, store them wrapped in a slightly damp paper towel inside a reusable bag in the fridge until right before you chop them for service.
Implementing efficient food staging techniques means placing the bowls in the logical order of assembly. Have your guests walk down the line and fill a small ramekin or a small plate with their desired mix-ins. Handing you a pre-portioned cup of ingredients is infinitely faster than having them point and hem and haw while your pan is getting dangerously hot on the burner. You are the chef; they are the prep cooks handing you the order.
The Pan-to-Plate Rhythm
When operating a live station, efficiency is everything. You should be using two 8-inch skillets simultaneously if you are comfortable with the choreography, or just stick to one if you want to pace yourself and enjoy the conversation.
Pre-whisk a massive batch of eggs in a large pouring pitcher. Do not add milk, cream, or water to the batch. This is a persistent myth that needs to die. Adding milk just increases the water content without improving the protein structure, raising the risk of overcooking and syneresis by extending the cooking time. A pinch of salt is fine, but leave the diluting liquids out. Pouring straight from a pitcher into the pan saves you the massive hassle of cracking and whisking two eggs to order every single time.
The Butter Factor
Fat is not just flavor; it is a vital thermal buffer between the heat of the pan and the delicate proteins of the egg. Before the eggs go in, drop a small pat of unsalted butter into the skillet. You want the butter to foam gently, not brown and certainly not smoke.
If you want to stop butter from burning, keep your heat strictly at medium-low. The water in the butter will sizzle as it evaporates, giving you an auditory cue about the pan’s temperature. Once the foaming subsides and the sizzling quiets down, that is your green light. It’s time to pour the eggs.
Step-by-Step: Cooking the Perfect Omelet (The Technique)
We are aiming for a classic French-style or a soft American diner-style omelet—pale gold and pristine on the outside, custardy, tender, and slightly soft on the inside. No brown, crispy, lacy edges allowed. Brown eggs are overcooked eggs, and overcooked eggs are rubbery eggs.
The Agitation Phase
Pour about a half-cup (roughly two to three eggs’ worth) of your whisked mixture from the pitcher into the buttered pan. Immediately grab your silicone spatula and start stirring the eggs rapidly in small circles while simultaneously shaking the pan back and forth on the burner.
This agitation is crucial. It breaks up the protein networks as they form, creating hundreds of tiny, soft curds rather than one large, tough, leathery sheet of egg. You are essentially scrambling the eggs very quickly to build a tender foundation.
The Resting Phase
Once the eggs look like a wet, loose scramble and the bottom is just starting to hold together as a cohesive layer (about 30 to 45 seconds into the process), stop stirring. Use your spatula to gently smooth the eggs into an even layer, filling in any gaps or holes.
Now, while the top is still slightly runny and shiny (remember, carryover cooking will finish the job), take the guest’s ramekin of pre-cooked fillings and cheese and sprinkle them in a neat line down the center of the pan. Do not overstuff the omelet. A massive mound of fillings will cause the egg to tear when you try to fold it. Less is more.
The Fold and Roll
Turn off the heat completely. The residual heat of the pan and the hot eggs is more than enough to melt the grated cheese and finish setting the interior to a perfect custardy finish.
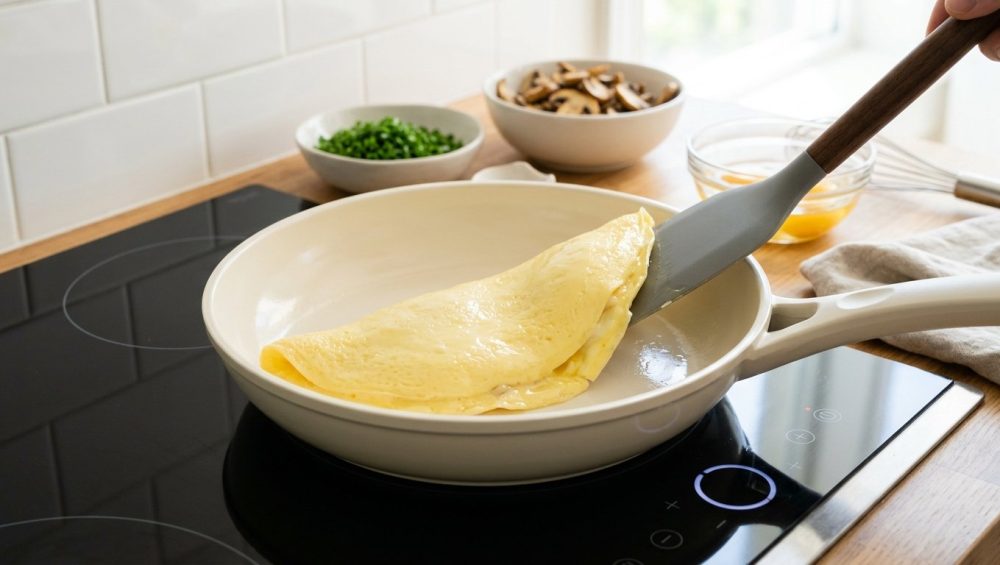
Tilt the pan slightly by the handle. Using your spatula, gently fold the top third of the egg over the fillings. Then, shift your grip on the handle to an underhand grip, hold the pan over the guest’s warm plate, and gently roll the omelet out so it lands seam-side down.
The result? A perfectly smooth, tender, structurally sound omelet that will not weep a single drop of water onto the plate. It is a masterpiece of thermal management.
Troubleshooting the Brunch Rush
Even with the best preparation, a live cooking station can throw you curveballs. When you are cooking for a crowd, things speed up. Here is how to handle the heat when things go slightly sideways.
What to Do When the Pan Gets Too Hot
If you are cooking your fourth or fifth omelet in a row, the pan is going to accumulate a significant amount of thermal mass. If you drop the butter in and it instantly turns brown, smokes, and smells nutty, the pan is too hot. If you pour the eggs in and they violently bubble, hiss, and immediately turn brown on the edges, the pan is entirely too hot.
Do not proceed. Pull the pan completely off the heat source. Let it sit on a cool burner for 60 seconds, wipe it out with a dry paper towel, and start over. Cooking eggs in a scorched pan guarantees a rubbery texture and a bitter, sulfurous flavor. It is infinitely better to make a guest wait an extra sixty seconds than to serve them a bouncy, foul-tasting mistake. If you are struggling to gauge the heat of your burners, it might be time to invest in a reliable thermometer for your meats and a better understanding of your stove’s dials.
Handling Dietary Restrictions and Substitutions
Inevitably, someone is going to ask for an egg-white-only omelet. Egg whites lack the fat of the yolk, meaning they coagulate faster and are even more prone to turning rubbery and weeping. When cooking an egg-white omelet, drop your heat even lower and use slightly more butter or a high-quality oil to compensate for the lack of natural fat.
And if someone brings their own vegan liquid egg substitute? Treat it similarly, but rely heavily on the visual cues of the liquid setting, as plant-based proteins (often mung bean or soy) do not coagulate at the exact same temperatures or speeds as ovalbumin. Keep your ceramic nonstick slick, manage the heat, and you won’t have an issue.
Conclusion: You’ve Got This
Hosting a weekend brunch should not feel like a punishment or a grueling restaurant shift. By respecting the fundamental science of protein coagulation, investing in safe, high-quality cookware, and ruthlessly managing the moisture of your vegetables, you can absolutely master the omelet station.
You don’t need to be a professional line cook to pull this off. You just need to prep smart, keep your heat low, and refuse to compromise on your gear. By the time you are rolling that tenth perfect, golden omelet onto a plate, you’ll realize that creating restaurant-quality food in your own home isn’t just possible—it’s incredibly satisfying. Now, go pour yourself a well-deserved mimosa, wipe down your station, and make sure your guests know exactly who rules the kitchen. If they leave behind a mess, you can always figure out how to clean stained plastic containers later. For now, sit down, take a bite of your own flawless creation, and enjoy the victory.






