Listen up, culinary weekend warriors. If you are still cooking your morning eggs in a scratched-up, chemical-laden nonstick pan that you bought on clearance three years ago, we need to have a serious talk. I am officially revoking your kitchen privileges until we sort this out. I have zero patience for pretentious chef-speak, but I have even less patience for toxic, disposable cookware that flakes mystery chemicals into your beautifully crafted meals.
You do not need a culinary degree to cook like an expert, but you do need to understand the basic physics and chemistry of your equipment. Today, we are taking a brutally analytical, unapologetically nerdy deep dive into the undisputed champion of the stovetop: the carbon steel pan. We are going to explore the thermodynamics, the molecular bonding, and the literal science of turning liquid fat into a slick, indestructible, chemical-free nonstick surface. By the time we are done, you will understand exactly how to season and maintain this metallurgical marvel.
The Toxic Elephant in the Kitchen: Why We Are Done with Disposable Nonstick
Before we get into the beautiful science of carbon steel, we need to address the peeling, gray elephant in the room: synthetic nonstick pans. I actively despise them. If you are serious about banishing toxic kitchen gear from your home, you need to understand the data behind what you are actually cooking on.
For decades, the nonstick cookware industry has relied on polytetrafluoroethylene (PTFE), widely known by brand names like Teflon. PTFE is a type of PFAS (per- and polyfluoroalkyl substances)—the notorious “forever chemicals.” Up until about 2015, manufacturers used PFOA to make these coatings [9]. After studies linked PFOA to a laundry list of horrifying health issues, the industry pulled a fast one and switched to newer PFAS compounds, like GenX, which are proving to be just as persistent in the environment [9].
Let us look at the cold, hard facts for a moment. Studies published in recent years have revealed that using a damaged or scratched synthetic nonstick pan can release millions of micro- and nanoplastic particles directly into your food [9]. Furthermore, when heated past 500°F (260°C)—a temperature easily reached if you leave a pan empty on a high burner for just a few minutes—PTFE begins to break down and release toxic fumes [9]. These fumes cause a very real, documented condition known as “polymer fume fever” or the “Teflon flu,” cases of which saw a noticeable spike in 2024 [17].
The regulatory landscape is finally catching up to this nightmare. As of January 1, 2025, Minnesota became the first U.S. state to outright ban the sale of nonstick cookware coated with intentionally added PFAS [12]. States like Maine, Vermont, Colorado, and Connecticut have similar bans going into effect between 2026 and 2028 [18]. Yet, despite these legislative moves, a recent Ecology Center study found that an alarming 79% of tested nonstick cooking pans were still coated with PTFE, often hiding behind misleading labels like “PFOA-free” [15].
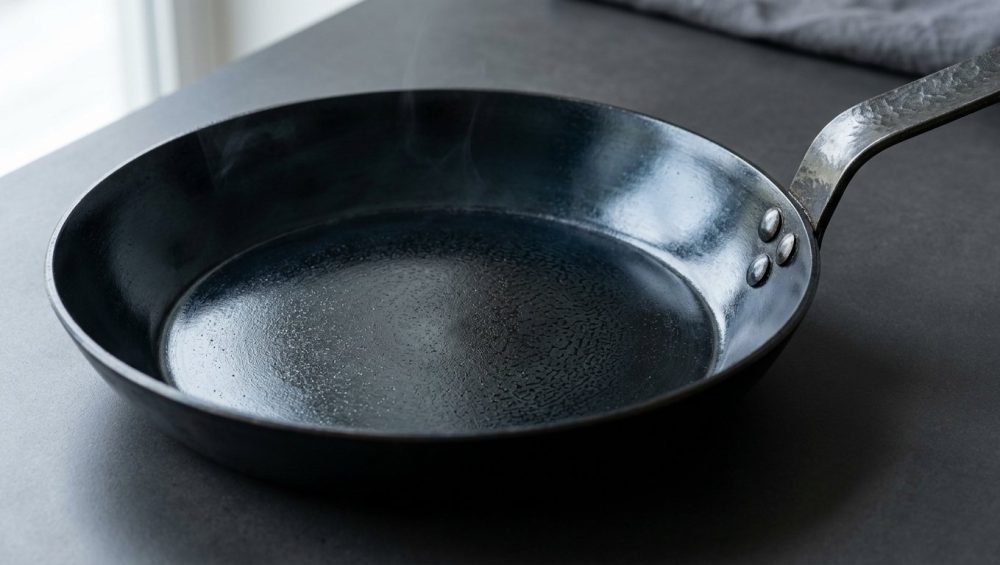
We are done with this. You deserve better. Your food deserves better. Carbon steel is the ultimate, lifetime-lasting alternative. It is the backbone of restaurant kitchens worldwide, and it is time it became the backbone of yours. When you are assembling your core beginner kitchen tools, a high-quality carbon steel skillet should be at the absolute top of the list.
Thermodynamics 101: Carbon Steel vs. The World
To master carbon steel, you have to understand its metallurgical and thermodynamic properties. Why does it perform differently than cast iron, stainless steel, or aluminum? The answer lies in its elemental composition and how it handles thermal energy.
Carbon steel is an alloy composed of roughly 99% iron and up to 1% carbon [14]. This relatively low carbon content (ironically, lower than the 2-4% carbon found in cast iron) makes the metal highly malleable and less brittle, allowing it to be spun or stamped into thinner, lighter pans [2, 3]. But the real magic happens when we look at the thermal metrics.
Thermal Conductivity
Thermal conductivity (measured in Watts per meter-Kelvin, or W/m·K) dictates how fast heat travels through a material. The thermal conductivity of carbon steel sits right around 45 to 58 W/m·K [4]. Cast iron is theoretically similar, hovering around 40 to 55 W/m·K, but its thick, porous, and dense casting severely limits its practical heat transfer speed [1, 2, 4]. Aluminum, for context, is highly conductive at roughly 237 W/m·K, while stainless steel is a dismal conductor at around 15 to 30 W/m·K [4].
Because carbon steel pans are typically forged thinner than cast iron (usually around 2mm to 3mm thick), they boast incredible thermal responsiveness [1]. When you turn the flame up, the pan gets hot almost instantly. When you turn the flame down, the temperature drops rapidly. This responsiveness is critical when you are trying to execute precise techniques or mastering the Maillard reaction without burning your delicate proteins. You are in total control of the thermal environment.
Specific Heat Capacity
Specific heat capacity (measured in Joules per kilogram-Kelvin, or J/kg·K) tells us how much thermal energy is required to raise the temperature of one kilogram of the material by one degree. Carbon steel has a specific heat capacity of roughly 490 J/kg·K [10]. Cast iron is slightly lower at 460 J/kg·K, and aluminum is much higher at 897 J/kg·K [10].
What does this mean for your Tuesday night dinner? It means carbon steel requires relatively little energy to get scorching hot, making it incredibly fuel-efficient and fast. However, because it is thinner and lighter than a massive cast-iron skillet, it holds less total thermal mass. If you drop a massive, fridge-cold ribeye into a thin carbon steel pan, the pan’s temperature will plummet. To counter this, you must learn to manipulate your heat source, preheating properly and allowing the pan to recover its thermal equilibrium.
The Chemistry of Polymerization: Turning Liquid Fat into Hard Plastic
Now we arrive at the most misunderstood, myth-riddled topic in the culinary world: seasoning. When we talk about “seasoning” a carbon steel pan, we are not talking about salt, pepper, or aromatics. We are talking about a permanent, chemical transformation. We are talking about free radical polymerization.
When you heat liquid cooking oil in a carbon steel pan to its smoke point, the oil molecules undergo a violent thermal cracking process [6]. The high heat causes the triglyceride molecules in the fat to break down, releasing free radicals [11]. In the presence of oxygen and the iron surface of the pan (which acts as a catalyst), these free radicals aggressively seek out new bonds. They cross-link with one another, forming massive, interconnected molecular chains called polymers [8, 11].
Simultaneously, a portion of the oil carbonizes, leaving behind a microscopic matrix of carbon residue embedded within the polymerized plastic-like film [6, 13]. This resulting iron-oxygen-carbon matrix bonds directly to the porous surface of the steel [8]. It is incredibly durable, highly hydrophobic (water-repelling), and practically frictionless. It is, quite literally, a natural, chemical-free nonstick coating.
The Iodine Value: The Secret Metric of Oils
Not all fats are created equal when it comes to polymerization. To understand which oil to use, we have to look at a chemistry metric known as the Iodine Value. The Iodine Value measures the degree of unsaturation in a fat [6].
Fats are composed of hydrocarbon chains. Saturated fats (like butter or lard, Iodine Value ~48-65) have no double bonds between their carbon atoms; they are completely saturated with hydrogen [6]. Because they lack double bonds, they are chemically stable and terrible at forming cross-linked polymers. If you try to season a pan with butter, you will just end up with a sticky, rancid mess.
Unsaturated fats, however, contain double bonds. These double bonds are the reactive sites where cross-linking occurs. The higher the number of double bonds, the higher the Iodine Value, and the more reactive the oil [8].
- Non-drying oils (Iodine Value < 115): Olive oil (80-88), Peanut oil (84-105) [6]. These take forever to polymerize and often leave a sticky residue.
- Semi-drying oils (Iodine Value 115-130): Canola oil (112-117), Grapeseed oil (~130), Corn oil (109-133) [6].
- Drying oils (Iodine Value > 130): Flaxseed oil (~150) [6, 11].
For years, internet forums have praised flaxseed oil as the ultimate seasoning fat because its exceptionally high Iodine Value means it polymerizes incredibly fast, creating a rock-hard finish [11]. However, in my brutally honest, trial-by-fire experience, flaxseed oil is a trap. The resulting polymer matrix is too hard and highly brittle [6, 16]. The natural expansion and contraction of the carbon steel pan during rapid heating and cooling cycles will cause a pure flaxseed oil seasoning to shatter and flake off like cheap nail polish.
The sweet spot lies in the semi-drying oils. Refined grapeseed oil, canola oil, or even specialized seasoning waxes (which blend oils with beeswax for elasticity) provide the perfect balance [6]. They contain enough double bonds to form a strong, durable polymer matrix, but they retain enough microscopic flexibility to expand and contract with the metal.
The Thermodynamics of the Perfect Seasoning Layer
Creating the perfect nonstick patina is an exercise in thermodynamic precision. You cannot just slop a puddle of oil into a cold pan, blast it with a blowtorch, and expect a miracle. You have to control the variables.
The Temperature Zone
Effective polymerization is a temperature-dependent reaction. For most semi-drying oils (like grapeseed or canola), this reaction occurs aggressively between 400°F and 500°F (204°C – 260°C) [8].
- Below 400°F: The thermal cracking is incomplete. The reaction is too slow. The oil will partially oxidize but fail to fully cross-link. The result is a gummy, sticky, brownish sludge that grabs onto food like superglue [8].
- 400°F to 500°F: The sweet spot. The oil breaks down, free radicals are released, and the molecules cross-link into a smooth, hard plastic-like layer [8].
- Above 500°F: You enter the zone of complete carbonization. The polymer bonds break down entirely, turning the oil into dry, powdery ash that provides zero nonstick benefits [8].
The Micro-Layer Rule
The single most critical rule of seasoning—and the one that trips up almost everyone—is the thickness of the oil layer. Polymerization requires oxygen to form the cross-linked matrix. If you leave a thick layer of oil in the pan, only the very top surface will interact with oxygen. The top layer will polymerize, sealing off the oil underneath from the air. The trapped oil will remain in a semi-liquid, gummy state. When you try to cook with it, the hard top layer will tear off, exposing the sticky mess beneath.
To achieve a durable seasoning, you must apply the oil in microscopic layers. We are talking about a layer so thin it is measured in molecules.
Step-by-Step Masterclass: Seasoning Like a Chemist
Alright, grab your safety goggles (or just a glass of wine), because we are going to season a carbon steel pan the right way. This is a flawless method that will save you from making the same beginner cooking mistakes that I made years ago.
Phase 1: The Chemical Strip
When you buy a high-quality carbon steel pan, it arrives coated in a thick layer of factory wax or mineral oil to prevent rust during shipping [16]. You cannot polymerize over this wax. You must strip the pan down to bare, naked iron.
Place the pan in your sink and scrub it aggressively with scalding hot water, heavy-duty dish soap, and a coarse steel wool pad. Scrub until the water runs completely clear and the metal looks dull and gray. Immediately dry the pan with a towel, then place it on a low stovetop burner for two minutes to evaporate any microscopic moisture from the pores of the metal.
Phase 2: The Micro-Application
Take a lint-free paper towel or a dedicated cotton rag. Pour exactly one dime-sized drop of your chosen semi-drying oil (grapeseed or canola) into the center of the warm pan. Rub the oil over the entire interior and exterior surface of the pan, including the handle.
Now, take a clean, dry paper towel and vigorously wipe the pan down. Wipe it as if you deeply regret putting the oil on in the first place and you are trying to erase your mistake. The pan should look completely dry, with only the faintest, barely perceptible sheen. This is your micro-layer.
Phase 3: The Thermal Bake
While you can season a pan on the stovetop, oven seasoning provides a perfectly controlled, uniform thermodynamic environment, ensuring an even gradient across the entire surface.
Preheat your oven to 450°F (232°C). Place the oiled pan upside down on the middle rack. Placing it upside down ensures that if you accidentally left too much oil on the surface, it will drip down rather than pooling and gumming up the cooking surface.
Bake the pan for exactly one hour. During this time, the pan will surpass the oil’s smoke point, initiating the free radical polymerization process. Your kitchen will smell like a diner—this means the chemistry is working. Turn on your exhaust fan.
After one hour, turn the oven off. Do not open the door. Let the pan cool down slowly inside the oven for at least two hours. This gradual cooling prevents thermal shock and allows the newly formed polymer bonds to stabilize.
Congratulations. You have successfully created one microscopic layer of seasoning. It will look slightly bronze or light brown. To build a truly bulletproof nonstick surface, repeat Phases 2 and 3 at least three to five times. Yes, it takes a whole weekend. Yes, it is worth it.
The Maillard Reaction and Nonstick Mechanics
Once your carbon steel pan is perfectly seasoned, it becomes a culinary weapon. The polymerized surface is highly hydrophobic, meaning it repels water. Because protein sticking is largely caused by chemical bonds forming between the moisture in the food and the bare metal of the pan, this hydrophobic barrier physically blocks those bonds from forming.
But a seasoned pan alone is not enough; you must also master the thermodynamics of cooking. If you drop a cold chicken breast into a lukewarm pan, the moisture will seep out, the temperature will drop, and the proteins will fuse to the polymer matrix. To prevent protein sticking, you must utilize proper heat management.
Preheat your carbon steel pan over medium heat for about 90 seconds. You want the surface to reach approximately 350°F to 400°F (175°C – 204°C). At this temperature, the moisture on the surface of the food instantly vaporizes upon contact, creating a microscopic cushion of steam. This phenomenon, closely related to the Leidenfrost effect, physically lifts the protein away from the pan’s surface while the intense, conductive heat triggers the Maillard reaction—the complex chemical reaction between amino acids and reducing sugars that occurs rapidly around 300°F, creating that deeply savory, golden-brown crust.
Troubleshooting Your Thermodynamic Failures
Look, I am your biggest cheerleader, but I am also a realist. You are probably going to mess this up at least once. It is part of the learning curve. When you inevitably run into trouble, do not panic. Carbon steel is basically indestructible. Here is how to diagnose and fix your thermodynamic failures so you can rescue a ruined dinner before the smoke detector goes off.
The Sticky, Gummy Pan
The Symptom: Your pan feels tacky to the touch, and when you try to cook eggs, they cement themselves to the bottom in a horrific, scrambled mess.
The Chemistry: You applied too much oil, or you did not heat the pan hot enough or long enough. The oil partially oxidized but failed to fully polymerize [8].
The Fix: You need to push the reaction to completion. Place the pan in a 450°F oven for an hour to see if the gummy oil hardens. If it is too thick and turns into a sticky sludge, you have to nuke it. Scrub the pan with coarse steel wool and hot soapy water until the sticky layer is gone, then re-season using much thinner micro-layers.
The Flaking, Peeling Pan
The Symptom: Little black flakes of seasoning are peeling off into your food.
The Chemistry: Your polymer matrix is too brittle (likely from using a drying oil like flaxseed), or your seasoning layers were too thick, preventing proper adhesion to the iron underneath.
The Fix: Do not panic; those black flakes are just polymerized fat and carbon, not toxic PFAS chemicals. Scrub the flaking areas aggressively with a chainmail scrubber or a stiff brush to remove the loose bits. Wipe a micro-layer of grapeseed oil over the spot and heat it on the stovetop until it smokes. The patch will blend in over time.
The Rusted Pan
The Symptom: You left the pan soaking in the sink (shame on you), and now it is covered in bright orange rust.
The Chemistry: Iron + Oxygen + Water = Iron Oxide (Rust). You stripped away the protective hydrophobic polymer layer and exposed the bare iron to moisture.
The Fix: Rust is just surface oxidation. Pour a tablespoon of coarse kosher salt and a splash of neutral oil into the pan. Use a paper towel to scrub the salt into the rust spots. The salt acts as a gentle abrasive that will lift the iron oxide without gouging the steel. Rinse it out, dry it immediately on the stove, and rub a tiny drop of oil into the surface.
Long-Term Thermal Care and Maintenance
Maintaining a carbon steel pan is not a delicate, precious ritual. These pans are forged in fire and designed to take a beating in commercial kitchens. However, they do require you to follow a few strict rules of thermal and chemical engagement.
Debunking the Soap Myth
Let us kill this old wives’ tale right now: You can, and should, wash your seasoned carbon steel pan with modern dish soap. The myth that “soap ruins seasoning” originated over a century ago when soap was made with harsh lye, which is highly caustic and will absolutely strip a polymer layer [8]. Modern dish liquids are gentle, pH-balanced detergents. They are designed to cut through loose, unpolymerized surface grease. They are completely powerless against the cross-linked, iron-oxygen-carbon bonds of a properly polymerized seasoning. Wash your pan. Cleanliness is not the enemy of seasoning.
Avoiding Thermal Shock
Carbon steel has incredible thermal conductivity, but its relatively thin gauge makes it susceptible to warping if subjected to massive, sudden temperature differentials. If you take a screaming hot pan off a 500°F burner and immediately plunge it under a stream of cold tap water, the metal will contract unevenly. This rapid contraction can cause the bottom of the pan to permanently bow or warp, turning your perfectly flat skillet into a wobbly spinner. Always let your pan cool down naturally on the stovetop before washing it.
The Acid Warning
While the polymer matrix is incredibly strong against heat and friction, it is chemically vulnerable to strong acids. Simmering a highly acidic tomato sauce, deglazing with a heavy pour of raw vinegar, or cooking down a lemon reduction will slowly eat away at the iron-oxygen-carbon bonds, stripping your seasoning and leaving a dull, gray, metallic-tasting patch. Save the acidic reductions for your stainless steel or enameled cast-iron cookware.
The Weekend Warrior’s Secret Weapon
Once you understand the thermodynamics, the heat capacity, and the molecular chemistry of carbon steel, cooking stops being a game of chance and becomes a predictable, controllable science. You will stop relying on cheap, toxic crutches and start relying on your own technique.
A perfectly seasoned carbon steel pan is the ultimate tool for efficiency. Because it heats up in seconds and cleans up with a quick wipe, it is my absolute favorite piece of gear when I need to master simple weeknight dinners. I can sear a piece of salmon, blister some asparagus, wipe the pan out, and be sitting on the couch with a glass of Pinot Noir in under twenty minutes.
It is also the key to unlocking true, restaurant-quality results at home. That deep, crusty sear on a steak? The perfect, nonstick slide of a French omelet? The smoky, high-heat wok hei of a proper stir-fry? All of these are achieved not through magic, but through the deliberate application of thermal energy to a polymerized iron surface.
These are the kinds of foolproof cooking secrets that separate the amateur from the confident home cook. You do not need to be intimidated by bare metal. You just need to respect the chemistry.
When you strip away the marketing fluff and the toxic coatings, you are left with the fundamental truths of cooking: heat, metal, fat, and time. By mastering the thermodynamics of carbon steel, you are not just learning how to care for a pan. You are taking absolute control of your kitchen. You are learning to eliminate kitchen chaos and replace it with precision, confidence, and undeniably mind-blowing food.
And the next time you decide to host a beautiful dinner party, you won’t be hiding in the kitchen, frantically scraping stuck-on chicken off the bottom of a peeling Teflon pan. You will be out there with your guests, knowing your carbon steel has done the heavy lifting. Now, get in the kitchen, strip that factory wax, and start polymerizing. You’ve got this.


