
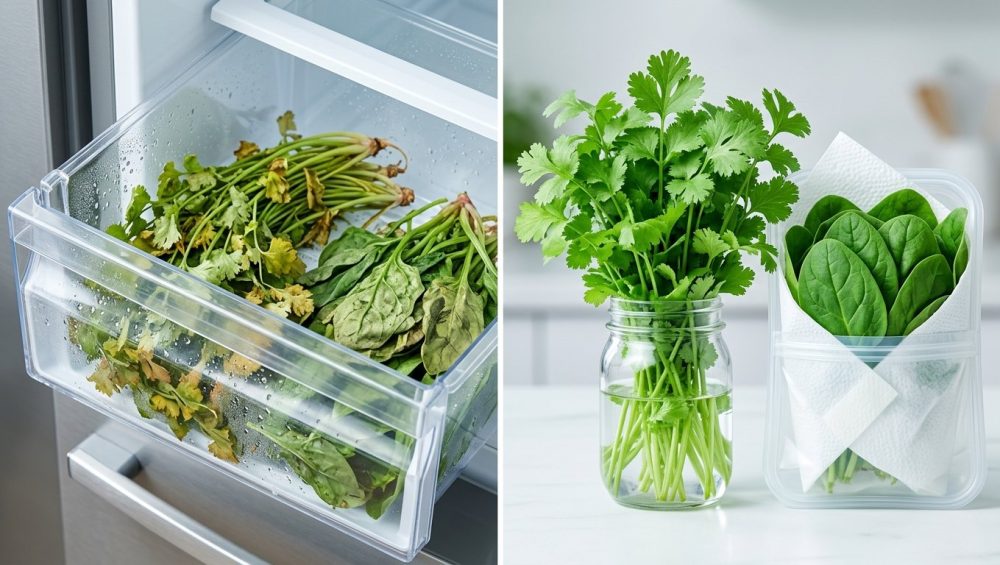
Listen up, weekend culinary warriors. We need to have a serious conversation about the crime scene currently unfolding in the bottom drawer of your refrigerator.
You know exactly what I am talking about. You went to the grocery store on Tuesday with the best of intentions. You bought a vibrant, beautiful, three-dollar bunch of fresh cilantro for a specific taco recipe. You used exactly two sprigs to garnish your plates, aggressively shoved the rest of the bunch back into the flimsy plastic produce bag, and tossed it into the crisper drawer. By Saturday morning, you opened that drawer to find that your once-glorious leafy greens had transformed into a foul-smelling, black, liquefied mass of despair.
It is frustrating, it is gross, and frankly, it is a massive waste of your hard-earned money. But before you swear off buying fresh greenery forever and resign yourself to those dusty jars of flavorless dried flakes from 2018, take a deep breath. It is not your fault; you are simply fighting basic plant biology without a strategy. If you want to transform your chaotic cooking routine into a streamlined, efficient system, you have to understand the science of your ingredients.
Today, we are going to master the absolute definitive science of herb preservation. No pretentious chef-speak, no culinary degree required—just cold, hard food science and brilliant, time-saving techniques that will easily extend the lifespan of your fresh produce from a pathetic two days to a staggering three weeks.
The Herb Graveyard in Your Crisper Drawer
Let us start by addressing the financial elephant in the room. The average American household throws away a staggering 30 to 40 percent of the food they purchase. When you calculate the math on that over a year, you are looking at upwards of $1,500 of your grocery budget literally rotting in the trash. A massive chunk of that waste comes directly from highly perishable, delicate produce that home cooks simply do not know how to store properly.
Your refrigerator’s crisper drawer is often treated like a magical preservation chamber, but for many delicate greens, it is actually a high-humidity coffin. We survive busy weeknights by utilizing clever shortcuts, which means we cannot afford to run back to the supermarket every time a recipe calls for a garnish. You need your ingredients to work for you, waiting patiently in perfect condition until you are ready to use them.
The Great Supermarket Scam: Why Store Packaging is Designed to Fail
Before we even get to your fridge, we have to talk about how these plants are sold to you. When you buy a bunch of parsley or mint at the supermarket, it is usually strangled by a tight rubber band and stuffed inside a narrow, unventilated plastic sleeve. This packaging is designed for the convenience of shipping and barcode scanning, not for the longevity of the plant.
That tight rubber band is actively crushing the plant’s vascular tissue—specifically the xylem and phloem, which are the microscopic tubes responsible for transporting water and nutrients up and down the stem. When you crush those tubes, you cause localized tissue death. Furthermore, the flimsy plastic sleeve traps condensation caused by temperature fluctuations during transit, creating a hyper-local swamp. If you have ever felt the frustration of throwing away sad veggies, you must realize that leaving them in their original supermarket packaging is the fastest way to guarantee their demise.
The Food Science of Slime: Why Good Herbs Go Bad
To defeat the slime, you must understand the enemy. The rapid decay of your fresh greens is triggered by a destructive trifecta of environmental factors: trapped moisture, severe cold damage, and invisible plant hormones.
Trapped Moisture: The Enemy Within
Plants breathe. Even after they are harvested and separated from their roots, the leaves continue to undergo transpiration, releasing water vapor into the air. When you trap that transpiring plant inside a tightly sealed, non-breathable plastic bag, that water vapor has absolutely nowhere to go. It condenses on the inside of the bag and drips right back down onto the delicate leaves.
This pooling water creates a microscopic swimming pool for bacteria and mold spores. The cell walls of the leaves begin to break down under the constant moisture, turning the structural cellulose into the dreaded black slime. Water is essential for keeping the stems hydrated, but water sitting directly on the surface of the leaves is a death sentence.
Cold Damage: When the Fridge is Too Fierce
Not all plants belong in the refrigerator. Many of the greens we use in our kitchens are native to warm, Mediterranean, or tropical climates. When you subject them to the harsh, 36-degree Fahrenheit chill of your refrigerator, they go into systemic shock.
The most dramatic victim of cold damage is sweet basil (Ocimum basilicum). Basil is highly susceptible to chilling injury when exposed to temperatures below 54 degrees Fahrenheit (12 degrees Celsius). At these low temperatures, the lipid bilayer of the plant’s cell membranes actually stiffens and ruptures. This cellular rupture leads to severe electrolyte leakage, a complete loss of turgor pressure (the internal water pressure that keeps the leaf crisp), and rapid tissue necrosis. That is the exact scientific reason why your beautiful green basil leaves develop hideous black spots and turn to mush the moment they touch the cold air of your fridge.
Ethylene Gas: The Silent Ripening Killer
Your produce drawer is a continuous, invisible chemical battlefield. Ethylene (C2H4) is a naturally occurring hydrocarbon gas that functions as a powerful plant hormone, triggering the ripening and aging process in fruits and vegetables.
Climacteric fruits—like apples, bananas, avocados, and tomatoes—are massive producers of ethylene gas. When you store your delicate, ethylene-sensitive leafy greens right next to an apple, the gas acts as a catalyst for rapid senescence (the botanical term for aging and deterioration). Exposure to ethylene gas causes severe chlorophyll degradation, meaning your vibrant, bright green cilantro will rapidly turn a sickly, pale yellow before dissolving into mush. Keep your delicate greens far, far away from your fruit bowl.
Soft Herbs vs. Hard Herbs: Know Your Leafy Divas
You cannot treat all plants the same way. If you want to master your kitchen, you have to separate your greens into two distinct categories based on their botanical structure. They require entirely different storage environments to survive.
The Soft Herb Squad
This category includes cilantro, parsley, basil, mint, dill, chervil, and tarragon. You can easily identify them by their tender, fleshy, bright green stems and delicate leaves. They have an exceptionally high water content and wilt incredibly fast when exposed to dry air. Because of their fragile vascular systems, they need to be treated exactly like a fresh bouquet of cut flowers.
The Hard Herb Crew
This category includes rosemary, thyme, oregano, sage, and marjoram. These plants are built for survival. They feature woody, rigid stems and tough, slightly fuzzy, or leathery leaves. Native to arid climates, they have a much lower internal water content and are highly prone to rotting if they are kept too wet. They do not want to sit in a glass of water; they want a controlled, slightly damp environment.
Washing Your Herbs: The Pre-Storage Ritual
Before we store anything, we have to prep it. The moment you get home from the store, remove those suffocating rubber bands and toss the plastic sleeves in the recycling bin. Now, you face the ultimate debate: to wash now, or to wash later?
My rule is simple: wash them immediately, but only if you have the discipline to dry them completely. Fill a large bowl with cold water and gently swish the greens around to dislodge the grit, sand, and field dirt. Lift them out of the water (do not pour the water over them, or you will just pour the dirt back on) and transfer them to a salad spinner. If you want to equip yourself with essential beginner kitchen tools, a high-quality pump-action salad spinner is non-negotiable. Spin them until they are bone dry. Any residual moisture left on the leaves will accelerate the rotting process.
The “Bouquet Technique”: The Ultimate Lifesaver for Soft Herbs
For the soft squad (cilantro, parsley, mint, dill), we are going to utilize the Bouquet Technique. This scientifically proven method provides the stems with a constant source of hydration while protecting the delicate leaves from the harsh, dry air of the refrigerator.
Step-by-Step Bouquet Execution
First, place your dry greens on a cutting board. Because repeatedly hacking at fibrous stems on a rock-hard surface is actively ruining your good knives, make sure you are using a forgiving edge-grain wood or high-quality rubber board. Using a sharp blade, cleanly snip about half an inch off the bottom of the stems at a 45-degree angle. This fresh, angled cut removes the dried-out, dead tissue at the base and opens up the xylem tubes, allowing the plant to drink water efficiently.
Next, find a heavy-bottomed glass jar (a wide-mouth mason jar or a sturdy water glass works perfectly). Fill the bottom with exactly one to two inches of fresh, cold water. Stand the freshly trimmed bunch upright in the jar, ensuring that the cut stem ends are fully submerged, but—and this is critical—make absolutely sure that none of the actual leaves are touching the water. Submerged leaves will rot in a matter of hours.
Finally, we must create a humid microclimate. Take a reusable, food-grade silicone bag (or a loose plastic produce bag, if you must) and invert it over the top of the leaves like a protective tent. Do not seal it tight; the plant still needs to breathe. This tent traps the humidity transpiring from the leaves, preventing them from drying out, while also acting as a physical shield against the aggressive cold air blowing from your fridge’s compressor fan. Place the jar in the refrigerator, and change the water every two to three days to prevent bacterial growth. Your cilantro and parsley will easily last two to three weeks this way.
The Basil Exception: Keep It Out of the Cold
I cannot stress this enough: do not put your basil in the refrigerator. As we discussed in the science section, basil suffers massive cellular damage below 54 degrees Fahrenheit. You will prep your basil using the exact same Bouquet Technique—trimming the stems and placing it in a jar of water—but you will leave it sitting right on your kitchen counter. Keep it away from direct, harsh sunlight and away from your ethylene-producing fruit bowl. Treated like a beautiful, aromatic houseplant, your basil will thrive at room temperature for over a week, and might even start sprouting new white roots.
The “Paper Towel Wrap”: The Bulletproof Method for Hard Herbs
Woody, hard herbs like rosemary, thyme, and sage will drown and rot if you try to put them in a glass of water. They require the Paper Towel Wrap method, which provides a slow, controlled release of moisture without ever allowing the leaves to get soggy.
The Perfect Wrap Strategy
Take a high-quality, unbleached paper towel or a clean, organic cotton kitchen cloth. Run it under the faucet, and then wring it out with brutal force. You want the towel to be barely damp, not soaking wet. If water drips from the towel when you squeeze it, it is too wet.
Lay the damp towel flat on your counter. Arrange your dry, unwashed woody sprigs in a single, even layer across the surface of the towel. Gently roll the towel up from the bottom, creating a snug, leafy culinary cigar. If any stray leaves fall out during this process, easily gather them up using a bench scraper rather than dulling your knife blade on the board.
Once your bundle is rolled, you must protect it from the dehydrating environment of the fridge. Place the damp roll inside an airtight glass container or a fully sealed silicone storage bag, and place it in your crisper drawer. The damp towel provides a perfect, localized humid environment, while the airtight container prevents the moisture from evaporating into the fridge. Your rosemary and thyme will stay brilliantly fresh for up to three weeks using this method.
Storage Gear: Stop Using Toxic Trash to Save Your Greens
We need to pause for a moment to discuss the actual vessels you are using to store your food. As a home cook who values both efficiency and health, I am fiercely passionate about banishing toxic kitchen gear from my house.
The Danger of Cheap Plastics and Mystery Metals
I have absolutely zero patience for cheap, peeling, off-gassing plastic storage containers. You know the ones I mean—the flimsy takeout containers that warp in the dishwasher, permanently absorb the smell of last week’s garlic, and develop a bizarre, hazy film over time. If you are exhausted by the endless chore of cleaning greasy plastic containers, the solution is to throw them in the recycling bin where they belong.
Cheap plastics are notorious for containing endocrine-disrupting chemicals like BPA, BPS, and phthalates. When exposed to the acidic nature of certain foods, or the heat of a dishwasher, these plastics micro-degrade and leach toxic compounds directly into the ingredients you are about to feed your family. You are putting in the effort to buy fresh, beautiful, healthy produce; do not insult those ingredients by entombing them in toxic trash. Furthermore, stay away from unlined mystery metals or cheap aluminum containers, which can react with the natural moisture of your greens and impart a harsh, metallic taint to your food.
What You Should Actually Be Using
Invest in your kitchen infrastructure. You only need to buy high-quality storage gear once. I strictly recommend using heavy-duty, thermal-shock resistant borosilicate glass containers with medical-grade silicone gaskets for an airtight seal. Glass is completely non-reactive, non-porous, and zero-waste.
For the bags needed in the Bouquet Technique or the Paper Towel Wrap, ditch the single-use plastic zip-top bags. Upgrade to pure, platinum-grade food silicone bags. They are endlessly reusable, completely non-toxic, dishwasher safe, and create a far superior airtight seal compared to cheap disposable plastics.
Reviving the Nearly Dead: Shock Therapy for Wilting Herbs
Let us say you slipped up. You left a bunch of parsley sitting on the cutting board for a few hours, or your fridge temperature fluctuated, and now your greens are looking sad, limp, and lifeless. As long as they have not turned black or slimy, you can bring them back from the brink using the science of osmosis.
The Ice Water Bath Resurrection
When a plant wilts, it is because the cells have lost their turgor pressure. Turgor pressure is the outward force exerted by water inside the plant cell’s central vacuole against the rigid cell wall. When the water evaporates, the pressure drops, and the structural integrity of the leaf collapses.
To fix this, fill a large bowl with cold water and dump in a generous handful of ice cubes. Submerge your wilted greens entirely in the freezing water and walk away for twenty to thirty minutes. Through the biological process of osmosis, the water molecules will move from the area of high concentration (the ice bath) across the semi-permeable cell membranes into the area of low concentration (the dehydrated plant cells). The vacuoles will fill back up, the turgor pressure will be restored, and your limp parsley will miraculously crisp up and look freshly picked. Dry them thoroughly in your salad spinner before using or storing them.
Long-Term Preservation: When You Just Can’t Eat Them Fast Enough
Sometimes, despite your best efforts, you simply have too much produce to consume before it naturally expires. When you reach the three-week mark and your greens are on their last legs, it is time to pivot to long-term preservation.
The Herb Butter and Oil Cube Strategy
Freezing is a fantastic preservation method, but you cannot just throw bare leaves into the freezer. The extreme cold will cause the water inside the plant cells to expand and crystallize, rupturing the cell walls. When thawed, you will be left with a dark, mushy paste. Furthermore, the dry environment of the freezer will cause sublimation (freezer burn), destroying the flavor.
The secret is to encapsulate the chopped greens in a protective layer of fat. Finely chop your leftover rosemary, thyme, or oregano. Pack the chopped pieces into the compartments of a silicone ice cube tray. Pour high-quality extra virgin olive oil, or melted unsalted butter, over the greens until they are completely submerged. Freeze the tray until solid, then pop the frozen flavor cubes out and transfer them to a silicone freezer bag.
The fat acts as a cryogenic shield, protecting the delicate essential oils from freezer burn and oxygen exposure. The next time you are searing a steak or sautéing vegetables, just drop a frozen compound butter cube directly into your hot skillet. Just remember that cheap aerosol oils are ruining your nonstick pans due to soy lecithin buildup, so always rely on the pure, high-quality fats you froze your greens in to lubricate your cookware.
Drying Herbs the Right Way
If you prefer dried seasonings, skip the dusty supermarket bottles and dry your leftovers yourself. Air-drying takes weeks and often leads to dust accumulation, but you can use your microwave to dehydrate them perfectly in minutes.
Pick the leaves off the stems and arrange them in a single layer between two dry paper towels on a microwave-safe plate. Microwave them on high power in short, thirty-second bursts. The microwave targets the water molecules inside the leaves, forcefully evaporating the moisture while leaving the flavorful essential oils perfectly intact. Depending on the moisture content of the plant, they will be completely dehydrated and crumbly within one to two minutes. Store them in an airtight glass spice jar in a cool, dark pantry.
Final Thoughts: Reclaiming Your Grocery Budget
Cooking incredible food at home does not require a Michelin star or a trust fund; it requires a basic understanding of your ingredients and a refusal to accept unnecessary waste. Your kitchen should be a place of creativity and joy, not a source of stress and guilt every time you open the refrigerator door.
By taking an extra five minutes after your grocery run to properly trim, hydrate, and wrap your delicate greens, you are actively protecting your financial investment and ensuring that your weekday meals are packed with bright, vibrant flavor. Once you master these simple, scientifically backed storage techniques, you will finally have the confidence to organize your dream kitchen and cook like the absolute expert you are. Stop throwing your money in the trash, respect your ingredients, and get back to making mind-blowing food.






