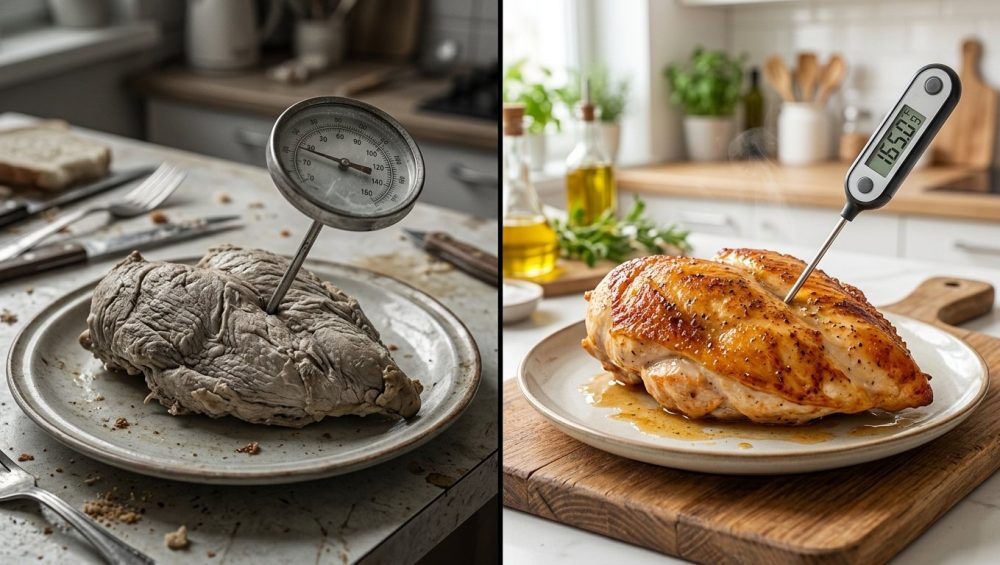
Pour yourself a generous glass of Pinot Noir, pull up a stool to the kitchen island, and let us have a brutally honest conversation about the betrayal currently sitting in your utensil drawer. You know the one. It is that cheap, plastic-encased, cloudy-dialed meat thermometer you bought for five dollars at the grocery store checkout aisle three years ago. You stab it into a beautiful, expensive cut of meat, stare at the dial as it slowly creeps upward like a snail moving through molasses, and pray that you are not about to serve your dinner guests something that resembles a leather shoe.
If you have ever pulled a roast out of the oven, sliced into it, and felt a crushing wave of disappointment as you realized it was catastrophically overcooked, I need you to listen to me carefully: it is entirely possible that it was not your fault. You might think you are committing one of those classic rookie kitchen mistakes, but the truth is far more insidious. You are being lied to by a piece of garbage kitchenware that has no business being in the home of a self-respecting cook.
As a fiercely unapologetic advocate for the home cook, I firmly believe that absolutely anyone can cook like a Michelin-starred professional without enduring years of culinary school. But you cannot execute professional-level techniques if you are relying on inaccurate, sluggish, and fundamentally flawed equipment. In this definitive masterclass, we are going to tear apart the science of why your cheap meat thermometer is ruining your dinners, decode the pretentious jargon surrounding modern temperature tools, and upgrade your kitchen arsenal so you never ruin a steak again.
The Culinary Saboteur in Your Kitchen Drawer
Let us set the scene. It is a Tuesday night. You are exhausted from a long day of pretending to care about spreadsheets, and all you want is to quickly sear a beautiful chicken breast or a thick-cut pork chop. You want efficiency, you want flavor, and you want to sit down and eat. You sear the meat, you insert your trusty grocery-store dial thermometer, and you wait. And wait. And wait.
By the time that little red needle finally settles on a number, thirty seconds have passed. In the culinary world, thirty seconds over a hot skillet is an absolute eternity. In that half-minute, your perfectly juicy pork chop has crossed the invisible threshold from “tender and succulent” to “dry and chalky.”
The problem with these cheap thermometers is that they instill a false sense of confidence. You followed the recipe. You hit the target temperature. You did everything right! And yet, the food is ruined. This breeds cooking anxiety. It makes you think you lack some innate, magical culinary talent. Let me banish that thought from your mind right now. There is no magic in cooking; there is only applied physics and chemistry. When your tools fail to accurately measure the physics of your food, your food fails. It is that simple.
The Anatomy of a Lie: How Bi-Metal Dial Thermometers Actually Work
To understand why we must violently throw these cheap thermometers into the nearest garbage receptacle, we must first understand the archaic science behind how they operate. Most inexpensive, analog dial thermometers—and even some of the cheaper digital ones—rely on a mechanism known as a bimetallic strip.
The Sluggish Coil of Disappointment
The bimetallic strip was famously utilized in 1759 by John Harrison, an eighteenth-century clockmaker who needed a way to compensate for temperature changes in marine chronometers on wooden ships. Yes, you read that correctly. You are trusting your expensive, modern groceries to technology invented during the reign of King George II.
Here is how it works: inside the thick metal stem of your dial thermometer, there is a small coil. This coil is made of two different types of metal—typically steel and copper, or steel and brass—that have been welded, brazed, or riveted together. These two metals have entirely different coefficients of thermal expansion. In plain English, this means that when they are exposed to heat, one metal expands much faster and larger than the other.
As the heat of your roasting turkey penetrates the stem of the thermometer, the metal with the higher expansion rate forces the coiled strip to physically bend and uncoil. One end of this coil is anchored to the housing of the thermometer, while the other end is attached to the dial’s needle. As the strip mechanically bends, it physically pushes the needle up the temperature scale.
Why is this a disaster for your weeknight dinners? Because mechanical displacement requires a massive amount of time and energy to stabilize. The heat has to penetrate the thick outer casing, warm up the two separate metals, cause them to physically expand, and force the coil to unwind. This entire agonizing process can take up to thirty agonizing seconds to give you a final, stable reading. By the time the needle stops moving, the temperature of your food has already skyrocketed past your target.
The “Two-Inch Deep” Reading Flaw
If the glacial speed of a bimetallic coil was not bad enough, its physical design introduces a second, far more fatal flaw. The bimetallic coil inside the stem is not located at the very tip of the thermometer. It is typically two to two-and-a-half inches long, stretching from the tip up to a small indentation or “dimple” on the shaft.
Because the entire coil must be heated to move the dial, a bimetallic thermometer does not measure the temperature at the tip. It measures the average temperature across the entire two-and-a-half-inch length of the coil.
Think about the catastrophic implications of this. If you are trying to measure the internal temperature of a three-quarter-inch thick hamburger patty or a relatively thin chicken breast, it is physically impossible to get an accurate reading. If you insert the probe from the top, the tip might be touching the hot skillet, the middle of the coil is in the meat, and the top of the coil is exposed to the ambient air of your kitchen. The thermometer takes the scorching heat of the pan, the moderate heat of the meat, and the cool air of the room, averages them all together, and spits out a completely fabricated number.
If you have ever wondered why your chicken always turns out dry, this average-reading flaw is the prime suspect. You cannot find the true thermal center of a piece of meat when your instrument is busy averaging the temperature of the surrounding atmosphere.
The True Cost of Cheap Kitchen Gear
One of my strictest rules in the kitchen is that I have absolutely zero patience for toxic, cheap, or poorly manufactured gear. I despise non-stick pans with peeling chemical coatings, I loathe flimsy spatulas that melt into your sauces, and I hold a special level of contempt for cheap thermometers. People often balk at the idea of spending fifty to one hundred dollars on a high-quality cooking thermometer, claiming they are on a budget. But let us break down the actual, mathematical cost of being cheap.
Ruined Dinners and Wasted Grocery Money
We are living in an era where groceries are not cheap, and high-quality protein is an absolute luxury. As of early 2026, the average wholesale price of a USDA Choice boneless ribeye steak is hovering around $13 to $14 per pound, with premium cuts at high-end steakhouses easily breaking the $100 mark. Even humble ground beef has surged past $6.70 per pound due to prolonged supply shocks and shrinking cattle herds.
Imagine you go to the butcher and spend $40 on two gorgeous, thick-cut, beautifully marbled ribeye steaks for a special weekend dinner. You season them perfectly, you get your cast iron skillet smoking hot, and you build a beautiful crust. You insert your five-dollar grocery store thermometer to check for a perfect medium-rare. Because the bimetallic coil takes thirty seconds to read, and because it is averaging the temperature of the air and the pan, it tells you the steak is only at 115°F. You leave it in the pan for another two minutes.
When you finally slice into the steak, it is a sad, grey, well-done tragedy. You have just thrown $40 directly into the trash can. If you ruin just two decent steaks or dry out one large holiday turkey because your thermometer lied to you, you have already wasted more money than it would have cost to buy the best, most professional thermometer on the market. This perfectly illustrates my strict philosophy on banishing toxic kitchen gear and cheap gadgets: buy it nice, or buy it twice.
The Food Safety Illusion
Beyond the financial tragedy of ruined meat, there is a very real, very serious health risk associated with inaccurate temperature readings. According to the USDA and the CDC, approximately one in six Americans—that is roughly 48 million people—suffer from foodborne illnesses every single year. These entirely preventable illnesses result in 128,000 hospitalizations and 3,000 deaths annually.
A staggering number of these cases originate in the home kitchen due to improper cooking temperatures. A 2016 USDA study revealed that 21% of participants relied entirely on visual cues—like the color of the meat or the presence of grill marks—to determine if their food was safe to eat. Let me be perfectly clear: color is a liar. Ground beef can easily turn brown on the outside long before the internal temperature reaches the safe zone of 160°F that is required to destroy dangerous pathogens like E. coli.
Even when home cooks try to do the right thing, cheap gear fails them. A 2023 observational study by the USDA found that while 50% of participants used a thermometer when cooking ground pork sausage, half of those people failed to check every single patty. If your thermometer takes thirty seconds to read one patty, you are certainly not going to stand over a splattering stove for three minutes to check six different burgers. You check one, assume the rest are fine, and put your family at risk. A lightning-fast thermometer eliminates this bottleneck, allowing you to temp an entire pan of burgers in under five seconds.
Enter the Thermocouple: Your Kitchen’s New Best Friend
If the bimetallic dial thermometer is the villain of our story, the thermocouple is the undisputed hero. Walk into any high-end professional kitchen, from a bustling Parisian bistro to a Michelin-starred tasting menu restaurant in New York, and you will not see a single chef using a dial thermometer. They use digital thermocouple thermometers.
What is a Thermocouple, Anyway?
Let us strip away the pretentious engineering jargon and look at the elegant science of how a thermocouple works. Unlike the clunky, two-inch mechanical coil of a dial thermometer, a thermocouple relies on pure electrical voltage.
Inside the incredibly thin, needle-like probe of a thermocouple thermometer, there are two microscopic wires made from two entirely different metals. In the culinary gold standard—known as a Type K thermocouple—these metals are typically nickel and chromium. These two tiny wires run down the length of the probe and are welded together at the very, very absolute tip of the needle.
When heat hits that microscopic welded junction at the tip, it creates a tiny, measurable electrical voltage across the two dissimilar metals. This phenomenon is known as the Seebeck effect. The hotter the tip gets, the higher the voltage becomes. A highly advanced microchip inside the handle of the thermometer instantly reads this voltage, runs a rapid mathematical calculation, and displays the exact temperature on a digital screen. When I curate my list of essential beginner kitchen tools, a high-quality thermocouple is always at the absolute top, because it entirely removes human error from the cooking process.
The Need for Speed (and Accuracy)
Because a thermocouple does not rely on the slow mechanical bending of thick metals, its response time is nothing short of breathtaking. A premium thermocouple thermometer can register a completely accurate, stable temperature reading in 0.5 to 1 second.
Furthermore, because the sensor is located exclusively at the microscopic welded junction at the very tip of the probe, it does not average the temperature across the shaft. It tells you the exact temperature of the precise millimeter of meat that the tip is touching.
This is especially critical when cooking delicate proteins, like a quick pan-seared salmon, where a few degrees means the difference between flaky perfection and cat food. With a thermocouple, you can push the tip into the absolute center of the thinnest filet of fish, and within one second, you know exactly what is happening inside.
Thermistor vs. Thermocouple: Decoding the Jargon
Now, if you go online to shop for a digital meat thermometer, you will likely encounter two terms: Thermocouple and Thermistor. While both are vast improvements over the dark ages of the bimetallic dial, they are not created equal, and it is vital to know what you are paying for.
The Middle Ground: Thermistors
A thermistor (short for thermal resistor) is a slightly older, cheaper digital technology. Instead of two welded wires creating voltage, a thermistor uses a tiny ceramic semiconductor bonded into the tip of the probe with temperature-sensitive epoxy. The device sends an electrical current through the semiconductor, and as the temperature changes, the semiconductor’s resistance to the electrical flow changes. The thermometer measures this resistance and calculates the temperature.
Thermistors are fantastic for specific uses. They are incredibly accurate, and because they are cheaper to manufacture, they are often used in “leave-in” probe thermometers—the kind you stick into a Thanksgiving turkey and connect via a wire to a monitor sitting on your counter. However, they have drawbacks. The semiconductor makes the tip of the probe slightly thicker, and they are considerably slower than thermocouples, typically taking anywhere from 5 to 10 seconds to register a final reading. Five seconds is fine for a roast sitting in a low oven, but it is still too slow for a steak searing in a 500-degree cast iron pan.
The Gold Standard: Type K Thermocouples
As we have established, the Type K thermocouple is the undisputed king of the “instant-read” category. If a thermometer claims to read in under three seconds, it is almost certainly a thermocouple. They are more expensive to manufacture, which is why you will not find them in the five-dollar bargain bin, but their speed, their microscopic sensor size, and their rugged durability make them the only acceptable choice for active, weeknight stovetop cooking.
How to Actually Temp Your Meat Like a Professional
Buying a Ferrari does not automatically make you a Formula 1 driver, and buying a $100 thermocouple does not magically guarantee perfect meat if you do not know how to use it. There is a specific, scientific technique to temping your food.
Finding the Thermal Center
The biggest mistake home cooks make with a fast digital thermometer is just stabbing the meat once, reading the number, and walking away. Because the outside of the meat cooks faster than the inside, there is a severe temperature gradient throughout the cut. The surface of your steak might be 200°F, while the dead center is only 100°F.
To find the true thermal center—the coolest part of the meat that dictates its final doneness—you must use the “pull-through” method. Insert the thin probe of your thermocouple past the center of the meat. Then, while watching the ultra-fast digital display, slowly pull the probe back through the meat toward you. You will see the numbers drop, hit a minimum low point, and then begin to rise again as you approach the outer crust. That lowest number you saw? That is your true thermal center. Mastering this one simple technique is a massive step toward truly embracing the art of the kitchen.
If you are cooking a thin food, like a smash burger or a delicate cutlet, never insert the thermometer from the top down. You will push right through to the pan. Pick the meat up slightly with your tongs and insert the probe horizontally through the side, ensuring the tip rests dead in the middle.
Carryover Cooking: The Invisible Heat Wave
We now arrive at the most crucial scientific concept in all of meat cookery: Carryover Cooking. If you wait until your thermometer reads 135°F to pull your medium-rare steak out of the pan, you have already ruined it.
When you remove a piece of meat from a heat source, it does not instantly stop cooking. The outer layers of the meat are still drastically hotter than the center. Because heat always seeks equilibrium, that intense thermal energy from the exterior will continue to aggressively migrate inward toward the cooler center, raising the internal temperature significantly as the meat rests on your cutting board. This latent heat transfer is carryover cooking.
Understanding this scientific reality is exactly how you turn a stressful, guessing-game dinner into a peaceful daily habit. You must pull your meat before it reaches your target temperature.
The amount of carryover heat depends entirely on the mass of the meat and the intensity of the cooking temperature.
- Small Cuts (Steaks, Burgers, Chicken Breasts): These have a smaller thermal mass but a high surface-area-to-volume ratio. Expect the internal temperature to rise by roughly 3 to 6 degrees Fahrenheit while resting. If you want a 130°F medium-rare steak, pull it at 125°F.
- Large Cuts (Pork Shoulders, Whole Turkeys, Prime Ribs): Massive cuts of meat hold an enormous amount of latent thermal energy. A large roast can easily rise by 10 to 15 degrees Fahrenheit (or more) after being removed from the oven. If your target for a pork roast is 145°F, you must pull it at 130°F to 135°F.
Never skip the resting phase. Not only does it allow the temperature to gently peak through carryover cooking, but it also gives the violently agitated muscle fibers time to relax and reabsorb their juices. If you slice into a blazing hot steak immediately, those juices will flood your cutting board, leaving the meat dry and flavorless.
The Sassy Sous-Chef’s Official Buying Guide: What to Buy Instead
I promised you I would not leave you hanging without a solution. As a strict pragmatist, I do not recommend gear unless I personally use it, abuse it, and trust it. Here is exactly what you should replace that ancient dial thermometer with.
The Unbeatable Industry Standard
If you want the absolute best, the undisputed heavyweight champion of the culinary world is the Thermapen ONE by ThermoWorks. This is not a sponsored endorsement; it is a statement of scientific fact. It utilizes a highly advanced Type K thermocouple that guarantees a full, accurate reading in one second or less. It is waterproof, its display auto-rotates depending on how you hold it, and it is built to survive being dropped on hard tile floors. Unlike the cheap materials that make your plastic containers stay greasy forever, this tool is made of durable, professional-grade polymers designed for commercial kitchens. Yes, it is an investment, but it will save you hundreds of dollars in un-ruined meat over its lifetime.
The Budget-Friendly Speed Demon
If you simply cannot stomach the price tag of the premium models, do not revert to the five-dollar dial. Look for a high-quality thermistor or entry-level thermocouple model, such as the ThermoPop (also by ThermoWorks) or a highly-rated mid-tier digital reader. These will generally cost you between $30 and $40. They might take three to four seconds to read instead of one second, but they still measure at the absolute tip of the probe, ensuring you get an accurate reading of the thermal center without averaging the air temperature.
The Leave-In Lifesaver for Roasts
For large, slow-cooking projects like Thanksgiving turkeys, Sunday pot roasts, or smoked briskets, you should invest in a leave-in probe thermometer. These units use a heat-resistant cable attached to a thermistor probe that stays inside the meat while it cooks in the oven. The cable connects to a digital base station on your counter, allowing you to set high and low temperature alarms. While you’re busy executing a clever frying pan pasta trick on the stove, your leave-in probe is monitoring the roast in the oven, completely eliminating the need to constantly open the oven door and let the heat escape. Brands like the ThermoWorks ChefAlarm or wireless smart-probes like the Meater are phenomenal tools for this specific job.
Calibrating Your Reality: The Ice Bath Test
Even the most expensive, high-tech thermocouple in the world needs occasional verification. If you drop your thermometer, or if you just want peace of mind before ruining a holiday roast, you should perform a simple calibration test. Knowing your gear is perfectly calibrated is the foundational step for unlocking kitchen creativity without the fear of failure.
Do not try to test your thermometer in boiling water. The boiling point of water changes drastically depending on your atmospheric pressure and elevation above sea level. Instead, use the universal constant of an ice bath.
Fill a tall glass entirely to the brim with crushed ice (not cubed ice, which leaves too many warm water gaps). Add just enough cold water to fill the spaces between the ice. Stir it vigorously and let it sit for two minutes. Insert the tip of your thermometer into the center of the icy slush, ensuring it does not touch the bottom or sides of the glass. A properly calibrated thermometer will read exactly 32°F (0°C). If it is off by more than a degree, check your manufacturer’s manual to adjust the calibration settings.
Final Thoughts: Invest Once, Cry Once, Eat Perfectly Forever
Cooking should not be an exercise in anxiety. It should not be a frantic guessing game where you slice into a piece of chicken and pray it isn’t raw, or gnaw on a piece of steak and mourn the $40 you just burned. You are a capable, intelligent home cook, and you deserve tools that respect your time, your budget, and your ingredients.
Throw away the sluggish, lying, bimetallic coil of disappointment. Invest in a tool that operates at the speed of modern science. Learn to find the thermal center, respect the invisible power of carryover cooking, and pull your meat off the heat before it is too late. Once you eliminate the guesswork, you will realize that you were never a bad cook—you were just a good cook fighting against terrible equipment. Now go pour yourself another glass of wine, buy a beautiful steak, and cook it with the absolute, unshakeable confidence of a professional.


