
Welcome to the weekend. You have survived the corporate grind, you have successfully optimized your meal prep to get through the chaos of Wednesday, and now you are ready to treat yourself to a proper, civilized morning. According to the latest 2025-2026 State of Home Cooking report, a staggering 93% of consumers expect to cook at home as much or more than they did last year, with 85% citing economic pressures and a collective desire to cut back on overpriced, ultra-processed restaurant meals. The weekend brunch has officially moved from the crowded, noisy downtown cafe to your own dining table. And honestly? Thank goodness. You can wear your sweatpants, the coffee is actually hot, and you do not have to pay twenty-two dollars for a piece of toast.
While I spend my weekdays fiercely advocating for efficiency and simple weeknight dinners, the weekend is when we have the luxury of time. It is when we tackle the elusive, intimidating, and endlessly frustrating culinary white whale: the restaurant-quality poached egg.
If you have ever tried to poach an egg at home, you already know the heartbreak. You carefully crack your egg into a pot of simmering water, expecting a beautiful, tight, mozzarella-ball-like sphere of culinary perfection. Instead, you watch in absolute horror as the egg white instantly explodes into a million wispy, ghostly tentacles, clouding up your water and leaving you with a sad, naked yolk wrapped in a rubbery string. You scoop it out, stare at the watery mess on your plate, and wonder why you even bother.
Take a deep breath. Pour yourself a mimosa. There is a deeply scientific reason your poached eggs fall apart the second they hit the water, and I promise you, it is not a lack of culinary talent on your part. It is basic chemistry, fluid dynamics, and the inevitable passage of time. Today, we are going to completely dismantle the myths surrounding poached eggs. We are throwing out the vortex, we are banning the vinegar, and we are introducing the only tool you actually need: a fine mesh strainer.
Grab your notebook. Class is in session.
The Anatomy of an Egg: Why It Betrays You
To understand why your poached eggs are turning into a stringy soup, we have to put on our lab coats and look at the physical structure of a raw egg. You might think an egg is just a yolk floating in a uniform puddle of clear slime, but the architecture of an egg is actually a highly complex, multi-layered biological marvel.
An egg white, scientifically known as the albumen, is not a single entity. It is composed of roughly 40 different proteins, along with water, vitamins, and minerals. When you crack a perfectly fresh egg onto a flat plate, you will notice that the white actually has two distinct zones. Immediately surrounding the yolk is a tall, tight, gelatinous layer. This is the thick albumen. Spreading out loosely around the edges of the thick albumen is a watery, runny puddle. This is the thin albumen.
The thick albumen is held together by a crucial glycoprotein called ovomucin, which makes up about 1.5% to 3.5% of the total egg white protein. Ovomucin interacts with another protein called lysozyme to form a highly viscous, structural gel network. When you get a perfect, tight poached egg at a high-end brunch spot, you are eating a cooked thick albumen.
The thin albumen, on the other hand, lacks this robust ovomucin network. It is watery, fluid, and structurally weak. When you drop an egg into a pot of hot water, it is this thin albumen that instantly separates from the yolk, catches the thermal currents of the water, and spins out into those disgusting, wispy white tentacles that ruin your breakfast.
The Aging Process and the pH Shift
Here is where the betrayal happens. When a hen first lays an egg, the internal pH of the egg white is relatively neutral, sitting around 7.6. However, eggshells are porous. From the moment the egg is laid, it begins to slowly off-gas carbon dioxide through the microscopic pores in its shell. As the carbon dioxide escapes into the atmosphere, the internal pH of the egg white begins to rise, eventually reaching a highly alkaline 9.2 over the course of a few weeks.
This shift in pH is catastrophic for the egg’s internal structure. The alkaline environment actively degrades the delicate ovomucin-lysozyme complex. As the ovomucin breaks down, the thick, gelatinous albumen literally melts, transforming into more of the watery, thin albumen. The older the egg, the more thin albumen it contains, and the less thick albumen remains to protect the yolk.
This means that if you try to poach a three-week-old egg, you are essentially dropping a puddle of flavored water into a hot pot. It will obliterate instantly. Blaming yourself for a messy egg when you are working with degraded ovomucin is one of the most common beginner cooking mistakes I see in my inbox every single week. You cannot out-cook chemistry.
The “Farm Fresh” Fallacy
At this point, you are probably thinking, “Okay, Sassy Sous-Chef, I will just buy the freshest eggs possible!” That is a lovely sentiment, but it is largely a fantasy for the average home cook.
Unless you physically walk into your backyard, reach under a very annoyed chicken, and carry the egg directly to your stove, you are not poaching a truly “fresh” egg. The logistics of the modern commercial grocery supply chain dictate that by the time an egg is laid, washed, graded, packaged, shipped to a distribution center, loaded onto a refrigerated truck, stocked on the supermarket shelf, purchased by you, and finally cracked open on a Sunday morning, it is already weeks old.
Even if you pay eight dollars for a carton of organic, pasture-raised, classical-music-listening heritage eggs at a boutique grocery store, those eggs have still been subjected to the relentless march of time and carbon dioxide loss. They will inevitably contain a significant amount of watery, thin albumen. You have to assume that every single egg you buy from a store is going to fight you in the poaching pot. Therefore, we cannot rely on freshness. We have to rely on technique.
Debunking the Myth of the Vortex
If you have ever Googled “how to poach an egg,” you have undoubtedly been told to create a “gentle vortex” in your simmering water before dropping the egg in. The theory claims that the swirling centrifugal force of the whirlpool will magically wrap the egg white around the yolk, creating a perfect sphere.
If you are tired of making stringy poached eggs that look like they belong in a haunted house, you need to stop swirling your water immediately. The vortex is a lie.
Let’s apply some basic physics to this culinary urban legend. Centrifugal force pushes denser, heavier objects toward the center of a spin, while lighter, less dense materials are whipped outward. The yolk of an egg is dense and heavy with fat. The thin albumen is light and watery. When you drop an aging supermarket egg into a spinning vortex of hot water, the whirlpool acts exactly like a laboratory centrifuge. The heavy yolk sinks to the eye of the storm, while the swirling currents violently rip the watery thin albumen away from the center, spinning it out into a massive, sprawling spiderweb across your entire pot.
The vortex method only works if you are using an egg that was laid ten minutes ago and contains zero thin albumen. For the rest of us living in reality, the vortex is actively destroying your breakfast. Stop doing it.
The Vinegar Delusion
The second piece of terrible advice that has plagued home cooks for generations is the mandate to pour a glug of white vinegar into your poaching water.
The science behind this trick is technically sound, but the culinary execution is a disaster. As we discussed, proteins coagulate (set) when they are exposed to heat. However, proteins also denature and coagulate when they are exposed to high levels of acidity. By adding vinegar to your poaching water, you are drastically lowering the pH of the cooking environment. When the egg hits this highly acidic, hot water, the proteins in the egg white experience a violent, rapid shock. They seize up and coagulate almost instantly, before they have a chance to drift away and form wisps.
So, yes, vinegar will technically help your egg stay together. But at what cost?
Leaving the vinegar in the pantry is one of those foolproof cooking secrets that instantly elevates your food from amateur to professional. When egg proteins are shock-coagulated by acid, they do not form a tender, delicate, silky gel. They seize into a tough, squeaky, rubbery shell. You end up with a poached egg that bounces if you drop it. Furthermore, egg whites are incredibly porous and absorb the flavors of their cooking liquid. Boiling your delicate, beautiful eggs in vinegar water ensures that your weekend brunch tastes faintly of a cheap salad dressing. We are making eggs Benedict, not a vinaigrette. Keep the acid out of the pot.
The Hero of the Story: The Fine Mesh Strainer
If we cannot rely on farm-fresh eggs, if we cannot use a vortex, and if we refuse to ruin our food with vinegar, how on earth do we achieve a perfect poached egg?
We turn to the brilliant, science-backed technique popularized by culinary legends like Harold McGee and J. Kenji López-Alt. The solution is not to fight the thin, watery albumen in the pot. The solution is to completely remove the thin albumen before the egg ever touches the water.
Enter the hero of our story: the fine-mesh kitchen strainer (also known as a sieve).
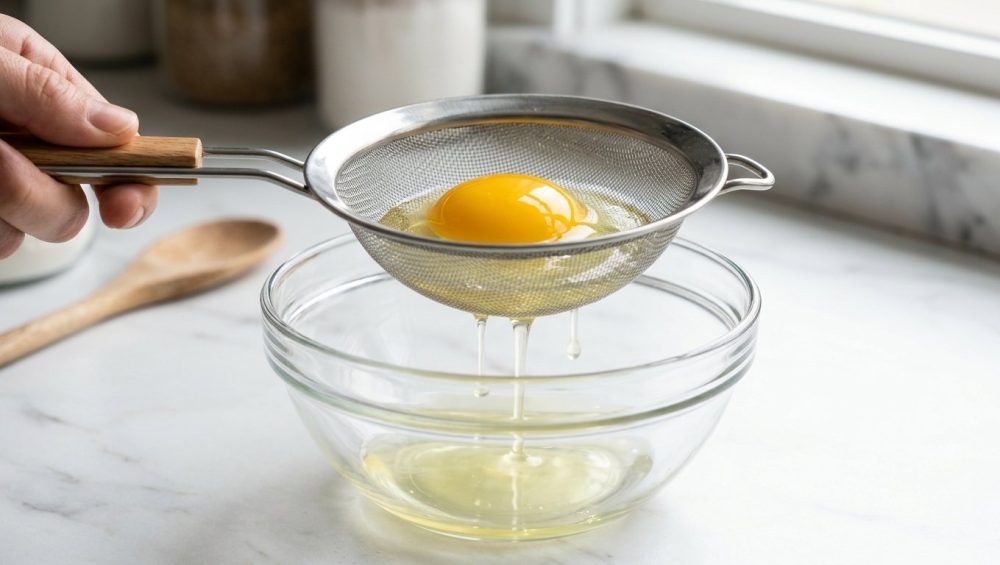
I will explicitly tell you to stop skipping the mesh strainer if you want perfectly tight, aesthetic results. The physics of this technique are beautifully simple. When you crack a raw egg into a fine mesh strainer suspended over a small bowl, the thick, gelatinous albumen (held together by whatever ovomucin is left) is far too cohesive and viscous to pass through the tiny holes of the wire mesh. However, the degraded, watery, thin albumen slips right through the mesh and drains into the bowl below.
By letting the egg sit in the strainer for just thirty seconds, you mechanically separate the problem from the solution. You are left with a pristine, tight package of yolk perfectly encapsulated by thick albumen. When you gently lower this strained egg into a pot of calm, sub-simmering water, there is absolutely no thin white left to drift away. There are no wisps. There are no tentacles. The egg simply sinks to the bottom and gently cooks into a flawless, tear-drop shape. It is a foolproof, stress-free revelation.
The “No-Go” Rule on Toxic Gear: Choosing Your Strainer
Before we get to the step-by-step masterclass, we need to have a very serious conversation about your kitchen equipment. As your sassy sous-chef, I am relentlessly dedicated to banishing toxic kitchen gear from your home. I have zero patience for cheap, dangerous tools that actively harm you and ruin your food.
If you are currently using a dollar-store mesh strainer made of mystery metal that is actively rusting, or worse, a cheap plastic strainer that is warping and leaching microplastics into your hot food, throw it in the garbage immediately. We do not tolerate peeling coatings, rusting wire, or toxic plastics in a kitchen that respects itself.
When purchasing a fine mesh strainer for poaching eggs (and for sifting flour, dusting powdered sugar, or straining sauces), you must invest in high-quality, food-grade stainless steel. Look specifically for 18/8 or 18/10 stainless steel. The numbers refer to the percentages of chromium and nickel in the alloy, which provide exceptional rust resistance, durability, and a completely non-reactive surface.
You want a strainer with a tightly woven, fine wire mesh. If the holes are too large, the thick albumen will start to sag through. If the holes are too small, the thin albumen will not drain properly. A standard fine-mesh tea strainer or a small cocktail sieve is usually the perfect size for a single egg. Ensure the rim is tightly sealed so that food particles do not get trapped in the crevice between the mesh and the frame, which is a breeding ground for bacteria. Buy a good tool once, and it will serve you for a lifetime.
The Masterclass: Step-by-Step Foolproof Poaching
We have the science, we have debunked the myths, and we have our non-toxic stainless steel strainer. It is time to poach. Follow these steps with absolute precision, and you will never fear brunch again.
Step 1: The Thermodynamics of the Water
Fill a wide, heavy-bottomed pot with about three to four inches of water. You do not necessarily need expensive copper cookware for this, but you do need a reliable, heat-retaining vessel or one of your high-quality stainless steel pans to maintain a steady temperature.
Place the pot over medium heat. We are not looking for a rolling, violent boil. A rolling boil sits at 212°F (100°C) and creates massive, turbulent convection currents that will physically tear your egg apart, no matter how well you strained it.
Instead, we want a bare simmer. You are looking for a water temperature between 180°F and 190°F (82°C – 88°C). Visually, this means the water is steaming slightly, and there are tiny, champagne-like bubbles gently rising from the bottom of the pot, but the surface of the water is relatively calm.
Why this specific temperature? Let’s look at the coagulation points of our egg proteins. Ovotransferrin, which makes up 12% of the egg white, is the most heat-sensitive protein and begins to set at 140°F (60°C). Ovalbumin, the primary structural protein making up 54% of the egg white, does not fully coagulate until 180°F (80°C). Meanwhile, the fats and proteins in the yolk begin to thicken at 150°F (65°C) and will completely hard-boil at 158°F (70°C).
By keeping our water right around 180°F to 185°F, we provide enough thermal energy to quickly set the ovalbumin in the egg white, creating a firm exterior, while keeping the ambient heat gentle enough that it takes a few minutes for the core temperature of the yolk to reach its thickening point. This is the thermodynamic sweet spot for a firm white and a liquid gold center.
Step 2: The Straining Process
Place your high-quality stainless steel fine mesh strainer over a small bowl. Carefully crack your cold egg directly into the strainer. (Pro tip: Eggs separate better when they are cold right out of the fridge, as the thick albumen is more viscous at lower temperatures).
Gently swirl the strainer in a circular motion for about twenty to thirty seconds. Watch as the watery, thin albumen drips through the mesh and pools in the bowl below. You will be shocked by how much liquid comes off a standard grocery store egg. Once the dripping stops, you are left with a perfect, tight package of thick albumen and yolk.
Step 3: The Drop
Bring the strainer directly over your pot of sub-simmering water. Do not swirl the water. Do not add vinegar. Simply lower the bottom of the wire mesh directly into the surface of the hot water.
Allow the egg to sit in the strainer, partially submerged in the hot water, for exactly five seconds. This allows the outermost layer of ovotransferrin to instantly coagulate upon contact with the heat, creating a micro-thin, structural skin around the egg before it even leaves the sieve.
After five seconds, gently tilt the strainer and allow the egg to slide seamlessly into the water. It will sink to the bottom and sit there, looking like a perfect, undisturbed pearl.
Step 4: Timing and Extraction
Set a timer. For a perfectly runny yolk with a fully set white, you want to cook the egg for exactly 3 to 3.5 minutes. If you prefer a jammy, slightly sticky yolk, aim for 4 minutes. If you want a hard yolk, go make a hard-boiled egg instead and stop wasting my time.
While the egg cooks, do not poke it, do not stir the water, and do not panic. Let the thermodynamics do the work.
When your timer goes off, use a slotted spoon to gently lift the egg out of the water. Before you put it on your toast, gently tap the bottom of the slotted spoon against a folded paper towel to wick away any excess poaching water. Nobody wants soggy sourdough bread.
Scaling Up Without Losing Your Mind (The Ice Bath Trick)
The strainer method is flawless, but it does present one logistical challenge: you can really only strain and drop one or two eggs at a time. If you are hosting a brunch for six people, standing over the stove monitoring individual eggs for twenty minutes while your guests drink all your prosecco is a recipe for a meltdown.
Fortunately, you can easily throw a flawless dinner party or host a massive Sunday brunch without breaking a single sweat by utilizing the professional restaurant industry’s favorite trick: par-cooking and holding.
You can poach all of your eggs hours (or even a day) before your guests arrive. Follow the exact strainer method described above, but pull the eggs out of the water at exactly 2.5 minutes. They will be slightly undercooked.
Immediately drop the undercooked poached eggs into a large bowl filled with ice water. This ice bath halts the cooking process instantly, shocking the proteins and locking the yolk in a liquid state. You can leave the eggs floating in this ice bath in the refrigerator overnight.
When your guests are seated and the English muffins are toasted, bring a wide pot of water back to a gentle simmer. Use your slotted spoon to transfer the cold, par-cooked eggs from the ice bath directly into the hot water. Because the whites are already set, you can crowd the pot with as many eggs as will fit. Leave them in the hot water for exactly 60 seconds. This is just enough time to reheat the egg through to the center without overcooking the yolk. Scoop them out, dab them on a paper towel, and serve a dozen perfect eggs simultaneously. You will look like an absolute culinary genius, and no one needs to know you did all the hard work yesterday.
Plating and Final Thoughts
A perfectly poached egg deserves respect on the plate. Do not ruin your hard work with cheap, pre-ground black pepper that tastes like sawdust. Invest in a heavy mortar and pestle or a high-quality burr grinder, and finish your eggs with freshly cracked black peppercorns, a generous pinch of flaky Maldon sea salt to provide textural crunch, and perhaps a dusting of smoked paprika or a drizzle of high-quality, cold-pressed olive oil.
Cooking should not be a source of stress; it should be an exercise in understanding your ingredients and wielding your tools with confidence. By understanding the biological breakdown of ovomucin, respecting the specific coagulation temperatures of ovalbumin and ovotransferrin, and utilizing the mechanical brilliance of a simple wire sieve, you have completely removed the guesswork from this notoriously difficult dish.
Consider this technique your ultimate weapon for conquering weeknight cooking anxiety and reclaiming your kitchen confidence. You do not need a culinary degree to make mind-blowing food. You just need a little bit of science, a rejection of toxic kitchenware, and the patience to let the strainer do the heavy lifting.
Now go preheat your pan, toast your bread, and poach some eggs. You’ve got this.






