
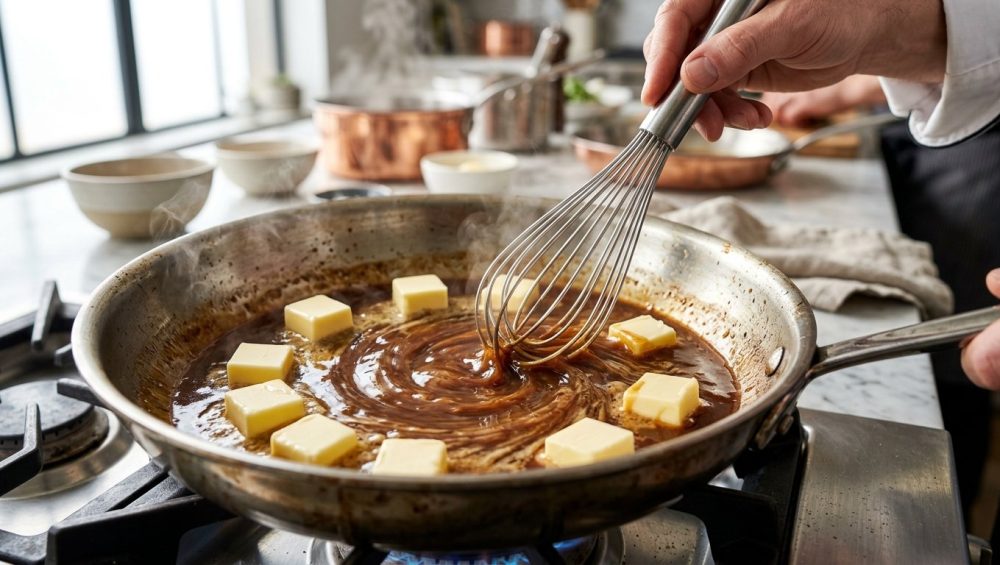
Welcome back to the kitchen. Let’s talk about the single most frustrating, tear-inducing, why-do-I-even-bother moment in weeknight cooking: the broken pan sauce.
You know the drill. You’ve just seared a beautiful steak or a couple of chicken thighs. You’ve got all that gorgeous, caramelized fond stuck to the bottom of the pan. You deglaze with a splash of wine, let it reduce, and then, feeling like a culinary god, you toss in a pat of butter to finish it off. You whisk. You wait for that glossy, velvety, restaurant-quality sauce to emerge.
Instead, you get a greasy, split, oil-slicked tragedy. The fat separates from the liquid, pooling around the edges of the pan like a bad vinaigrette. It looks unappetizing, it feels heavy on the palate, and frankly, it’s an insult to the beautiful piece of protein you just cooked.
If you are nodding along, take a deep breath. You are not a bad cook. You just fell victim to a fundamental misunderstanding of thermal dynamics. You probably used room-temperature butter.
Today, we are going to fix this. We are going to dive deep into the culinary science of monter au beurre—which is just a pretentious French way of saying “mounting with butter.” We are going to explore why whisking freezing-cold butter into a hot liquid creates a perfectly stable, creamy emulsion, while room-temperature butter leaves you with a greasy mess. And because I firmly believe that anyone can cook like an expert without a culinary degree, we are going to break down the science so you can execute this flawlessly every single time.
The Resurgence of the Home Cook (And Why You Need This Skill)
Let’s set the stage. If you’ve been spending more time in your kitchen lately, you aren’t alone. Recent statistics from early 2026 show that the home cooking segment has expanded massively, driving a 15% increase in high-quality cookware sales [1]. People are ditching the expensive takeout, rolling up their sleeves, and realizing that making phenomenal food at home is entirely within their grasp.
But as we upgrade our kitchens—online sales of premium cookware alone have surged by over 30% in the past year [1]—we also need to upgrade our techniques. Having a gorgeous, multi-clad stainless steel skillet doesn’t mean a thing if you don’t know how to use it to its full potential. The ultimate flex for any home cook isn’t buying a $300 pan; it’s knowing how to properly extract every ounce of flavor from it. That means mastering the pan sauce.
A great pan sauce is the ultimate weeknight dinner hack. When time is money, you don’t have hours to simmer a complex demi-glace. You need a sauce that comes together in the exact amount of time it takes your seared protein to rest on the cutting board. It is the epitome of efficiency. You are literally turning burnt bits into sauce, utilizing the residual heat and flavor already in the pan.
But to do it right, you have to understand the science of emulsions.
The Science of Emulsions: Why Oil and Water Hate Each Other
To understand why your pan sauce separates, you first need to understand what an emulsion actually is.
In the culinary world, an emulsion is a temporary peace treaty between two mortal enemies: fat and water. Naturally, these two liquids are immiscible. They despise each other. If you pour oil into water, the oil will immediately float to the top and pool together. This is due to surface tension. The molecules of water want to bond with other water molecules, and the molecules of fat want to bond with other fat molecules.
To force them to play nicely, we have to create an emulsion. This requires two things: mechanical force and an emulsifier.
Mechanical Force (Shear)
When you whisk a sauce vigorously, you are applying sheer force. This mechanical action takes the large pool of liquid fat and physically smashes it into millions of microscopic droplets. By breaking the fat down into microscopic spheres, you disperse it evenly throughout the water phase (the wine or stock in your pan).
The Emulsifier
But mechanical force isn’t enough. The moment you stop whisking, those microscopic fat droplets will find each other, bump into each other, and merge back into a giant oil slick. This is called coalescing. To stop this, you need an emulsifier.
An emulsifier is a molecule with a split personality. One end of the molecule is hydrophilic (water-loving), and the other end is lipophilic (fat-loving). When you whisk the fat into microscopic droplets, the emulsifier molecules rush in and coat the droplets. The fat-loving tails bury themselves in the fat droplet, while the water-loving heads face outward into the water phase. This creates a protective barrier around each microscopic fat droplet, preventing them from merging back together.
When a sauce is properly emulsified, it looks thick, opaque, and glossy. The fat is suspended perfectly. If you’ve ever wondered if your pan sauces are watery because you did something wrong, it’s often because the emulsion failed to form, leaving you with thin liquid and a separate layer of grease.
The Anatomy of Butter: More Than Just Fat
To master the monter au beurre technique, you need to look at butter not just as a delicious ingredient, but as a complex chemical compound.
In the United States and Canada, commercial butter is legally required to contain a minimum of 80% milk fat [2]. European-style butters often push this to 82% or even 84% [2]. But what about the rest of it?
A standard stick of butter is actually a water-in-oil emulsion itself. Its composition looks roughly like this:
- 80-82% Milk Fat: This is the rich, flavorful lipid that gives the sauce its luxurious mouthfeel [2].
- 16-18% Water: Yes, almost a fifth of your butter is just water [2].
- 1-2% Milk Solids: These are the proteins (like casein and whey) and lactose sugars left over from the churning process [2].
Why does this matter? Because those milk solids are the secret weapon. The proteins in the milk solids act as natural emulsifiers. Furthermore, butter contains naturally occurring lecithin (about 0.25%), which is a powerhouse emulsifier [2].
When you whisk butter into a pan sauce, you aren’t just adding fat. You are adding the fat, the water to thin the fat, and the emulsifiers (milk solids and lecithin) needed to bind the whole thing together. It is a complete, self-contained sauce-thickening package. But the temperature of that package dictates whether the mission succeeds or fails.
The Thermal Dynamics of Melting: Cold Butter vs. Room Temperature Butter
Here is the crux of the entire masterclass. This is the reason your sauce broke last Tuesday.
Why Room Temperature Butter Fails
If you take a tablespoon of soft, room-temperature butter and drop it into a hot pan of simmering wine and stock, it melts instantaneously. In a fraction of a second, the butter’s internal emulsion breaks. It dumps its entire 80% fat payload into the pan all at once.
Your whisk simply cannot keep up. You cannot physically apply enough mechanical shear force to break down that massive, sudden influx of liquid fat. The natural emulsifiers in the butter are completely overwhelmed. The fat molecules instantly find each other, coalesce, and form an oil slick on top of your sauce. The emulsion is broken before you even had a chance to fight for it.
The Magic of Freezing-Cold Butter
Now, let’s look at what happens when you use butter straight from the fridge—or better yet, the freezer.
When you drop a cube of freezing-cold butter into a hot liquid, it cannot melt instantly. The thermal mass of the cold butter resists the heat of the pan. It melts slowly, from the outside in.
Because it melts gradually, the fat is released into the liquid in tiny, manageable increments. As you whisk, you are easily able to shear that small amount of melting fat into microscopic droplets. Simultaneously, the slowly melting butter is steadily releasing its water and its milk solid emulsifiers. The emulsifiers have plenty of time to coat the newly formed fat droplets.
By the time the core of the cold butter cube finally melts, the rest of the sauce is already a perfectly stable, thick, glossy emulsion. The cold temperature acts as a natural time-release mechanism, pacing the introduction of fat so that your mechanical whisking can keep up.
It is pure, unadulterated kitchen science, and it works every single time.
The Essential Equipment (And My “No-Go” Rule)
Before we get into the step-by-step technique, we need to have a serious conversation about your hardware. I have zero patience for pretentious chef-speak, but I have even less patience for toxic, garbage kitchenware that actively sabotages your cooking.
If you want to make a proper pan sauce, you need the right pan. You need a heavy-bottomed, multi-clad stainless steel skillet, or a well-seasoned carbon steel pan.
The Problem with Cheap Non-Stick
Let me be brutally clear: you cannot make a great pan sauce in a cheap, Teflon-coated non-stick pan. Why? Because non-stick pans are designed to prevent food from sticking. But when we sear a piece of meat, we want it to stick initially. We want the proteins to undergo the Maillard reaction and leave behind a layer of caramelized, browned bits on the bottom of the pan. This layer is called the fond, and it is the entire flavor base of your sauce.
If you use a flimsy non-stick pan, you get no fond. No fond means no flavor. Furthermore, whisking vigorously in a non-stick pan will scratch the delicate coating, flaking toxic mystery chemicals into your dinner. If you are serious about banishing toxic kitchen gear from your life, throw that scratched non-stick pan in the trash immediately.
The Stainless Steel Advantage
A high-quality stainless steel skillet is your best friend here. It conducts heat evenly and allows for perfect fond development. If you are afraid of your meat tearing, you just need to learn temperature control. Once you understand that your stainless steel pan sticks only when it is improperly preheated, you will unlock a whole new world of searing.
The Whisk
You also need a good whisk. Do not use a silicone whisk; they are too thick and clumsy to provide the aggressive shear force needed to emulsify the fat droplets. You need a stainless steel French whisk or a flat roux whisk. And please, invest in one that is fully sealed at the handle so you don’t end up wondering why your whisk leaks dishwater all over your pristine sauce.
If you want to make your life even easier, consider using a curved saucier pan for dedicated sauce work. The rounded bottom eliminates sharp corners, ensuring your whisk hits every single drop of liquid, leaving no un-emulsified fat hiding in the edges.
The Step-by-Step Masterclass: Executing the Perfect Pan Sauce
Alright, grab your apron. Here is the foolproof, step-by-step method for executing a flawless pan sauce using the monter au beurre technique. We are prioritizing efficiency here, because it’s a Tuesday night and you have things to do.
Step 1: The Sear and the Fond
Sear your protein (chicken, steak, pork chops) in your stainless steel or carbon steel skillet. Use a high-heat oil. Once the meat is cooked to perfection, remove it from the pan and set it on a cutting board to rest. Do not wash the pan! Look at the bottom. See those dark brown, crusty bits? That is your fond. That is culinary gold.
Note: If there is a massive pool of burnt black grease in the pan, pour off the excess fat, leaving just a thin coating. But leave the sticky brown bits.
Step 2: The Aromatics (Timing is Everything)
Lower the heat to medium. Toss in your finely diced shallots. If your knives go dull so fast that you are crushing the shallots instead of slicing them, sharpen your blade—bruised alliums release bitter sulfur compounds. Let the shallots sweat for about 60 seconds until translucent.
Now, add your minced garlic. Why now? Because if you stop adding garlic first, you prevent it from burning and turning your entire sauce acrid. Garlic only needs about 30 seconds to bloom in the residual fat.
Step 3: The Deglaze
Turn the heat up slightly and pour in your liquid. This is usually wine (white or red, depending on the protein), but it can be chicken stock, beef broth, or even apple cider. As the liquid hits the hot pan, it will hiss and boil violently.
Immediately grab your whisk or a flat-edged wooden spoon and start scraping the bottom of the pan. The rapidly boiling liquid acts as a solvent, lifting all that caramelized fond off the metal and dissolving it into the sauce.
Step 4: The Reduction
Let the liquid boil and reduce. This concentrates the flavors and evaporates the harsh alcohol if you used wine. You want to reduce the liquid by at least half, until it is slightly syrupy and the bubbles look thick. If you don’t reduce it enough, your emulsion will be too thin and watery.
Step 5: The Magic of Monter au Beurre
This is the moment of truth.
- Kill the heat. Take the pan completely off the burner. The residual heat in the metal is more than enough to melt the butter. If the pan is too hot, the emulsion will break, regardless of how cold your butter is.
- Add the cold butter. Drop in 2 to 3 tablespoons of freezing-cold, cubed unsalted butter.
- Whisk like your life depends on it. Vigorously whisk the butter into the liquid. Keep the butter moving constantly so it melts slowly and evenly.
- Watch the transformation. As you whisk, you will see the dark, translucent liquid suddenly turn opaque, glossy, and thick. It will coat the back of a spoon perfectly.
Step 6: The Final Seasoning
Taste the sauce. Does it need a pinch of kosher salt? A crack of fresh black pepper? Perhaps a dash of acidity? If you ever wonder why your dinner tastes boring, it is almost always a lack of acid. A tiny squeeze of fresh lemon juice or a splash of sherry vinegar right at the end will brighten the rich butterfat and make the flavors sing.
Pour the glossy sauce over your rested protein. You just made a restaurant-quality meal in the five minutes it took your steak to rest.
Troubleshooting: How to Save a Broken Sauce
Okay, let’s say you got distracted by the dog barking, you left the pan on the heat, and your sauce broke. You are staring at a greasy, separated puddle. Do you throw it out? Absolutely not. We are resourceful home cooks, and we can fix this.
A broken sauce means the fat droplets have coalesced because they got too hot, or there wasn’t enough water phase to suspend them.
The Fix:
- Remove the pan from the heat immediately.
- Add a splash (about a tablespoon) of very cold water or heavy cream. The cold liquid drops the temperature of the sauce, stopping the fat from melting further, while adding more water phase to rebalance the emulsion ratio.
- Whisk violently. The sheer force, combined with the new liquid, will often force the fat droplets back into suspension.
- If that fails, you can cheat. A tiny pinch of xanthan gum or a teaspoon of Dijon mustard (which is packed with natural mucilage emulsifiers) whisked into the sauce will instantly bind it back together.
Advanced Flavor Profiles and Variations
Once you understand the basic mechanics of the cold butter emulsion, the pan sauce becomes a blank canvas for your culinary creativity. You don’t need a recipe; you just need a ratio and an imagination.
The Classic French (Steak au Poivre style):
Deglaze with cognac (flambé if you are feeling brave, but watch your eyebrows). Add beef stock and reduce. Mount with cold butter and finish with a heavy handful of cracked black peppercorns.
The Bright Mediterranean (Perfect for Chicken or Fish):
Deglaze with a dry, crisp white wine like Sauvignon Blanc. Reduce, then add a splash of chicken stock. Mount with cold butter. Finish with fresh lemon juice, brined capers, and finely chopped parsley.
The Umami Bomb (Great for Pork):
Deglaze with dry vermouth. Add a spoonful of whole-grain mustard and a splash of soy sauce or Worcestershire. Reduce, mount with cold butter, and finish with fresh thyme.
Notice a trend? We are never relying on toxic aerosol sprays that leave a sticky residue. If you want to know what actually ruins nonstick pans and gums up your stainless steel, it’s those cheap propellants. By utilizing the natural fats from the meat and finishing with pure, high-quality cold butter, you are cooking cleaner, safer, and infinitely tastier food.
The Final Word
Cooking doesn’t have to be a stressful, chaotic chore. You don’t need a culinary degree to make mind-blowing food. You just need to understand a few basic principles of kitchen science.
The monter au beurre technique is the perfect example of how a tiny tweak in methodology—using freezing-cold butter instead of room-temperature butter—completely changes the chemical outcome of your dish. It is the difference between a greasy, disappointing mess and a glossy, luxurious sauce that makes you look like an absolute genius.
So the next time you sear a piece of meat, don’t you dare wash that pan. Grab a shallot, pour a splash of wine, and go get that cold butter out of the fridge. You’ve got this. Now go cook something amazing.






