
Listen up, buttercup. We need to have a serious, no-holds-barred conversation about the absolute massacre currently happening on your stovetop every Tuesday night. I know exactly what you are doing. You buy a beautiful, expensive piece of salmon or a perfectly marbled steak. You drop it into a cold or lukewarm stainless steel skillet, hear a lackluster sizzle, and then, three minutes later, tragedy strikes. You try to flip the protein, but it has chemically welded itself to the metal. Panic sets in. You scrape, you pry, you curse, and eventually, you are left serving a mangled, shredded pile of meat while spending the next twenty minutes aggressively scrubbing the pan in the sink.
If you are constantly wondering why everything sticks to your cookware, you are not alone. It is one of the most frustrating rookie kitchen mistakes that drives perfectly capable home cooks back into the welcoming, yet highly toxic, arms of cheap non-stick cookware. But as your resident culinary realist, I am here to tell you that you do not need a culinary degree to cook like a professional, and you certainly do not need to rely on chemical coatings that inevitably peel off into your scrambled eggs.
What you actually need is a basic, working understanding of thermodynamics. Specifically, you need to master a little phenomenon called the Leidenfrost effect. By understanding the precise temperature thresholds required to create a microscopic vapor barrier, you can transform an uncoated piece of metal into a naturally stick-free workhorse.
This is the definitive, exhaustive masterclass on exactly how to prevent your food from bonding to your cookware, saving your dinners, your wallet, and your sanity.
The Toxic Lie of Cheap Non-Stick Cookware
Before we dive into the beautiful science of thermal dynamics, we need to address the elephant in the kitchen. I have zero patience for cheap, disposable kitchenware, and I am a huge advocate for banishing toxic kitchen gear from your home permanently. For decades, the cookware industry has sold us a convenient lie: that cooking is inherently messy and difficult, and the only way to survive it is to buy a $19 aluminum pan coated in synthetic polymers.
Here is the brutal truth about those lightweight, non-stick skillets. Most traditional non-stick pans rely on a coating made from polytetrafluoroethylene (PTFE), a synthetic polymer belonging to the broader class of PFAS (per- and polyfluoroalkyl substances). While modern iterations manufactured after 2015 are generally free of PFOA (a particularly nasty chemical that was phased out due to severe health concerns), the replacement chemicals and the PTFE base itself still carry significant baggage.
The primary issue is heat. When a PTFE-coated pan is heated past 500°F (260°C)—a temperature that an empty pan over a high gas flame can reach in less than three minutes—the chemical bonds in the coating begin to break down. This thermal degradation releases invisible, toxic fumes into your kitchen. In humans, inhaling these fumes can cause a condition literally called “polymer fume fever,” which mimics severe flu-like symptoms. In pet birds, these fumes are notoriously and rapidly fatal.
Furthermore, these coatings are incredibly fragile. The moment you use a metal spatula, wash the pan with an abrasive sponge, or stack it carelessly in your cabinet, the coating scratches. Once scratched, the non-stick properties degrade, and you end up ingesting microscopic flakes of synthetic polymers with your dinner. You are likely ruining your nonstick pans with aerosol cooking sprays anyway, as the soy lecithin in commercial sprays bakes onto the PTFE and creates an impenetrable, sticky residue that ruins the pan’s slick surface.
The market is finally waking up to this reality. Recent 2026 industry data shows that 68% of surveyed households now consider cookware material safety as a primary factor in their purchasing decisions. Consequently, the global stainless steel pan market, valued at $3.42 billion in 2024, is projected to surge past $5.18 billion by 2034. Home cooks are realizing that buying a new non-stick pan every eight months is a terrible investment. A high-quality, fully clad stainless steel pan will outlive you, it will never release toxic fumes, and it can sear a steak to absolute perfection. You just need to know how to use it.
The Microscopic Battlefield: Why Does Food Stick to Metal?
To understand how to stop food from sticking, you first have to understand why it sticks in the first place. This requires looking at your cookware on a microscopic level.
To the naked human eye, a brand-new stainless steel skillet looks perfectly smooth, like a mirror. But under a microscope, the surface of that metal is actually incredibly rough. It is a jagged, porous landscape full of microscopic hills, valleys, craters, and crevices.
When you place a piece of cold food—particularly protein-rich foods like chicken, fish, beef, or eggs—into a cold or lukewarm stainless steel pan, a complex chemical reaction takes place. Proteins are essentially long chains of amino acids folded into intricate three-dimensional structures. As the heat from the pan begins to transfer to the food, these proteins denature. They unfold, relax, and expose highly reactive amino acid side chains.
Because the pan is not hot enough to instantly sear the exterior of the food, these exposed, sticky proteins sink deeply into the microscopic valleys of the metal. Once there, they form incredibly strong chemical bonds—specifically covalent bonds and van der Waals forces—with the iron atoms present in the stainless steel alloy.
Congratulations. Your chicken breast is now chemically fused to your cookware. You have effectively created a high-strength culinary adhesive. When it comes to preventing protein adhesion on ungreased metal, temperature control is everything. If the pan is too cold, the proteins bond to the metal. If the pan is too hot, the cooking fat breaks down, smokes, and the food burns instantly. You need a method to hit the exact thermal sweet spot where the pan protects itself.
Enter the Hero: The Science of the Leidenfrost Effect
The secret to cooking on stainless steel without losing your mind is a fascinating principle of physics known as the Leidenfrost effect. Named after the 18th-century German doctor and theologian Johann Gottlob Leidenfrost, who first described the phenomenon in his 1756 tract “On the Fixation of Water in Diverse Fire,” this effect is the ultimate kitchen hack.
The Leidenfrost effect occurs when a liquid comes into contact with a solid surface that is significantly hotter than the liquid’s boiling point. When this happens, the bottom layer of the liquid vaporizes instantly upon contact with the hot metal. This rapid vaporization creates a microscopic, insulating cushion of steam between the hot surface and the rest of the liquid. Because steam conducts heat much more poorly than liquid water, this vapor barrier actually protects the rest of the liquid from boiling away immediately, allowing it to levitate and skitter across the surface with virtually zero friction.
How does this apply to your Tuesday night pork chops?
Every piece of raw food contains moisture. When you place a piece of meat into a stainless steel pan that has been heated to the precise Leidenfrost threshold, the moisture on the very surface of the meat instantly vaporizes. This creates a microscopic barrier of steam between the food and the metal. The food is literally hovering a fraction of a millimeter above the microscopic pores of the pan. Because the proteins are not making direct physical contact with the iron atoms in the steel, they cannot chemically bond to it.
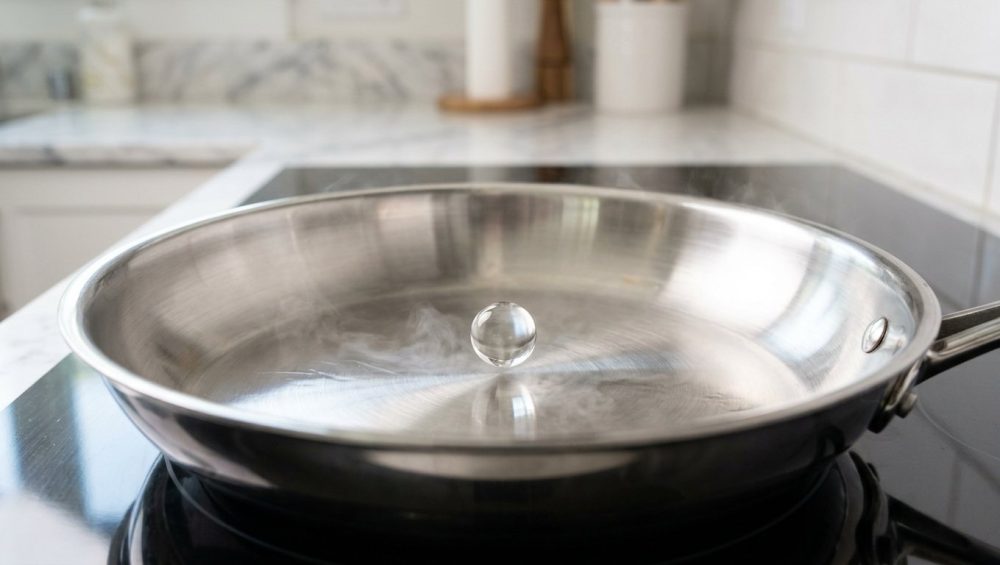
This is exactly where the magic of the water drop test comes into play. By using a few drops of tap water, you can visually confirm that your pan has reached the exact temperature required to trigger this levitating steam barrier.
The Masterclass: How to Perform the Water Drop Test
You can make your stainless steel pan actually non-stick by utilizing basic thermodynamics. The water drop test (sometimes called the mercury ball test) is a foolproof, equipment-free method to gauge the thermal readiness of your cookware. Recent 2026 laboratory validations show that when executed correctly, this visual test is 92% accurate for determining optimal searing temperatures across various pan brands.
Here is exactly how you execute it, step-by-step, with zero fluff.
Step 1: The Dry Heat
Start with a completely clean, completely dry stainless steel skillet. Place it on your stove over medium heat. Do not put it on high heat; stainless steel holds heat incredibly well, and blasting it with a high flame will simply warp the metal and overheat the surface. And most importantly: Do not add your cooking oil yet. Heating oil from a cold start is a recipe for polymerization (where the oil turns into a sticky, gummy resin) and premature degradation. Let the dry pan heat up for about 2 to 3 minutes, depending on the power of your stove.
Step 2: The Flick
Once you suspect the pan is getting hot, run your fingers under the kitchen faucet and flick 3 to 5 drops of cold tap water directly onto the dry surface of the pan.
Step 3: Reading the Drops
The way the water reacts will tell you exactly what is happening on a microscopic level. There are three possible outcomes:
Outcome A: The Under-Heated Pan (Below 320°F / 160°C)
If the water drops hit the pan and just sit there, pooling out and lazily bubbling until they evaporate, your pan is too cold. It has not reached the Leidenfrost point. If you add oil and food now, the food will sink into the microscopic pores of the metal, the proteins will bond with the iron, and your meal will be hopelessly stuck. Wipe the pan dry and wait another minute before testing again.
Outcome B: The Over-Heated Pan (Above 450°F / 232°C)
If the water drops hit the pan and instantly shatter into dozens of tiny, violent micro-beads that sizzle aggressively and vanish in less than a second, your pan is way too hot. You have overshot the mark. If you add cooking oil to a pan this hot, it will immediately exceed its smoke point, breaking down into acrid, bitter compounds and filling your kitchen with smoke. Take the pan off the heat entirely for a minute to let it cool down.
Outcome C: The Goldilocks Zone (380°F – 420°F / 193°C – 215°C)
This is what you are looking for. When the pan is perfectly heated, the water drops will hit the surface and immediately pull together into cohesive, spherical beads. They will look exactly like beads of liquid mercury. These water balls will dance, skitter, and glide effortlessly across the surface of the pan without evaporating right away. This visual confirmation proves that the Leidenfrost effect has been achieved. The vapor barrier is active. Your pan is ready.
The Execution: Cooking With Your Perfectly Heated Pan
Hitting the Leidenfrost point is only half the battle. How you introduce your ingredients to the pan dictates whether you get a Michelin-quality sear or a disastrous, sticky mess.
Step 1: Wipe and Oil
Once you see the mercury balls dancing, immediately wipe them out with a dry paper towel (or carefully tip them into the sink). You do not want water trapped under your cooking oil, as it will cause violent splattering.
Now, add your cooking fat. Because the pan is already at roughly 400°F, you must use an oil with a high smoke point. Avocado oil, ghee, clarified butter, or refined grapeseed oil are excellent choices. Extra virgin olive oil and standard butter will burn instantly at this temperature, ruining the flavor of your dish.
When the oil hits the hot pan, it will undergo a rapid drop in viscosity. It will thin out dramatically, becoming as fluid as water, and will easily coat the entire surface, filling in any remaining microscopic valleys in the metal. Wait about 10 to 15 seconds for the oil to heat up. You will know it is ready when it begins to “shimmer”—producing tiny, faint ripples across its surface.
Step 2: The Dry Pat
Before your food touches that shimmering oil, it must be completely dry. I cannot stress this enough. If you take a soaking wet chicken breast out of its packaging and throw it into the pan, the excess surface moisture will instantly drop the temperature of the pan, killing the Leidenfrost effect. Furthermore, all that water has to boil off before the meat can actually begin to fry. This is exactly why your chicken always turns out dry and completely flavorless—you are boiling it in its own surface moisture instead of searing it.
Take a paper towel and aggressively pat your proteins dry on all sides. Season them generously with salt right before they go into the pan.
Step 3: The Drop and the Release
Gently lay your food into the pan, laying it away from you so the hot oil doesn’t splash back onto your hands. You should hear an immediate, aggressive sizzle.
Now comes the absolute hardest part of cooking for most beginners: Walk away. Do not touch it.
When the food first hits the pan, it might grab onto the metal slightly as the temperature fluctuates. Do not panic, and do not try to force a spatula under it. As the food cooks, a glorious chemical process called the Maillard reaction takes place. Amino acids and reducing sugars on the surface of the food react under high heat to create hundreds of new flavor compounds, resulting in that beautiful, golden-brown crust.
As this crust forms, it naturally hardens and dehydrates, physically breaking the bonds with the metal surface. When the sear is perfect, the food will literally release itself from the pan. If you gently nudge the chicken or the fish and it feels stuck, it simply means it is not ready yet. Give it another 60 seconds. Patience is the greatest non-stick tool in your kitchen.
Troubleshooting: Why You Are Still Sabotaging Your Dinner
If you followed the water drop test and your food still stuck, you likely committed one of the cardinal sins of thermal management. Let’s troubleshoot your technique.
Mistake 1: Cooking Fridge-Cold Food
If you take a massive, 16-ounce steak directly out of a 36°F refrigerator and drop it into a 400°F pan, you are introducing a massive thermal shock. The freezing cold meat will rapidly absorb the heat from the pan, plummeting the surface temperature of the metal well below the Leidenfrost threshold. The steam barrier collapses, the pores of the metal grab the protein, and you are stuck. Let your proteins sit at room temperature for 20 to 30 minutes before cooking to take the chill off.
Mistake 2: Overcrowding the Pan
If you try to cook four large chicken breasts in a standard 10-inch skillet, you are going to fail. Overcrowding the pan does two things: it drops the temperature of the metal drastically, and it traps the steam escaping from the meat. Instead of searing in hot oil, your food ends up steaming in a crowded, lukewarm puddle of its own juices. Cook in batches, leaving at least an inch of space between each piece of food.
Mistake 3: Using Cheap, Flimsy Cookware
Not all stainless steel is created equal. High-quality skillets are among the tools you actually need to execute professional techniques, but they must have the right construction.
Cheap stainless steel pans often feature a thin “disc bottom”—a small plate of aluminum glued to the base of a thin steel shell. These pans have terrible thermal mass. The moment you add food, they lose all their heat, and they take forever to recover. You need fully clad cookware (often labeled as tri-ply or 5-ply), where thick layers of heat-conductive aluminum or copper are sandwiched between layers of stainless steel throughout the entire body of the pan, not just the base. Just like how cheap baking sheets warp under high heat, thin pans will fail you when you need them to maintain a consistent searing temperature.
Mistake 4: Moving the Food Too Early
I know I already said this, but it bears repeating because weekend cooks are notoriously fidgety. Stop prodding your food. Stop lifting the edge to check the color every ten seconds. Every time you move the food, you break the thermal contact and interrupt the crust formation. Put it down, set a timer, and drink your wine.
The Cleanup: Embracing the Fond
Even when you execute the Leidenfrost effect perfectly, you are going to be left with a pan that looks a bit messy. The bottom of the skillet will be covered in dark, caramelized, sticky patches.
Do not take this to the sink. Do not reach for the dish soap. You have just created culinary gold.
Those brown patches are called fond (the French word for “base” or “foundation”). It is not burnt food; it is highly concentrated, caramelized protein and sugars left behind from the Maillard reaction. This is the foundation of every great restaurant-quality pan sauce.
While the pan is still hot, remove your cooked meat to a cutting board to rest. Lower the heat to medium-low, and pour a splash of liquid directly into the hot skillet. This can be dry white wine, chicken stock, or even a splash of apple cider vinegar and water. The liquid will instantly boil and bubble furiously. Take a flat-edged wooden spoon and scrape the bottom of the pan. The acidic liquid will rapidly dissolve the chemical bonds holding the fond to the metal, lifting all that incredible flavor into the liquid.
Deglazing is the ultimate trick for turning burnt bits into sauce for your meal. Toss in a minced shallot, let the liquid reduce by half, turn off the heat, and swirl in a cold tablespoon of butter. You now have a luxurious, glossy pan sauce that took three minutes to make, and your stainless steel pan is practically clean already.
Dealing With Actual Disasters
Let’s say you messed up. You got distracted, the pan was too cold, the oil burned, and now you have a thick, black layer of polymerized carbon permanently fused to your expensive tri-ply skillet.
First, never use harsh steel wool on your good stainless steel. It will carve deep scratches into the metal, creating larger microscopic valleys that will make food stick even worse the next time you cook.
Instead, use chemistry. Fill the ruined pan with an inch of water and a generous splash of white vinegar. Bring it to a rolling boil on the stove for five minutes. The heat and the acid will loosen the polymerized fats. Turn off the heat, dump the water, and while the pan is still warm, sprinkle in a generous amount of Bar Keepers Friend (a non-abrasive cleaning powder containing oxalic acid). Make a paste with a wet sponge and gently scrub. The oxalic acid will break down the carbon bonds without scratching the steel, restoring your pan to a mirror finish in seconds.
Final Thoughts: Trust the Process
Cooking on stainless steel requires a paradigm shift. We have been conditioned by decades of marketing to believe that cookware should do the work for us, that a synthetic chemical coating is the only thing standing between us and a ruined dinner.
That is simply not true. You have the ability to control your environment. By understanding how your equipment works, respecting the physics of heat transfer, and employing the water drop test, you can permanently elevate your daily cooking routine. It takes a few tries to get the feel for it, but once you master the Leidenfrost effect, you will never look at a cheap, peeling non-stick pan the same way again.
So preheat that skillet, dry off your proteins, look for the dancing mercury balls, and cook with confidence. You’ve got this.






