Listen up, weekend culinary warriors. We need to have a serious, brutally honest conversation about what is happening in your skillet on a Tuesday night. You have just spent good money on a beautiful, thick-cut pork chop or a premium, air-chilled chicken breast. You seared it perfectly. You took it out of the pan to rest, and you stared down at that beautiful crust of caramelized drippings left behind in the skillet. You did everything the recipe told you to do: you tossed in some shallots, you poured in a splash of white wine, and you added half a cup of store-bought chicken broth. You boiled it down, whisked in a pat of butter, and proudly poured it over your meat.
And yet, instead of a thick, glossy, restaurant-quality glaze that clings to the meat like a velvet blanket, you are left with a sad, split, greasy puddle of dirty dishwater rapidly spreading across your plate. The meat is sitting in a watery swamp, the butter has separated into an unappetizing oil slick, and the flavor is aggressively salty but somehow completely hollow.
If this scenario triggers your cooking anxiety, take a deep breath. I am the Sassy Sous-Chef, and I am here to tell you that this failure is not your fault. You do not lack a magical culinary touch, and you certainly do not need a degree from Le Cordon Bleu to fix it. The reason your pan sauces are failing comes down to a fundamental misunderstanding of food science and a misplaced trust in the modern grocery store. Restaurant chefs have a secret weapon sitting on their stoves at all times: gallons of slowly simmered, collagen-rich, homemade meat stock. You, on the other hand, are relying on a carton of highly processed, industrially produced boxed broth.
Today, we are going to bridge the gap between the professional kitchen and your weeknight dinner routine. We are going to dive deep into the molecular anatomy of a reduction, expose the undeniable flaws of commercial pantry staples, and teach you the ultimate, science-backed shortcut for achieving flawless viscosity. We are talking about the magic of unflavored gelatin. By the end of this definitive masterclass, you will never serve a runny, disappointing sauce again.
The Anatomy of a Perfect Pan Sauce
Before we can fix your watery sauce, we have to understand what a pan sauce actually is. At its core, a pan sauce is a rapid, à la minute extraction technique designed to capture the flavor compounds left behind after searing a piece of protein. It is an exercise in efficiency, utilizing the very same vessel you just used to cook your meat.
The entire foundation of a pan sauce relies on your ability to sear a piece of meat, leave behind a crust of caramelized proteins, and then successfully deglaze the pan, effectively turning burnt bits into sauce rather than scrubbing them down the drain later. This sticky, browned residue is known in the culinary world as the “fond.” The fond is the physical manifestation of the Maillard reaction—a complex chemical process where amino acids and reducing sugars react under high heat to create hundreds of entirely new, intensely savory flavor compounds.
When you add a liquid to the hot pan—be it wine, vermouth, or broth—the rapid boiling action and a bit of mechanical scraping dissolve this fond, lifting those flavor compounds into the liquid phase. This is deglazing. But a deglazed liquid is not a sauce; it is just flavored water. To transform it into a sauce, you must execute two critical physical transformations: reduction and emulsification.
The Physics of Reduction
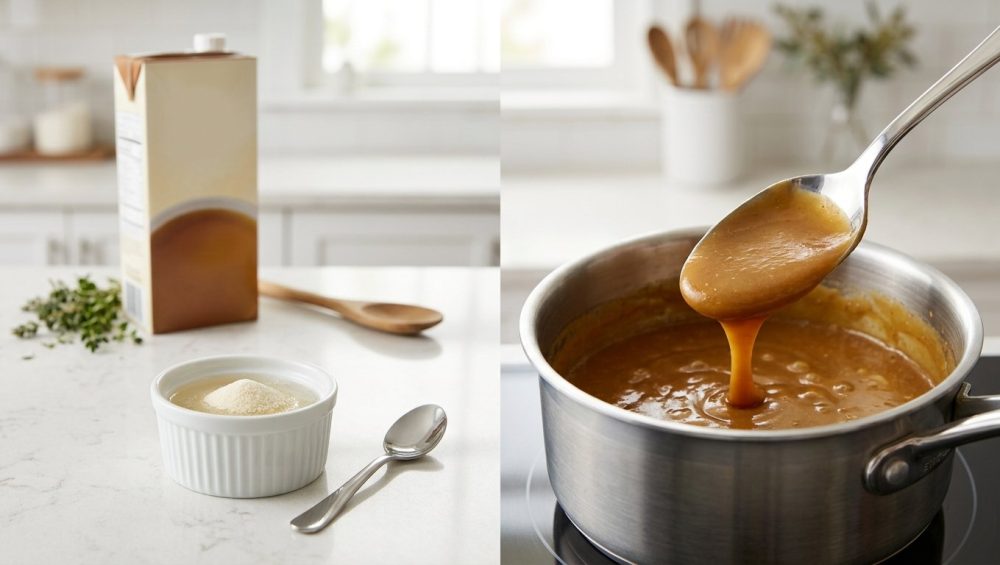
Reduction is simply the process of boiling the liquid to evaporate its water content. As the water turns to steam and leaves the pan, the flavor compounds, salts, and proteins become highly concentrated. However, evaporation alone does not create the thick, mouth-coating texture we desire. In a professional kitchen, the liquid being reduced is a homemade stock packed with natural gelatin. As the water evaporates, the ratio of gelatin to water increases, thickening the liquid until it reaches a specific viscosity known as “nappé”—a French term meaning the sauce is thick enough to evenly coat the back of a spoon without running off.
The Challenge of Emulsification
The final step of a classic pan sauce is “monter au beurre,” which translates to mounting with butter. You remove the pan from the heat and vigorously whisk in cubes of cold butter. This serves two purposes: it adds a rich, dairy sweetness to balance the harshness of the reduction, and it creates a temporary emulsion. An emulsion is the forced suspension of fat droplets within water—two substances that naturally want to repel each other. If the emulsion is unstable, the butter melts into a greasy, separated slick. A proper pan sauce requires a stabilizing agent to keep those fat droplets suspended in the water phase.
The Boxed Broth Betrayal: Why Your Pantry Staples Are Sabotaging You
Now that we understand the mechanics of a sauce, we have to look at the primary ingredient you are pouring into your skillet: store-bought boxed broth. Relying blindly on a carton of thin, highly processed grocery store broth is one of those classic rookie kitchen mistakes that will completely sabotage your final dish.
Let’s get one thing straight: the liquid inside those aseptic cartons is nothing like the stock simmering in the back of a French bistro. Commercial broth is manufactured under strict industrial constraints where time is money. To maximize profit, commercial producers use massive pressure cookers to rapidly extract flavor from a high ratio of meat scraps and minimal bones. The liquid is then heavily filtered, pasteurized, and pumped into cartons.
The Missing Link: Collagen
The critical difference between your boxed broth and a chef’s homemade stock is the presence of connective tissue. When a chef makes stock, they use specific cuts of the animal—knuckles, joints, chicken feet, and wing tips. These parts are loaded with tough, fibrous connective tissue made of a structural protein called collagen. When exposed to gentle, prolonged, moist heat (simmering for 12 to 24 hours), this tough collagen slowly denatures and hydrolyzes, unwinding its tight triple-helix structure and melting into the surrounding liquid as gelatin.
A high-quality, long-simmered homemade bone broth typically contains between 6 to 12 grams of pure collagen per cup. When you chill homemade stock in the refrigerator, it sets up into a firm, jiggly block of meat-flavored Jell-O. That jiggle is the visual proof of gelatin.
Boxed broth, on the other hand, is completely devoid of this structural protein. Because it is flash-cooked and heavily filtered, it lacks the extracted gelatin necessary to provide any physical body to a sauce. If you look at the nutritional label of a standard commercial chicken broth, you will often see only 1 or 2 grams of total protein per serving, meaning the collagen content is virtually non-existent.
When you pour boxed broth into a hot skillet and attempt to reduce it, you are simply boiling away water. There is no gelatin network left behind to thicken the liquid. You can boil a cup of boxed broth down to a single tablespoon, and it will still have the exact same thin, watery viscosity as when you started. It will just taste like incredibly salty water.
The Science of Gelatin: Your Culinary Secret Weapon
If you do not have the time to spend your entire Sunday roasting veal bones and skimming a giant stockpot for 14 hours, you need a shortcut. And no, the shortcut is not cornstarch, and it is certainly not a raw flour slurry. We are not making a heavy, gloopy, 1950s cafeteria gravy; we are making an elegant, glossy pan sauce. The modern food science hack that will change your weeknight cooking forever is unflavored, powdered gelatin.
By simply blooming a pinch of unflavored gelatin into your store-bought broth before you start cooking, you are artificially reintroducing the exact structural protein that the commercial manufacturing process stripped away. It is a brilliant, foolproof cheat code.
Rheology and the “Melt-in-Mouth” Phenomenon
To understand why gelatin is so superior to starch-based thickeners, we have to look at the rheology of the sauce—the study of how the liquid flows and deforms. Gelatin is a unique biopolymer. When dissolved in hot water, its long protein chains float freely. As the liquid cools, these chains begin to seek each other out, forming a loose, three-dimensional matrix that traps water molecules within its web.
What makes gelatin truly magical is its thermal reversibility and its specific melting point. Gelatin gels melt just below human body temperature, right around 95°F (35°C). When you eat a sauce thickened with gelatin, the ambient temperature of your mouth literally melts the microscopic gel structure upon contact. This creates an unparalleled, luxurious “melt-in-mouth” sensation that coats the palate cleanly, allowing the flavor compounds to release instantly.
Cornstarch and flour, by contrast, rely on starch gelatinization. The swollen starch granules do not melt at body temperature; they simply sit heavily on the tongue. This mutes the vibrant flavors of your wine and herbs, leaving a dull, cloudy, and sometimes chalky or gummy residue behind. Gelatin ensures your sauce remains brilliantly translucent, glossy, and intensely flavorful.
The Ultimate Emulsion Stabilizer
Not only does gelatin provide that signature lip-smacking viscosity, but its molecular structure actually helps to prevent broken emulsions when you mount the sauce with butter at the very end.
Gelatin is an amphiphilic molecule, meaning it contains both hydrophilic (water-loving) and hydrophobic (water-repelling) regions. Because of this, it acts as a highly effective emulsifier and stabilizer. When you whisk cold butter into your hot reduction, the butter melts into millions of microscopic fat droplets. The gelatin molecules physically wrap themselves around these fat globules, forming a protective film that prevents them from clumping back together, while simultaneously thickening the surrounding water phase to slow down their movement. The result is a tight, creamy, impenetrable emulsion that will not split on the plate.
The Sassy Sous-Chef’s Magic Hack: Blooming Unflavored Gelatin
Now that we have established the science, let’s talk about the execution. Working with powdered gelatin is incredibly easy, but it does require one specific preparatory step: blooming.
You cannot simply dump dry gelatin powder directly into a hot pan of simmering liquid. If you do, the exterior of the powder granules will instantly hydrate, forming a waterproof, rubbery shell around the dry powder inside. You will be left with hard, unappetizing lumps of raw gelatin floating in your sauce that will never dissolve.
The Golden Ratio
For the perfect pan sauce, you want to use 1.5 teaspoons of unflavored powdered gelatin for every 1 cup of cold, store-bought broth. A standard packet of Knox unflavored gelatin contains about 2.5 teaspoons, so you will be using roughly half a packet per cup.
The Blooming Process
- Pour your cold or room-temperature boxed broth into a measuring cup or small bowl.
- Evenly sprinkle the 1.5 teaspoons of gelatin powder over the surface of the liquid. Do not dump it in a single pile.
- Walk away. Let the mixture sit undisturbed for at least 5 minutes.
During this time, the dry gelatin granules will slowly absorb the cold water, swelling up and hydrating completely. The surface of the broth will look slightly wrinkled, like an orange peel. Once the gelatin is fully bloomed, it is ready to be introduced to heat, where it will instantly and smoothly melt into the liquid without a single clump. Just like how a lack of starch is the reason your pasta sauce separates on the plate, a lack of gelatin is the reason your pan sauce turns into a sad, watery puddle. This five-minute prep step is the ultimate insurance policy.
A Masterclass Walkthrough: The Ultimate Weeknight Pan Sauce
We have our gelatin-fortified broth standing by. Now, it is time to put it all together. I am going to walk you through the definitive, step-by-step process of building a flawless weeknight pan sauce. This technique works identically whether you are searing chicken breasts, pork chops, or a steak.
Step 1: The Perfect Sear
You begin by searing your seasoned protein in a high-quality skillet over medium-high heat. You need to develop a deep, mahogany-brown crust. You want the meat to stick initially, and then release naturally once the Maillard reaction has occurred, which is why you must learn how to prevent protein adhesion through proper temperature control rather than relying on a chemical crutch. Once the meat reaches your desired internal temperature, remove it from the pan and transfer it to a plate to rest. Do not wash the skillet. The browned bits stuck to the bottom are culinary gold.
Step 2: The Aromatics
Assess the fat left in the pan. If there is an excessive oil slick, pour off all but about one tablespoon. If the pan is bone dry, add a tiny splash of olive oil. Lower the heat to medium. Toss in your minced shallots first, and only add the garlic in the last thirty seconds; otherwise, your garlic always burns and infuses the entire reduction with a harsh, acrid bitterness. Sauté the aromatics just until they soften and turn translucent, using their released moisture to begin gently loosening the fond.
Step 3: The Deglaze
Turn the heat up slightly and pour in about 1/4 cup of your chosen deglazing liquid. Dry white wine, dry vermouth, or even a splash of brandy work brilliantly here. As the cold liquid hits the hot metal, it will immediately violently boil and steam. Use a sturdy wooden spoon or a flat-edged spatula to aggressively scrape the bottom of the pan, lifting every single microscopic browned bit into the liquid. Let the alcohol boil and reduce until the pan is almost completely dry (a stage the French call “au sec”). This concentrates the flavor of the wine while boiling off the harsh ethanol vapor.
Step 4: The Gelatin-Fortified Broth
Give your bloomed gelatin broth a quick stir and pour the entire cup into the skillet. Bring the liquid to a rapid simmer. Now, you wait. You need to reduce this liquid by at least half. As the water evaporates, keep a close eye on the physical behavior of the boiling liquid. At first, the bubbles will be large, rapid, and watery. As the sauce reduces and the gelatin concentration increases, the bubbles will become smaller, tighter, and glossier. The liquid will begin to look syrupy. Drag your spatula through the center of the pan; if it leaves a distinct trail that takes a second to fill back in, your reduction is ready.
Step 5: Monter au Beurre
This is the most critical stage of the emulsion. Turn the heat completely off. Do not attempt to mount butter into a boiling sauce, or the emulsion will instantly break. Take two tablespoons of very cold, cubed unsalted butter and drop them into the hot reduction. Grab a whisk and agitate the liquid vigorously and continuously. The cold butter will slowly melt, and the mechanical shearing action of the whisk will disperse the fat droplets into the gelatin-thickened water. The sauce will undergo a visible transformation, changing from a dark, translucent liquid into a lighter, opaque, velvety glaze.
Step 6: The Finish
Finally, you must taste and adjust. Stir in a tablespoon of finely chopped fresh herbs (parsley, chives, or tarragon). Next, check the seasoning. Do not blindly add salt—remember, you just boiled down a cup of commercial broth, which already concentrated its sodium levels. Instead, focus on brightness. If your sauce tastes flat, heavy, or one-dimensional, it is not because it needs more salt—it is because your dinner actually needs acid to balance the rich fats. Squeeze in half a teaspoon of fresh lemon juice or a dash of sherry vinegar. Stir, taste, and immediately pour the glorious, thick, lip-smacking sauce over your resting meat.
Troubleshooting Your Sauces: Why Things Still Go Wrong
Even with the gelatin hack, cooking requires intuition. If you run into issues, here is exactly how to diagnose and fix them.
The Sauce Split and Looks Greasy
If your beautiful, creamy sauce suddenly separates into a watery layer and a greasy oil slick, you broke the emulsion. This almost always happens for one reason: excessive heat. You either left the burner on while whisking in the butter, or you tried to reheat the finished sauce too aggressively. Emulsions are delicate. If your sauce is evaporating too rapidly before the flavors can meld, it means you are failing to manage the thermodynamics of carbon steel or stainless cookware, leaving the burner blasting on high when you should be gently simmering. To rescue a split sauce, take it off the heat, add a splash of cold heavy cream or a tiny teaspoon of cold water, and whisk furiously until it comes back together.
The Sauce is Way Too Salty
As water evaporates during the reduction phase, everything else is concentrated. If you start with a standard, fully salted commercial broth, reducing it by half will yield a liquid that is twice as salty as ocean water. You must always, without exception, purchase “Low Sodium” or “No Salt Added” broth for pan sauces. You can always add a pinch of kosher salt at the end, but you can never take it out.
The Sauce is Gummy or Jell-O-Like
If your sauce feels sticky on your lips or sets up like a rubber tire on the plate within two minutes, you used too much gelatin. Stick strictly to the 1.5 teaspoons per cup ratio. If it over-thickens while resting in the pan, simply whisk in a tablespoon of hot water to loosen the matrix before serving.
Gear Matters: Ditch the Toxic Pans
I can teach you all the food science and culinary hacks in the world, but if you are attempting to make a pan sauce in a cheap, scratched, non-stick Teflon pan, you are entirely wasting your time.
You might be wondering why your cheap non-stick pans keep losing their slip after just a few months of use. It is because those chemical coatings degrade rapidly under the high heat required for searing. Worse yet, non-stick surfaces are specifically designed to prevent food from adhering. If the food does not adhere, you do not develop a fond. Without a fond, you have no caramelized flavor compounds to deglaze. Attempting to make a pan sauce in a non-stick skillet will yield nothing but hot, bland broth.
But my hatred for cheap non-stick cookware goes far beyond culinary performance. I have a strict, non-negotiable rule when it comes to banishing toxic kitchen gear from my home, and you should too.
The Dangers of PFAS and “Forever Chemicals”
Traditional non-stick coatings, like Teflon (PTFE), belong to a class of synthetic chemicals known as PFAS (per- and polyfluoroalkyl substances). These are widely referred to as “forever chemicals” because they do not break down naturally in the environment or in the human body.
When you heat a non-stick pan to temperatures above 500°F (260°C)—which can happen in a matter of minutes when preheating an empty pan for a hard sear—the PTFE coating begins to physically break down and decompose. As it degrades, it releases toxic perfluorinated gaseous compounds into the air. Inhaling these fumes can lead to a very real, documented medical condition called “polymer fume fever,” characterized by intense chills, fever, and respiratory distress.
Furthermore, once that cheap non-stick coating gets scratched by a spatula or a fork, the pan begins flaking microscopic particles of PFAS directly into your food. Prolonged exposure to these forever chemicals has been linked by extensive health studies to endocrine disruption, immune system suppression, liver toxicity, and an increased risk of kidney and testicular cancers.
The Only Cookware You Need
Stop poisoning your family and ruining your dinners for the sake of an “easy clean-up.” Throw those peeling, toxic mystery-metal pans in the garbage immediately.
If you want to cook like a professional, you need to invest in professional, non-toxic materials. A heavy-bottomed, fully clad tri-ply stainless steel skillet, a well-seasoned cast iron pan, or a sleek carbon steel skillet are the only tools you should be using for searing meat and building pan sauces. They can withstand roaring high heat without off-gassing toxic fumes, they will last for generations rather than months, and most importantly, they will grip the proteins just enough to develop the beautiful, sticky fond that is the absolute prerequisite for a life-changing sauce.
Conclusion
Cooking is not magic, and it is certainly not an exclusive club reserved for people who wear tall white hats and scream at line cooks. It is just the practical application of heat, chemistry, and a little bit of clever resourcefulness.
By understanding the physiological makeup of a reduction, recognizing the severe limitations of commercial boxed broth, and utilizing the brilliant, science-backed hack of blooming unflavored gelatin, you have officially leveled up your culinary arsenal. You no longer have to settle for sad, watery, split sauces that ruin your perfectly cooked proteins. You can now effortlessly manipulate viscosity and emulsions on a random Tuesday night, all while saving the hours of labor required to simmer a traditional stock.
So go ahead, ditch the toxic pans, buy a box of unflavored gelatin, and start searing. Your weeknight dinners are about to get a whole lot more spectacular, and you didn’t even have to go to culinary school to pull it off. You’re welcome.


