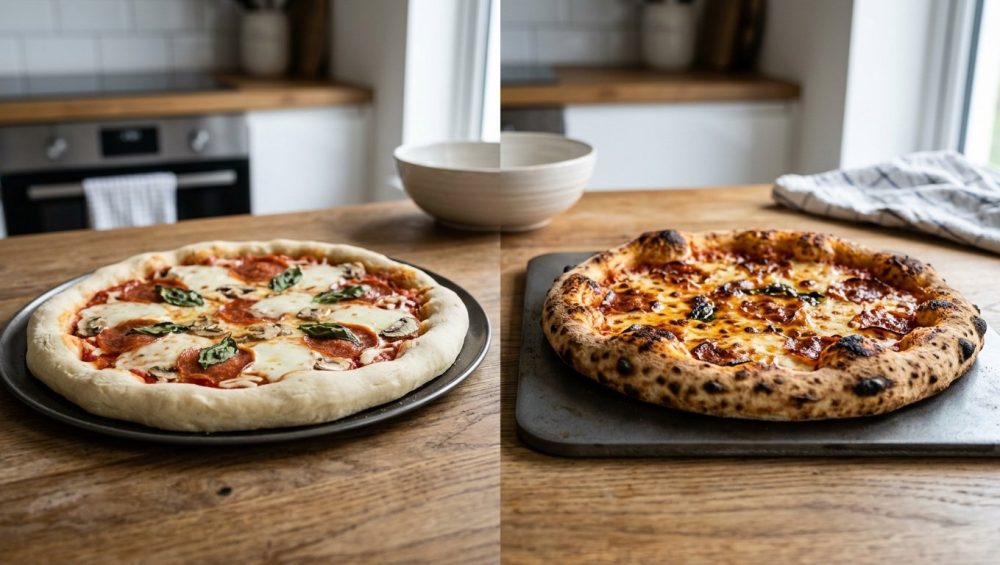
Picture this: You have spent the entire week looking forward to Friday night. You’ve dutifully fed your sourdough starter, splurged on imported San Marzano tomatoes, and hunted down the expensive, low-moisture whole milk mozzarella that the pretentious food influencers swear by. You stretch your dough, top it beautifully, and slide it into your 500°F oven. You wait. You watch the cheese bubble into a perfect golden canopy. You pull it out, slice into it, and… disaster.
The top looks like it belongs in a rustic Neapolitan pizzeria, but the bottom is a pale, limp, anemic tragedy. When you pick up a slice, the tip immediately flops over like a wet towel, dumping a landslide of hot cheese and sauce directly onto your plate. It is a soggy, doughy, culinary heartbreak.
If this sounds familiar, take a deep breath. You are not a bad cook. Your recipe isn’t broken. Your oven isn’t necessarily defective. The brutal truth is that your bakeware is actively sabotaging you.
According to recent 2026 industry data, 86% of Americans eat pizza regularly, and with the average cost of a large pie pushing past $17 at local joints, mastering homemade pizza isn’t just a fun weekend project anymore—it is a necessary financial survival tactic. But if you want professional-grade, blistered, crackling crusts in a standard home kitchen, you have to stop relying on flimsy pans and start treating baking like a science experiment.
It is time to throw out the cheap aluminum, ditch the fragile ceramics, and embrace the absolute magic of a baking steel.
Why Your Current Pizza Setup Is Setting You Up for Failure
Let’s get one thing straight right out of the gate: standard home cookware was never designed to bake a proper pizza. To understand the solution, we first have to brutally analyze the problem.
The Flimsy Aluminum Baking Sheet
Most weekend culinary hobbyists start their pizza journey by stretching dough onto a standard aluminum half-sheet pan. Aluminum is a fantastic conductor of heat, which is why it is great for roasting broccoli or baking cookies. However, it lacks the sheer mass required to hold onto that heat. The moment a wet, room-temperature piece of pizza dough touches a hot aluminum pan, the pan’s surface temperature plummets. It simply does not have the thermal battery power to bounce back. This is exactly why your cheap baking sheets keep warping the second you blast them under a broiler—they cannot handle the extreme thermal stress required for artisan pizza. Instead of searing the bottom of your dough, the pan acts as a lukewarm resting place while the hot air in the oven slowly steams your crust into a chewy, dense sponge.
The Toxic Non-Stick “Pizza Pan”
If you are using one of those dark, non-stick, perforated pizza pans you bought for ten dollars at a big-box store, I am begging you to throw it in the trash immediately. My “No-Go” rule on toxic kitchen gear is absolute. Traditional non-stick coatings (like PTFE/Teflon) are designed for low-to-medium heat applications, like scrambling eggs. They begin to degrade and release toxic fumes at temperatures above 500°F. Since good pizza requires your oven to be cranked to its absolute maximum limit, using a cheap non-stick pan is not just resulting in terrible, pale crusts—it is actively introducing degraded chemical coatings into your kitchen. We have zero patience for mystery metals and peeling coatings.
The Traditional Ceramic Pizza Stone
Eventually, the frustrated home cook upgrades to a cordierite pizza stone. This is a massive step in the right direction. Ceramic stones have been used for decades to mimic the brick floor of a traditional wood-fired oven. They absorb heat and draw moisture away from the dough. But stones have two fatal flaws. First, they are terrible conductors of heat, meaning they take forever to transfer their stored energy into the bottom of your pie. Second, they are incredibly vulnerable to thermal shock. If you accidentally drip a spoonful of cold tomato sauce onto a 500°F ceramic stone, you will quickly discover why glass baking dishes shatter under pressure. The stone will crack right down the middle, leaving you with two useless pieces of rubble and a ruined dinner.
The Brutal Physics of a Soggy Bottom: Thermal Mass vs. Thermal Conductivity
To understand why a baking steel is the ultimate kitchen hack, we have to endure a brief, highly relevant science lesson. Don’t worry, there is no quiz, but understanding this will permanently change how you cook.
A commercial wood-fired or deck oven in a professional pizzeria operates at temperatures between 700°F and 900°F. At these blistering temperatures, the dough cooks in about 90 seconds. The intense, immediate heat causes the water inside the dough to instantly turn into steam, forcing the crust to puff up rapidly before the gluten structure sets. This phenomenon is called “oven spring,” and it is the secret to an airy, bubbly crust with a shatteringly crisp exterior.
Your standard home oven maxes out at 500°F or 550°F. You are operating at a massive thermal deficit. To cheat the system and achieve a 900-degree result in a 500-degree oven, you have to manipulate two principles of physics: Thermal Mass and Thermal Conductivity.
Thermal Mass (The Heat Battery)
Thermal mass refers to a material’s ability to absorb, store, and release heat energy. Think of it like a rechargeable battery. A thin aluminum pan is a AAA battery; it drains its heat instantly. A heavy slab of material is a car battery; it holds a massive reserve of energy. When cold dough hits the surface, a material with high thermal mass barely registers the temperature drop. It just keeps pumping heat into the food.
Thermal Conductivity (The Heat Highway)
This is where the magic truly happens. Thermal conductivity (measured in W/m·K) dictates how fast a material can transfer its stored heat into another object.
- Cordierite Pizza Stone: Has a thermal conductivity of roughly 1.5 W/m·K. It holds a lot of heat, but it releases that heat very slowly. It is like a massive reservoir of water draining through a tiny garden hose.
- A36 Carbon Steel: Has a thermal conductivity of roughly 50 W/m·K. It transfers heat almost 18 to 20 times faster than a ceramic stone. It is like a reservoir draining through a ruptured dam.
When you place pizza dough on a preheated baking steel, the steel aggressively blasts its stored heat directly into the bottom of the crust. This rapid energy transfer artificially shocks the dough, creating massive oven spring and perfectly mastering the Maillard reaction before the cheese on top has a chance to overcook and separate. It is the only scientifically sound way to mimic a commercial pizza oven in a residential kitchen.
Enter the Baking Steel: A Slab of A36 Magic
So, what exactly is this miracle tool? It is refreshingly simple, devoid of pretentious chef-speak, and entirely utilitarian. A baking steel is quite literally a heavy, precision-cut rectangular slab of food-grade carbon steel, typically an alloy known as A36.
A36 is a low-carbon, mild steel widely used in structural engineering and construction because of its incredible strength and machinability. In the kitchen, it is a revelation. Baking steels are generally sold in thicknesses of 1/4-inch, 3/8-inch, or 1/2-inch.
The Thickness Dilemma
- 1/4-Inch (The Weeknight Warrior): Weighing around 15 pounds, this is the easiest to maneuver in and out of the oven. It preheats in about 45 minutes and holds enough thermal mass to bake two or three pizzas back-to-back flawlessly.
- 3/8-Inch (The Enthusiast’s Sweet Spot): Weighing around 22 pounds, this offers a perfect balance. It packs significantly more thermal energy for aggressive oven spring and rapid recovery times between bakes.
- 1/2-Inch (The Heavyweight Champion): Weighing upwards of 30 pounds, this is a permanent oven fixture. It takes well over an hour to properly preheat, but its thermal battery is practically infinite. You can bake ten pizzas in a row, and the last one will be just as blistered as the first.
Regardless of which thickness you choose, the beauty of the baking steel is its sheer durability. It is a solid block of metal. It will never shatter, it will never warp under normal oven conditions, and it will never peel toxic flakes into your food. If you drop it on the floor, the steel will be perfectly fine; your floor tiles, however, will not survive.
The Ultimate Showdown: Baking Steel vs. Pizza Stone
If you already own a pizza stone, you might be wondering if the upgrade is truly justified. Let’s look at the brutal, side-by-side performance metrics.
The Recovery Rate
When you bake a pizza, the cold dough violently sucks heat out of the baking surface. The time it takes for that surface to regain its target temperature is called the “recovery rate.” Independent thermal imaging tests from 2026 show that a standard 1-inch cordierite stone takes upwards of 45 seconds to recover its surface temperature after a pizza is loaded. A 1/2-inch baking steel recovers to within 10 degrees of its target temperature in under 10 seconds. If you are hosting a pizza night and churning out pies for a hungry crowd, a stone will leave your third and fourth pizzas pale and soggy. A steel will deliver a blistering char every single time.
The Char Factor
Because steel conducts heat 18 times faster than stone, it creates what pizza aficionados call “leopard spotting”—those beautiful, charred, asymmetric black bubbles on the undercarriage of the crust. A stone will give you a uniformly brown, slightly chewy bottom. A steel will give you a crackling, charred, artisan crunch that shatters perfectly when you bite into it.
The only scenario where a stone outperforms a steel is if you are lucky enough to own a dedicated outdoor pizza oven that reaches 900°F. At those extreme temperatures, the hyper-conductivity of steel will actually burn the bottom of your pizza to a crisp before the top is cooked. But for a standard 500°F indoor home oven, steel is the undisputed king.
Setting the Stage: Dough Hydration and Preparation
You cannot talk about baking hardware without talking about the software: the dough. A baking steel is a powerful tool, but it requires the right formulation to work its magic.
Before we get to the bake, let’s address the elephant in the room: why pizza dough shrinks back into a tiny hockey puck every time you try to stretch it. This is a classic rookie mistake caused by tight, overworked gluten. When you use a baking steel, you want a dough that is relaxed, extensible, and highly hydrated.
The Magic of High Hydration
Hydration refers to the ratio of water to flour in your dough recipe (expressed as a baker’s percentage). Most store-bought or basic recipe doughs sit around 60% hydration. For a baking steel, you want to push that hydration up to 65% or even 70%+.
Why? Because the steel is going to blast the dough with conductive heat. If the dough is too dry, it will simply turn into a giant cracker. A wetter dough provides the necessary moisture to create massive pockets of steam. That steam expands the gluten network rapidly, creating those beautiful, airy, translucent bubbles in the crust.
Yes, wet dough is intimidating. It sticks to your hands, your counter, and your sanity. But once you fighting sticky bread dough and actually let it rest and ferment properly in the fridge for 24 to 72 hours, the flour fully hydrates, the gluten relaxes, and it becomes a joy to handle.
How to Actually Use Your Baking Steel Without Ruining Dinner
Owning a baking steel does not automatically make you a master pizzaiolo. You have to know how to drive the sports car. Here is the foolproof, step-by-step masterclass on executing the perfect bake.
Step 1: Strategic Oven Placement
Where you put the steel matters immensely. Your goal is to balance the intense conductive heat from the bottom (the steel) with the radiant heat from the top (the air and the broiler) so that the crust and the cheese finish cooking at the exact same second.
- The Middle Rack: Good for a balanced, even bake. Best if your oven has a strong convection fan.
- The Top Rack (The Pro Move): Place the steel on the second-highest rack, about 6 to 8 inches below the broiler element. This is the optimal setup for achieving a Neapolitan-style char.
Step 2: The Mandatory Pre-Heat
Time is money during the week, but on pizza night, patience is mandatory. You cannot turn the oven on, wait for the little beep that says it has reached 500°F, and immediately throw your pizza in. The air in the oven heats up quickly; a 20-pound slab of solid steel does not.
You must preheat your oven to its absolute maximum temperature (usually 500°F or 550°F) for a minimum of 60 minutes. Do not shortcut this. The steel needs a full hour to become fully saturated with thermal energy.
Step 3: The Launch
You will need a wooden pizza peel (a flat paddle) to transfer the raw dough onto the hot steel. Do not assemble your pizza on a metal peel; the dough will stick, and you will end up scraping a mangled calzone onto your steel.
Dust your wooden peel lightly with semolina flour. Do not use regular all-purpose flour for dusting; it burns instantly at 500°F and will make the bottom of your crust taste like bitter ash. Semolina acts like tiny ball bearings, allowing the dough to slide off effortlessly.
Build your pizza quickly. The longer the wet dough sits on the wooden peel, the more likely it is to stick. Give the peel a little shimmy to ensure the pizza is loose, open the oven door, and confidently slide the pie onto the back of the scorching hot steel, pulling the peel toward you in one smooth motion.
Step 4: The Broiler Hack
If you positioned your steel on the upper rack, wait until the pizza has been baking for about 4 minutes, and then turn your oven from “Bake” to “Broil.” The steel will continue to aggressively pump heat into the bottom crust, while the intense, direct infrared heat from the broiler will blister the cheese and char the top crust. Watch it like a hawk—it will go from perfect to incinerated in about 45 seconds.
Pull the pizza out using a metal peel or a pair of tongs, let it rest on a wire cooling rack for exactly two minutes so the cheese sets, and slice. You will hear an audible, satisfying crunch that will make you weep tears of culinary joy.
Care and Feeding of Your Heavy Metal: Seasoning and Cleaning
Because a baking steel is made of raw, uncoated A36 carbon steel, it is highly susceptible to oxidation. If you leave it wet, it will rust. If you throw it in the dishwasher, you should be permanently banned from the kitchen. You have to care for it exactly like a premium cast iron skillet.
The Initial Seasoning
Most baking steels arrive from the manufacturer pre-seasoned or coated in a thin layer of protective beeswax or oil. To make it truly non-stick and rust-proof, you need to build up a layer of polymerized oil.
If you understand the science of polymerization, you know that exposing a microscopic layer of polyunsaturated fat to high heat causes the fat molecules to cross-link and bond with the metal, forming a hard, slick, protective plastic-like coating.
To season your steel, wash it once with hot water and dry it immediately and aggressively. Rub a microscopic amount of high-smoke-point oil (like grapeseed or canola) over the entire surface. Wipe it off with a paper towel until the steel looks completely dry. Bake it at 400°F for an hour, turn the oven off, and let it cool inside. Repeat this two or three times, and your steel will turn a beautiful, deep, mottled black.
Daily Cleaning
When you inevitably spill cheese or sauce onto the steel during a bake, do not panic. Let the steel cool completely. Use a metal bench scraper to aggressively chisel off the burnt carbonized bits. Wipe it down with a dry paper towel. That is it.
Do not scrub it with soapy water. I have seen firsthand how beginner cooking disasters usually start with someone trying to soak a piece of raw carbon steel in a sink full of Dawn dish soap overnight, only to wake up to a massive sheet of orange rust. If you absolutely must use water to remove a stubborn stain, do it quickly, dry it immediately on the stovetop to evaporate all moisture, and rub a tiny drop of oil back into the surface before storing it.
Your Steel Is Not a One-Trick Pony
While it is called a “pizza steel,” pigeonholing this massive thermal battery into a single category is a waste of its potential. You have essentially just installed a commercial flattop griddle in your home.
The Ultimate Breakfast Griddle
Place your steel over two burners on your gas or induction stovetop. Let it heat up slowly. You now have a massive, edge-to-edge cooking surface. You can use this slab for mastering the Maillard reaction on a dozen ultra-crispy smash burgers simultaneously, or cooking an entire pound of bacon, pancakes, and eggs all at once.
Artisan Breads and Pastries
If you bake sourdough or artisan boules, the steel provides the exact same conductive heat benefits as it does for pizza. It guarantees a massive oven spring and a deeply caramelized bottom crust for your loaves. You can also use it to bake English muffins or pita bread directly on the surface.
The Reverse Sear and Roasting
You can even toss a sheet pan of root vegetables directly onto the preheated steel; the conductive heat transfer will aggressively sear the bottoms, reviving sad roasted vegetables with an incredible, restaurant-quality char.
The Cold Plate
Thermal mass works in both directions. If you have the freezer space, put your steel in the deep freeze overnight. Pull it out, and you have a massive, sub-zero work surface. It is absolutely brilliant for tempering chocolate, rolling out finicky, butter-heavy laminated pastry doughs, or keeping a massive charcuterie board ice-cold during a summer party.
Just remember one critical rule: never use your steel as a cutting board. The hardened A36 carbon steel will instantly roll the edge of your expensive chef’s knife. Just like I constantly warn you about ruining your good knives on hard surfaces, chopping on a slab of industrial metal is a surefire way to destroy your blades.
The Final Slice: Reclaiming Your Weekend Pizza Night
We live in an era where time is our most precious commodity. When we actually carve out the hours to craft a meal from scratch, we deserve equipment that respects our effort. The baking steel is not a gimmick. It is not a unitasker destined to gather dust in the back of your cabinet. It is a scientifically validated, practically indestructible tool that permanently solves one of the most frustrating problems in the home kitchen.
If you want to know the secret to effortless dinner party hosting, it is the ability to confidently slide a homemade pizza into your oven and know, with absolute certainty, that it will emerge 6 minutes later with a blistered, crackling, structurally flawless crust.
Ditch the toxic non-stick pans. Retire the fragile ceramic stone. Invest in a heavy, unapologetic slab of A36 steel, and take your rightful place as the absolute master of your weekend pizza nights. Your tastebuds, your sanity, and your dinner guests will thank you.


