Look, I get it. You have had a long, exhausting week. You are actively trying to avoid ordering that sad, overpriced, lukewarm takeout for the third time, and you have finally decided to tackle homemade pizza. You mixed the dough, you let it rise, you poured yourself a generous glass of Chianti, and you are ready to channel your inner Neapolitan pizzaiolo. But the absolute second you try to stretch that beautiful, pillowy ball of dough into a circle, it aggressively snaps back into a thick, stubborn puck. You push, it pulls. You stretch, it shrinks. Suddenly, you are wrestling with a piece of wheat that has more underlying tension than a dysfunctional family holiday dinner.
This is arguably the single most common frustration I hear from weekend culinary hobbyists. It makes perfectly capable home cooks want to throw in the towel and just buy a frozen pie. But here is the brutal, liberating truth: your dough is not broken, and you are not a bad cook. Your dough is just stressed out. And quite frankly, so are you. But we are going to fix both of those things today.
We are currently living in a golden age of home pizza making. According to 2026 industry data, a staggering 86% of Americans eat pizza or flatbreads regularly, and the trend of hosting a mindful pizza night at home is surging as people ditch $17 average takeout pizzas for high-quality, customized homemade pies. But if you want to actually enjoy the process and avoid a total kitchen meltdown, you have to understand the foundational science of what is happening on your countertop. You do not need a culinary degree to make mind-blowing food, but you do need to understand your ingredients.
The Science of the Snap-Back: Meet Your Frenemies, Glutenin and Gliadin
Before we can permanently fix the problem, we need to put on our lab coats and talk about what is actually happening at a microscopic level. I promise I will keep the pretentious chef-speak to an absolute minimum—I have zero patience for fluff—but you need to understand the chemistry of flour if you want to master it.
Breaking Down the Flour Proteins
When you pour water into wheat flour, a fascinating chemical reaction occurs. The flour contains two distinct, naturally occurring proteins: glutenin and gliadin. On their own, in a dry bag of flour, they are just innocent little proteins hanging out in the endosperm of the wheat berry. But the moment they meet water and are subjected to physical agitation (like kneading or mixing), they bond together to form a complex, web-like network called gluten.
Here is where the magic—and the extreme frustration—happens. These two proteins have very different jobs within the dough structure.
- Glutenin is the muscle. It is a large, complex protein responsible for the dough’s strength, structure, and elasticity (the ability to bounce back).
- Gliadin is the flexible gymnast. It is responsible for the dough’s extensibility (the ability to stretch out without breaking).
When your pizza dough stubbornly snaps back like a rubber band, it means the glutenin is entirely dominating the relationship. The elasticity is overpowering the extensibility.
The Rubber Band Effect
Think of the gluten network in your dough as thousands of tiny rubber bands woven together. When you knead the dough, you are stretching, folding, and aligning these rubber bands, pulling them incredibly tight. This tension is actually a very good thing during the initial stages of bread making. A strong gluten matrix is what traps the carbon dioxide gases produced by the yeast, allowing the dough to rise, hold its shape, and become light and airy.
However, if you try to stretch the dough while those rubber bands are still pulled tight, they are going to fight you with everything they have. Every time you push the dough outward, the strands pull it right back to where it started. The dough is not misbehaving; the gluten is literally just doing its biological job. To get the dough to stretch into a beautiful, thin crust, you have to convince those microscopic rubber bands to relax.
Why High-Protein Flours Fight Back Harder
It is crucial to understand that not all flours are created equal. If you are using a high-protein bread flour (which typically clocks in around 12% to 14% protein), you are creating a much stronger, denser gluten network than you would with a standard all-purpose flour (which sits around 9% to 10% protein).
High-protein flours are fantastic for achieving that signature chewy, crisp pizza crust that can hold up to a mountain of heavy toppings without collapsing into a soggy mess. But that extra protein means extra glutenin, which directly translates to extra snap-back if you do not handle it correctly. If you are using a strong flour, you have to be even more diligent about your resting times and temperature control.
The Five Deadly Sins of Stubborn Pizza Dough
Now that we know why the dough is fighting back, let’s look at the specific, highly preventable mistakes you are making that are causing all of this unnecessary kitchen drama. Fixing these five rookie errors will permanently eliminate your shaping struggles.
Sin #1: You Are Rushing the Rest (The Autolyse and Bench Rest)
Time is money during the busy workweek, but on the weekend, time is flavor and texture. The absolute number one reason your pizza dough shrinks is that it is under-rested. Period.
When you divide your large mass of bulk dough into individual pizza balls, you are agitating and tightening the gluten network all over again. If you immediately try to stretch those newly formed balls, you are going to fail miserably. The dough needs a dedicated “bench rest” to allow the gluten strands to relax and the tension to dissipate.
How long? If your dough is sitting at room temperature (around 70°F to 72°F), it needs an absolute minimum of 2 to 4 hours of resting time after being balled up. I know that sounds like a long time when you are hungry, but statistics show that properly resting dough at room temperature can increase its extensibility by up to 30%. If your kitchen is slightly cooler (say, 65°F), it might need even longer. Do not rush this step. Pour a drink, prep your toppings, and let the dough chill out.
Sin #2: The Dough is Too Damn Cold
I am a massive advocate for cold fermentation. Letting your dough sit in the refrigerator for 24 to 72 hours works absolute miracles for flavor development. The yeast works slowly in the cold, producing complex organic acids that give the crust an incredible, nuanced, almost sourdough-like taste.
But here is the catch: cold gluten is rigid gluten. Think about your own muscles. If you go outside in the freezing cold and immediately try to do the splits without warming up, you are going to pull a hamstring. Your dough behaves exactly the same way. If you pull a ball of dough straight from the fridge and try to stretch it, it will aggressively snap back, and it will likely tear.
You must let cold-fermented dough come fully to room temperature before you even think about stretching it. This usually takes between 2 and 4 hours, depending on the ambient temperature of your kitchen. You want the dough to feel soft, supple, and almost alive in your hands.
Sin #3: You Overworked the Poor Thing
There is a persistent, outdated myth that you need to knead pizza dough until your arms fall off. While thorough mixing is important to establish the initial gluten structure, over-kneading is a very real problem. If you knead the dough for 20 minutes in a stand mixer on high speed, you are winding those gluten rubber bands so tightly that they may never fully relax.
This is why I highly recommend using a Danish dough whisk for your initial mixing, followed by gentle hand-kneading or the “stretch and fold” method. The stretch and fold technique builds incredible structural strength without over-oxidizing the dough or creating an impenetrable matrix of tension. You want the dough to pass the “windowpane test”—where you can stretch a small piece of dough until it is translucent without tearing—but you do not want it to feel like a dense rubber ball.
Sin #4: The Hydration is Off
Hydration refers to the mathematical ratio of water to flour in your dough recipe. If your dough is too dry, it is going to be stiff, dense, and incredibly difficult to stretch.
For a standard home oven (which typically maxes out around 500°F to 550°F), you want a hydration level of at least 65% to 70%. This means if you are using 1,000 grams of flour, you should be using 650 to 700 grams of water.
Higher hydration does two crucial things: it makes the dough more extensible (stretchy), and it creates vital steam during baking, which leads to a puffier, airier crust. Yes, a wetter dough is slightly stickier to handle at first, but it is infinitely easier to stretch than a dry, brick-like mass.
Sin #5: You Are Using a Rolling Pin (A Crime Against Pizza)
If you take a rolling pin to your pizza dough, we cannot be friends. I mean it.
Using a rolling pin does not just tighten the gluten network; it violently forces all of the beautiful, hard-earned gas bubbles out of the dough. You are literally crushing the life out of your pizza. The result will be a dense, flat, cracker-like crust with zero oven spring and zero soul.
Pizza dough should only ever be stretched by hand. You want to preserve the air pockets, especially around the outer edge (the cornicione), so that it puffs up beautifully in the extreme heat of the oven. Put the rolling pin away and let gravity do the work.
The “Rescue Rest” Protocol: What to Do When It Shrinks Mid-Stretch
Okay, so you made a mistake. You got impatient, you tried to stretch the dough too early, and now it is snapping back into a stubborn little oval. You are starting to sweat, your guests are watching, and you are tempted to just force it.
Stop. Do not force it. If you force it, the dough will tear, and you will be left with a structural disaster that will leak hot cheese and tomato sauce all over your oven floor. Instead, you are going to employ the “Rescue Rest.”
Step Away from the Dough
When the dough starts fighting you, the absolute best thing you can do is surrender. Acknowledge that the gluten is currently too tense, and give it a timeout.
Simply place the partially stretched dough on your lightly floured counter, cover it with a large inverted mixing bowl or a piece of lightly oiled plastic wrap (to prevent a dry skin from forming on the surface), and walk away.
The 15-Minute Magic Window
Go check your email. Pour another glass of wine. Mince some garlic. Do whatever you need to do for exactly 10 to 15 minutes.
During this brief window, the gluten strands will rapidly relax. When you come back and lift the bowl, you will find that the dough has magically transformed. It will be dramatically softer, more pliable, and willing to stretch out to its full diameter with minimal resistance. This rescue rest works almost every single time, and honestly, many professional pizza makers build a mid-stretch rest into their routine just to make their lives easier.
Step-by-Step Masterclass: How to Stretch Pizza Dough Like a Pro
Now that we have covered the science, the common pitfalls, and the troubleshooting, let’s talk about the actual physical technique. Stretching pizza dough is an art form, but it is an art form that anyone can learn with a little bit of patience and the right method.
Pre-Game: Temperature and Timing
As we firmly established, your dough must be at room temperature (around 70°F) and fully rested. You will know it is ready when it has roughly doubled in size, looks pillowy, and feels soft when you gently poke it. If you poke it and the indentation immediately springs back out, the gluten is still too tight. Give it more time.
Before you start stretching, make sure your workspace is properly prepped. Lightly flour your countertop. I highly prefer to use a mix of 50% all-purpose flour and 50% fine semolina flour for dusting. The semolina acts like tiny ball bearings, preventing the dough from sticking to the counter and adding a wonderful, subtle crunch to the bottom of the baked crust.
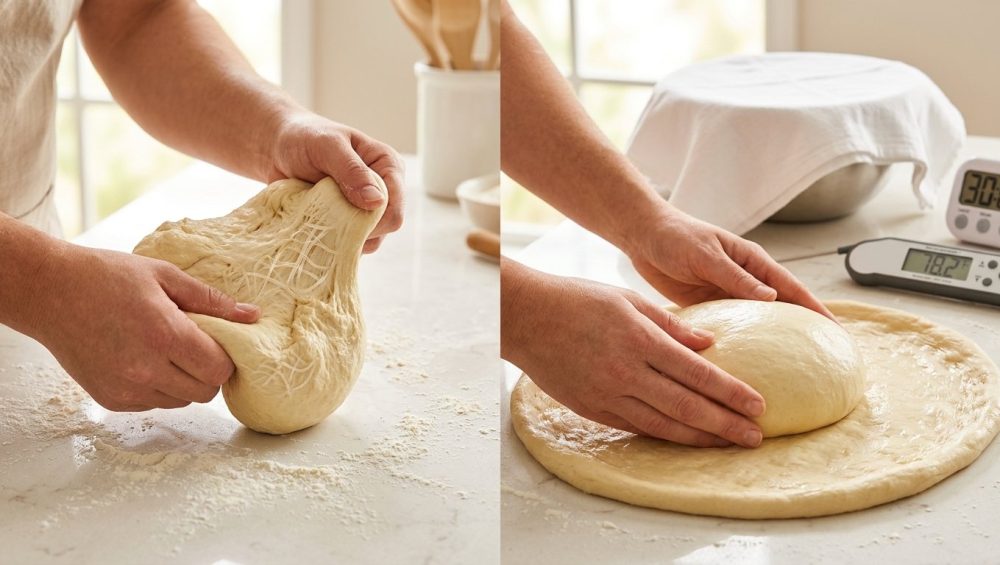
The Initial Flattening (The Knuckle Method)
Take your rested dough ball and place it on the floured surface. Gently press down on the center of the dough with your fingertips, working your way outward. You are trying to flatten the middle while leaving a slightly thicker, untouched rim around the outside edge. This rim will become your puffy crust.
Never press down on the very edge of the dough. You want to keep all those lovely, fermented air bubbles completely intact. Once you have a small, flat disc with a raised edge, it is time to pick it up.
The Gravity Stretch
This is where the magic happens. Pick up the dough and drape it over your knuckles. Keep your hands in gentle fists; do not use your fingertips, or you will poke holes right through the delicate center of the dough.
Hold the dough vertically, letting gravity do the heavy lifting. Gently pull your hands apart, slowly rotating the dough along your knuckles like a steering wheel. As you turn it, gravity will pull the dough downward, naturally stretching it out into a larger and larger circle.
If the dough is properly rested and at the correct temperature, it will stretch effortlessly. You will not have to fight it. Just keep rotating until the center is thin and even. If you notice a thin spot developing, simply avoid stretching that particular area and focus on the thicker parts.
What to Do if It Tears
Look, accidents happen. Even the seasoned pros occasionally tear a dough. If a small hole opens up, do not panic. Place the dough flat on the counter, gently pinch the edges of the hole together, and press down firmly to seal it.
Do not try to patch it by pasting a separate, thick piece of dough over the top; it will not cook evenly and will result in a raw spot. Just pinch and seal. And remember, perfectly round pizzas are highly overrated. An amoeba-shaped, rustic pizza tastes exactly the same as a perfectly circular one, and it proves that it was made by human hands, not by a factory machine.
The Gear You Actually Need (And the Toxic Junk You Need to Toss)
You know I cannot write a masterclass without talking about equipment. I have absolutely zero patience for cheap, gimmicky kitchen tools that break after three uses or, worse, leach mystery chemicals into your food. If you want to make incredible pizza at home, you need a few core pieces of high-quality gear.
The Anti-Teflon Rant
First of all, if you are trying to bake pizza on a flimsy, warped, non-stick baking sheet that you bought at a discount store ten years ago, stop it. I am begging you.
Those cheap non-stick coatings are not designed to withstand the extreme heat required for good pizza (500°F+). At those temperatures, the toxic coatings can degrade, flake off into your food, and release dangerous fumes. It is disgusting, it is unsafe, and it is entirely preventable. I am a massive proponent of banishing toxic kitchen gear from your home entirely.
Furthermore, thin aluminum pans do not have the thermal mass required to properly crisp a pizza crust. Your oven will drop in temperature the second you open the door, and that thin pan will not be able to recover quickly enough, leaving you with a pale, soggy bottom. If your baking sheets keep warping in the oven with a loud pop, they belong in the recycling bin.
Why Baking Steels Reign Supreme
If you want professional-level, blistered, crispy pizza crusts in a standard home oven, you need to invest in a baking steel.
A baking steel is a heavy, solid slab of highly conductive steel that you leave in your oven permanently. Steel is vastly superior to traditional ceramic pizza stones because it has a much higher thermal conductivity. It absorbs heat efficiently and transfers that heat into the pizza dough incredibly fast. This rapid heat transfer causes the moisture in the dough to turn into steam instantly, creating what bakers call “oven spring”—that beautiful, dramatic puffing of the crust.
Preheat your baking steel at your oven’s maximum temperature for at least 45 minutes to an hour before baking. When you slide your stretched dough onto that screaming hot steel, the crust will begin to bake and set before the gluten has any chance to shrink back.
Precision is Everything (Scales and Scrapers)
Baking is science, and science requires precision. If you are still measuring your flour by scooping a measuring cup into a bag, you are setting yourself up for failure. Depending on how tightly packed the flour is, a “cup” can vary in weight by up to 30%. This completely throws off your hydration ratio, leading to dry, unyielding dough that will snap back aggressively.
You must stop scooping your flour by volume and start measuring by weight. A high-quality digital kitchen scale is the single most important tool a baker can own. It ensures that your 65% hydration dough is actually 65% hydration, every single time.
Additionally, you need to grab a bench scraper. A sturdy stainless steel bench scraper is indispensable for dividing dough, moving sticky ingredients, and cleaning dried flour off your countertops without ruining the edge of your good chef’s knife.
Flour, Water, Salt, Yeast: Optimizing Your Ingredients
A traditional pizza dough recipe only has four ingredients. When a recipe is this minimal, the quality and treatment of those ingredients dictate the entire outcome. You cannot hide bad technique behind a complicated sauce. Speaking of sauce, please fry your tomato paste in a little olive oil before adding your crushed tomatoes—it caramelizes the sugars and removes that harsh, metallic tin-can flavor. But I digress. Let’s talk about optimizing the dough ingredients.
The Case for Tipo 00 Flour
While you can absolutely make a great pizza with standard grocery store bread flour, if you want to take your dough to the next level, seek out authentic Italian Tipo 00 flour.
The “00” refers to the grind of the flour, not the protein content. Tipo 00 is milled incredibly fine, almost like baby powder. However, most commercial 00 pizza flours are formulated with a very specific protein content (usually around 12.5%) that provides the perfect balance of glutenin and gliadin.
This means the dough will have enough strength to hold a long fermentation and puff up in the oven, but it will also have enough extensibility to stretch out beautifully without fighting you. It is the gold standard for a reason.
The Role of Water Temperature
The temperature of your water dictates the temperature of your final dough, which in turn dictates how fast the yeast ferments.
If you are mixing a dough that you plan to cold-ferment in the fridge for three days, you should use cold water (around 55°F to 60°F) to prevent the yeast from becoming too active before it hits the cold environment. If you use warm water, the yeast will go into overdrive, consuming all the sugars too quickly and leaving you with an over-proofed, slack dough that tears easily.
Conversely, if you are doing a same-day, room-temperature dough, you want to use lukewarm water (around 80°F to 85°F) to kickstart the yeast activity. Control your water temperature, and you control the dough’s destiny.
Salt as a Gluten Strengthener
Salt is not just there for flavor—although a saltless pizza crust is truly a culinary tragedy. In baking chemistry, salt plays a vital role in tightening and strengthening the gluten network.
Salt molecules interact with the gluten proteins, bringing them closer together and making the dough less sticky and more manageable. It also regulates the yeast, preventing it from fermenting too rapidly. A standard pizza dough should contain about 2% to 3% salt by weight relative to the flour. Do not skimp on it, and do not forget it.
The Magic of Olive Oil
While traditional Neapolitan dough strictly forbids oil, adding a little bit of high-quality extra virgin olive oil to your home dough can be a game-changer. Fats act as “shorteners” in baking. They literally shorten the gluten strands by coating the proteins and preventing them from forming overly long, tough bonds. Adding just 2% to 3% olive oil to your dough will result in a more tender, less rubbery crust that is significantly easier to stretch.
Advanced Techniques for the Weekend Warrior
Once you have mastered the basic rest periods and temperature controls, you can start tweaking your process to achieve different textures and flavor profiles.
Sourdough vs. Commercial Yeast Elasticity
If you want to dive into the deep end, swapping commercial yeast for a natural sourdough starter will drastically change how your dough behaves. Sourdough cultures naturally contain lactic and acetic acids. These acids have a profound effect on the gluten network, actually increasing the extensibility of the dough and making it incredibly stretchy.
However, it is a double-edged sword. If you let a sourdough pizza ferment for too long, those same acids will completely degrade and destroy the gluten network, turning your dough into a soupy, un-stretchable mess. Sourdough requires careful monitoring, but the flavor and texture payoff is immense.
Hydration Tweaks for a More Extensible Dough
If you find that your dough is consistently too tight, even after a proper rest, you can experiment with increasing the hydration.
Try bumping your water content up by 2% or 3%. For example, if you normally use 65% hydration, try 68%. The extra water acts as a vital lubricant between the gluten strands, allowing them to slide past each other more easily. This increases the extensibility of the dough, making it much more compliant during the stretching phase.
Just be aware that higher hydration doughs are stickier and require a bit more finesse to handle. You will need to rely more heavily on your bench scraper and dusting flour. But the reward is a lighter, crispier, and much more open crumb structure.
A Final Pep Talk for the Home Pizza Maker
Making pizza from scratch is supposed to be fun. It is a tactile, deeply satisfying process that connects you to the fundamentals of cooking. If you find yourself getting angry at a ball of flour and water, you need to take a step back and breathe.
Remember the golden rules:
- Respect the rest. Do not rush the dough. Give it the 2 to 4 hours it needs at room temperature.
- Watch your temperatures. Cold dough is tight dough. Let it warm up.
- Ditch the rolling pin. Use gravity and your knuckles to gently coax the dough into shape.
- Embrace the Rescue Rest. If it fights back, cover it, walk away for 15 minutes, and try again.
You do not need a culinary degree to make mind-blowing food. You just need a basic understanding of the science, a little bit of patience, and the absolute refusal to settle for mediocre equipment. Stop fighting your food, start listening to what it needs, and you will be turning out flawless, perfectly stretched pizzas every single weekend. Now go preheat that steel, pour another glass of wine, and let the dough do the work.


