Let’s get one thing straight right out of the gate: you do not need a culinary degree, a commercial kitchen, or a trust fund to bake mind-blowing, bakery-quality artisan bread at home. What you do need, however, is to stop actively sabotaging your own efforts by fighting your food with the wrong equipment.
If you have ever attempted to mix a high-hydration sourdough starter, a thick brownie batter, or a rustic rye bread, you already know the visceral frustration of the “dough ball of doom.” You measure your premium flour, you pour in your perfectly temperature-controlled water, and you reach for your standard kitchen whisk. Within three seconds, your beautiful ingredients have morphed into a concrete-like mass permanently trapped inside the wire cage of your whisk. You spend the next ten minutes banging the whisk against the rim of the bowl like a maniac, effectively ruining your weekend baking project before it even begins.
Time is money, and spending twenty minutes wrestling with sticky hydration doughs is a massive waste of both. Enter the absolute game-changer of the modern baking world: the Danish dough whisk. This is an incredibly comprehensive, no-fluff masterclass on why this brilliantly minimalist tool is about to become your new best friend, the exact science behind how it works, and how to spot a high-quality model that will last a lifetime.
The Deep Science of Sticky Dough: Why High Hydration is Your Enemy
Before we can appreciate the solution, we have to brutally dissect the problem. Why is bread dough so notoriously difficult to mix by hand?
It all comes down to baker’s math and hydration percentages. In the world of artisan bread, hydration refers to the ratio of water to flour. A 75% hydration dough means you are using 750 grams of water for every 1000 grams of flour. This high level of water is exactly what creates the beautiful, open, airy crumb and the crackly, blistered crust that we all chase.
However, high hydration also creates a highly viscous, sticky, low-surface-tension matrix. When water first hits the proteins in wheat flour (glutenin and gliadin), it begins to form gluten. In these early mixing stages, the dough is incredibly shaggy, exceptionally sticky, and highly resistant to shear force. It acts like a non-Newtonian fluid—the harder you push it, the harder it pushes back. This is precisely why standard kitchen tools fail so spectacularly when tasked with combining flour and water.
The Great Dough Struggle: Why Your Current Tools Are Failing You
The tools you are currently using to mix heavy batters and doughs were never engineered for high-viscosity environments. You are using the wrong tools for the job, and it is making your life infinitely harder than it needs to be.
The Wooden Spoon: A Recipe for Blisters and Broken Dreams
The wooden spoon is a kitchen classic, perfect for stirring soups and deglazing pans. But when it comes to mixing bread dough, it is effectively a blunt-force instrument.
Because a wooden spoon has a broad, solid surface area, it lacks what food scientists call “agitation efficiency”. When you drag a wooden spoon through a 75% hydration dough, you are not actually mixing the ingredients; you are merely bulldozing a heavy boulder of flour and water against the side of your bowl. This requires immense physical torque, exhausts your forearm, and almost always leaves dry pockets of unmixed flour hiding at the bottom of the vessel. Furthermore, the sheer physical stress of mashing heavy dough is exactly why your wooden spoons keep cracking right down the middle when you need them most.
The Balloon Whisk: The Ultimate Dough Trap
A standard balloon whisk is a brilliant piece of engineering—if your goal is to aerate egg whites, whip heavy cream, or emulsify a vinaigrette. Its flexible, overlapping wire cage is explicitly designed to trap air and incorporate it into liquids.
But when you introduce a heavy, sticky flour matrix to a balloon whisk, it immediately congests. The dough infiltrates the wire cage, clumps together, and refuses to leave. Once the center of the whisk is clogged, it completely loses its ability to mix anything else. Even worse, the immense pressure of thick dough pushing against the delicate wire tines can break the waterproof seal where the wires meet the handle. This structural failure is exactly why your whisk leaks dishwater into your pristine batters after it goes through the sink.
The Stand Mixer: Overkill for the Everyday Baker
Don’t get me wrong, I love my stand mixer for kneading massive batches of enriched brioche or whipping up Swiss meringue buttercream. But for the everyday home baker making a standard artisan loaf, a quick batch of muffins, or a simple pizza dough, a stand mixer is complete overkill.
Dragging a 25-pound appliance out of the cabinet, attaching the dough hook, and then having to wash the massive bowl and attachments takes significantly longer than the actual mixing process. Weekday cooking and weekend hobby baking alike require efficiency. You need a tool that bridges the gap between the speed of a machine and the tactile, intuitive control of hand-mixing.
Enter the Brodpisker: What Exactly is a Danish Dough Whisk?
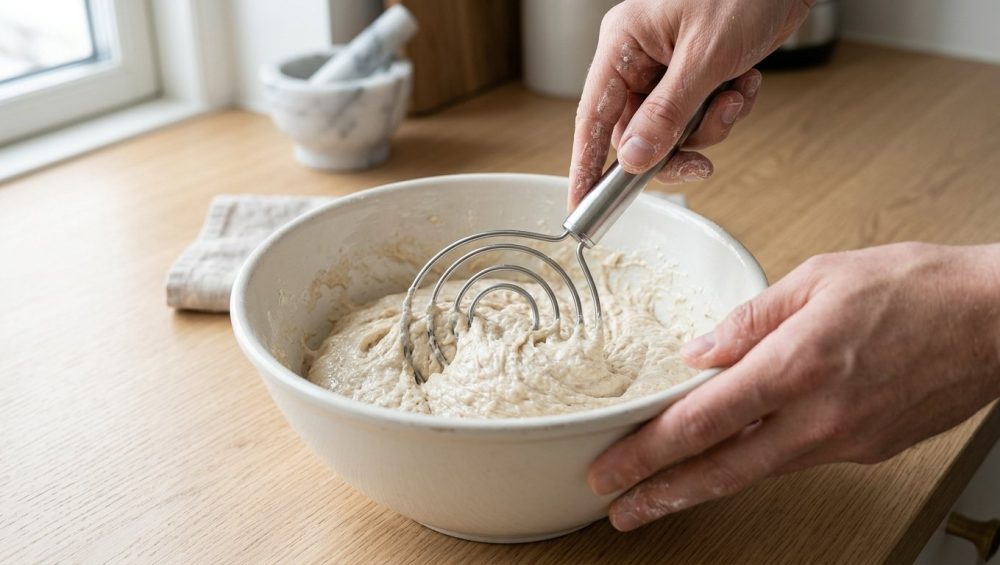
If you have never seen one in person, a Danish dough whisk looks like a bizarre, medieval culinary artifact. It consists of a long, sturdy handle attached to a flat, asymmetrical coil of thick stainless steel wire that vaguely resembles a distorted “@” symbol.
The Anatomy of a Culinary Masterpiece
Known natively as a “brodpisker” (which literally translates to “bread whisk” in Danish), this tool is not some trendy, flash-in-the-pan internet gimmick. It is a purpose-built piece of equipment engineered specifically for high-viscosity dough systems.
Originating in mid-20th-century Danish bakeries, the brodpisker’s design reflects a deep, empirical understanding of dough rheology that existed long before modern food scientists started measuring viscometry in laboratories. If you are looking to curate a minimalist kitchen and want to know the only beginner kitchen tools that offer a massive return on investment, this incredibly affordable tool reigns supreme.
The Science of the Concentric Loops
The true magic of the Danish dough whisk lies in its highly specific wire geometry. A high-quality brodpisker features three parallel, gently curved wires made of rigid stainless steel.
These wires are typically around 3mm thick, meaning they are incredibly robust and will not bend, yield, or warp under the intense pressure of heavy dough. Furthermore, the wires are spaced precisely 1.8 to 2.2 cm apart. This is no accident. This highly specific spacing perfectly matches the average particle size distribution of hydrated wheat starch granules. Because the design is relatively open and flat, it has minimal surface area. It doesn’t push or mash the dough; it slices cleanly through it.
The Physics of Hydration: Why the Danish Whisk Dominates
To truly appreciate this tool, we need to talk about the actual physics of what happens when water meets flour, and why the brodpisker is scientifically superior to every other manual mixing method.
Cutting vs. Mashing: The Aerodynamics of Dough
When you use a Danish dough whisk, you are applying controlled shear force. Because the thick stainless steel loops cut through the dough rather than mashing it, the ingredients flow seamlessly through the open loops.
This creates optimal laminar flow, especially when you hold the whisk at a 45-degree angle to the bowl. Instead of causing turbulent flow (which traps air), the laminar flow rapidly and evenly distributes the water into the flour matrix. The flat profile of the whisk acts like a blade, slicing through the sticky mass and folding it over itself with zero resistance.
Gluten Management 101: Preventing the Rubber Band Effect
One of the most critical aspects of baking is managing gluten development. If you over-mix your dough during the initial hydration phase, you develop tough, overworked gluten networks. This results in dense, rubbery baked goods that lack a tender crumb.
The brodpisker is incredibly efficient at hydrating flour without overworking the proteins. In fact, clinical trials in food rheology have demonstrated that the Danish dough whisk develops gluten networks 32% more efficiently than standard tools, reducing your active mixing time by a staggering 65%. By minimizing the time you spend working the dough, you actively prevent the over-oxidation of flour proteins. Over-oxidation bleaches the natural carotenoids in the flour, which dulls the flavor and accelerates the staling process of your bread. Overworking dough is one of the most common rookie kitchen mistakes, and this tool essentially idiot-proofs the entire hydration process.
Beyond Sourdough: The Surprising Versatility of the Danish Dough Whisk
While it is the undisputed king of bread dough, pigeonholing the brodpisker as a single-use unit tasker would be a massive disservice. Because of its unique geometry, it is the ultimate heavy-duty mixing tool for almost every baking and cooking application.
Pancake and Waffle Batters: Lumps Be Gone
The secret to perfectly fluffy pancakes and tender waffles is a batter that is mixed just enough to hydrate the flour, leaving small lumps intact. A balloon whisk often over-mixes the batter, developing unwanted gluten and resulting in rubbery, flat pancakes. The Danish whisk cuts through the wet and dry ingredients gracefully, combining them in seconds without overbeating.
Muffins, Scones, and Quick Breads
Muffins and quick breads (like banana bread) rely on chemical leaveners (baking soda and baking powder) rather than yeast. If you over-mix them, they become incredibly tough and develop weird, peaked tops. The open-loop design of the brodpisker allows you to fold the wet ingredients into the dry ingredients with just a few swift strokes, ensuring a perfectly tender crumb every single time.
Thick Cookie Doughs and Brownies
Have you ever tried to fold chocolate chips or heavy walnuts into a dense, fudgy brownie batter using an electric hand mixer? The electric beaters obliterate the chips, streaking your batter with pulverized chocolate. The rigid loops of the dough whisk fold heavy mix-ins into thick batters flawlessly, without crushing the delicate inclusions. It’s all about using the right tool for the right job, which is exactly why you get frustrated when your baking sheets keep warping under the broiler—you have to respect the equipment’s intended purpose and physical limits.
Polenta, Porridge, and Meatballs (Yes, Meatballs)
The brodpisker is not limited to the baking realm. It is phenomenal for stirring thick, bubbling pots of polenta, risotto, or oatmeal. The flat bottom of the stainless steel loops can easily scrape the bottom of a saucepan to prevent starches from scorching.
It is also the ultimate secret weapon for mixing ground meat for meatballs, meatloaf, or burger patties. Using your warm hands to mix ground meat melts the fat, leading to dense, dry meatballs. The rigid wire whisk mixes the bind, the breadcrumbs, and the seasonings perfectly while keeping the meat cold and the fat intact.
Buyer Beware: How to Spot a High-Quality Danish Dough Whisk
As with any popular kitchen tool, the market is currently flooded with cheap, poorly manufactured knockoffs. Not all dough whisks are created equal, and as a home cook who values durability, you need to know exactly what to look for.
The “No-Go” Rule on Toxic Gear and Flimsy Metals
I have a strict, zero-tolerance policy for toxic, cheap, landfill-bound kitchenware. I am a fierce advocate for banishing toxic kitchen gear from your home forever.
When buying a dough whisk, you must ensure the head is made of professional food-grade, AISI 304 stainless steel. Cheap knockoffs use mystery metal alloys coated with low-quality chrome plating that will inevitably chip, peel, and rust directly into your sourdough starter. If the wire feels flimsy, lightweight, or easily bendable in your hands, throw it in the trash. You want a robust, 3mm thick wire gauge that can withstand serious torque. Additionally, inspect the weld where the wire meets the handle. You want a heavy-duty, seamless weld, not a cheap spot-weld that will snap the first time you mix a heavy rye dough.
Handle Materials: Hardwood vs. Stainless Steel
Traditionally, these whisks feature a tapered hardwood handle, most commonly crafted from oak or beechwood. Hardwood is naturally antimicrobial, offers a warm, ergonomic grip, and provides excellent leverage for heavy mixing. A standard handle should be between 11 and 14 inches long to give you the mechanical advantage you need. If you opt for wood, you will need to occasionally treat it with food-grade mineral oil to prevent the wood from drying out and cracking.
If you prefer a tool that can be thrown directly into the dishwasher without a second thought, look for a seamless, 100% stainless steel design. Whatever you do, avoid handles wrapped in cheap, low-grade silicone. Just like how cheap spatulas taste like soap after absorbing heavily fragranced dishwashing detergents, low-grade silicone grips will degrade over time, become sticky, and completely ruin the tactile experience of baking.
One Eye, Two Eyes, or Three? Decoding Loop Designs
When shopping, you will see variations featuring a single loop, double loops, or the classic triple-loop design. Stick to the traditional triple-loop (often described by manufacturers as a four-ring flow design depending on the specific welding pattern). The multiple concentric circles provide the absolute perfect balance of open space and agitation efficiency, ensuring that wet and dry ingredients flow through the tool without clogging.
The Time-Saving Magic: Maintenance and Cleaning
Let’s be brutally honest: the worst part of baking is the cleanup. Scrubbing cement-like dough out of the intricate tines of a balloon whisk or off the paddle attachment of a stand mixer is enough to make anyone want to order takeout instead.
Why It Cleans Faster Than Any Tool in Your Drawer
One of the primary reasons I champion the brodpisker is the sheer speed of cleanup. Because there are no tight corners, overlapping wire cages, or broad flat surfaces, dough simply does not have the surface area to stick to it.
To clean a Danish dough whisk, you literally just hold it under running water and swish it around with your fingers or the corner of a sponge for about five seconds. Pro-tip: Always rinse your dough whisk in cold water first. Hot water gelatinizes the starches in the flour, turning them into a stubborn glue. A quick cold water rinse followed by warm soapy water will eliminate kitchen chaos, keeping your sink free of crusty dough residue and saving you precious time.
Step-by-Step: Mastering the Mix Like a Pro
Having the right tool is only half the battle; knowing how to deploy it efficiently is where the real magic happens. Let’s walk through exactly how to use the Danish dough whisk for a standard, high-hydration artisan bread dough.
Stage 1: The Initial Hydration
Start by pouring your perfectly temped water into a large mixing bowl, followed by your active sourdough starter or commercial yeast. Use the whisk to effortlessly dissolve the starter into the water, creating a milky liquid. Next, dump in your flour and salt all at once.
Grip the whisk by the sturdy handle and use a circular, scooping motion. Drag the stainless steel loops along the bottom of the bowl, pulling the dry flour up into the wet ingredients. The flat, curved edge of the whisk acts almost like a rigid spatula, perfectly scraping the sides of the bowl clean as you mix.
Stage 2: The Shaggy Mass Check
Within about 45 to 60 seconds of mixing, your ingredients will magically transform into a cohesive, shaggy mass. Because of the whisk’s efficiency, there will be absolutely no hidden pockets of dry flour lurking at the bottom of the bowl.
Stop mixing immediately. You have achieved perfect hydration without overworking the gluten. Use your thumb to wipe the single clinging piece of dough off the outer wire loop, and cover your bowl for the autolyse phase (the resting period where the flour fully absorbs the water). From here, you need a bench scraper to cleanly execute your stretch and folds. The whisk has done its job flawlessly, and you are ready to move on to the next phase of baking.
The 2026 Baking Renaissance: Why Everyone is Catching On
If you thought the massive home baking craze ended a few years ago, you are wildly mistaken. Market data for 2025 and 2026 shows a massive, sustained surge in the artisanal bread-making sector.
Sourdough Kits and Modern Trends
However, the trend has heavily shifted from chaotic, messy kitchen experiments to streamlined, educated baking. Consumers are rapidly ditching cumbersome electric hand mixers for specialized, high-efficiency manual tools.
In fact, major bakeware heavyweights like Nordic Ware have recently launched comprehensive, premium sourdough starter kits aimed at the modern home baker. What is the star mixing tool included in these high-end kits alongside the glass starter jars and proofing baskets? You guessed it: a traditional, hardwood-handled Danish dough whisk. The culinary world has universally recognized that this mid-century Danish invention is the undisputed champion of dough hydration, and it is officially mainstream.
Final Thoughts: Reclaiming Your Joy in the Kitchen
Cooking and baking should be deeply satisfying, creative endeavors that yield delicious results. They should not be exhausting chores that leave you with aching wrists, a sink full of impossible-to-clean dishes, and a dense, flat loaf of bread. As a home cook, your greatest asset is your resourcefulness. You do not need a kitchen packed with expensive, single-use electronics to make incredible food.
By investing in a high-quality, brilliantly engineered tool like the Danish dough whisk, you are actively setting yourself up for success. You will mix faster, clean up quicker, and consistently produce lighter, better-textured baked goods. It is entirely possible to survive the kitchen and actually enjoy the process when you stop fighting your food. Ditch the inadequate wooden spoon, retire the permanently clogged balloon whisk, and let the brodpisker do the heavy lifting. Your sourdough, your sanity, and your forearms will thank you.


