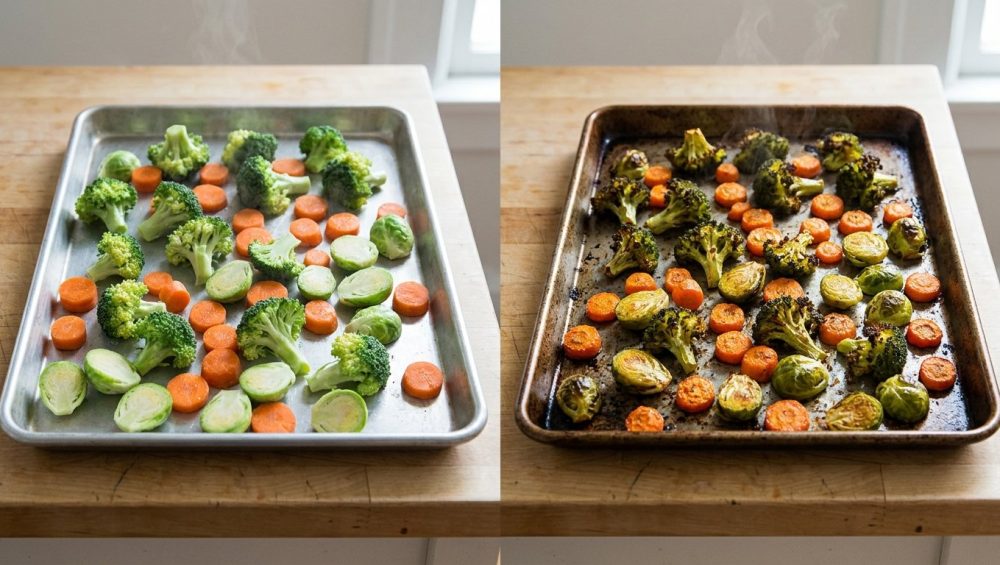
Listen to me. We need to have a very serious, brutally honest conversation about the grey, limp, depressing piles of mush you have been serving alongside your weeknight chicken. You know exactly what I am talking about. You come home exhausted, chop up a head of broccoli, toss it in whatever oil is sitting on the counter, scatter it onto a cold, flimsy baking sheet, and shove it into a 400°F oven. Thirty minutes later, instead of the deeply caramelized, crispy-edged restaurant-quality side dish you were dreaming of, you pull out a watery, steamed tragedy.
It is incredibly frustrating, especially when you are just trying to get a healthy meal on the table without spending three hours on your feet. But here is the good news: it is not your fault, it is not your oven’s fault, and it certainly is not the vegetable’s fault. You do not need a culinary degree to achieve mind-blowing, perfectly charred vegetables. You just need to understand a tiny bit of basic kitchen physics. The entire reason your roasted veggies turn mushy is because you are putting them onto a cold piece of metal.
Today, we are going to fix this permanently. We are going to dive deep into the science of thermal mass, the magic of the Maillard reaction, and the absolute game-changing technique of the preheated pan. This is a zero-cost, zero-extra-time technique that will completely revolutionize your weeknight dinners. Grab a glass of wine, take a seat, and let’s get into the science of the perfect roast.
The Anatomy of a Soggy Vegetable: Understanding Water Content
To understand why your vegetables are turning into sad, steamed mush, we first have to look at the botanical reality of your grocery haul. Vegetables are, from a scientific standpoint, essentially just structured water balloons.
When you buy produce, you are mostly paying for hydration. Let’s look at the raw data. Zucchini and celery are a staggering 95% water by weight. Tomatoes sit right behind them at 94%. Cabbage is 93% water, and eggplant, cauliflower, bell peppers, and spinach are all 92% water. Even dense-seeming vegetables like broccoli and carrots are 91% and 87% water, respectively. Even the humble, starchy white potato is 79% water.
Why does this matter? Because water is the ultimate enemy of browning. Water boils and evaporates at exactly 212°F (100°C). Thanks to a principle called the latent heat of vaporization, as long as there is liquid water present on the surface of your food, the temperature of that surface cannot exceed 212°F. All of the thermal energy from your oven is being spent converting that liquid water into steam, rather than browning your food.
When you take a pile of 91%-water broccoli, toss it on a cold baking sheet, and put it in the oven, that pan takes a solid ten to fifteen minutes just to heat up. During that agonizingly slow heating process, the plant cell walls begin to break down and leak their internal moisture. That moisture pools on the cold metal tray. By the time the pan actually gets hot, your broccoli is sitting in a shallow puddle of its own juices. You are no longer roasting; you are boiling. You are steaming. You are creating mush. If you are tired of throwing away sad veggies at the end of every week because no one in your family wants to eat them, you have to change how you manage that water content.
The Holy Grail of Flavor: The Chemistry of the Maillard Reaction
If water is the enemy, what is the goal? The goal is the Maillard reaction. I have zero patience for pretentious chef-speak, but this is one scientific term you absolutely must know if you want to cook like a pro in a standard home kitchen.
The Maillard reaction is a complex chemical cascade that occurs when amino acids (the building blocks of proteins) and reducing sugars react under high heat. It is responsible for the glorious brown crust on a seared steak, the golden color of toasted bread, the complex aroma of roasted coffee, and, yes, the sweet, nutty, crispy edges of perfectly roasted vegetables. It is important to note that this is different from caramelization, which involves the breakdown of sugars alone. The Maillard reaction requires both proteins and sugars, and it creates hundreds of brand new, highly complex flavor compounds that make food taste irresistibly savory and deeply satisfying.
Here is the catch: the Maillard reaction does not happen at low temperatures. While it can technically occur very slowly at lower heats, to achieve the rapid, aggressive browning we want for roasted vegetables, you need a surface temperature of at least 230°F to 340°F (110–170°C).
Remember our water problem? If the surface of your vegetable is covered in a puddle of water, its temperature is capped at 212°F. The Maillard reaction is literally locked out. It cannot happen.
This is where the magic of the preheated pan comes into play. When you place an empty, heavy-duty baking sheet or skillet into the oven while it preheats, that metal absorbs a massive amount of thermal energy. When you finally drop your room-temperature, oil-coated vegetables onto that blazing hot 425°F surface, the thermal shock is instantaneous. The surface moisture on the vegetable flashes into steam and evaporates on contact. Because the water is instantly cleared away, the surface temperature of the vegetable immediately skyrockets past the 212°F boiling point and enters the 230°F+ zone. You bypass the steaming phase entirely. By mastering the Maillard reaction through temperature control, you instantly elevate a boring weeknight side dish into a culinary masterpiece.
Thermal Mass and The “No-Go” Rule on Toxic Gear
We cannot talk about preheating pans without talking about the pans themselves. The success of this technique relies entirely on a concept called thermal mass—the ability of a material to absorb, store, and radiate heat.
When you drop two pounds of room-temperature vegetables onto a hot pan, you are introducing a massive amount of cold mass to a hot environment. If your pan is thin, cheap, and flimsy, it lacks the thermal mass to fight back. The temperature of the metal will immediately crash, and you will be right back to square one: waiting for the pan to heat up while your vegetables leak water and steam.
The Heavyweights: Aluminum, Carbon Steel, and Cast Iron
You need equipment that holds its ground. Cast iron is the undisputed king of thermal mass. Because it is incredibly dense and heavy, it stores heat like a battery. A 12-inch cast iron skillet heated to 400°F will barely drop in temperature when you add cold food to it. This makes it phenomenal for roasting smaller batches of vegetables like Brussels sprouts or mushrooms.
However, for a standard family weeknight dinner, you usually need more surface area than a skillet can provide. This is where heavy-gauge aluminum baking sheets come in. Aluminum is a spectacular conductor of heat—it conducts heat roughly 2.3 times faster than stainless steel and 5.6 times faster than cast iron. A commercial-grade, 18-gauge or 13-gauge aluminum half-sheet pan has the thickness required to hold heat, but the conductivity to transfer that heat rapidly into your vegetables. If your baking sheets keep warping the second they hit a hot oven, it means they are too thin. A warped pan means uneven contact with the food, which means uneven browning. Throw the flimsy grocery-store pans in the recycling bin and invest in heavy-duty commercial aluminum.
The Absolute Danger of Cheap Non-Stick
Now, let me be abundantly clear about my strictest kitchen rule. I have zero tolerance for cheap, toxic kitchenware. You absolutely cannot, under any circumstances, use this preheating technique with a cheap Teflon or PTFE-coated non-stick baking sheet.
When you heat an empty non-stick pan in a 400°F to 450°F oven, the chemical coating begins to rapidly degrade. At high temperatures, these synthetic coatings off-gas toxic fumes that can literally kill pet birds and cause “polymer fume fever” in humans. Furthermore, the coatings will blister, peel, and flake directly into your food. There is no excuse for using mystery metals and peeling chemical coatings in a modern kitchen. I am fiercely passionate about banishing toxic kitchen gear from your home. Stick to bare aluminum, stainless steel, carbon steel, or seasoned cast iron. They are safer, they perform infinitely better, and they will literally last you a lifetime.
The Smoke Point Dilemma: Choosing the Right Fat
So, you have your heavy-duty aluminum pan, and you are ready to blast it in a 425°F oven. Before you do, we need to talk about oil.
Cooking oils are composed of triglycerides—fatty acids attached to a glycerol molecule. Every single fat in your kitchen has a specific “smoke point.” The smoke point is the exact temperature at which the oil stops shimmering and begins to break down, burn, and produce visible, acrid smoke. When an oil exceeds its smoke point, its molecular structure changes. It destroys the beneficial nutrients, releases free radicals, and, most importantly for our purposes, imparts a profoundly bitter, burnt, nasty flavor to your food.
If you try to roast vegetables on a blazing hot preheated pan using unrefined Extra Virgin Olive Oil or butter, you are going to set off your smoke alarms and ruin your dinner. Butter contains milk solids that burn rapidly at just 302°F (150°C). Extra Virgin Olive Oil, depending on its quality and refinement, typically smokes between 325°F and 375°F (163-190°C). Neither of these can survive a 425°F roasting environment.
You need high-heat warriors. Refining an oil removes the impurities and free fatty acids that cause it to smoke early, drastically raising its heat tolerance. Here is a look at the data for the best high-heat roasting oils:
- Refined Avocado Oil: The absolute champion, boasting a massive smoke point of 520°F (271°C). It is completely neutral in flavor and handles blistering oven temperatures with ease.
- Refined Safflower Oil: Clocks in at an impressive 510°F (266°C).
- Refined Peanut Oil: Hits 450°F (232°C) and is a beloved staple for high-heat applications.
- High-Oleic Sunflower Oil: Also sits comfortably at 450°F (232°C) and is incredibly cost-effective for everyday weeknight cooking.
- Canola Oil: Reaches 400°F (204°C), making it a borderline but acceptable choice if you are roasting at exactly 400°F.
Do not ruin perfectly good produce by burning your oil. Matching your fat to your cooking temperature is a fundamental skill, and consider this your essential kitchen survival guide for navigating the cooking oil aisle.
The Preheated Pan Masterclass: Step-by-Step Execution
We have covered the water content, the Maillard reaction, the thermal mass, and the smoke points. Now it is time to put it all together. This is my exact, no-nonsense workflow for weeknight roasting. It requires rigorous prioritization of efficiency.
Step 1: The Aggressive Preheat
Before you even look at a vegetable, take your clean, bare, heavy-duty aluminum baking sheet and place it into the cold oven. Set the oven to 425°F (or 450°F if you are feeling brave and using avocado oil). Do not just wait for the oven to beep. Ovens are notorious liars. When the beep sounds, the air inside might be 425°F, but the heavy metal pan needs more time to absorb that energy. Give the pan an extra 10 minutes in the hot oven to ensure it is fully saturated with heat.
Step 2: The Bone-Dry Prep
While the oven preheats, wash your vegetables. Then—and I cannot stress this enough—dry them aggressively. Use a salad spinner for broccoli florets. Use clean kitchen towels for zucchini and peppers. If you leave tap water clinging to the outside of your vegetables, you are immediately defeating the purpose of the hot pan. You will induce steaming. Dry them like your dinner depends on it, because it does.
Step 3: The Geometry of the Chop
You want maximum contact between the vegetable and the hot metal. Round objects do not sear well. When cutting carrots, parsnips, or potatoes, use a bias cut (slicing at a steep angle) to create long, flat, oval surfaces. When prepping broccoli or Brussels sprouts, cut them cleanly in half so they have a perfectly flat side to lay facedown on the pan. More surface area touching the metal equals more Maillard reaction.
Step 4: The Oil and Seasoning Bowl
Never, ever pour oil directly onto the hot baking sheet. If you pull a 425°F pan out of the oven and drizzle oil onto it, the oil will immediately begin to smoke and degrade while you are fumbling around trying to add your vegetables. Instead, place your perfectly dried, geometrically chopped vegetables into a large mixing bowl. Drizzle your high-smoke-point oil over the vegetables and toss them thoroughly with your hands until every single piece is lightly and evenly coated. Season aggressively with kosher salt and black pepper at this stage.
Step 5: The Drop
This is the moment of truth. Carefully remove the blazing hot pan from the oven. Working quickly, dump the oiled vegetables onto the pan. You should immediately hear a loud, aggressive sizzle. That sound is the surface moisture instantly evaporating. That sound is the Maillard reaction beginning. Quickly use a pair of tongs or a spatula to arrange the vegetables so their flat sides are facing down, directly touching the metal. Do not overlap them. Shove the pan back into the oven.
Because you bypassed the steaming phase, your vegetables will roast in nearly half the time they used to. This is one of my absolute favorite foolproof cooking secrets for getting dinner on the table faster.
The Vegetable Playbook: Tailoring the Technique
Not all vegetables are created equal. Because of their differing water contents and cellular structures, they require slightly different handling. Here is how to manage the three main categories of weeknight vegetables.
The Brassicas (Broccoli, Cauliflower, Brussels Sprouts)
These are dense but have highly textured tops that love to trap water. They sit right around 91% to 92% water. The preheated pan is an absolute miracle for Brassicas. Because the flat cut side sears instantly on the hot metal, the stalks get incredibly tender and deeply browned, while the florets on top get crispy and frizzled without turning to mush. Do not flip them during cooking. Let that flat side maintain uninterrupted contact with the hot metal for the entire roasting time.
The Root Vegetables (Carrots, Potatoes, Beets, Parsnips)
Root vegetables are much denser and have a lower water content (carrots are 87% water, potatoes are 79%). They also contain a high amount of complex starches. Because they have less water to fight off, they brown beautifully, but they take longer to cook all the way through to the center. The preheated pan gives them a massive head start on crust formation. For potatoes, the hot pan immediately gelatinizes the exterior starches, creating a French-fry-like crunch that is impossible to achieve on a cold pan.
The Nightshades and Squashes (Zucchini, Eggplant, Bell Peppers)
These are the most difficult vegetables to roast correctly. They are essentially water balloons masquerading as produce. Zucchini is 95% water; eggplant and bell peppers are 92%. If you put zucchini on a cold pan, it will turn into a gelatinous, unappetizing slime. The preheated pan is non-negotiable here. You must use a very high heat (450°F with avocado oil) to rapidly sear the exterior and evaporate the moisture before the internal structure collapses. Cut them into larger chunks than you think you need, because they will shrink drastically as they lose water.
Troubleshooting Your Roast: Why You Are Still Failing
If you followed the steps above and your vegetables still came out looking like a sad cafeteria side dish, you likely committed one of these cardinal sins. Let’s diagnose the problem so you can cure cooking anxiety and never ruin a batch of expensive produce again.
Sin #1: Overcrowding the Pan
This is the number one reason home cooks fail at roasting. If you pile three pounds of broccoli onto a single half-sheet pan, the vegetables are sitting on top of each other. As the heat hits them, they release their internal moisture as steam. If they are packed shoulder-to-shoulder, that steam gets trapped between the vegetables. You have essentially created a steam room on top of your baking sheet. The vegetables must have breathing room. You need at least a half-inch of empty space around every single piece of food. If your pan is too full, use two pans, or roast in batches. Committing the sin of overcrowding is one of the classic seven rookie kitchen mistakes that will guarantee a soggy dinner.
Sin #2: Using Silicone Baking Mats
I know you hate scrubbing baking sheets. I know silicone baking mats are incredibly convenient for cleanup. But silicone is a thermal insulator. It resists the transfer of heat. If you put a silicone mat on your baking sheet, you are literally blocking the thermal mass of the aluminum from transferring its energy into your vegetables. You will never get a proper, aggressive sear on a silicone mat. If you absolutely refuse to scrub bare metal, use a sheet of parchment paper. Parchment is thin enough that it allows the heat to transfer efficiently, though bare metal will always yield the absolute crispiest results.
Sin #3: Opening the Oven Door Too Much
Every time you open the oven door to peek at your vegetables, you let out a massive amount of accumulated heat and disrupt the ambient temperature. Furthermore, you are letting out the dry air and allowing the oven to cool down, which slows the evaporation of the vegetable’s moisture. Put the pan in, close the door, turn on the oven light, and leave it alone. Trust the process. Trust the heat.
Reclaiming Your Weeknight Dinner
Cooking during the week does not have to be an exercise in frustration or a compromise on quality. You do not have to settle for steamed, flavorless vegetables just because it is a Tuesday. The difference between amateur cooking and professional-level results rarely comes down to expensive ingredients or culinary degrees; it almost always comes down to understanding the basic physical reactions happening in your pans.
By leveraging the thermal mass of a heavy-duty pan, respecting the smoke points of your oils, and utilizing the explosive power of the Maillard reaction, you can transform the cheapest, most basic grocery store vegetables into the highlight of your meal. The preheated pan technique requires absolutely zero extra active cooking time—the pan simply heats up while the oven heats up. It is the ultimate efficiency hack.
So the next time you are staring down a head of cauliflower after a long day at work, do not default to the lazy, cold-pan method. Heat your metal. Dry your produce. Listen for that beautiful, aggressive sizzle when the food hits the pan. If you want to survive the kitchen without losing your mind, let the science do the heavy lifting for you. Now get back in there, preheat your pans, and start roasting like you actually mean it.


