The Anatomy of Kitchen Chaos (And Why It’s Not Your Fault)
Let’s paint a picture that I am willing to bet is uncomfortably familiar. It’s 6:30 PM on a Wednesday. You’re exhausted from a long day of meetings, you’re hungry, and you’ve decided that tonight, you are finally going to cook that healthy recipe you bookmarked three weeks ago. Fast forward forty-five minutes: your kitchen looks like it was ransacked by raccoons, the smoke alarm is screaming its piercing song, you’re crying over an onion that refuses to be diced, and you’re one burnt garlic clove away from throwing the entire pan out the window and ordering a forty-dollar pizza.
If this sounds like your nightly routine, take a deep breath. You are not alone, and more importantly, it is not your fault.
We live in an era where the visual standard for cooking is set by aggressively curated, sixty-second social media videos that conveniently edit out all the mess, the tedious prep work, and the mountain of dishes. The reality of the home kitchen is far less glamorous, and the pressure to perform is causing widespread panic. According to recent industry surveys, 52% of Americans report feeling immense pressure to make meals absolutely perfect, leading to a very real phenomenon known as “cooking anxiety”. The fear of messing up a recipe, combined with the sheer exhaustion of multitasking, turns what should be a nourishing daily ritual into a high-stakes, stressful chore.
Yet, despite this stress, we are actually cooking more than ever. Recent 2025 consumer data reveals that 81% of Americans are cooking more than half of their meals at home. Interestingly, the demographics of the kitchen are shifting, too. A comprehensive analysis of the American Time Use Survey from 2003 to 2023 shows that men are finally closing the cooking gap, with male participation in daily home food preparation rising to 52%, while women consistently hold steady at around 72%. That is a massive portion of the population spending roughly an hour every single day standing over a stove. If you are spending an hour a day doing something that makes you miserable, we need to fix it immediately.
As someone who learned to cook through trial, error, and setting off the smoke detector more times than I care to admit, I understand the struggle. My philosophy as your resident sassy sous-chef is simple: absolutely anyone can cook like an expert. You do not need a fancy culinary degree, you do not need a trust fund to buy imported ingredients, and you certainly do not need to endure chaotic, anxiety-inducing prep sessions. You just need a system. I am going to teach you the exact framework for transforming your daily cooking from a dreaded obligation into a peaceful, highly efficient, and dare I say, enjoyable daily habit.
Phase 1: The Mental Shift and The “Mise en Place” Miracle
What the French Know That You Don’t
Let’s be real for a second: the culinary world is absolutely overflowing with gatekeepers. If you’ve ever tried to decode pretentious recipe jargon just to figure out how to make a simple Tuesday night chicken breast, you know exactly what I mean. But there is one French culinary term that is absolutely essential to your survival in the kitchen, and that is mise en place.
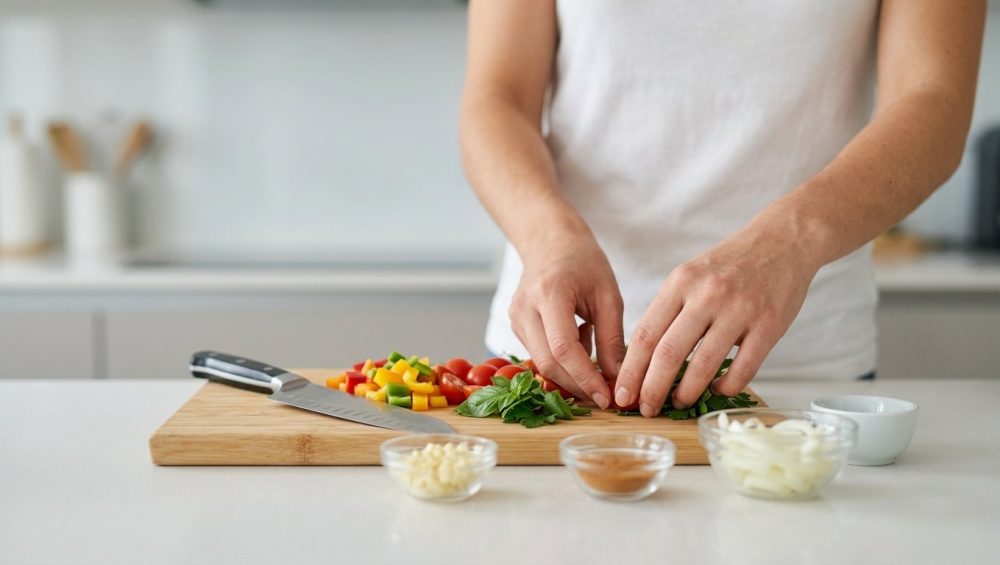
Literally translated, it means “putting in place.” In practice, it means that before you even think about turning on a burner, every single ingredient is washed, chopped, measured, and staged in little bowls ready to go.
Why is this so critical? Because heat waits for no one. Trying to chop a roly-poly onion while your garlic is actively turning into bitter, black charcoal in a skillet three feet away is one of those classic rookie kitchen mistakes that will spike your blood pressure and ruin your dinner. When you are rushing to mince herbs while a sauce is rapidly reducing and threatening to break, you are existing in a state of pure, unadulterated panic. That is not cooking; that is firefighting.
The Workflow: Read, Prep, Cook
The biggest mistake beginners make is treating a recipe like a live-action video game where the instructions appear just as you need them. You cannot read step four while step three is currently burning on the stove.
Mise en place begins before you even touch a knife. It begins with reading the recipe from start to finish. Twice. You must understand the entire roadmap of the meal. If the recipe calls for “1 cup of chicken broth, heated,” you need to know that before you are standing over a hot pan realizing your broth is still in a sealed carton in the back of the pantry.
Once you have read the recipe, pull every single ingredient out of the fridge and pantry and place them on the counter. This prevents the mid-cooking realization that you are completely out of soy sauce. Next, do all of your chopping. Put the chopped onions in one bowl, the minced garlic in another (never together, because garlic cooks in thirty seconds and onions take eight minutes). Measure out your spices into a ramekin. Only when your cutting board is clean, your ingredients are staged, and your trash is thrown away, do you finally ignite the burner. It sounds like extra work, but you are simply front-loading the effort so that the actual cooking process is a calm, controlled assembly line.
Clearing the Decks: The Clean Workspace Imperative
Before you can organize your ingredients, you have to organize your environment. A cluttered counter leads directly to a cluttered mind. You cannot achieve culinary greatness if you are trying to dice a butternut squash on a three-inch square of available cutting board space, surrounded by today’s junk mail, a pile of dirty coffee mugs, and your kid’s homework.
The first step to a permanently organized kitchen is ruthless decluttering. Your prep zone needs to be a sacred, empty space. Wipe down the counters before you begin. Empty the sink completely (this is crucial for the “clean as you go” method we will discuss later). Set up your cutting board, and place a damp paper towel directly underneath it so it doesn’t slide around like a hockey puck while you’re holding a sharp knife.
Phase 2: Gear That Actually Works (And The Toxic Trash You Need to Toss)
The Non-Stick Nightmare: A Public Service Announcement
Let’s get one thing straight right out of the gate: I have absolutely zero patience for cheap, toxic kitchenware. If you open your cabinet right now and see a scratched, peeling, mystery-metal non-stick pan, I want you to take it, march it out to the garbage bin, and throw it away. I am completely serious. Do not pass go, do not cook another egg in it.
The non-stick nightmare is one of the greatest scams ever sold to the home cook. For decades, we were told that we needed these slick, lightweight pans for convenience. What they didn’t tell us was the chemical cost. Traditional non-stick coatings are made using PTFE (polytetrafluoroethylene), which belongs to the notorious family of PFAS, widely known as “forever chemicals” because they do not break down in the environment or in the human body. In late 2023, the International Agency for Research on Cancer officially classified PFOA—a chemical historically used to manufacture these coatings—as a Group 1 carcinogen. That places it in the exact same risk category as asbestos and tobacco smoke.
But wait, your pan says “PFOA-Free,” so you’re safe, right? Wrong. That is a brilliant piece of marketing misdirection. Even without PFOA, the PTFE coating itself is highly unstable at the temperatures we routinely use for cooking. Research confirms that PTFE begins to aggressively degrade at temperatures above 260°C (500°F). Do you know how easy it is to reach 500°F on a standard home gas burner? It takes mere minutes if you leave a pan preheating empty. When that coating degrades, it releases invisible, toxic fumes into your kitchen air. This isn’t a conspiracy theory; it’s a documented medical phenomenon called “polymer fume fever,” or “Teflon flu,” which causes fever, chills, and severe headaches. In fact, suspected cases of Teflon flu hit one of the highest annual totals on record in the US in 2023, and it’s notoriously underreported because most people don’t connect their flu-like symptoms to their frying pan. Oh, and those fumes are famously fatal to pet birds at concentrations that won’t immediately harm a human. If it’s killing the canary in the coal mine, why are we searing our steaks in it?
The legislative writing is finally on the wall. In January 2025, Minnesota became the very first US state to completely ban the sale of PFAS-containing cookware, with states like Vermont, Connecticut, Rhode Island, and Colorado rolling out their own strict bans through 2028. The era of toxic, disposable cookware is ending.
You do not need a thirty-piece non-stick cookware set from a late-night infomercial. You need a few high-quality beginner cooking essentials that will outlive you. A heavy-bottomed, fully-clad stainless steel skillet, a beautifully seasoned cast-iron pan, and perhaps a carbon steel wok. These materials are inert, safe, and virtually indestructible. Yes, they require a tiny bit of technique to prevent food from sticking, but learning how to properly heat a pan is vastly preferable to ingesting microplastics with your scrambled eggs.
The Holy Trinity of Knives (And How to Actually Hold Them)
If toxic pans are my biggest pet peeve, dull knives are a close second. A dull knife is not just frustrating; it is a trip to the emergency room waiting to happen. Every single year, roughly 350,000 people are injured by kitchen knives in the United States alone. And where do you think the vast majority of those injuries happen? If you guessed the fingers, you’re absolutely right—a staggering 66% of kitchen knife injuries occur right on the digits.
Why? Because when a knife is dull, it requires you to apply excessive downward force to break through the skin of an onion or the waxy exterior of a bell pepper. When you apply extreme force with a blunt object on a slippery, rounded surface, physics takes over. The blade slips, slides sideways off the vegetable, and goes straight into the hand holding the food. A razor-sharp knife, on the other hand, bites into the food effortlessly with minimal pressure. The sharper the knife, the safer the cook.
You do not need that massive wooden block of twenty-four identical, mediocre knives taking up half your counter real estate. You need exactly three knives:
- An 8-inch Chef’s Knife: This is the absolute workhorse of the kitchen. It will handle 90% of your prep work, from dicing onions to breaking down a chicken.
- A Paring Knife: For off-the-board work, peeling apples, hulling strawberries, and delicate tasks.
- A Serrated Bread Knife: Because trying to slice a crusty sourdough boule or a delicate tomato with a standard chef’s knife is a fool’s errand.
But having the right knives is only half the battle. You have to know how to hold them. If you are gripping your chef’s knife by the handle with your index finger pointed straight down the top of the spine like you’re pointing at a map, stop it right now. That grip gives you zero rotational stability. If you hit a hard root vegetable, the blade will twist in your hand. Instead, you need to use the “Pinch Grip.” Pinch the actual base of the metal blade (the heel) between your thumb and the side of your curved index finger, and wrap your remaining three fingers loosely around the handle. It will feel incredibly weird for about two days, and then it will completely transform your control over the blade.
The Unsung Heroes of Prep Work: Cutting Boards and Scrapers
While we are on the topic of knives, we need to have a very serious conversation about cutting boards. If you own a glass cutting board, or a marble cutting board, I want you to pack it away and use it as a decorative cheese platter. Never, under any circumstances, let a knife blade touch glass or stone. It will instantly fold the microscopic edge of your blade, dulling it after a single use. You want a heavy, thick wooden cutting board—preferably end-grain walnut or maple—or a high-quality, dense plastic board that can be sanitized.
And please, for the love of all things holy, buy a bench scraper. It costs less than your morning latte and will revolutionize how you move ingredients from the cutting board to the pan. Scraping a delicate, sharp knife edge horizontally across a hard wooden board to scoop up chopped garlic is a surefire way to ruin your blade’s alignment. Use a bench scraper to scoop. Your knives will thank you.
Phase 3: Mastering the Flame (Temperature Control Without the Smoke Alarm)
The Myth of “High Heat Equals Fast Food”
There is a pervasive, chaotic myth among beginner cooks that turning the stove dial all the way to “High” will simply make the food cook faster. This is how you end up with chicken breasts that are blackened and charred on the outside but dangerously raw and rubbery in the center. Heat is not just a mechanism for making food hot; it is a delicate tool for transforming texture and flavor.
Preheating: The Step You Keep Skipping
If you have ditched your toxic non-stick pans as I so lovingly demanded, you are now cooking on stainless steel or cast iron. Welcome to the big leagues. But I can already hear you complaining: “Everything sticks to my stainless steel pan!” No, it doesn’t. You just aren’t preheating it properly.
Stainless steel has microscopic pores that expand and contract with temperature. If you put cold food into a cold pan and turn on the heat, the proteins in the food will literally bond with the metal as it heats up, creating a cement-like grip. To prevent this, you must heat the pan before you add the oil, and certainly before you add the food.
How do you know when it’s ready? Use the water drop test, scientifically known as the Leidenfrost effect. Heat your dry pan over medium heat for about two to three minutes. Flick a tiny drop of water into the pan. If the water aggressively sizzles and evaporates immediately, the pan is not hot enough. Wait another minute. If the water drop forms a perfect, cohesive little bead of mercury that dances and glides across the surface of the pan without evaporating, congratulations! You have achieved the Leidenfrost effect. The pan is perfectly preheated. Now, add your oil, let it shimmer for five seconds, and add your protein. It will glide like it’s on ice.
The Maillard Reaction for Mere Mortals
Whether you are attempting a complex weekend braise or just throwing together some simple pan-seared salmon and asparagus, mastering the flame is non-negotiable. And the ultimate reward for mastering the flame is the Maillard reaction.
The Maillard reaction is the chemical reaction between amino acids and reducing sugars that gives browned food its distinctive, savory flavor. It is the reason a seared steak tastes infinitely better than a boiled steak. It is the crust on a smash burger. It is the golden, crispy edge of a roasted potato.
But here is the secret that separates the pros from the amateurs: moisture is the enemy of the Maillard reaction. Water cannot exceed 212°F (100°C) before it turns into steam. The Maillard reaction doesn’t kick into high gear until around 300°F (150°C). If you take a wet piece of meat straight from its packaging and throw it into a hot pan, the heat energy is entirely wasted on boiling off the surface water. Your meat will steam, turning gray and sad. Always, always pat your proteins bone-dry with a paper towel before they hit the pan.
The Smoke Point Conundrum
Part of mastering the flame is understanding what you are putting in the pan. Not all fats are created equal. If you try to sear a steak in extra virgin olive oil over high heat, your kitchen will immediately fill with acrid, bitter smoke, and your smoke alarm will scream loud enough to wake the neighbors.
Every cooking fat has a “smoke point”—the temperature at which the fat stops shimmering and starts burning, breaking down into toxic, foul-tasting compounds. Extra virgin olive oil is a delicate, unrefined fat with a low smoke point (around 350°F). It is meant for finishing dishes, making vinaigrettes, or gentle sautéing. For high-heat cooking, you need a refined oil with a high smoke point. Avocado oil (smoke point of 520°F), grapeseed oil (420°F), or clarified butter/ghee (450°F) are your best friends here. Knowing your oils is the easiest way to prevent your kitchen from turning into a smoky disaster zone.
Phase 4: Knife Skills That Will Save Your Fingers and Your Sanity
The “Claw” Grip: Your Fingertips’ Best Friend
We’ve already established that dull knives are dangerous, but even a razor-sharp Japanese steel blade is a hazard if your non-dominant hand is flailing around the cutting board. When you are holding the food you are about to cut, you must protect your digits. Enter: The Claw.
Take your non-dominant hand and curl your fingers inward, like you are holding an invisible tennis ball or making a bear claw. The tips of your fingers should be tucked away, pointing back toward your palm, while your knuckles extend forward. When you hold an onion, your thumb should be securely tucked behind your fingers, acting as the anchor pushing the food forward. The flat side of the knife blade should rest gently against the flat, middle phalanx of your middle and index fingers. As you slice, the knife guides up and down against your knuckles, completely shielding your fingertips from the cutting edge.
Understanding this fundamental grip is basic kitchen survival if you want to keep all ten digits intact. It will feel awkward at first. You will chop slower. That is fine. Speed comes with time; safety is non-negotiable from day one.
The Rocking Motion
Once your claw hand is secure, you need to move the knife correctly. Stop lifting the knife entirely off the board and hacking down like you are chopping firewood. A chef’s knife has a curved belly for a reason. Keep the tip of the knife in constant contact with the cutting board. Lift the heel of the knife, slide the food forward with your claw hand, and push the blade down and forward in a smooth, continuous rocking motion. Let the geometry of the blade do the work for you.
Phase 5: Designing a Frictionless Weekday Cooking Routine
Batch Prepping Without Losing Your Weekend
I am a firm believer that time is money, especially on a Tuesday night when you’ve just logged off from an endless string of meetings and the absolute last thing you want to do is mince garlic. I survive weekdays using clever, time-saving cooking hacks, which buys me the time to be an absolute perfectionist with my elaborate weekend cooking projects.
But let me be clear: I despise the modern internet trend of “meal prepping” that involves cooking fifteen identical, sad little plastic containers of chicken, broccoli, and rice on a Sunday afternoon, only to eat a soggy, depressing version of it by Thursday.
Instead, we batch prep, we don’t batch cook. Spend one hour on Sunday washing and spinning your greens, dicing onions, peeling carrots, and making a versatile vinaigrette. Store them in airtight glass containers in the fridge. When Tuesday night rolls around, you aren’t starting from scratch. You are just assembling and applying heat. This drastically reduces the activation energy required to cook a fresh meal.
The Magic of the “Pantry Pull” Meal
You need a fallback plan. A meal that relies entirely on shelf-stable and long-lasting ingredients that you always have in stock. My go-to is a simple pasta aglio e olio, or a robust chickpea stew with canned tomatoes, smoked paprika, and whatever wilted spinach is begging for mercy in the crisper drawer. When you have a reliable pantry pull meal, you eliminate the frantic 6:00 PM trip to the grocery store and the temptation to order takeout.
Cleaning As You Go: The Ultimate Flex
If there is one habit that separates a chaotic cook from a peaceful one, it is cleaning as you go. Nothing destroys the post-dinner bliss quite like walking back into the kitchen to find a bomb site of crusted pans, sticky cutting boards, and a mountain of utensils.
Before you even start cooking, fill a third of your sink with hot, soapy water. As soon as you are done with a prep bowl, a whisk, or a measuring spoon, drop it in the water. While your onions are sweating for five minutes, wash your cutting board and knife. While the pasta is boiling, wipe down the counters. By the time dinner is plated, the only thing left to wash should be the plates you eat on and the pan you cooked in. If you follow these steps, you’ll spend a lot less time surviving kitchen disasters and a lot more time actually enjoying the food you make.
The Final Plating: From Anxious to Automatic
Cooking is not a genetic trait that you were either born with or magically denied at birth. It is a mechanical skill, governed by the laws of physics, chemistry, and organization. When you strip away the romanticized fluff and the pretentious chef-speak, what you are left with is a highly logical process.
When you respect the process—when you prep your ingredients before the heat hits, when you invest in safe, high-quality gear, when you master the flame and handle your knife with respect—the chaos simply evaporates. The kitchen transforms from a stressful battlefield into a peaceful sanctuary.
Once you establish these foundational habits, you’ll find that you can easily master the art of effortless hosting without having a minor breakdown in the pantry before your guests even arrive. True kitchen artistry isn’t about owning a pair of culinary tweezers to meticulously place micro-greens on a plate; it’s about the quiet, unshakeable confidence of knowing exactly what you are doing, and doing it efficiently.
So, pour yourself a glass of wine, sharpen that chef’s knife, throw that peeling Teflon pan straight into the garbage, and reclaim your kitchen. You’ve got this.


