Let’s get one thing straight right out of the gate: if you are craving a dense, fudgy, bakery-style chocolate chip cookie and you are currently reaching for your stand mixer to cream softened butter, you are actively sabotaging your own dessert.
I know, I know. Every traditional recipe you have ever read, from the back of the yellow chocolate chip bag to your grandmother’s grease-stained recipe card, insists that you must beat room-temperature butter and sugar together until it is “light and fluffy.” We have all blindly followed this culinary dogma for decades. But as a home cook who has spent years testing, failing, and setting off the smoke detector more times than I care to admit, I am here to tell you that this ubiquitous instruction is exactly why your homemade cookies taste like puffy little cakes instead of the rich, chewy masterpieces you actually want.
Listen, I love my stand mixer, but dragging that thirty-pound behemoth out of the cabinet on a random Tuesday night is a special kind of torture. When time is money and you just want a spectacular weeknight treat without destroying your kitchen, skipping the creaming process isn’t just a shortcut; it is a profound upgrade in texture. I’ve spent years advocating for home cooks to banish toxic kitchen gear from their homes, and part of that journey is learning how to properly manipulate your basic ingredients so you don’t have to rely on complicated gadgets. You do not need a culinary degree to bake like a professional pastry chef. You just need a saucepan, a little bit of food science, and the willingness to break the rules.
Today, we are going to dive deep into the molecular magic of melted butter. We are going to explore exactly how temperature alters the hydration of your flour, why aeration is the enemy of a chewy center, and how you can easily control the exact texture of your baked goods with zero pretentious chef-speak. Pour yourself a glass of wine, grab a whisk, and let’s get into it.
The Great Cookie Lie: Why We’ve Been Creaming Butter Wrong
To understand why melted butter is the holy grail of cookie textures, we first have to understand why almost every recipe tells you to cream your butter in the first place. Creaming is not just about mixing ingredients together; it is a mechanical process of physical leavening.
When you beat softened butter and sugar together, the sharp, jagged edges of the sugar crystals act like microscopic shovels. They dig into the semi-solid fat, scooping up tiny pockets of air and trapping them inside the matrix of the butter. If you do this for several minutes, the mixture turns pale and increases in volume. You have successfully created millions of microscopic air bubbles. When you put that dough into a hot oven, the heat causes those trapped air bubbles to expand. The water in the dough turns to steam, and the baking soda creates carbon dioxide, both of which flood into those pre-existing air pockets, ballooning them up like tiny hot air balloons before the structure sets.
The result? A cookie that has risen beautifully. It is light, it is airy, and it is decidedly cake-like.
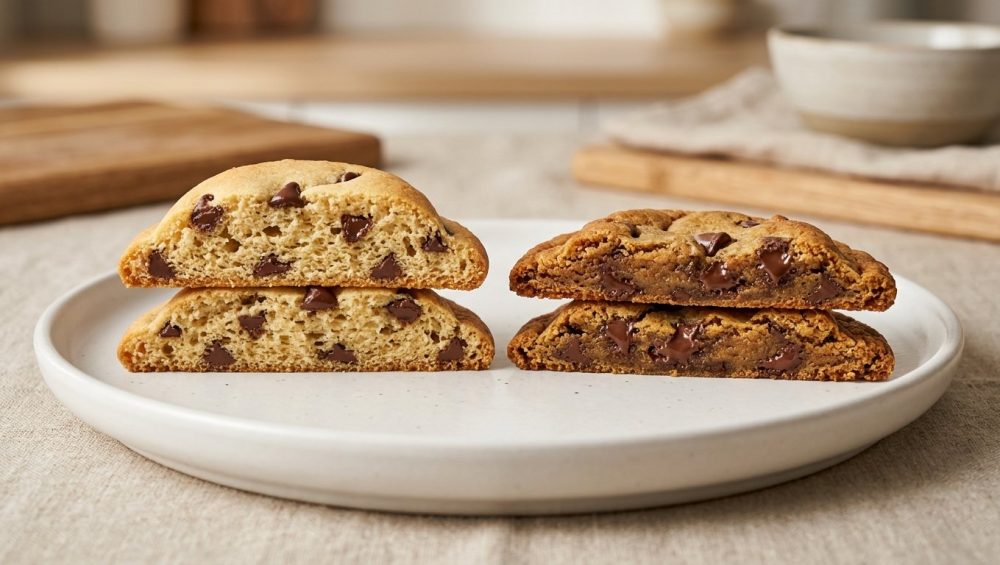
Now, if you want a cakey cookie, that is perfectly fine. But let’s be brutally honest: nobody actually fantasizes about a cakey chocolate chip cookie. We dream about cookies that bend before they snap. We want cookies with a dense, fudgy, almost doughy core and edges that shatter perfectly between our teeth. You cannot achieve that level of density if your dough is riddled with expanded air pockets. Even if you ditch those cheap silicone baking mats that inhibit browning, aerated dough will always yield a puffy result.
Melting the butter entirely bypasses this aeration process. Because liquid butter cannot hold onto air bubbles, your dough remains incredibly dense. Without those trapped pockets of air to expand in the oven, the cookie bakes up flatter, richer, and significantly more concentrated in flavor. By skipping the stand mixer, you aren’t just saving yourself fifteen minutes of cleanup; you are fundamentally altering the physical architecture of the cookie.
The Science of the Melt: What Actually Happens to Your Dough
Baking is not magic; it is just edible chemistry. When you change the state of your fat from a solid to a liquid, you trigger a completely different chain of chemical reactions the second that butter hits your dry ingredients.
Aeration vs. Hydration: The Stand Mixer Conspiracy
As we established, creaming is all about aeration. But melting is all about hydration. Butter is not 100% pure fat. Standard American butter is a water-in-oil emulsion consisting of about 80% butterfat, 15% to 18% water, and a small percentage of milk proteins and solids.
When butter is in its solid, room-temperature state, that water is tightly bound within the fat matrix. It is trapped. Because it is trapped, it cannot easily interact with the other ingredients in your bowl. But when you apply heat and melt the butter, that emulsion breaks. The fat and the water separate from one another. This sudden release of “free water” is the absolute secret weapon for achieving a bakery-level chew. Precision is key here, which is why a digital kitchen scale is your absolute best friend when calculating hydration ratios.
Gluten Development: The Chew Factor
Let’s talk about gluten. In the world of pastries and pie crusts, gluten is usually treated like the ultimate villain. We are constantly told to “mix until just combined” to avoid overworking the dough and creating tough, rubbery baked goods. But in the context of a chewy cookie, a controlled amount of gluten is exactly what you want. Gluten is what gives a cookie its structural “chew” and prevents it from crumbling into dust when you bite into it.
Gluten is formed when two proteins found in wheat flour—glutenin and gliadin—come into contact with water. According to renowned food scientist Shirley Corriher, when you use melted butter, the newly freed water immediately hydrates the flour proteins, allowing them to grab onto each other and form elastic sheets of gluten. Because the water is totally unbound from the fat, this hydration happens rapidly and thoroughly.
When you use creamed butter, the water is still largely trapped in the fat emulsion, meaning the flour proteins don’t get hydrated as efficiently. The resulting gluten network is much weaker, contributing to a softer, more crumbly, cake-like texture. By intentionally melting the butter, you are purposefully encouraging a stronger gluten network to develop, which directly translates to that glorious, jaw-tiring chewiness we all crave.
Water Content and Evaporation Dynamics
The journey of that 15% water content doesn’t end in the mixing bowl. As the cookie bakes, the oven heat causes the moisture to evaporate and turn into steam. In a creamed cookie, this steam inflates the trapped air bubbles. But in a melted butter cookie, there are no air bubbles to inflate. Instead, the moisture simply evaporates out of the dough, leaving behind a highly concentrated matrix of fat, sugar, and hydrated starches.
This evaporation dynamic is crucial for the edges of the cookie. As the moisture leaves the perimeter of the dough first, the edges fry in the residual butterfat, creating a crispy, caramelized halo. Meanwhile, the center of the cookie retains just enough moisture to stay soft and fudgy. It is a masterclass in contrasting textures, all achieved by simply throwing a stick of butter into the microwave.
The Anatomy of a Chewy Cookie (Fact-Checked Data)
If you think I’m just making this up after a few glasses of Pinot Noir, let’s look at the exhaustive, borderline obsessive research conducted by culinary heavyweights. J. Kenji López-Alt famously baked over 1,500 chocolate chip cookies to test every single variable in the pursuit of the perfect texture. His findings, alongside the extensive testing done by the team at King Arthur Baking, overwhelmingly support the melted butter theory for achieving a dense, fudgy center.
But the butter is only one piece of the puzzle. To maximize the effects of the melted butter technique, you have to look at the anatomy of the rest of your dough:
1. The Sugar Ratio: White granulated sugar creates crispness. It absorbs moisture and crystallizes as it cools. Brown sugar, on the other hand, contains molasses. Molasses is slightly acidic and highly hygroscopic, meaning it actively attracts and holds onto moisture from the air. If you are using melted butter to create a chewy cookie, you must support that texture by using a higher ratio of dark brown sugar to white sugar. The acidity in the brown sugar also reacts with the baking soda to provide just enough lift so your dense cookie doesn’t turn into a literal hockey puck.
2. The Flour Type: While standard all-purpose flour works beautifully, many weekend perfectionists swap out a portion of their all-purpose flour for bread flour. Bread flour has a higher protein content (usually around 12-14%, compared to 10-11% for AP flour). When that high-protein flour meets the free water from your melted butter, it creates an even stronger, more robust gluten network. This results in an aggressively chewy texture that rivals the famous Levain Bakery cookies in New York.
3. The Egg Yolk Hack: Melted butter provides a lot of liquid, which can sometimes make the dough a bit too wet. To counteract this while adding immense richness, many master recipes call for dropping one whole egg white and replacing it with an extra egg yolk. The fat and emulsifiers in the yolk act as a tenderizer, keeping the strong gluten network from becoming too tough while adding a luscious, velvety mouthfeel to the finished cookie.
The Toxic Gear Warning: Don’t Ruin Good Science with Bad Bakeware
Alright, it is time for my absolute strictest kitchen rule. You can use the finest European butter, the most expensive vanilla bean paste, and execute the melted butter technique flawlessly, but if you bake your cookies on cheap, toxic garbage, you are going to ruin your food. I have zero patience for this.
We want a golden Maillard reaction, not the scorched bottoms you get from dark nonstick pans. Dark metal absorbs and radiates heat far more aggressively than light metal. If you put a dense, melted-butter cookie dough on a dark Teflon-coated pan, the bottom of the cookie will burn long before the center has time to set. Furthermore, cheap non-stick coatings inevitably scratch, peel, and degrade, leaching mystery chemicals into your beautiful baked goods. Stop buying them. Throw them away.
And for the love of all things holy, do not bake your cookies in glass baking pans. Glass is an insulator, not a conductor. It takes forever to heat up, but once it gets hot, it holds onto that heat aggressively, leading to wildly uneven baking and overcooked edges.
You need heavy-gauge, uncoated, light-colored aluminum half-sheet pans. They conduct heat evenly, they cool down quickly when removed from the oven, and they are virtually indestructible. There is a very specific scientific reason why your flimsy baking sheets keep warping at high temperatures, and it absolutely ruins your heat distribution. When a thin pan violently twists in the oven, half of your cookies are suddenly tilted toward the heating element, causing uneven spreading and burning. Invest in commercial-grade aluminum. It costs twenty dollars and will last the rest of your life. Line it with unbleached parchment paper, and you will have flawless, non-toxic, perfectly browned cookies every single time.
How to Master the Melted Butter Method (Step-by-Step)
Ditching the stand mixer makes this process incredibly fast, which is why it is my ultimate weeknight baking hack. You can literally mix this dough in a single bowl with a wooden spoon or a sturdy spatula. However, because we are dealing with liquid fat, there are two non-negotiable rules you must follow to avoid disaster.
Temperature Matters: Don’t Scramble Your Eggs
When you melt your butter on the stove or in the microwave, it is going to be hot. If you immediately dump your sugar and raw eggs into boiling hot butter, two terrible things will happen. First, you will literally scramble the eggs, resulting in gross little rubbery bits of cooked egg white floating in your dough. Second, you will melt the sugar prematurely, turning your dough into a greasy, soupy syrup that will never bake properly.
Once your butter is melted, you must let it cool until it is just warm to the touch. It should still be entirely liquid, but not hot enough to burn your finger. A great trick is to melt the butter, then whisk in your cold brown and white sugars immediately. The cold sugar will rapidly drop the temperature of the butter, creating a thick, glossy, caramel-like slurry. Once that mixture is room temperature, it is completely safe to whisk in your eggs and vanilla extract.
The Rest Period: Why Chilling is Non-Negotiable
This is where the impatient bakers always fail. When you make a dough with melted butter, the resulting batter will be very soft, wet, and incredibly sticky. If you scoop that warm, wet dough directly onto a baking sheet and put it in a 350-degree oven, the butter will immediately liquefy further, and your cookies will spread out into paper-thin, greasy pancakes.
You must chill the dough. The transformative power of chilling dough cannot be overstated when working with liquid fats. Placing the bowl in the refrigerator for at least 30 minutes (though 24 hours is the absolute gold standard) accomplishes two critical things.
First, it drops the temperature of the butterfat, allowing it to solidify again. Cold fat takes longer to melt in the oven, which prevents excessive spreading and ensures your cookie bakes up thick and chunky. Second, it gives the flour time to hydrate. You might be impatient, but resting your dough allows the flour to fully absorb the free water released by the melted butter. As the starches swell and absorb the liquid, the dough becomes significantly thicker, firmer, and more flavorful. Do not skip the chill. Use that time to clean your single mixing bowl and pour another glass of wine.
Brown Butter: The Ultimate Upgrade for the Weekend Perfectionist
If melting your butter is a weeknight hack, browning your butter is the weekend perfectionist’s ultimate flex. Brown butter (beurre noisette) takes the melted butter technique and dials the flavor up to an astronomical level.
When you melt butter in a saucepan and continue to cook it past the melting point, the 15% water content begins to boil and evaporate. You will hear the butter aggressively sputtering and popping in the pan. Once that water completely evaporates, the sputtering will stop, and the butter will foam up. At this exact moment, the milk proteins and sugars left behind in the fat begin to toast. This is the Maillard reaction in action. In a matter of seconds, those milk solids turn a deep, golden brown and release an intoxicating, nutty, caramel-like aroma that will make your knees weak.
Using brown butter in your cookies gives them a depth of flavor that is impossible to achieve with regular butter. It adds notes of butterscotch, toffee, and roasted nuts that perfectly complement the chocolate.
However, because you have actively evaporated the water out of the butter, you have altered the hydration ratio of your recipe. If you simply replace a half-cup of regular butter with a half-cup of brown butter, your dough will be slightly dry, and you won’t get that optimal gluten development we talked about earlier. To fix this, you must replace the lost moisture. J. Kenji López-Alt brilliantly solves this by dropping a single ice cube into the hot brown butter. The ice cube immediately stops the cooking process so the milk solids don’t burn, and it perfectly replaces the exact amount of water that was lost during evaporation. It is a flawless food science trick that guarantees your brown butter cookies will be perfectly chewy every single time.
Troubleshooting the Melted Butter Cookie
Even with the best science, things can go wrong in the kitchen. If your melted butter cookies didn’t turn out like a bakery window display, don’t panic. Here is exactly how to diagnose and fix the most common issues.
“My Cookies Spread Into Puddles”
If your freshly baked treats spread into giant puddles on the tray, you likely skipped the refrigeration step. As we discussed, warm liquid fat will melt instantly in the oven, causing the structure to collapse before the edges have time to set.
If you definitely chilled the dough and they still spread, your oven temperature is likely inaccurate. Most home ovens are lying to you by at least 15 to 20 degrees. If your oven is running too cool, the cookie will sit in the heat and slowly melt outward rather than receiving the quick blast of heat necessary to set the edges and puff the center. Buy a cheap oven thermometer and verify your actual baking temperature.
“They Are Too Greasy”
If your cookies feel like they are oozing oil, you have a flour ratio problem. Specifically, you didn’t use enough flour to absorb the melted fat. Why did this happen? Because you are still scooping your flour with a measuring cup.
When you jam a measuring cup into a bag of flour, you compress the powder. A single cup of scooped flour can weigh anywhere from 120 grams to 160 grams depending on how aggressively you packed it. If your recipe was designed for 150 grams of flour and you loosely scooped 120 grams, your dough is going to be severely under-hydrated and swimming in excess butterfat. Weigh your ingredients. It is the only way to ensure the delicate balance of fat, water, and starch is maintained.
Frequently Asked Baking Questions (Because I Know You’re Wondering)
Can I use margarine or shortening instead of melted butter?
Absolutely not. Margarine and shortening are formulated entirely differently than butter. Shortening is 100% fat with zero water content. If you melt shortening, you are providing no free water to hydrate the flour, meaning no gluten development, meaning no chew. Your cookies will be crumbly, greasy, and completely devoid of flavor. Stick to real, high-quality butter.
Does the brand of butter actually matter?
Yes, it does. American butter is legally required to be at least 80% butterfat, which leaves a generous margin for water. European-style butters (like Kerrygold or Plugrá) are churned longer to achieve 82% to 84% butterfat. Less water means a richer flavor and a slightly more tender cookie, but it also means slightly less gluten development. Both work beautifully with the melted butter method, but if you are using a super-premium European butter, you may want to add a tiny splash of milk to the dough to ensure the flour hydrates properly.
Should I use salted or unsalted butter?
In the professional pastry world, unsalted butter is the gold standard because it allows you to control the exact sodium level of the dough. However, as an unapologetic home cook, I almost exclusively bake with salted butter. Salt enhances the perception of sweetness and brings out the nuanced caramel notes in the dough. If you use salted butter, just reduce the added salt in the recipe by about a quarter teaspoon per stick. And always, always finish your cookies with a sprinkle of flaky sea salt right when they come out of the oven.
The Final Bite: Ditch the Mixer and Reclaim Your Kitchen
Baking does not have to be an exhausting, messy chore reserved only for the weekend. By understanding the fundamental food science behind your ingredients, you can manipulate them to work for your schedule and your specific cravings.
Creaming butter has its time and place—specifically when you are making a pound cake or a light, fluffy buttercream frosting. But when it comes to the ultimate, dense, chewy, bakery-style chocolate chip cookie, the stand mixer is obsolete. Melting your butter saves you time, saves you dishes, and fundamentally rewires the gluten structure of your dough to produce a vastly superior texture.
So the next time you get a weeknight craving, leave the heavy machinery in the cabinet. Grab a saucepan, melt that butter, embrace the science of hydration, and bake the best batch of cookies of your life. You’ve got this.


