
Picture this: It is a beautiful Sunday morning. You have invited your favorite people over for a glorious weekend brunch. You envision clinking mimosas, effortless laughter, and a towering, majestic stack of golden, crispy waffles taking center stage on your dining table. But what is the actual reality? You are sweating profusely over a sputtering, plastic appliance in the corner of your kitchen, frantically churning out one waffle every six minutes while your friends politely make small talk in the other room. By the time you finally sit down to eat, you are exhausted, and your guests are quietly chewing on what can only be described as warm, syrupy bath sponges.
Welcome to the tragic, entirely avoidable reality of the home waffle bar.
Listen, I have zero patience for pretentious chef-speak, but I also have zero tolerance for bad food. You absolutely do not need a culinary degree to pull off a spectacular morning gathering. What you do need is a basic understanding of thermodynamics, a ruthless approach to time management, and the willingness to throw out that peeling, toxic waffle maker you bought for fifteen bucks a decade ago.
Mastering the art of effortless hosting means you are never trapped at the appliance while your friends are enjoying the party. We are going to dive deep into the molecular science of moisture migration, the exact oven holding temperatures required to maintain maximum crunch for a crowd, and the precise chemistry of a structurally sound batter. By the time we are done here, you will have the ultimate blueprint for a weekend gathering that actually allows you to drink your coffee while it is still hot.
The Science of the Soggy Waffle: Why Good Brunches Go Bad
To fix a problem, you have to understand the enemy. In the case of the weekend brunch, your greatest enemy is not time; it is water. When you pour liquid batter onto a blistering hot iron, the heat rapidly turns the liquid into steam, which forces the batter to expand and cook. This is exactly what you want. But the moment that waffle leaves the iron, that residual steam becomes a liability.
Moisture Migration: The Silent Killer of Crunch
When a piping hot waffle is placed directly onto a room-temperature ceramic plate, the steam escaping from the bottom of the waffle hits the cool, non-porous surface. Because the vapor has nowhere to go, it immediately undergoes a phase change, condensing back into liquid water. This water is then reabsorbed into the bottom of your waffle.
On a molecular level, this re-hydration triggers a process known as starch hydrolysis. The beautifully rigid, crystallized starches on the exterior of your waffle break down, and the crust completely collapses. But it gets worse. Implementing proper food holding strategies is critical because of a phenomenon known in food science as “moisture toughening.” As the waffle absorbs this condensation, it does not just become wet; the partial plasticization of the starch matrix actually causes the waffle to lose its brittleness and become weirdly chewy and tough. Instead of a satisfying crunch, your guests are left tearing at a leathery disc of dough.
Steam Traps and Condensation: Your Plates Are Betraying You
If putting a hot waffle on a cold plate is a misdemeanor, stacking hot waffles on top of each other is a culinary felony. Stacking creates an inescapable micro-climate of trapped steam. The heat from the bottom waffle rises into the waffle above it, completely destroying the exterior texture in a matter of seconds.
To combat this initial burst of steam, you can actually utilize a brilliant, if slightly chaotic, technique popularized by culinary icon Martha Stewart. When the waffle finishes cooking, do not just drop it on a plate. Instead, carefully remove it from the iron and literally toss it back and forth between your hands (like a hot potato) for a few seconds. This rapid movement through the ambient air allows the heaviest concentration of internal steam to escape harmlessly into the kitchen, rather than getting trapped against a surface. It sounds mildly ridiculous, but the physics are sound, and it will give you the crispiest edges you have ever achieved.
Thermodynamic Waffle Holding: The Secret to Batch-Cooking Success
You cannot host a relaxed, mindful gathering if you are cooking to order. You need to batch-cook your waffles before anyone even sits down. To do this without sacrificing texture, you must manipulate the airflow and ambient temperature of your kitchen.
The Wire Cooling Rack: Your New Best Friend
If you take only one piece of advice from this entire masterclass, let it be this: hot baked goods must breathe. The magic of a wire rack lies in its ability to elevate your food above a flat surface, allowing air to circulate a full 360 degrees around the item.
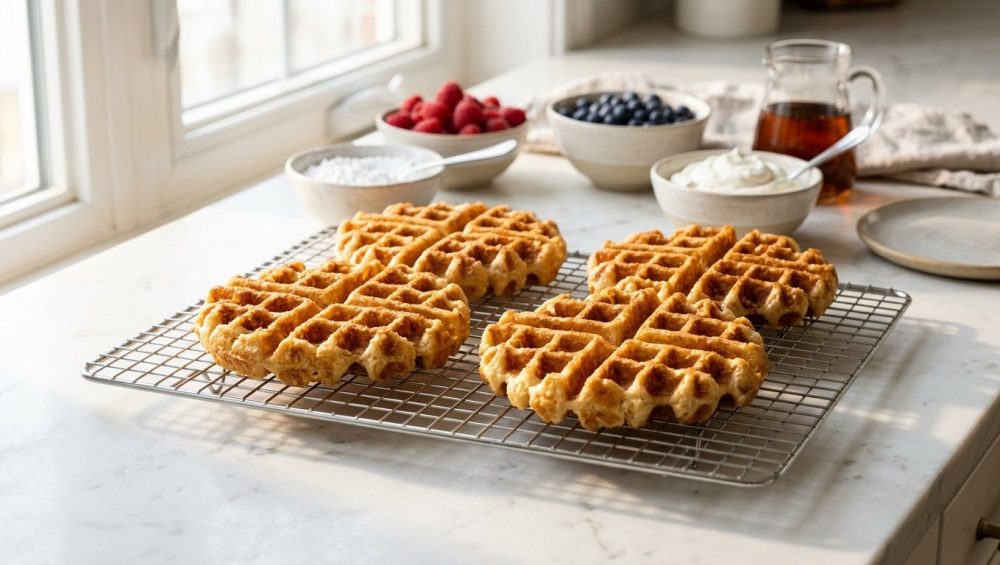
When you pull a waffle from the iron (and perhaps give it a quick toss), immediately place it on a stainless steel wire cooling rack that has been set inside a rimmed baking sheet. This setup ensures that the steam escaping from the bottom of the waffle dissipates into the air rather than pooling into a puddle of condensation. Furthermore, you must respect the rule of the single layer. Never overlap your waffles on the rack. Give them space to breathe.
Precise Oven Holding Temperatures for Maximum Crispness
Leaving the waffles on a wire rack on your counter will keep them crispy, but they will go ice cold in ten minutes. To keep them warm for a crowd, that wire rack and baking sheet combo needs to go into the oven. But temperature control here is an absolute science.
Set your oven between 200°F (93°C) and 225°F (107°C). Why this specific window? If you set the oven any lower (like 170°F), the ambient heat is not strong enough to actively evaporate the surface moisture, and the waffles will eventually steam themselves soft. If you set the oven any higher (like 250°F or above), you are essentially double-baking the waffles, which will completely dry out the fluffy interior and turn them into giant croutons.
At exactly 200°F to 225°F, the oven acts as a perfect dehydrator for the crust while leaving the interior crumb tender and moist. If your baking sheets keep warping under the heat and popping loudly in the oven, it is time to upgrade to heavy-gauge, bare aluminum half-sheet pans that can handle prolonged thermal exposure without buckling.
The Anti-Toxic Kitchen: Waffle Makers That Won’t Poison Your Family
Time for some brutal honesty. I actively despise cheap, toxic kitchenware. If you open your waffle maker and see a scratched, flaky black surface with peeling non-stick coating, unplug it and throw it in the garbage right now. You are actively feeding your family microplastics and synthetic chemicals.
The Truth About Cheap Non-Stick Coatings (PTFE and PFAS)
For decades, the standard non-stick coating on waffle irons has been PTFE (polytetrafluoroethylene), famously known as Teflon. PTFE belongs to a massive class of synthetic chemicals known as PFAS (per- and polyfluoroalkyl substances). These are widely referred to as “forever chemicals” because their carbon-fluorine bonds are so incredibly strong that they virtually never break down in the environment or in the human body.
Scientific studies have consistently linked prolonged PFAS exposure to immune system disruption, liver problems, and certain cancers. The regulatory landscape has finally caught up to the science. In January 2025, Minnesota became the first U.S. state to outright ban PFAS-containing cookware, with several other states enacting strict enforcement bans rolling out through 2026 and 2028. Across the Atlantic, the European Union’s Packaging and Packaging Waste Regulation (PPWR) goes into full effect in August 2026, strictly banning PFAS in food contact materials.
Do not fall for clever marketing. Many brands will slap a “PFOA-Free” label on their boxes. PFOA is just one specific, older type of PFAS that was phased out years ago; the manufacturer is likely still using PTFE, which is absolutely still a PFAS compound. Taking the time and effort toward banishing toxic kitchen gear is the single most important upgrade you can make as a home cook.
Safe, Durable Alternatives for the Home Cook
So, what should you use to make your weekend brunch? You have two truly safe options in 2026.
The absolute gold standard is cast iron. A stovetop cast iron waffle maker is virtually indestructible, completely free of synthetic chemicals, and retains heat beautifully. Yes, it requires you to manually season it with a high-smoke-point oil to build up a natural layer of polymerized fat (which acts as a non-stick surface), but it will last for generations.
If you absolutely must have the convenience of an electric plug-in appliance, look for a verified PFAS-free ceramic waffle maker. Modern iterations use a silicone-based sol-gel coating that is completely free of all PTFE and forever chemicals. Just be aware that ceramic coatings are delicate; you must never use aerosol cooking sprays on them (the soy lecithin in the spray burns and ruins the coating), and you should only wash them with a soft sponge once completely cooled.
Batter Up: The Chemistry of a Structurally Sound Waffle
You can have the best oven-holding technique in the world, but if your batter is fundamentally flawed, your waffles will still be sad and floppy. A pancake batter and a waffle batter are not the same thing. Pancakes are meant to be soft and pillowy; waffles require structural integrity.
The Role of Cornstarch in Creating the Ultimate Crust
If you want a diner-style, shatteringly crisp exterior, you need to alter the protein structure of your dry ingredients. Wheat flour contains proteins that form gluten when mixed with liquid. Gluten provides a wonderful, chewy structure for bread, but too much gluten in a waffle makes it heavy, dense, and rubbery.
To achieve the perfect balance of a tender inside and a crunchy outside, you must introduce cornstarch (also known as maize starch) into your dry mix. Cornstarch is a pure carbohydrate extracted from the endosperm of the corn kernel; it contains absolutely zero gluten. When you substitute a portion of your regular flour for cornstarch, you effectively lower the overall protein content of the batter.
Furthermore, cornstarch molecules are highly absorbent. When they hit the heat of the waffle iron, these moisture-loving molecules swell to six to ten times their original size. This rapid expansion creates an incredibly fine, rigid, and aerated crust that locks in the internal moisture while preventing the exterior from going soggy.
The golden ratio? Replace one-quarter of your all-purpose flour with cornstarch. For example, if a recipe calls for 1 cup of flour, use ¾ cup of flour and ¼ cup of cornstarch. This simple pantry hack will change your brunch game forever.
Resting the Batter: Patience You Didn’t Know You Needed
Once you have whisked your wet and dry ingredients together, step away from the bowl. Your batter needs to rest for at least 10 to 15 minutes before it ever touches the hot iron.
This resting period serves two vital chemical purposes. First, it gives the starches (especially your newly added cornstarch) time to fully hydrate and swell, ensuring a thicker, more cohesive batter that won’t run out the sides of your appliance. Second, it allows the gluten strands that you accidentally agitated while whisking to relax, ensuring the interior of the waffle remains tender rather than tough.
During this rest, your leavening agents are also hard at work. If your recipe uses baking powder, it is likely “double-acting.” This means it reacts once when it touches the wet ingredients (creating initial air bubbles), and it will react a second time when it hits the intense heat of the iron. If your recipe uses baking soda, it requires an acidic ingredient—like buttermilk or yogurt—to activate and create immediate lift. A truly masterful batter often utilizes a small amount of both to ensure maximum fluffiness.
The Blueprint for a Stress-Free, Mindful Waffle Bar
With the science of the batter and the thermodynamics of the holding oven mastered, it is time to focus on the actual event. Hosting should be a joyful, mindful experience, not a chaotic catering gig. According to 2026 industry reports, a staggering 93% of Americans expect to cook at home as much or more this year due to rising restaurant prices. People are craving experiential, communal dining in the comfort of a home environment. A customizable waffle bar is the ultimate crowd-pleaser.
Pre-Gathering Prep: Because Time is Money
To eliminate kitchen chaos, you must embrace the philosophy of aggressive prep work. The morning of your brunch should require nothing more than pouring batter and arranging bowls.
The night before your gathering, measure out all of your dry ingredients (flour, cornstarch, sugar, baking powder, baking soda, salt) into a large mixing bowl and cover it. In a separate container in the fridge, whisk together your wet ingredients (buttermilk, eggs, vanilla extract). Wash and slice your fruit. Cook your bacon and store it in the fridge (you can quickly reheat it on a sheet pan in the oven the next morning).
An hour before your guests arrive, preheat your oven to 225°F (107°C) and set up your wire rack. Combine your wet and dry ingredients, let the batter rest, and start cranking out the waffles. As each one finishes, give it the Martha Stewart toss, and place it in a single layer on the wire rack in the oven. By the time the doorbell rings, your kitchen is clean, the appliance is turned off, and you have a massive stockpile of perfectly hot, shatteringly crisp waffles ready to serve.
Building the Ultimate Toppings Matrix
A mindful waffle bar is all about giving your guests the power to customize their plate. You want to offer a matrix of flavors that hits every note: sweet, savory, crunchy, and creamy.
For the sweet zone, move beyond basic maple syrup. Offer a warm berry compote (just frozen berries simmered with a splash of lemon juice), a bowl of freshly whipped cream (whip it yourself, it takes two minutes), and toasted nuts for texture.
For the savory zone, waffles are an incredible canvas. Offer crispy fried chicken strips, thick-cut bacon, and a high-quality sharp cheddar. A quick word to the wise: please stop buying pre-shredded cheese for your savory toppings. Bagged shredded cheese is coated in cellulose and anti-caking agents that prevent it from melting smoothly. Take sixty seconds to grate a block of real cheese yourself; the texture is infinitely better.
When setting up your buffet, spatial awareness is key. You can eliminate bottlenecks by separating the plates, the waffles, the sweet toppings, and the savory toppings into distinct stations across your kitchen island or dining table. This encourages a natural flow of traffic and prevents everyone from hovering over the same bowl of strawberries.
Dietary-Friendly Strategies: Gluten-Free and Vegan Hacks that Actually Work
A truly great host ensures that everyone leaves full and happy. If you have guests with dietary restrictions, you do not need to cook an entirely separate menu; you just need a few smart substitutions to keep your crispy brunch bar inclusive.
If you are hosting gluten-free friends, you can easily swap the standard wheat flour for a high-quality 1-to-1 gluten-free baking blend. Because you are already using cornstarch (which is naturally gluten-free) to provide the crispy structure, your gluten-free waffles will still have a fantastic crunch.
For vegan guests, swap the buttermilk for a plant-based milk mixed with a teaspoon of apple cider vinegar (to activate the baking soda). Instead of eggs, use aquafaba (the liquid from a can of chickpeas) whipped to soft peaks. It provides the exact same lift and aeration as egg whites without altering the flavor profile of the waffle.
Conclusion: Reclaiming Your Weekend Brunch
Hosting a weekend gathering should never feel like a punishment. You do not have to be chained to a hot appliance, serving limp, soggy food to your friends while missing out on all the conversation.
By understanding the simple physics of moisture migration, utilizing the undeniable power of a wire cooling rack, holding your food at precisely 200°F to 225°F, and bolstering your batter with a healthy dose of cornstarch, you can easily achieve professional-level results in a standard home kitchen.
Throw away the toxic gear, prep your toppings the night before, and reclaim your weekend. You have the science, you have the strategy, and you have the blueprint. Now go pour yourself a mimosa, preheat that iron, and show your friends what a real waffle is supposed to taste like.






