You know the exact feeling. You have just spent the better part of your Saturday afternoon meticulously prepping a batch of buttermilk fried chicken, perfectly golden onion rings, or thick, panko-crusted pork chops. You respected the entire culinary process from start to finish. You mastered the art of the kitchen by setting up a flawless, organized breading station, maintaining your frying oil temperature with the unwavering vigilance of a hawk, and pulling the food out at the exact moment it reached a glorious, mahogany-hued perfection. The kitchen smells like an absolute dream, your mouth is watering uncontrollably, and you are ready to claim your rightful title as the ultimate weekend culinary warrior.
And then, in a matter of seconds, you completely ruin it.
How? By committing the most common, tragic, and entirely preventable sin in the home cooking playbook: you plop that magnificent, screaming-hot piece of fried perfection directly onto a flat dinner plate lined with a double layer of paper towels.
By the time you proudly carry that plate to the dining table and serve your guests, a sinister, invisible transformation has occurred. You bite into what should be a shattering, ear-splitting crust, only to be met with a damp, spongy, profoundly sad mouthful of mush. The bottom of your beautifully fried chicken looks and feels like it took a bath in a lukewarm puddle. Your soul dies a little bit, and you find yourself wondering why you didn’t just order takeout.
If you are tired of watching your hard work devolve into a soggy disaster before it even reaches your mouth, it is time for a brutal reality check. We are going to dive deep into the culinary physics of crispness, dissect the complex thermodynamics of hot oil and moisture migration, and formally introduce you to the unsung hero of the culinary world: the heavy-gauge stainless steel cooling rack. Grab your favorite beverage, pull up a stool, and let’s fix your food once and for all.
The Heartbreak of the Soggy Bottom
To truly understand why your food is failing, let us paint a vivid picture of the sheer physics at play when you deep-fry or pan-fry a piece of protein. When you drop a piece of chicken coated in seasoned flour or breadcrumbs into a heavy pot of 350°F (175°C) oil, you are not just “cooking” it in the traditional sense; you are initiating a violent, rapid dehydration process.
The intense, enveloping heat of the oil immediately begins vaporizing the surface moisture of the food. That aggressive, rolling bubbling you see when the food hits the fat? That is not the oil boiling; oil boils at a much higher temperature. That bubbling is actually the water inside the food rapidly converting to steam and violently escaping into the atmosphere. As this moisture leaves the outer layer, the starches in your flour or breadcrumb coating gelatinize and then quickly dehydrate, forming that rigid, structurally sound, deeply browned crust we all crave.
If you have ever wondered why your breading always falls off in the pan, it is often because this delicate dehydration process was interrupted, the oil temperature plummeted, or the surface tension was compromised by excess moisture trapped under the crust. But let us assume you did everything right today. You created a perfect, dry, crispy shell that encapsulates the juicy meat inside.
The exact moment you lift that food out of the hot oil, the internal temperature of the protein is still incredibly high. The water inside the meat is still actively converting to steam and aggressively pushing its way out through the porous crust you just worked so hard to build. This is precisely where the disaster strikes.
When you place that steaming-hot, freshly fried object flat against a solid surface—like a ceramic plate, a cutting board, or a baking sheet—you are effectively sealing off the escape route for that steam. The bottom hemisphere of the food is now trapped in a humid micro-climate of its own making. The escaping steam hits the cool, impermeable surface of the plate, instantly condenses back into liquid water, and is immediately reabsorbed by the very crust you just spent twenty minutes trying to dehydrate. The result? The dreaded, heartbreaking soggy bottom.
The Culinary Physics of Crispness: Why Paper Towels Are the Enemy
“But wait!” I can hear you shouting at your screen right now. “I don’t put my fried food directly on a bare plate! I always use paper towels to soak up the grease like my grandmother taught me!”
Oh, my sweet, well-intentioned home cook. Paper towels are not the magical savior you think they are. In fact, when used incorrectly, they are the primary architects of your soggy demise.
The Thermodynamics of a Freshly Fried Cutlet
To understand why paper towels betray you, we have to look closely at the thermodynamics of cooling and moisture migration. When a hot object cools down in a kitchen environment, it relies heavily on evaporative cooling and convective heat transfer. The ambient air needs to circulate freely around the entire object to carry away the residual heat and the escaping water vapor.
When you lay a hot, freshly fried chicken thigh flat on a bed of paper towels, you are entirely cutting off airflow to the bottom half of the food. Yes, the paper towel will immediately absorb the surface oil through capillary action. But remember that escaping steam we just talked about? The paper towel absorbs that condensation, too. Within a matter of seconds, that paper towel transforms from a dry, absorbent grease-catcher into a hot, wet, oil-and-water-logged sponge pressed directly against your delicate crust. You have essentially created a localized steam bath for your food, ensuring that the bottom layer turns into a gummy paste.
The Paper Towel Trap: A One-Way Ticket to Mushville
There is a long-standing, highly contested debate in the culinary science community about this exact phenomenon. Some food scientists and rigorous recipe testers rightly point out that paper towels are highly effective at wicking away excess lipid fats that a wire rack alone simply cannot catch. Because of the physical properties of surface tension, a simple wire rack will not magically pull every single drop of grease off your food; the oil will stubbornly cling to the food’s surface unless it has an absorbent material to draw it away via capillary action.
However, the severe trade-off of resting food flat on a paper towel is a catastrophic loss of texture. The moisture migration from the steaming food hits the paper towel, cannot evaporate into the air, and completely ruins the structural integrity of the crust.
So, what is the ultimate, scientifically backed solution? It is a two-part harmony. You need the wicking power of the paper towel combined with the structural elevation of a wire rack. Or, if you are caught completely without a rack, you must employ the “crumple method”—aggressively crumpling the paper towels into loose, textured balls to create makeshift elevation and airflow, while still providing an absorbent surface to catch drips. But let us be honest with each other: you are a serious cook who wants professional results, and you deserve proper, reliable equipment.
Enter the Wire Rack: The Unsung Hero of Airflow
If you want to consistently cook like a professional chef, you need to set up your home kitchen like one. You do not need a massive collection of single-use gadgets, avocado slicers, or pretentious culinary toys that clutter your drawers. You just need a few high-quality, foundational items that perform flawlessly every time. When compiling a master list of essential beginner kitchen tools, a heavy-duty wire cooling rack should be sitting right at the very top, nestled comfortably next to your sharpest chef’s knife and your perfectly seasoned carbon steel skillet.
The Mechanics of 360-Degree Air Circulation
A wire rack works its magic by leveraging the power of convective heat transfer. By elevating the food a mere half-inch to an inch above the surface of the counter or baking sheet, you are creating a dedicated channel for laminar airflow beneath the food.
When the hot food releases steam, that steam is no longer trapped against a flat, impermeable surface. It dissipates harmlessly into the surrounding air. The ambient air can freely circulate around the entire 360-degree surface area of the food, cooling it evenly and, most importantly, allowing the crust to remain perfectly dry and shatteringly crisp.
Rigorous scientific trials have demonstrated that elevating kitchen items on a wire rack reduces surface moisture retention by up to 72% compared to resting them flat on a towel. This undeniable principle applies to everything from air-drying your freshly washed dishes to cooling your delicate baked goods, and it is absolutely critical for the survival of fried foods.
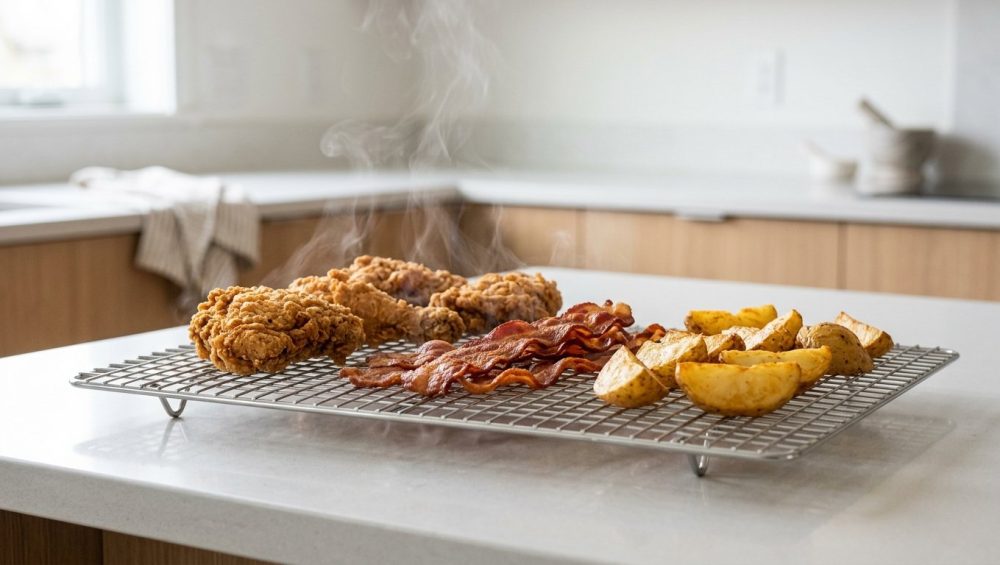
The optimal, foolproof setup for a home frying station is this: a standard rimmed baking sheet (often referred to in the industry as a half-sheet pan), lined with a double layer of paper towels to catch the grease, with a stainless steel cross-wire rack set directly inside it. When your food comes out of the hot oil, it goes straight onto the rack. The excess oil drips down onto the paper towels below, while the steam escapes into the ether. Your crust remains an impenetrable fortress of crunch.
Beyond Frying: The Wire Rack as a Multi-Tasking Powerhouse
If you think a wire rack is just a one-trick pony meant for cooling chocolate chip cookies and resting fried chicken, you are severely underestimating the utility of this tool. A high-quality, oven-safe wire rack is a multi-tasking powerhouse that will fundamentally change the way you roast, bake, prep, and glaze your meals.
The Secret to Superior Roasting and Reverse Searing
Have you ever tried to roast a whole chicken or a thick-cut pork chop directly on a flat baking sheet? As the meat cooks in the oven, it releases a significant amount of juices and rendered fat. If the meat is sitting flat on the pan, the bottom half of your expensive cut is essentially boiling in a swamp of its own exudate. You will never, ever achieve an even, crispy sear or properly rendered skin that way.
By placing an oven-safe wire rack inside your baking sheet and resting the meat on top, you elevate the protein out of the liquid. The hot, circulating air of the oven can wrap completely around the meat, cooking it faster and far more evenly. The fat drips away, leaving you with perfectly rendered, crispy skin on all sides. This is the exact same foundational principle required if you want to achieve the crispiest roasted potatoes, though for starchy vegetables, you often want maximum contact with the hot pan for conduction. But for proteins? Elevation is absolutely everything.
This setup is also completely mandatory for the reverse sear method. When you are slowly bringing a thick, expensive steak up to temperature in a low oven before searing it in a ripping-hot skillet, the wire rack ensures that the exterior of the steak dries out perfectly. This dry surface is the ideal canvas for the Maillard reaction to work its browning magic later.
Dry-Brining: The Ultimate Pre-Cook Hack
Let us talk about advanced prep. If you want to permanently transform your bland weeknight dinners into restaurant-quality meals, you need to fully embrace the magic of dry brining. Dry brining involves generously salting your raw meat and leaving it completely uncovered in the refrigerator for anywhere from 12 to 48 hours.
The salt slowly penetrates the meat, seasoning it deeply to the bone and altering the protein structures so they retain significantly more moisture during the cooking process. But the secondary, equally important benefit of dry brining is that the harsh, constantly circulating air of the refrigerator completely dries out the exterior surface of the meat, forming a tacky, moisture-free layer called a pellicle.
If you attempt to dry-brine a chicken breast by leaving it flat on a plate, the bottom will remain slimy, wet, and unappetizing. If you elevate that chicken breast on a wire rack, the refrigerator air can circulate around the entire piece of meat. When you finally drop that chicken into a hot skillet, the perfectly dry surface will immediately sear into a gorgeous, golden-brown crust, rather than steaming in its own moisture and turning a depressing shade of beige.
The “No-Go” Zone: Why Cheap Chrome Racks Are Toxic Trash
Now, we need to have a very serious, no-nonsense talk about materials. As your resident sassy sous-chef, I have absolutely zero patience for cheap, poorly manufactured kitchen equipment that degrades after three uses and actively threatens to poison your food. We are officially banishing toxic kitchen gear from our lives, starting with the absolute worst offender in the entire bakeware aisle: the chrome-plated cooling rack.
If you walk into a big-box discount store and buy a set of two shiny cooling racks for $8.99, I can guarantee you they are made of cheap, low-grade steel coated in a microscopic, fragile layer of chrome or nickel plating. They might look shiny, beautiful, and professional on day one, but they are a ticking time bomb waiting to ruin your dinner.
The Danger of Mystery Metals and Flaking Finishes
The fundamental, inescapable flaw with chrome-plated racks lies in the physics of thermal expansion. The cheap steel core and the incredibly thin chrome outer layer expand and contract at completely different rates when exposed to the high heat of your oven or the hot oil dripping off your freshly fried food.
Over a surprisingly short period of time, this differential thermal expansion causes the chrome plating to craze—meaning it develops microscopic, invisible cracks. Once that protective seal is broken, it is game over. Moisture from your food, the ambient humidity in your kitchen, or the water from your sink penetrates the cracks and reaches the highly reactive iron core.
Rust immediately begins to bloom underneath the plating. As the rust expands, it creates intense outward pressure, forcing the chrome plating to blister and physically flake off. Suddenly, you are pulling a batch of cookies off the rack and finding tiny, razor-sharp shards of metallic chrome embedded directly in the bottom of your snickerdoodles.
Not only is accidentally ingesting sharp metal flakes a massive physical hazard, but the underlying rust is impossible to clean, ruins the taste of your food, and actively harbors harmful bacteria. Furthermore, many cheap non-stick coated racks use mystery chemical compounds that degrade under high oven heat, releasing toxic fumes and leaching directly into your food. If you value your health, your family’s safety, and your sanity, you will take every single chrome-plated or cheap non-stick rack currently sitting in your kitchen and throw it directly into the recycling bin today.
The Ultimate Buyer’s Guide: Finding the Forever Rack
So, if cheap chrome is out, what exactly should you be buying? You want a rack that you can confidently pass down to your grandchildren. You need a rack that can withstand a 500°F roasting session, a bath in hot frying oil, and the daily rigors of a busy home kitchen without warping, rusting, or flaking.
100% Uncoated 304 (18/8) Stainless Steel
The only material you should ever consider for a wire rack is 100% uncoated, solid stainless steel. But not just any generic stainless steel—you need to specifically look for Grade 304, which is also commonly referred to as 18/8 stainless steel.
The numbers 18/8 refer to the specific composition of the metallurgical alloy: 18% chromium and 8% nickel. This specific, highly engineered ratio provides an incredibly stable, passive oxide layer on the surface of the metal that makes it highly resistant to corrosion from acidic foods, hard water minerals, and heavy salt exposure. Unlike plated racks, a solid 304 stainless steel rack has absolutely no artificial coating to flake off. It is the exact same durable material all the way through to its core. If you accidentally scratch it with a knife or a spatula, the chromium simply reacts with the oxygen in the air to form a brand new oxide layer, continuously protecting itself from rust.
The Grid Pattern: Cross-Wire vs. Parallel
When shopping for your forever rack, you will notice two distinct styles of wire construction: those with parallel wires running in only one direction, and those with a tightly woven cross-wire (or grid) pattern.
Always, without exception, choose the cross-wire grid. Parallel wire racks are much cheaper for companies to manufacture, but they offer terrible, inconsistent support. If you try to cool a delicate, warm sugar cookie on a parallel rack, the soft dough will inevitably sag between the wires, leaving you with a permanently deformed, unpresentable dessert. If you try to roast a delicate piece of flaky white fish, it will break apart and fall right through the massive gaps.
A tight, cross-wire grid provides uniform, edge-to-edge structural support for even the most delicate foods, while still offering plenty of open negative space for optimal convective airflow and rapid grease drainage.
Gauge and Fit: Heavy Duty for Heavy Duty Cooking
Finally, you must pay close attention to the gauge (thickness) of the wire and the overall dimensions of the rack. A flimsy, thin-wire rack will bow, bend, and warp the second it encounters a heavy pork roast or a 450°F oven. If you are constantly frustrated by why your baking sheets keep warping with a terrifying pop in the middle of baking, putting a cheap, thin rack inside them is only going to exacerbate the thermal stress problem. You want thick, heavy-gauge wire with multiple reinforced crossbars securely welded across the bottom to ensure the rack remains perfectly flat under immense stress.
Furthermore, ensure you are buying a rack specifically designed to fit perfectly inside a standard commercial half-sheet pan (which generally measures 18 by 13 inches). The rack itself should measure exactly 16.5 by 11.5 inches, allowing it to drop perfectly into the pan without sliding around dangerously or leaving massive gaps at the edges where food can slip through.
Maintenance and Care for Your Stainless Steel Rack
Congratulations, you have finally upgraded to a heavy-duty 304 stainless steel cross-wire rack. It is going to fundamentally change your life in the kitchen. But to keep it performing flawlessly decade after decade, you need to understand exactly how to care for it.
Cleaning Without Losing Your Mind
Let me guess: the main reason you hate using wire racks, and the reason you keep reaching for paper towels, is because racks are a complete nightmare to clean. Trying to scrub baked-on grease, polymerized oil, and sticky fruit glaze out of hundreds of tiny, intersecting wire joints with a sponge is enough to make anyone reconsider their culinary hobbies.
First, let us dispel a very dangerous, prevalent myth. Just because your new stainless steel rack is technically labeled “dishwasher safe” does not mean you should aggressively put it in the dishwasher every single day. The brutal combination of high heat, aggressively alkaline dishwasher detergents, and prolonged moisture exposure can eventually cause microscopic crevice corrosion at the welded joints, even on high-quality 304 steel. If you want to avoid ruining your nonstick pans, you already know to keep them far away from the dishwasher; you should extend that exact same courtesy to your premium baking racks.
The absolute secret to cleaning a wire rack effortlessly is the soak. Find a baking sheet that fits your rack (the one you just cooked with is usually perfect). Fill the pan with hot water and a generous squirt of a high-quality, enzyme-based dish soap. Invert the dirty rack into the soapy water, make sure it is submerged, and walk away. Go eat your perfectly crispy fried chicken. Go entertain your guests. Go have a glass of wine.
By the time you return 30 to 60 minutes later, the enzymes and hot water will have completely broken down the baked-on proteins and stubborn fats. Take a stiff-bristled nylon dish brush—never a sponge, which will just get shredded to pieces by the wires—and give the rack a quick, vigorous scrub. The debris will literally melt away.
If you are dealing with severely polymerized grease or burnt-on barbecue sauce that refuses to budge, skip the harsh, toxic chemical oven cleaners. Make a thick paste of baking soda and warm water, smear it generously over the affected areas, and let it sit for an hour. The mild abrasiveness and highly alkaline nature of the baking soda will gently lift the burnt carbon without scratching or damaging the steel. If you have ever used baking soda to avoid scrubbing stainless steel pans for hours on end, you know exactly how magical this simple compound can be.
One crucial warning: never use steel wool to clean your rack. Steel wool leaves behind microscopic iron particles embedded in the surface of the rack, and those particles will rapidly rust, ruining your beautiful stainless finish. Once your rack is clean, rinse it thoroughly with hot water and dry it immediately with a microfiber cloth. Do not let it air dry if you have hard water, as the mineral deposits will adhere to the steel and create a cloudy, dull finish that is difficult to remove.
The Final Verdict: Elevate Your Food, Literally
Great cooking is rarely about learning overly complex, pretentious techniques or buying ridiculously expensive, highly specialized gadgets that you only use once a year. It is almost always about mastering the fundamentals, respecting the unyielding physics of heat and moisture, and investing in a few core pieces of equipment that simply work every single time.
By banishing the paper towel trap and elevating your food on a heavy-duty, uncoated stainless steel wire rack, you are taking ultimate control of the thermodynamics in your kitchen. You are preventing the tragic, soggy demise of your hard-earned fried foods. You are unlocking the secrets to superior roasting, perfect dry-brining, and flawless baking.
When you finally equip yourself with the right tools and the right knowledge, you are not just making dinner; you are building the foundation for a beautifully organized dream kitchen where failure is minimized and delicious, crispy, perfectly executed meals become your new standard. So go forth, throw away those rusting chrome monstrosities, invest in solid stainless steel, and give your food the breathing room it truly deserves. Your tastebuds—and your sanity—will thank you.


