Look, we need to have a serious, brutally honest conversation about your food storage drawer. You know exactly which drawer I am talking about. It is that chaotic, jumbled graveyard of mismatched lids, warped bottoms, and permanently discolored plastic tubs that you frantically shove closed whenever company comes over. We have all been there. You spend your entire weekend meticulously crafting a beautiful, slow-simmered bolognese sauce or a vibrant, deeply spiced chicken tikka masala. You feel like an absolute culinary genius. But then, Monday rolls around. You pack those glorious leftovers into a pristine, crystal-clear plastic container, pop it into the office microwave, and boom—your container is ruined forever. You are left with a horrific, neon-orange stain that refuses to budge, and you find yourself wondering why your plastic containers stay greasy no matter how much elbow grease you apply.
As a home cook who relies heavily on weekend meal prep to survive the grueling weekday grind, I completely understand the frustration. Time is money, and nobody has the patience to stand over a sink aggressively scrubbing a cheap piece of plastic until their knuckles bleed, only to find that the orange ring of death is still mocking them. I firmly believe that anyone can cook like an absolute expert without a fancy culinary degree, but part of being an expert in the kitchen is understanding the science behind your tools. You cannot fight an enemy you do not understand. And in this case, the enemy is not your cooking—it is basic, undeniable chemistry.
Today, we are taking a deep, exhaustive dive into the material science of why tomato-based leftovers absolutely destroy your plastic food containers. We are going to strip away the pretentious chef-speak and look at the cold, hard molecular facts. More importantly, I am going to equip you with scientifically proven, non-toxic cleaning hacks that actually work, while sternly advising you on when it is time to throw that warped plastic straight into the recycling bin. Because if there is one thing I have absolutely zero patience for, it is toxic kitchenware leaching mystery chemicals into my hard-earned meals.
The Chemistry of the Crime: Why Tomato Sauce Hates You
To understand why your containers look like they just survived a paintball match, we have to look at the microscopic structure of both your food and your storage vessels. The vast majority of affordable, standard food storage containers are manufactured using either polypropylene (PP, recycling code 5) or high-density polyethylene (HDPE, recycling code 2). Polypropylene is a semi-crystalline thermoplastic polymer that is incredibly popular because it is lightweight, durable, and relatively cheap to produce. However, polypropylene has a defining chemical characteristic that is the root cause of all your dishwashing misery: it is highly hydrophobic.
In the realm of chemistry, “hydrophobic” literally translates to “water-fearing.” Polypropylene molecules repel water, which is precisely why water beads up on the surface of your plastic containers when you pull them out of the dishwasher. But while polypropylene hates water, it absolutely loves lipids, oils, and fats. It is a lipophilic (fat-loving) material.
Now, let us look at the other half of this disastrous equation: your food. Tomatoes, red bell peppers, and chili powders get their vibrant, gorgeous red coloring from a naturally occurring pigment called lycopene. Lycopene is a carotenoid—a highly concentrated antioxidant compound that is fantastic for your health, boasting benefits ranging from heart health to cellular protection. From a molecular standpoint, lycopene contains a long chain of conjugated double bonds, which gives it that intense red color. But here is the kicker: lycopene is also extremely hydrophobic and fat-soluble.
When you create a delicious tomato sauce, you are usually simmering those tomatoes in olive oil, butter, or the rendered fat from ground beef or pancetta. The lycopene dissolves seamlessly into those fats. When you pour that luscious, oil-rich, lycopene-heavy sauce into a polypropylene container, you are introducing a hydrophobic, fat-soluble pigment to a hydrophobic, fat-loving plastic. It is a match made in molecular heaven. The lycopene molecules are naturally drawn to the polymer chains of the plastic. They cling to the surface, repelling the soapy dishwater you try to use to wash them away. “Like attracts like,” and in this case, the plastic and the pigment become inextricably linked. Understanding this basic interaction is the first step in creating your own essential kitchen survival guide for handling stubborn stains.
The Microwave Murder: How Heat Seals the Deal
If storing cold tomato sauce in a plastic container is a misdemeanor, microwaving that sauce in the container is a first-degree culinary felony. Heat is the ultimate catalyst for permanent plastic staining, and the microwave is the scene of the crime.
When you place a sealed or partially vented plastic container of cold leftovers into the microwave, the electromagnetic waves agitate the water and fat molecules in your food, generating intense, rapid heat. As the temperature of the food skyrockets, that heat is directly transferred to the polypropylene container. Here is where the material science gets truly fascinating—and frustrating.
Polypropylene is a thermoplastic, meaning it responds dynamically to temperature changes. When exposed to the high heat of microwaved food, the polymer chains that make up the plastic undergo a process known as thermal relaxation. The tightly packed molecular bonds physically expand and loosen up. As the plastic expands, microscopic pores and fissures open up across the interior surface of the container.
Remember that hot, bubbling layer of red grease floating at the top of your microwaved chili? That is your fat-soluble lycopene, now heated to a highly fluid state. As the polymer chains of the plastic open up, the lycopene-infused fats literally seep into the microscopic pores of the container. The pigment is no longer just sitting on the surface; it has physically migrated inside the molecular structure of the plastic itself.
Once the microwave dings and you take your food out to eat, the container begins to cool down. As the temperature drops, the polymer chains undergo thermal contraction. The microscopic pores snap shut, tightly clamping down on the lycopene molecules that managed to sneak inside. The pigment is now physically entrapped within the plastic matrix via van der Waals dispersion forces. This is not a covalent chemical bond, but rather a physical locking mechanism that is incredibly difficult to undo.
This is exactly why your frantic scrubbing does absolutely nothing. You are scrubbing the surface of the plastic, but the orange stain is literally embedded inside the walls of the container. You could scrub until your sponge disintegrates, and the stain will remain. Learning how to navigate this thermal expansion trap is a crucial part of surviving kitchen disasters without losing your mind.
The Terrifying Truth About Microwaving Plastic (Yes, We Need to Talk About Microplastics)
As your favorite snarky culinary blogger, I have a few strict rules. One of them is the absolute, uncompromising “No-Go” rule on toxic kitchen gear. I despise cheap, peeling non-stick coatings, mystery metals, and kitchenware that actively poisons your food. And unfortunately, we cannot talk about the science of microwaving plastic containers without addressing the massive, terrifying elephant in the room: microplastics.
You might think that an orange stain is just a harmless aesthetic annoyance. But that expanding and contracting polymer matrix we just talked about? It does not just trap tomato sauce; it also sheds pieces of itself directly into your meal.
In July 2023, a groundbreaking and deeply alarming study was published in the peer-reviewed journal Environmental Science & Technology by researchers at the University of Nebraska-Lincoln. The scientists set out to assess the release of microplastics and nanoplastics from standard, FDA-approved, “microwave-safe” plastic containers and reusable food pouches. The results were nothing short of horrifying.
The study found that microwave heating caused the highest release of microplastics into food compared to any other usage scenario, including refrigeration or room-temperature storage. When researchers microwaved these supposedly safe polypropylene and polyethylene containers for just three minutes, they discovered that a single square centimeter of the plastic released up to 4.22 million microplastic particles and an astonishing 2.11 billion nanoplastic particles directly into the food simulants. Let that sink in. Billions of invisible plastic particles, shedding from the walls of your container and mixing seamlessly into your Tuesday night dinner.
But it gets worse. The researchers did not just count the particles; they tested their biological impact. In an in vitro study, they introduced these extracted microplastics and nanoplastics to cultured human embryonic kidney cells. After just 48 hours of exposure, approximately 75% to 77% of the kidney cells died.
These microplastics and the chemical additives used to manufacture them (such as phthalates and bisphenols) are known endocrine disruptors. They hijack the hormonal signals in the human body, potentially leading to metabolic disorders, reproductive issues, and cellular damage. The heat of the microwave exponentially accelerates the migration of these chemicals from the plastic packaging into your food.
So, while we are going to discuss how to clean your stained containers, my primary advice as your kitchen advocate is this: stop microwaving plastic. Period. It does not matter if the bottom of the tub has a little wavy microwave symbol on it. “Microwave-safe” simply means the plastic will not visibly melt or catch fire; it does not mean it is biologically safe for your long-term health. If you are finally ready to banish toxic kitchen gear from your home, the microwaveable plastic tub should be the very first thing to go. Always transfer your leftovers to a ceramic bowl or a glass dish before hitting start.
What NOT to Do: The Kitchen Hacks That Will Ruin Your Containers
Before I give you the actual, science-backed solutions for cleaning the containers you use for cold storage, we need to debunk the terrible advice floating around the internet. Desperation leads people to do crazy things to their Tupperware, and most of these “hacks” will only destroy your gear faster.
1. The Bleach Soak
Do not pour household bleach (sodium hypochlorite) into your plastic containers. Yes, bleach is a powerful oxidizing agent that will destroy the lycopene pigment, but it will also destroy the plastic. Bleach causes oxidative chain scission in polypropylene. This means it literally breaks the molecular backbone of the plastic, reducing its tensile strength by up to 37% after just a few uses. This chemical degradation causes microscopic cracking across the surface, which not only accelerates the release of microplastics but also makes the container infinitely more porous. The next time you put tomato sauce in that bleached container, the stain will be ten times worse because you have essentially given the lycopene millions of new microscopic craters to hide in.
2. Abrasive Scrubbing and Baking Soda Pastes
While baking soda is a fantastic, gentle abrasive for stainless steel sinks and enameled cast iron, it is generally too harsh for soft plastics. Scrubbing a polypropylene container with a thick baking soda paste, steel wool, or the rough green side of a heavy-duty sponge will create thousands of microscopic scratches on the surface. Just like the chemical micro-cracking caused by bleach, these physical scratches ruin the smooth finish of the plastic, giving pigments, oils, and bacteria permanent hiding spots. If you have ever wondered why your silicone spatulas taste like soap or hold onto weird smells, it is often because their surfaces have been micro-scratched and are trapping detergent residues.
3. The Boiling Water Purge
Some well-meaning folks suggest pouring boiling water directly from a kettle into the stained container to “melt” the grease away. Do not do this. The heat deflection temperature of standard polypropylene is around 100°C (212°F). Pouring boiling water directly onto thin, un-tempered plastic will cause immediate, irreversible warping. Your lid will never fit securely again, and your container will be rendered useless.
4. White Vinegar Soaks
Vinegar is a miracle worker for descaling coffee makers and cutting through hard water stains, but it is utterly useless against lycopene. Acetic acid (the active component in vinegar) lacks the oxidative capacity required to break down the conjugated double bonds of the tomato pigment. You are just wasting good vinegar and making your kitchen smell like a pickle factory.
How to Actually Clean Stained Plastic Containers (The Science-Backed Methods)
Alright, we have covered the molecular biology, the health warnings, and the terrible internet advice. Now, let us get to the solutions. Here are the scientifically proven, highly effective methods for rescuing your stained plastic containers.
The Viral Soap and Paper Towel Emulsion Trick
If you spend any time on culinary TikTok or Instagram, you have likely seen this viral cleaning hack popularized by creators like Adi Kempler and Bobby Berk,. It sounds completely absurd, but it is rooted in brilliant, undeniable chemistry, and it works flawlessly.
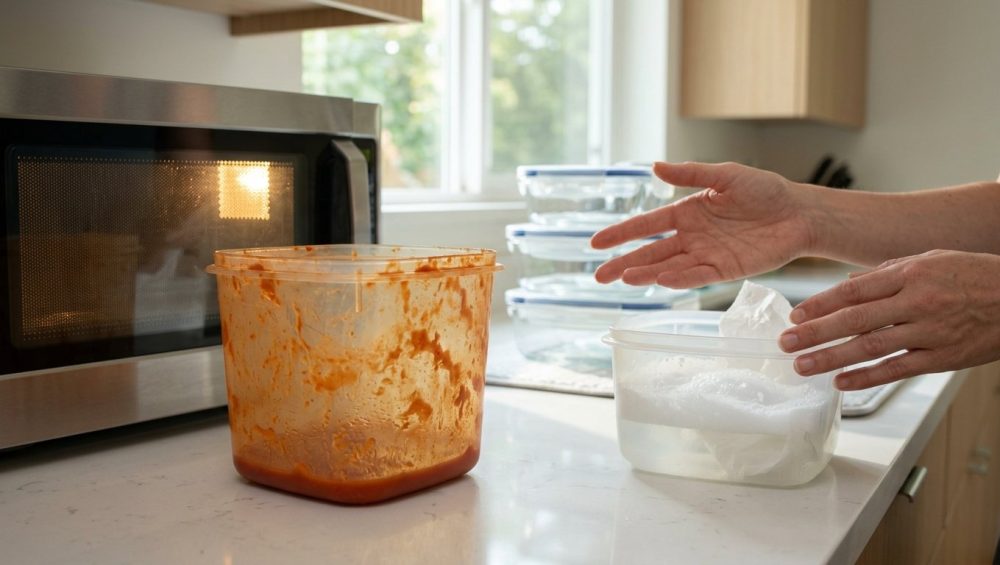
The Method:
- Squeeze a generous pump of high-quality, grease-cutting liquid dish soap (like Dawn) into the bottom of the stained container.
- Fill the container about halfway with warm (not boiling) water.
- Take a single sheet of standard paper towel, rip it into a few smaller pieces, and drop them into the soapy water.
- Put the lid on the container, ensure it is tightly sealed, and shake it vigorously for 45 to 60 seconds. Shake it like it owes you money.
- Pour the murky, sudsy water and the soggy paper towel into the trash (or compost), and rinse the container with clean water. The stain will be gone.
The Science:
Why does this work when aggressive scrubbing fails? It comes down to emulsification and mechanical absorption. Dish soap is packed with surfactants—molecules that have a hydrophilic (water-loving) head and a hydrophobic (water-fearing) tail. When you shake the container, the hydrophobic tails of the soap molecules seek out and attach themselves to the hydrophobic lycopene and grease molecules clinging to the plastic walls.
The violent shaking creates intense mechanical agitation, forcing the soap to lift the grease away from the plastic and suspend it in the water (creating an emulsion). But here is the genius part: the paper towel. The ripped-up paper towel acts as a massive, fibrous matrix of cellulose. As it whips around the inside of the container, it provides gentle, non-scratching friction that helps dislodge the pigment. More importantly, it acts as a physical sponge. Before the emulsified lycopene and oil can settle back onto the plastic, the highly absorbent paper towel traps the hydrophobic mess within its fibers. You are essentially creating a tiny, soapy washing machine that extracts the stain and immediately traps it in a disposable filter.
Pro-Tip for Extreme Stains: If the stain is incredibly old and stubborn, some culinary scientists recommend rubbing the inside of the dry container with a thin layer of butter before doing the paper towel trick. Because lycopene is highly fat-soluble, the fats in the butter will actually draw the lycopene out of the plastic’s micro-pores. Then, when you add the soap, water, and paper towel, the soap easily emulsifies the butter, taking the trapped lycopene right along with it. It is a masterclass in fighting fat with fat, and it is one of those simple kitchen fixes that will make you feel like a domestic god.
The Hydrogen Peroxide Soak
If you do not want to stand around shaking Tupperware like a maraca, the hydrogen peroxide soak is your best chemical alternative. Unlike bleach, hydrogen peroxide is safe, non-toxic, and incredibly effective at targeting organic pigments.
The Method:
- Fill the stained container with a mixture of warm water and standard 3% hydrogen peroxide (the cheap stuff in the brown bottle from the pharmacy). A 50/50 ratio works beautifully.
- Let the container sit undisturbed on your counter for 15 to 30 minutes.
- Pour out the solution, wash the container normally with dish soap, and rinse.
The Science:
Hydrogen peroxide (H2O2) is a mild bleaching and oxidizing agent. When it comes into contact with the lycopene molecules trapped in the plastic, it attacks the conjugated double bonds that give the pigment its red color. The oxidation process breaks these long molecular chains into smaller, colorless fragments. You are not necessarily removing the lycopene; you are chemically dismantling its structure so that it no longer reflects red light. Crucially, 3% hydrogen peroxide is gentle enough that it will not cause oxidative chain scission in the polypropylene, meaning your plastic remains smooth, intact, and safe for future use. If you have ever wondered why your spatula smells like garlic, a quick peroxide soak can also help neutralize those trapped organic odor compounds without degrading the silicone.
The UV Light Degradation Method (Harnessing the Sun)
For the ultimate low-effort, zero-cost cleaning hack, you can simply harness the terrifying power of the nearest star.
The Method:
- Wash the stained container with soap and water to remove any surface grease.
- Place the container outside in direct, bright sunlight for a few hours (a sunny windowsill will also work, though it may take longer).
- Bring it back inside and wash it once more.
The Science:
This method relies on photodegradation. The ultraviolet (UV) rays from the sun possess enough energy to break the chemical bonds within the lycopene molecule. Just as UV rays can bleach the color out of outdoor furniture or clothing left on a clothesline, they will actively break down the chromophores in the tomato pigment, rendering the stain completely invisible.
A word of caution: while a few hours in the sun is perfectly fine, you should not leave your plastic containers outside for days on end. Prolonged exposure to intense UV radiation will eventually degrade the plastic polymers, causing them to become brittle and prone to cracking. But for a quick, afternoon stain-removal session, the sun is an unbeatable tool to help eliminate kitchen chaos.
The Permanent Fix: Upgrading to Glass
While the cleaning methods outlined above are scientifically sound and highly effective, we need to have a moment of brutal honesty. If you are constantly battling stained, warped, greasy plastic containers, you are wasting your precious time and energy. You are fighting a losing battle against material science.
As an advocate for the home cook, my ultimate advice is to phase out your plastic food storage entirely and upgrade to high-quality glass containers. Yes, the initial investment is higher, but the long-term payoff in durability, safety, and sheer weekday efficiency is immeasurable.
Glass is non-porous and incredibly dense. It does not matter how hot your chicken tikka masala is, or how much lycopene is in your bolognese; glass will never absorb pigments, and it will never retain odors. You can store your food, reheat it in the microwave, and run the container through the hottest, most aggressive cycle of your dishwasher without a single worry.
However, not all glass is created equal. When shopping for food storage, you must look for borosilicate glass rather than standard soda-lime tempered glass. Borosilicate glass (which was used to make vintage Pyrex and is still used by high-end brands today) is manufactured with boron trioxide. This gives the glass an incredibly low coefficient of thermal expansion. In plain English, this means the glass does not expand or contract significantly when exposed to extreme temperature changes. You can take a borosilicate glass container directly from the freezing cold temperatures of your refrigerator and place it into a hot microwave or oven without fear of thermal shock.
Standard soda-lime glass, on the other hand, expands and contracts rapidly with temperature fluctuations. If you have ever experienced the sheer terror of a situation where a glass baking dish shattered into a thousand pieces inside your oven, it was almost certainly made of cheap soda-lime glass that succumbed to thermal shock. Always check the manufacturer’s specifications and invest in borosilicate. It is heavier, it is safer, and it will literally last you a lifetime if you don’t drop it on a tile floor.
Furthermore, by switching to glass, you completely eliminate the terrifying risk of microplastic ingestion. You can microwave your meals with absolute peace of mind, knowing that your container is not actively shedding endocrine-disrupting chemicals into your perfectly crafted dinner. It is a small lifestyle change that yields massive dividends for your health and your culinary sanity.
Conclusion: Protect Your Food, Protect Your Sanity
Cooking should be a joyful, creative endeavor, not a source of stress and endless cleanup. You deserve to spend your weekends perfecting your grandmother’s famous marinara recipe without the looming dread of ruining your storage containers on Monday morning.
By understanding the hydrophobic nature of lycopene and the thermal expansion properties of polypropylene, you can outsmart the chemistry that causes these stubborn stains. You now know that the microwave is the enemy of plastic, that the soap-and-paper-towel emulsion trick is a stroke of scientific genius, and that a little bit of hydrogen peroxide can work miracles.
But more importantly, I hope you walk away from this masterclass with the confidence to audit your kitchen gear. Throw away the warped, peeling, heavily stained plastic tubs that have been haunting your cabinets for a decade. Invest in safe, non-toxic, durable borosilicate glass. Building a beautifully organized dream kitchen does not require a massive budget or a professional remodel; it simply requires intentional, informed choices about the tools you use every single day.
Now, go make that massive batch of spaghetti bolognese. Your dinner is going to be spectacular, and your containers are going to be just fine. Stay sassy, stay safe, and keep cooking.


