We have all been there. You just executed a phenomenal Tuesday night meal. You are feeling like an absolute culinary deity, floating on the high of perfectly seared chicken and a flawlessly emulsified pan sauce. You pack up the leftovers, snap the lid onto your trusty plastic container, and toss it in the fridge. Fast forward to the next day. You eat your lunch, walk over to the sink, and begin the dreaded cleanup. But no matter how much soap you use, no matter how aggressively you scrub until your knuckles turn white, that plastic container still feels like it was just used to change the oil in a 1998 Honda Civic. And do not even get me started on the permanent, radioactive-orange marinara stain that has forever claimed the corners of the plastic.
It is infuriating. It is one of the most universally despised chores in the modern kitchen, and it has driven countless home cooks to the brink of madness. But before you blame yourself or throw your sudsy sponge across the room, take a deep breath. Pour yourself a glass of wine. It is not your fault. You are fighting a losing battle against fundamental material science. Thinking that you just aren’t scrubbing hard enough is one of the most common rookie kitchen mistakes, but the truth is that elbow grease cannot defeat chemistry.
Today, we are going completely scorched-earth on greasy plastic containers. We are going to break down exactly why your Tupperware stubbornly refuses to let go of yesterday’s vinaigrette, why scrubbing is actually making the problem exponentially worse, and how a shockingly simple trick involving warm water, dish soap, and a torn paper towel will banish that greasy film in roughly fifteen seconds. More importantly, we are going to have a brutally honest conversation about the safety of the plastics currently lurking in your cabinets.
The Physics of Frustration: Why Plastic Clings to Grease
When you are trying to streamline your chaotic cooking routine, the last thing you want is to spend ten minutes wrestling with a slippery piece of plastic in the sink. To understand how to defeat the grease, you first have to understand why oil sticks to plastic in the first place, while it rinses effortlessly off of glass or stainless steel. It all comes down to a chemical concept called lipophilicity.
The Lipophilic Nature of Petroleum Polymers
In the world of chemistry, there is a golden rule: “like attracts like.” Water is a polar molecule, meaning it has a slight electrical charge. Fats and oils, on the other hand, are non-polar. This is why oil and water famously refuse to mix without the help of an emulsifier.
Here is the inconvenient truth about your plastic food storage containers: they are derived from petroleum. Polypropylene, polyethylene, and polycarbonate are all essentially complex chains of hydrocarbons. Because plastics and edible oils are both non-polar, hydrocarbon-based substances, they possess a strong chemical affinity for one another. In scientific terms, plastic is highly lipophilic, which literally translates to “fat-loving”. When you pour a leftover olive oil dressing or a rich, buttery sauce into a plastic tub, the oils and the plastic practically want to elope. They bind together on a molecular level, creating a stubborn, hydrophobic (water-fearing) film that standard rinsing simply cannot penetrate.
The Lycopene Problem: The Red Ring of Death
If you have ever stored leftover spaghetti Bolognese or chicken tikka masala in a plastic container, you are intimately familiar with the “red ring of death”—that permanent orange-red stain that embeds itself into the plastic and refuses to leave. You can thank a specific molecule called lycopene for this phenomenon.
Lycopene is the naturally occurring pigment that gives tomatoes their bright red color. It is a highly potent antioxidant, but it is also fiercely hydrophobic and fiercely lipophilic. When you cook tomatoes down into a sauce, especially with olive oil or butter, the lycopene dissolves into the fats. When that fat-laden, lycopene-rich sauce makes contact with your lipophilic plastic container, the pigment is essentially given a VIP pass to bond directly with the polymer chains. Because lycopene repels water, trying to wash it out with a standard wet sponge is an exercise in futility. The water simply beads up and rolls off the pigment, leaving the stain intact.
The Microscopic Landscape of Your Containers
To the naked eye, a brand-new plastic container looks perfectly smooth. But under a microscope, the surface of that plastic is highly porous, resembling a rugged, lunar landscape filled with microscopic craters, ravines, and valleys.
When you put hot food into a plastic container, or worse, when you microwave food directly in the plastic, the heat causes the polymer chains to expand. Those microscopic pores open up, allowing the oils, fats, and lycopene pigments to seep deep into the structural matrix of the plastic. When the container eventually cools down in the refrigerator, the pores contract and close, physically trapping the grease and the stains inside the walls of the container. This is why a container can feel perfectly clean when it comes out of the dishwasher, but the moment you run your finger across it, it still feels inexplicably tacky. The grease isn’t just on the surface; it has become one with the plastic.
The Sassy Sous-Chef’s “No-Go” Rule: The Ugly Truth About Cheap Plastics
If you have read my previous rants on banishing toxic kitchen gear, you already know that I have a strict, non-negotiable “No-Go” rule when it comes to cheap, degrading kitchen equipment. I firmly believe that you do not need a culinary degree to cook like a pro, but you absolutely must respect your ingredients and your health by using safe tools. We need to have a very serious conversation about what happens when those cheap plastic containers start to break down.
The Illusion of “Microwave-Safe”
Let me be unequivocally clear: the label “microwave-safe” on the bottom of a plastic container is one of the most misleading marketing terms in the culinary world. When a manufacturer stamps “microwave-safe” on a product, it simply means that the plastic will not visibly melt, warp into a puddle, or catch fire when exposed to microwave radiation. It does absolutely nothing to guarantee that the plastic will not leach harmful chemicals or shed microscopic fragments into your food.
Recent scientific studies published in 2024 and 2025 have demonstrated that when plastic containers (even those made of supposedly “safe” polypropylene or polyethylene) are subjected to the extreme thermal stress of a microwave, they undergo accelerated degradation. This thermal cycling stresses the polymer bonds, causing them to fracture and release millions of microplastics and billions of nanoplastics directly into whatever you are about to eat. If your container is old, scratched, or has been subjected to repeated runs through the scorching heat of a dishwasher, the rate of this chemical leaching increases exponentially.
Endocrine Disruptors: BPA, BPS, and Phthalates
For decades, Bisphenol A (BPA) was the primary chemical used to harden plastics. After immense public backlash regarding its health risks, many companies, including Tupperware, officially phased out BPA around 2010. However, the industry’s solution was to quietly replace it with Bisphenol S (BPS), a chemical cousin that recent studies suggest is just as dangerous, demonstrating the exact same hormone-mimicking, estrogenic properties.
Furthermore, to make certain plastics flexible, manufacturers use a class of chemicals called phthalates. Phthalates are notorious endocrine disruptors. Because these chemicals are not strongly covalently bound to the polymer matrix of the plastic, they are highly prone to breaking free and migrating into your food. And remember our discussion about lipophilicity? Phthalates and bisphenols are highly lipophilic. This means that if you store fatty, oily, or highly acidic foods (like a rich beef stew or a citrusy marinade) in a plastic container, the fats actively pull the toxic plasticizers out of the container walls and into your dinner.
The Microplastic Migration
The degradation of cheap plastic doesn’t just stop at chemical leaching. As these containers age, they begin to shed physical microplastics. Every time you aggressively scrape the bottom of a plastic tub with a metal spoon, or aggressively scrub it with a highly abrasive scouring pad, you are carving microscopic trenches into the plastic. These trenches not only harbor dangerous bacteria (like E. coli and Salmonella) that can survive multiple dishwasher cycles, but they also compromise the structural integrity of the container, leading to the ingestion of plastic fragments.
My rule is simple: if your plastic container is warped, heavily stained, peeling, cracked, or feels permanently sticky no matter what you do, you must throw it away immediately. Do not keep it “just in case.” Do not use it to store dry goods. It is actively degrading, and it has no place in a home cook’s kitchen.
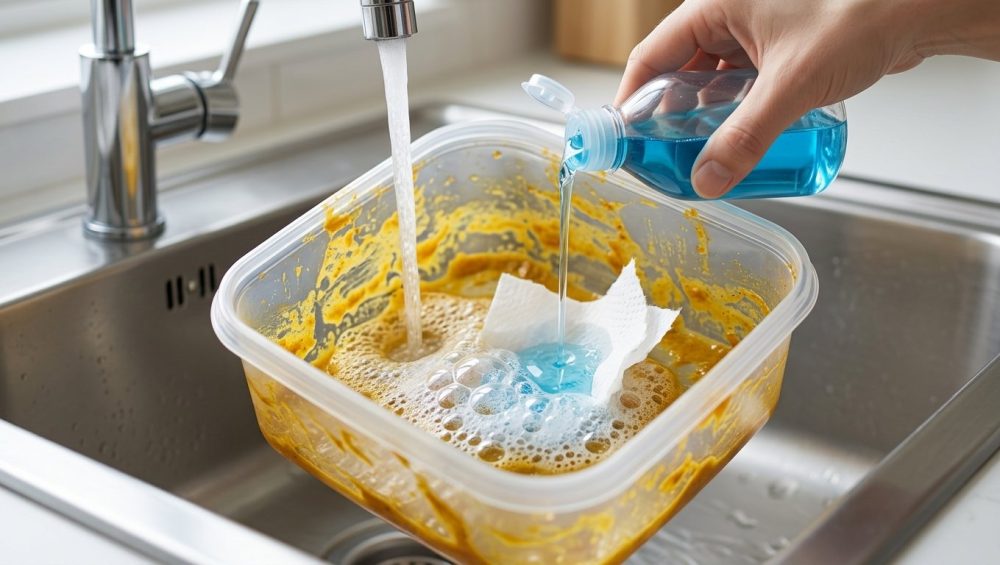
The Viral Paper Towel Trick: A Step-by-Step Masterclass
Now, for the high-quality, durable plastic containers that are still in pristine condition, how do we clean them without scratching them to death or wasting half a bottle of soap? Much like surviving kitchen disasters when a recipe goes sideways, handling this cleanup requires working smarter, not harder.
Enter the paper towel trick. This method has taken social media by storm, but unlike most internet fads, this one is backed by rigorous fluid dynamics and material science. It takes less than thirty seconds, requires zero aggressive scrubbing, and leaves your plastics squeaky clean.
What You Need
- The Greasy Container: Any plastic food storage tub suffering from an oily film or fresh tomato sauce stains.
- Warm Water: Temperature is key. You want it warm enough to loosen the fats, but not boiling hot (which would warp the plastic).
- High-Quality Dish Soap: Do not use weak, watered-down natural soaps for this. You need a robust, surfactant-heavy dish detergent (the classic blue Dawn is universally praised for a reason).
- One Paper Towel: A standard, 2-ply cellulose paper towel.
The Execution
- Do Not Rinse First: Resist the urge to hit the container with cold water, which will only cause the fats to congeal and harden against the plastic. If there are large, physical chunks of food left, scrape them out gently with a silicone spatula.
- Add the Soap and Water: Squeeze a generous squirt of dish soap directly into the greasy container. Fill the container about one-third to one-half of the way full with warm water from the tap.
- Deploy the Paper Towel: Take your single sheet of paper towel, tear it into two or three smaller pieces, and drop the dry pieces directly into the soapy water mixture.
- Seal the Hatch: Place the lid securely onto the container. Make sure it is snapped shut on all sides. You are about to create a high-velocity environment, and you do not want soapy tomato water painting your kitchen cabinets.
- Agitate: Shake the container vigorously for 15 to 30 seconds. Shake it up, down, and side to side. You want the soapy water and the paper towel pieces to violently slosh against every single interior surface, corner, and crevice.
- The Reveal: Open the lid over the sink. Dump the sudsy, dirty water and the sodden paper towel directly into the trash (or a compost bin, if your local facilities accept grease-soaked paper).
- Rinse: Give the container a quick rinse with clean, warm water.
Run your thumb across the inside of the plastic. It will squeak. The greasy film will be entirely gone, and the stubborn red stains will have vanished (or at least significantly faded, depending on how old they are). When you finally master simple weeknight dinners, the cleanup shouldn’t take longer than the cooking. This trick ensures that it doesn’t.
The Chemistry of the Clean: Why This Hack Actually Works
Why does a torn-up piece of paper and a little bit of shaking achieve what ten minutes of aggressive sponge-scrubbing cannot? It comes down to a perfect storm of chemical surfactants, mechanical isolation, and capillary action. Just like when you finally stopped burning dinner every night by learning heat control, learning the chemistry of soap will change your life.
Surfactants: The Magic of Dish Soap
Water alone cannot clean grease because of high surface tension; the water molecules are so strongly attracted to each other that they refuse to interact with the non-polar oil. Dish soap is a surfactant (surface-active agent). A soap molecule is uniquely shaped like a tiny tadpole. It has a hydrophilic (water-loving) head and a hydrophobic, lipophilic (fat-loving) tail.
When you add soap to the greasy container, the fat-loving tails of the soap molecules immediately dive into the layers of oil and lycopene stuck to the plastic. Meanwhile, the water-loving heads remain pointed outward, gripping the warm water. This action shatters the surface tension of the water and rips the grease away from the plastic walls, encapsulating the oil into tiny, suspended microscopic spheres called micelles.
Mechanical Agitation: Why Shaking Beats Scrubbing
If soap does all that work, why do we need to shake it? When you use a sponge, you are applying localized pressure to one specific area at a time. Furthermore, a sponge often just pushes the emulsified grease around the surface of the plastic, rather than lifting it away.
When you seal the container and shake it vigorously, you are applying intense, multi-directional shear force. The violent agitation forces the soapy water into every single microscopic pore, scratch, and corner of the plastic. The kinetic energy of the shaking physically dislodges the deeply embedded lycopene and fat molecules much more effectively than the slow, dragging motion of a sponge.
Capillary Action: The Heroic Role of Cellulose
The true hero of this hack, however, is the paper towel. Paper towels are made of cellulose fibers, which form a highly porous, interstitial structure. As you shake the container, the paper towel acts as a mobile, highly absorbent agitator.
While the dish soap lifts the grease off the plastic, the paper towel actively absorbs it. Through a physics principle known as capillary action, the liquid and the suspended oils are drawn deep into the microscopic pores of the paper towel. Because the paper towel is infinitely more porous and absorbent than the plastic walls of the container, the grease happily transfers from the plastic to the paper. The paper towel traps the mess, preventing the oil from simply re-depositing onto the plastic when the shaking stops.
Why Your Sponge is Sabotaging You
We need to talk about your kitchen sponge. Sponges are phenomenal tools for certain tasks, but they are the absolute worst enemy of plastic food storage. A standard kitchen sponge is a bacterial nightmare, capable of retaining hundreds of millions of colony-forming units of bacteria per cubic centimeter.
When you use a wet sponge to wipe out a greasy plastic container, the sponge quickly becomes saturated with the oil. Because the sponge lacks the rapid, single-use absorbency of dry cellulose, it ends up acting like a paintbrush, smearing a thin, invisible layer of grease and biofilm across the entire container—especially into the threaded grooves near the lid. This is the primary vector for cross-contamination in the home kitchen. The paper towel hack eliminates the sponge entirely, ensuring that the grease is absorbed, trapped, and thrown directly into the garbage.
Stop Making It Worse: How to Properly Handle Your Remaining Plastics
A major part of breaking your takeout habit is learning how to efficiently store your leftovers so they actually taste good the next day. If you want to prolong the life of the safe, high-quality plastic containers you currently own, you need to change the way you interact with them.
Temperature Control is Everything
As we discussed earlier, heat is the enemy of plastic. You must never, under any circumstances, place piping hot food directly from the stove into a plastic container. Let your soups, stews, and sauces cool down to room temperature in the pot or in a glass bowl before transferring them to plastic for refrigeration.
More importantly, banish the habit of reheating food in plastic. When you want to eat yesterday’s chili, take the extra thirty seconds to transfer it to a ceramic plate or a glass bowl before putting it in the microwave. Keeping your plastics away from thermal shock will prevent the polymer pores from expanding, keeping stains out and preventing chemical degradation.
The Pre-Grease Barrier Trick
If you know you are going to be storing a highly staining, lipophilic food—like a rich curry or a heavy tomato ragù—you can create a physical barrier before the food ever touches the plastic. Take a paper towel, dab it with a tiny drop of neutral cooking oil (like canola or avocado oil), and lightly wipe the inside of the clean container. Alternatively, give it a microscopic spritz of non-stick cooking spray. This creates a sacrificial lipid layer. The lycopene and fats in the food will bind to this thin layer of oil rather than seeking out the porous plastic walls. When you go to wash the container using the paper towel hack, the sacrificial oil layer washes away effortlessly, taking the stains with it.
Dishwasher Dynamics
If you are going to put plastic in the dishwasher, it belongs strictly on the top rack. The heating element in a standard dishwasher is located at the very bottom of the machine. Placing plastic on the bottom rack exposes it to intense, direct radiant heat during the drying cycle, which will inevitably cause warping, crazing (microscopic cracking), and chemical leaching.
The Ultimate Upgrade: Transitioning to Lifetime Storage Solutions
When we talk about the essential tools every beginner needs, high-quality food storage is right at the top of the list. While the paper towel trick is a lifesaver for the plastics you currently own, your long-term goal should be to slowly phase out plastic food storage entirely. Investing in non-reactive, non-porous materials will save you money, protect your health, and completely eliminate the headache of greasy residue.
Borosilicate Glass: The Gold Standard
Glass is the undisputed king of the kitchen. Specifically, you should look for containers made from tempered borosilicate glass. Unlike plastic, glass is completely non-porous and lipophobic (fat-fearing). It will never absorb odors, it will never stain, and it will never leach endocrine disruptors into your food. You can pour boiling hot soup into a glass container, freeze it, and then microwave it without a single worry. When it comes time to clean it, grease slides off glass with nothing more than a gentle wipe of a soapy sponge.
Stainless Steel: The Indestructible Option
For cold storage, meal prepping, and packed lunches, food-grade stainless steel is an incredible option. It is lightweight, completely indestructible, and visually sleek. Like glass, it is non-porous and will not hold onto oils or lycopene stains. The only drawback is that stainless steel cannot be microwaved, so it is best reserved for foods that will be eaten cold or transferred to a plate later.
High-Grade Silicone: The Flexible Compromise
If you need something lightweight and flexible (like for freezing liquids or packing snacks), platinum-grade food silicone is a phenomenal alternative to petroleum-based plastics. Silicone is incredibly heat-resistant and does not contain BPA, BPS, or phthalates. While silicone can occasionally hold onto the scent of strong dish soaps if washed improperly, it does not permanently bond with grease the way cheap Tupperware does.
Conclusion
One of the true secrets for kitchen artistry is treating your ingredients—and the vessels that hold them—with respect. Cooking should be an empowering, joyful experience, not a chore that ends in a deeply frustrating, knuckle-scraping battle at the kitchen sink.
By understanding the basic material science of lipophilic polymers and harnessing the chemical power of surfactants and capillary action, you can reclaim your time and your sanity. Throw away the warped, toxic, peeling tubs of the past. Protect your health, upgrade to glass where you can, and for the plastics that remain, let the paper towel trick do the heavy lifting. Mastering the art of effortless hosting means you shouldn’t be scrubbing plastic tubs at midnight. Pour out the suds, toss the paper towel, and get back to enjoying the food you worked so hard to create.


