
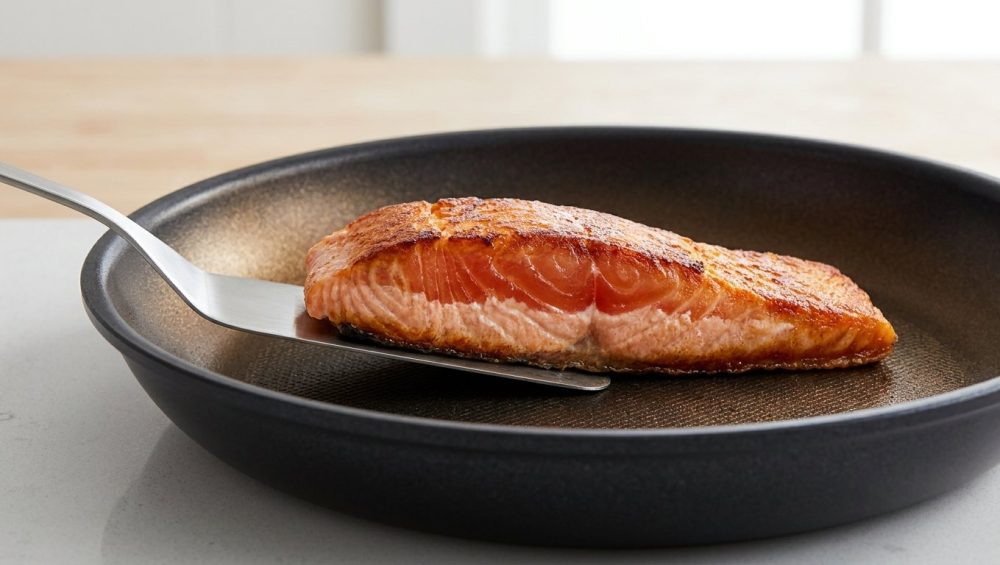
Listen Up, We Need to Talk About Your Mangled Fish
Listen, I love you, but we need to have a serious, closed-door intervention about what is happening on your stove. I know the story all too well because I have lived it. You go to the seafood counter, you spend a small fortune on a beautiful, pristine, wild-caught fillet of halibut or king salmon. You bring it home, pour yourself a glass of wine, and envision a restaurant-quality dinner. You place it in the pan, and ten minutes later, you are aggressively scraping a mangled, shredded, tragic pile of fish-mush onto a plate while fighting back tears of frustration. It looks like it was attacked by a feral raccoon, and you are ready to swear off cooking seafood forever and order takeout.
Stop panicking. Take a deep breath. It is not your fault, and you absolutely do not need a culinary degree to fix this. You do not lack talent; you simply lack an understanding of thermodynamics and protein structures. Cooking fish is not an art reserved for pretentious chefs in Michelin-starred kitchens—it is a science. And like any science, once you understand the underlying rules, you can manipulate them to your advantage.
As a home cook who has set off the smoke detector more times than I care to admit, I have done the grueling trial and error for you. We are going to break down exactly why delicate fish proteins act like superglue in a skillet, how to manipulate heat to create a flawless, golden crust, and the precise visual cues that tell you exactly when to flip. Grab your spatula, because we are turning your weeknight seafood disasters into absolute perfection.
The Science of the Stick: Why Fish Hates You
Let’s get nerdy for a second, because understanding the chemistry of your food is the only way to genuinely master it. If you want to know why fish behaves like a clingy, desperate ex when it hits a hot pan, you have to look at its biological makeup.
Fish are fundamentally different from land animals. A cow spends its life walking around, fighting gravity. Its muscles are tough, and its connective tissue (collagen) is incredibly thick, requiring prolonged, intense heat—usually upwards of 160°F—to melt down into tender gelatin. Fish, on the other hand, float effortlessly in a buoyant, often freezing aquatic environment. They do not need heavy-duty connective tissue to hold themselves together. Their muscles are arranged in distinct, flaky sheets called myotomes, which are held together by an incredibly delicate, thin network of connective tissue called myocommata.
When you apply heat to a fish fillet, that delicate marine collagen begins to melt at remarkably low temperatures—often between 100°F and 120°F. This low melting point is exactly why perfectly cooked fish flakes apart so beautifully on your fork. However, this same delicate structural integrity is exactly why it is so prone to absolute disaster in the skillet.
As the raw fish hits the hot metal, the proteins in the muscle fibers (specifically a protein called myosin) undergo a violent chemical reaction. If the conditions in the pan aren’t absolutely perfect, the sulfur atoms in the fish proteins will literally form strong, unbreakable chemical bonds with the metal atoms in your cookware. The fish essentially fuses itself to the pan at a molecular level. When you try to force a spatula under it, the delicate myocommata connective tissue gives way long before the myosin-metal bond does, tearing the fillet to shreds. To prevent protein adhesion, you must create an impenetrable thermal barrier between the fish and the metal before those bonds can ever form.
Banish the Toxic Garbage: A Rant on Cookware
I am looking directly at you, cheap, scratched-up non-stick skillet. We have talked about this before, and I have zero patience for it. I have a strict, non-negotiable rule in my kitchen: absolutely no toxic kitchen gear. Those flimsy, bargain-bin pans with peeling Teflon coatings are not doing you any favors.
First of all, when that chemical coating begins to scratch and flake, it is leaching mystery compounds directly into your beautifully sourced, expensive seafood. Second, non-stick pans are a culinary crutch that ultimately fails you. They are physically incapable of achieving the kind of hard, aggressive, golden-brown sear that makes restaurant fish so spectacular. Traditional non-stick coatings degrade and off-gas under high heat, which means you are forced to cook your fish over a tepid, medium-low flame that steams the flesh rather than searing it.
You need to graduate to the big leagues. I am talking about high-quality, heavy-bottomed tri-ply stainless steel, well-seasoned carbon steel, or enameled cast iron. I can already hear you panicking through the screen: “But Sassy Sous-Chef, stainless steel is a nightmare! Everything sticks to it!” No, my friend, everything sticks to it because you are using it wrong. Stainless steel is a precision instrument. When you understand how to control thermal dynamics, you can make your actually non-stick without relying on fragile, toxic chemical coatings.
The Leidenfrost Effect: Your New Best Friend
Enter Johann Gottlob Leidenfrost, an 18th-century German doctor who is about to save your weeknight dinners. The Leidenfrost effect is a physical phenomenon that occurs when a liquid comes into contact with a mass that is significantly hotter than the liquid’s boiling point.
When your stainless steel or carbon steel pan reaches the optimal temperature—right around 437°F or 225°C—the moisture on the surface of your food instantly vaporizes the millisecond it touches the metal. This rapid vaporization creates a microscopic, highly pressurized, insulating cushion of steam. Your fish is literally levitating on a cloud of its own vapor, preventing the sticky myosin proteins from ever making physical contact with the microscopic pores of the hot steel.
How do you know when your pan has reached this magical state of culinary levitation? You don’t need a laser thermometer; you just need to perform the water drop test. You heat your completely dry pan over medium heat. After a few minutes, you wet your fingers and flick a tiny drop of water into the skillet.
- If the water just sits there and slowly bubbles away, the pan is too cold. The fish will stick.
- If the water shatters into a million tiny, aggressive droplets that instantly vanish in a puff of smoke, the pan is too hot. Your cooking oil will instantly burn and polymerize into a sticky mess.
- But if that water droplet forms a perfect, cohesive bead of liquid mercury that dances and glides frictionlessly across the surface of the pan, congratulations. You have achieved the Leidenfrost effect. Wipe the water out, add your oil, and you are ready to cook.
Prep Work: The Difference Between Perfection and Catastrophe
I am a massive advocate for ruthless efficiency on weeknights, because time is money and nobody wants to spend three hours cooking after a long day at the office. But skipping your prep work is exactly how you end up eating a ruined, stressful dinner over the sink. Having a few essential kitchen tools and employing proper techniques before that fish ever sees the stove will dictate your success.
Moisture is the Enemy of the Sear
The Maillard reaction is the complex chemical process between amino acids and reducing sugars that creates that gorgeous, savory, golden-brown crust on seared food. However, the Maillard reaction cannot occur in the presence of water. If your fish is wet when it hits the pan, the heat of the skillet has to expend all its energy boiling off that surface water before it can even begin to sear the flesh. By the time the water is finally gone, the inside of your fish is hopelessly overcooked, dry, and chalky. You must thoroughly pat your fillets aggressively dry with paper towels.
The Magic of Dry Brining
If you have an extra 20 minutes, you need to dry brine your fish. Generously salt your fillets and let them sit on a wire rack in the fridge. The salt will initially draw moisture to the surface of the fish. But given a little time, the salt will dissolve into that moisture and be reabsorbed deep into the muscle fibers, seasoning the fish all the way through. Right before cooking, take the fish out and pat it dry one last time to remove any residual surface moisture.
Tempering Your Fish
Never throw a fridge-cold piece of fish into a hot pan. The drastic temperature difference will instantly crash the heat of your skillet, destroying your carefully cultivated Leidenfrost effect and causing the fish to stick. Let your fillets sit at room temperature for 15 to 20 minutes before cooking.
Respect Your Cutting Boards
Stop using the wrong surfaces for your prep work. I see so many home cooks slicing lemons, mincing herbs, and portioning delicate fillets on hard bamboo boards, entirely unaware that the dense, glue-filled material is slowly ruining your knives. Use a proper edge-grain wooden board or a high-quality, non-porous plastic board that you can easily sanitize after handling raw seafood.
The “Oozing White Stuff” Phenomenon
We need to talk about the elephant in the room, or rather, the weird, unappetizing white goo on your salmon. You know exactly what I mean. You bake or sear a beautiful piece of salmon, and suddenly it oozes white stuff from between the muscle flakes. It looks like toothpaste, it is visually repulsive, and it makes you feel like you have ruined the dish.
That white substance is called albumin. It is a liquid protein that naturally exists in the muscle fibers of all fish, regardless of whether it is an expensive wild-caught Pacific king salmon or a budget-friendly farm-raised Atlantic fillet. When the fish is raw, the albumin is completely invisible and liquid. But as the fish cooks, the heat causes the muscle fibers to violently contract. This contraction acts exactly like a wet sponge being wrung out by a giant hand, squeezing the liquid albumin out of the cells and pushing it to the surface of the fish. Once it hits the heat of the pan or the ambient heat of the oven, the protein coagulates, solidifies, and turns stark white.
Let me be clear: albumin is completely safe to eat, and it has virtually no taste. But we eat with our eyes first, and it ruins the aesthetic of your hard work. So, how do we stop it?
The answer lies in temperature control and chemistry. The more aggressively the muscle fibers contract, the more albumin is squeezed out. If you blast your fish with uncontrolled, screaming high heat from start to finish, or if you leave it in the pan too long and overcook it, you are going to get a massive albumin blowout.
You can actively mitigate this by utilizing the brining technique we discussed earlier. A quick 15-minute wet brine (a solution of water and salt) or a dry brine works absolute wonders. The salt partially dissolves the muscle fibers near the surface of the flesh. Because these specific fibers are broken down, they congeal during the cooking process without aggressively contracting, meaning they don’t squeeze the albumin out. Combine a good brine with gentle, controlled cooking temperatures (searing the presentation side and then lowering the heat to finish), and you will banish the white goo forever.
The Masterclass Cook: Step-by-Step Execution
You have the right pan. You understand the science. Your fish is dry and tempered. It is time to execute. This is where weekend hobbyists usually panic, but you are going to follow these steps with cold, calculated precision.
Step 1: The Preheat and the Oil
Heat your dry pan over medium heat until it passes the water drop test. Once the pan is ready, pour in a generous glug of cooking oil. You must use an oil with a high smoke point—avocado oil, grapeseed oil, or clarified butter (ghee). Do not use extra virgin olive oil; it will burn, smoke out your kitchen, and make your fish taste like bitter ash. Swirl the oil so it coats the entire bottom of the pan. You want a shimmering, rippling pool of fat.
Step 2: The Lay Down
Gently lay the fish into the pan, laying it away from your body. If you drop it toward yourself, the hot oil will splash back and burn your forearms. As soon as the fish hits the pan, it is going to sizzle aggressively.
Step 3: The Press
Fish skin and surface proteins shrink rapidly when they hit intense heat, which causes the fillet to curl up at the edges. If the fish curls, only the very center will touch the pan, resulting in an uneven sear. Take your spatula and gently, but firmly, press the fish flat against the pan for the first 10 to 15 seconds of the cook. Once the proteins set, the fish will relax and stay flat.
Step 4: Walk Away (Seriously, Do Not Touch It)
This is the hardest part for any home cook. Your anxiety is going to scream at you to poke it, nudge it, or lift the edge to check the color. Do not touch it. If you try to move the fish before the Maillard crust has fully formed, you will tear the flesh. Let the heat do its job. The fish will naturally release its grip on the pan the exact second the crust is perfectly formed.
Step 5: The Visual Cues for Flipping
Stop staring at the bottom of the pan and look at the side of the fillet. As the fish cooks, you will see the color change from translucent and raw to opaque and pale, and this color change will slowly creep up the side of the fish. When the opaque color has moved about two-thirds of the way up the fillet, it is time to flip.
Step 6: The Flip
When it is finally time to turn the fillet, you must use the correct tool. Do not come at this delicate operation with a clunky wooden spoon, a pair of aggressive metal tongs, or a thick plastic pancake flipper. You need a flexible, slotted fish turner. The thin, razor-sharp, beveled edge of a metal fish spatula is specifically designed to slide seamlessly under the delicate crust without tearing it. The slots allow excess hot oil to drain away so you don’t splash yourself. Slide the spatula under the fish with confidence and authority. If you hesitate or wiggle it, you will break the crust. Flip it gently, kiss the other side with heat for just a minute or two, and remove it from the pan.
The Cold Pan Method: A Weeknight Cheat Code
Now, I know I just spent three thousand words lecturing you about the Leidenfrost effect and the absolute, undeniable necessity of a pre-heated pan. And for skinless fillets, white fish like cod or halibut, or scallops, that hot-pan method is the undisputed gospel truth.
But I am also a realist who survives busy weekdays by finding brilliant, scientifically sound shortcuts. If you are cooking a fillet with the skin on—particularly a fatty fish like salmon—there is a completely different technique that will blow your mind and save you a massive amount of stress. It is called the cold pan trick.
Here is how it works: You take your cold, dry, seasoned salmon fillet and place it skin-side down in a completely cold, unheated pan (a high-quality non-stick or carbon steel works best here). You turn the burner on to medium-high heat. As the pan slowly comes up to temperature, the thick layer of subcutaneous fat located just under the salmon’s skin begins to slowly render out.
Instead of aggressively shocking the skin and causing it to seize and curl, the slow application of heat gently fries the skin in its own natural, highly flavorful fat. By the time the pan is fully hot, the skin is shatteringly crisp—like a potato chip—and the fish has gently cooked almost all the way through without ever squeezing out a drop of albumin. You simply give it a 30-second flip at the very end to finish the top, and you are done. It is a foolproof, zero-stress method for perfect weeknight salmon.
Troubleshooting Your Fish Fails
Even with the best instructions, things can go sideways in the kitchen. When they do, you need to know how to diagnose the problem so you never make the same mistake twice. Let’s run through the most common rookie disasters and how to fix them.
“My fish is incredibly dry and chalky!”
You overcooked it, plain and simple. Fish continues to cook even after you take it out of the pan—a phenomenon known as carryover cooking. The residual heat trapped inside the fillet will raise the internal temperature by another 5 to 10 degrees while it rests on the plate. If you leave the fish in the skillet until it looks 100% cooked all the way through the center, it will be hopelessly overcooked by the time you sit down to eat. You must pull the fish off the heat when the very center is still slightly translucent. It will finish cooking perfectly on the plate.
“My pan sauce or glaze tastes like last night’s dinner!”
Cross-contamination of flavors is a classic rookie mistake that ruins perfectly good seafood. Fish has a highly absorbent, delicate flavor profile. If you are brushing your finished fillet with a delicate miso glaze or a bright citrus reduction at the end of the cook, make sure your tools aren’t harboring ghost flavors from past meals. If your fish tastes weirdly pungent, make sure you are using an odor-free silicone basting brush or spatula that hasn’t permanently absorbed the garlic and onion oils from yesterday’s heavy stir-fry.
“The skin is rubbery and chewy instead of crispy!”
You committed one of two sins: you either didn’t dry the skin thoroughly enough before cooking, or your pan wasn’t hot enough. If there is moisture on the skin, it steams instead of frying. If the oil isn’t hot enough, the skin absorbs the fat and becomes soggy rather than rendering its own fat and crisping up. Dry the fish, heat the oil until it shimmers, and press the fillet flat.
“It still stuck to my stainless steel pan and ripped in half!”
You panicked. You either didn’t wait for the pan to get hot enough to achieve the Leidenfrost effect, you didn’t use enough oil to create a secondary barrier, or—most likely—you tried to flip the fish before it was ready. When the Maillard crust is fully formed, the fish will naturally release itself from the metal. If you feel resistance when you slide your spatula under the edge, stop immediately. Walk away, drink some wine, and give it another 30 to 45 seconds. Patience is the ultimate non-stick coating.
The Final Word
Cooking professional-quality fish at home is not a dark art, and it does not require a brigade of sous-chefs or a pantry full of expensive gadgets. It requires a fundamental respect for the ingredients, a basic understanding of how proteins react to heat, and the confidence to leave the food alone while the pan does the heavy lifting.
You are entirely capable of making mind-blowing, perfectly seared, intact fillets in your own kitchen. Banish the cheap toxic pans, embrace the science of the sear, dry your fillets like your life depends on it, and trust the process. Now, go buy a beautiful piece of fish, get that skillet screaming hot, and show your dinner who is absolutely in charge.






