The Great Stainless Steel Sticking Epidemic
Picture this: It is a Tuesday night. You are exhausted, starving, and just trying to get a decent meal on the table. You’ve invested in a gorgeous, gleaming, heavy-bottomed stainless steel skillet because you watched a cooking show over the weekend and decided it was time to cook like a sophisticated adult. You heat the pan, drop in a beautifully seasoned, expensive chicken breast, and hear that satisfying sizzle. You feel like a culinary genius.
Two minutes later, you try to flip it. The chicken refuses to budge. You push harder with your spatula. You scrape. You pry. Panic sets in. By the time you finally wrestle the meat off the metal, you have violently ripped the golden crust off the chicken, leaving a shredded, mangled mess of white meat and a pan coated in burnt, impenetrable cement.
Sound familiar? Welcome to the club.
Listen, your pan is not cursed, and you are not a bad cook. You are simply fighting a battle against physics and chemistry without knowing the rules of engagement. The sheer frustration of food bonding to metal is the exact reason millions of home cooks give up on high-quality cookware and retreat to the false comfort of cheap, fragile, chemical-laden nonstick skillets. But I am here to tell you that you do not need a culinary degree to cook like an expert. You just need a little bit of patience and a basic understanding of thermodynamics.
The secret to flawlessly seared steaks, perfectly gliding eggs, and golden-crusted fish lies in a simple, foolproof technique. Once you understand the magic of the water drop test, you will unlock the natural nonstick capabilities of bare metal. We are going to break down exactly why your food is supergluing itself to your cookware, the microscopic science of heat management, and how to master your kitchen equipment so you never have to aggressively scrub a ruined skillet again.
Why Your Meat is Supergluing Itself to the Pan (The Science)
If you want to stop destroying your dinner, you need to understand what is actually happening on a molecular level when cold food meets hot metal. It is not bad luck; it is a chemical romance gone horribly wrong.
The Microscopic Potholes in Your Cookware
To the naked eye, your brand-new stainless steel skillet looks perfectly smooth, like a mirror. But if you were to look at that exact same surface under a high-powered electron microscope, you would see a jagged, chaotic landscape. Bare metal is riddled with microscopic pores, scratches, hills, valleys, and imperfections.
When your pan is cold or inadequately heated, this jagged landscape is static. If you pour cold cooking oil into a cold pan and drop your food in, that liquid fat just sits there, sluggish and thick. The raw food sinks straight through the oil, seeping into every single microscopic pothole and crevice in the metal. As the pan slowly heats up, the metal undergoes thermal expansion. Those microscopic pores actually shift, pinch, and bite down on the food that has seeped into them. You have literally locked your dinner into a microscopic vice grip.
Conversely, when you properly preheat the dry metal before adding your cooking fat, thermal expansion happens first. The metal expands, the surface tension changes, and when you finally add your oil, the fat hits the hot surface and its viscosity plummets. The hot oil instantly thins out, flowing like water to fill in all those microscopic valleys, creating a perfectly smooth, temporary nonstick bridge between the jagged metal and your food.
The Protein-Metal Chemical Romance
While the microscopic potholes explain the mechanical sticking, there is a much more sinister chemical reaction happening, particularly when you are cooking proteins. There is a reason why a piece of salmon will bond to a cold pan with the strength of industrial adhesive, while a handful of chopped bell peppers will just kind of sit there and sweat.
Proteins—whether in beef, poultry, fish, or eggs—are complex molecules made up of long chains of amino acids. When these proteins are exposed to heat, they denature. Their intricate three-dimensional structures unwind, exposing highly reactive amino and carboxylate side chains. Stainless steel is an alloy primarily made of iron, chromium, and nickel.
When denatured proteins come into direct contact with bare, inadequately heated metal, those exposed amino side chains chemically bond with the iron atoms in the pan. They form covalent bonds and strong van der Waals forces. Your chicken breast isn’t just physically stuck in a pothole; it has chemically fused with the skillet. The only way to break that bond is by violently tearing the meat apart with a spatula.
Enter the Leidenfrost Effect: Your Kitchen’s Best Kept Secret
So, how do we stop this chemical fusion from happening? We rely on a brilliant piece of physics discovered in 1756 by a German doctor named Johann Gottlob Leidenfrost.
What the Heck is the Leidenfrost Effect?
The Leidenfrost effect is a physical phenomenon that occurs when a liquid comes into contact with a surface that is significantly hotter than the liquid’s boiling point. Instead of immediately boiling away and evaporating, the very bottom layer of the liquid instantly vaporizes into steam. This sudden burst of steam creates a microscopic, insulating vapor barrier between the hot surface and the rest of the liquid. The liquid droplet literally levitates on its own steam cushion, gliding frictionlessly across the metal.
How does this apply to your Tuesday night pork chops? All raw food contains moisture. When you place a piece of meat into a properly heated stainless steel pan, the moisture on the surface of the meat instantly vaporizes upon contact. That micro-layer of steam acts as an invisible shield, physically lifting the protein mere nanometers away from the iron atoms in the metal. This vapor barrier is the absolute key to preventing protein adhesion when you are cooking. The meat sears and browns beautifully via the Maillard reaction, but it never actually touches the bare metal long enough to form those disastrous chemical bonds.
The Temperature Sweet Spot
The Leidenfrost effect is not magic; it is precise temperature management. Water boils at 212°F (100°C). However, the Leidenfrost point—the exact temperature where the vapor barrier forms reliably on stainless steel—typically occurs around 379°F (193°C).
If your pan is below this temperature, the moisture in your food will simply boil, the steam will escape, and the proteins will violently bond to the iron. If your pan is drastically above this temperature (say, 500°F), you will burn your cooking oil, instantly scorch the outside of your food while leaving the inside raw, and fill your kitchen with acrid, choking smoke.
The culinary sweet spot for perfectly searing proteins on stainless steel lies right in that 350°F to 380°F window. You want the pan just hot enough to trigger the Leidenfrost vapor barrier, but not so hot that you polymerize your cooking fats into a sticky, impossible-to-clean resin.
The Magic of the Water Drop Test: A Step-by-Step Masterclass
You do not need a fancy infrared laser thermometer to find this exact temperature sweet spot. You just need a teaspoon of tap water and a little bit of patience. Here is the definitive, foolproof method for making bare stainless steel perform like a nonstick pan.
Step 1: The Naked Heat
Place your completely clean, bone-dry stainless steel skillet on the stove. Turn the burner to medium or medium-low. Do not blast the burner on high heat. Stainless steel is incredibly durable, but rapidly blasting a cold pan with maximum heat can cause thermal shock, warping the metal so it never sits flat on your stove again. We want a gentle, even, gradual preheat. Let the pan sit naked over the heat for about two to three minutes.
Step 2: The Flick and Observe
After a few minutes, wet your fingers under the kitchen sink and flick a few drops of water into the center of the dry pan. You are looking for one of three distinct reactions:
Reaction A: The Sad Sizzle. If the water drops hit the pan, sizzle aggressively, and immediately evaporate into nothing, your pan is too cold. The Leidenfrost point has not been reached. If you put food in now, it will stick. Wipe the pan dry and wait another minute.
Reaction B: The Angry Splatter. If the water drops hit the pan and violently explode into dozens of tiny, angry micro-beads that spit everywhere, your pan is too hot. You have overshot the sweet spot. Take the pan off the heat for thirty seconds to let it cool down before trying again.
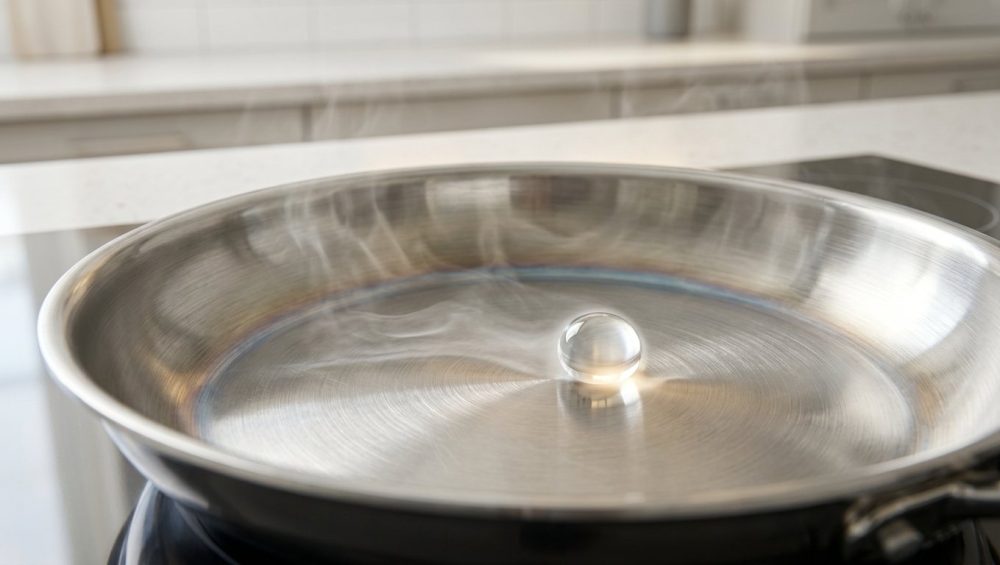
Reaction C: The Mercury Ball. This is what we are looking for. When the pan is perfectly heated, the water drops will hit the metal, merge together, and form a perfect, cohesive, shimmering bead that looks exactly like liquid mercury. This bead will dance and glide effortlessly around the pan without evaporating. Congratulations, you have achieved the Leidenfrost effect.
Step 3: Adding the Fat
Once you see the dancing mercury ball, take a paper towel and quickly wipe the water out of the pan (do not leave the water in there, or your oil will violently splatter). Now, and only now, do you add your cooking fat.
Pour in a tablespoon of high-smoke-point oil (like avocado, grapeseed, or clarified butter). Remember the golden rule: Hot pan, cold oil, food won’t stick. Because the pan is already at the perfect temperature, the oil will instantly shimmer and thin out, rushing to fill in all those microscopic, thermally-expanded valleys in the metal.
A quick warning: Stop using aerosol cooking sprays. Those spray cans are loaded with soy lecithin and chemical propellants that burn at low temperatures. You might think you are saving calories, but you are actively ruining your nonstick pans and permanently staining your stainless steel with baked-on, polymerized aerosol gunk. Use real, liquid oil.
Step 4: The Sizzle and The Wait
Immediately after the oil shimmers, gently lay your protein into the pan, laying it away from you so the oil doesn’t splash back onto your hands. You should hear a loud, aggressive, continuous sizzle.
Now comes the hardest part for most home cooks: Take a massive step back and do absolutely nothing. Do not poke it. Do not prod it. Do not try to lift the edge to see how it looks. Leave it alone. Let the Leidenfrost steam barrier and the Maillard reaction do their jobs. The heat is rapidly dehydrating the surface of the meat, creating a complex, flavorful, golden-brown crust.
The “No-Go” Rule: Why We Are Ditching Toxic Non-Stick Forever
At this point, you might be thinking, “This water drop stuff sounds like a lot of effort. Why don’t I just buy a cheap Teflon pan and call it a day?” Because I have a strict, non-negotiable rule against cheap, toxic kitchenware, and it is time for some tough love.
The Dark Side of Convenience
Traditional nonstick cookware is coated with polytetrafluoroethylene (PTFE), which belongs to a massive family of synthetic chemicals known as PFAS (per- and polyfluoroalkyl substances). These are widely referred to as “forever chemicals” because they simply do not break down in the environment or in the human body.
We are not dealing with abstract, decades-old fears here. The regulatory landscape has shifted massively. As of 2025 and 2026, the data against PFAS is so overwhelming that major governments are stepping in. Minnesota’s groundbreaking Amara’s Law went into effect, aggressively banning intentionally added PFAS in cookware. California’s AB 1200 has forced manufacturers to disclose the toxic chemicals in their pan coatings, and the European Union’s REACH framework is actively enforcing strict PFAS restrictions across the entire continent in 2026.
When you heat a traditional nonstick pan past 500°F (which is incredibly easy to do if you leave an empty pan on a hot burner for just a few minutes), the PTFE coating begins to break down and off-gas toxic fumes. When you inevitably scratch that cheap coating with a metal whisk or a fork, those forever chemicals flake off directly into your scrambled eggs. I am a fierce advocate for banishing toxic kitchen gear from your home entirely. The convenience of easy egg-flipping is not worth the environmental and biological toll.
The Financial Black Hole of Cheap Pans
Beyond the health hazards, cheap nonstick pans are a financial scam. No matter how delicately you treat them, no matter how carefully you hand-wash them with soft sponges, the nonstick coating will inevitably degrade, scratch, and lose its slip within 12 to 18 months. You are trapped in an endless subscription service of buying a $30 pan, throwing it in a landfill a year later, and buying another one.
A high-quality, fully-clad stainless steel skillet might cost you $100 upfront, but it is practically indestructible. You can drop it, scrub it with steel wool, scorch it, and it will still outlive you. You will pass it down to your grandchildren. Mastering the water drop test frees you from the nonstick financial trap forever.
Weeknight Efficiency: Mastering Stainless Steel When You’re Starving
I know what you are thinking. “I work a nine-to-five. I have screaming kids. I do not have time to stand around flicking water at a pan like a mad scientist.” I completely agree. Time is money, and efficiency is everything.
Time is Money: Preheating Shortcuts
When you are trying to whip up simple weeknight dinners after a long day, you need to multitask safely. The beauty of stainless steel is that it actually requires a slow, gentle preheat.
The very first thing you should do when you walk into the kitchen is put your dry skillet on the stove over medium-low heat. Then, ignore it. Go chop your onions, mince your garlic, open your mail, or pour yourself a glass of wine. By the time you have spent four or five minutes prepping your ingredients, the pan will be perfectly heated. Do a quick water drop test to confirm, wipe it, add your oil, and you are ready to cook immediately. You haven’t wasted a single second of active time.
The Cold Food Trap
There is one massive weeknight mistake that will ruin the water drop test every single time: the cold food trap.
If you take a massive, fridge-cold, soaking wet chicken breast straight from the grocery store packaging and drop it into your perfectly heated pan, you will instantly kill the Leidenfrost effect. That block of cold, wet mass will plunge the surface temperature of the metal by 50 degrees in a matter of seconds. The vapor barrier will collapse, the pan will drop below the sweet spot, the meat will chemically bond to the iron, and you will be left frustrated, wondering why your chicken won’t brown.
To fix this, you must aggressively manage moisture. Always, always thoroughly pat your proteins completely dry with paper towels before they go near the stove. Surface moisture is the enemy of a good sear. If you have the time, pull your meat out of the fridge 15 minutes before cooking to take the aggressive chill off. Dry, room-temperature meat guarantees that your pan retains its heat and the nonstick magic works flawlessly.
Troubleshooting the Tear: When Things Still Go Wrong
Even armed with the science of the water drop test, things can occasionally go sideways. If you find yourself scraping at a stuck piece of food, one of these three culprits is likely to blame.
You Flipped Too Soon
As I mentioned earlier, a stainless steel pan is essentially a smart device. It will automatically release your food when it is ready.
When a protein hits the hot oil, it initially sticks as the crust begins to form. But as the Maillard reaction progresses, the heat aggressively dehydrates the surface of the meat, creating a rigid, dry, caramelized crust. Once that crust is fully formed, it naturally detaches itself from the metal. If you slide your spatula under a steak and feel intense resistance, stop pulling. The pan is telling you the crust isn’t done yet. Give it another 60 to 90 seconds, and it will release effortlessly.
The Sugar Crash
The water drop test works miracles for raw proteins and vegetables, but it cannot save you from burning sugar. If you have marinated your chicken in honey, maple syrup, brown sugar, or even a heavy splash of soy sauce, you are introducing highly volatile carbohydrates to a 375°F surface.
Sugar caramelizes beautifully, but it crosses the line from caramel to burnt carbon incredibly fast. That burnt carbon will glue itself to the pan regardless of the Leidenfrost effect. If you are cooking with a sweet marinade, you need to wipe the excess liquid off the meat before searing, and you must cook at a slightly lower temperature to prevent the sugars from scorching.
Pan Overcrowding
We have all been guilty of this. You have a 10-inch skillet, and you try to cram four giant pork chops into it at the exact same time so you can get dinner over with.
When you cover every square inch of the pan’s surface area with cold food, the heat source underneath simply cannot keep up. The temperature of the metal plummets. Instead of searing, the meat begins to rapidly release its internal juices. Because the pan isn’t hot enough to vaporize those juices, the liquid pools in the skillet. You are no longer searing your meat; you are boiling it in its own lukewarm sweat. This steaming effect is the exact reason your chicken always turns out dry, tough, and depressingly grey. Cook in batches, or use a larger pan. Give your food room to breathe.
Acidic Foods and Reactive Metals
One of the greatest advantages of mastering stainless steel is that it is a non-reactive metal. If you try to cook a long-simmering tomato sauce in a raw cast iron or carbon steel skillet, the high acidity of the tomatoes will strip the polymerized seasoning right off the metal. The acid reacts with the iron, which is why your tomato sauce tastes metallic and your cast iron pan looks ruined. Stainless steel does not care about acid. You can sear a steak, deglaze with a cup of acidic white wine, and simmer a lemon-caper sauce all in the same pan without a single worry.
The Cleanup: Deglazing Like a Pro
Let’s say you followed the rules, but you still ended up with a bunch of dark, crusty bits stuck to the bottom of your pan. Do not drag the pan to the sink and start furiously scrubbing. Those stuck-on bits are a culinary gift.
Turning Mistakes into Pan Sauce
In professional kitchens, those caramelized, stuck-on brown bits are called “fond.” They are highly concentrated flavor bombs created by the Maillard reaction. Instead of washing them down the drain, you should be eating them.
While the pan is still hot, remove your meat and pour in half a cup of liquid—chicken broth, white wine, or even just plain water. The liquid will instantly boil and bubble up. Take a wooden spoon and gently scrape the bottom of the pan. The hot liquid will dissolve the fond, lifting it effortlessly off the metal. Let the liquid reduce by half, swirl in a tablespoon of cold butter, and you have just created a restaurant-quality pan sauce in three minutes. You are turning burnt bits into sauce, elevating your meal, and cleaning your pan all at the exact same time.
The Ultimate Scrub-Free Cleaning Hack
Okay, but what if you actually messed up? What if you got distracted by a text message, burned your dinner to a literal crisp, and now your beautiful stainless steel pan is coated in a thick layer of impenetrable black carbon?
Do not reach for the steel wool, and do not leave it soaking in the sink for three days (we all know you aren’t going to wash it tomorrow, either). There is a zero-effort hack for this.
Fill the ruined pan with an inch of water and a generous squirt of dish soap. Put it back on the stove and bring the soapy water to a rolling boil for five to ten minutes. The intense heat and the surfactants in the soap will penetrate the burnt carbon, softening it completely. Take a wooden spatula and gently scrape the bottom while it boils; the burnt cement will peel off in sheets. Pour the gross water down the drain, give the pan a quick wipe with a sponge, and it will look brand new.
If there is any residual cloudy staining or rainbow discoloration (which is just a harmless buildup of oxidized minerals from your tap water), sprinkle a little Bar Keepers Friend in the wet pan, wipe it with a sponge, and rinse. The pan will gleam like a mirror.
Cooking does not have to be a stressful, chaotic battle against your own equipment. Once you stop treating your cookware like a mystery and start treating it like a tool governed by basic physics, everything changes. Mastering the water drop test will fundamentally transform your weeknight dinners, eliminate your rookie kitchen woes, and finally give you the confidence to ditch the toxic nonstick pans for good.
Heat the pan. Flick the water. Look for the mercury ball. It really is that simple. Now get off your phone, go into the kitchen, and sear something. You’ve got this.


