
Listen up, weekend warriors and weeknight cooking survivors. We need to have a serious, intervention-level talk about the absolute massacre happening in your kitchen every single time you try to sear a piece of meat. You buy a gorgeous, expensive cut of protein, you heat up your shiny stainless steel skillet, you drop the meat in, and suddenly, it is welded to the pan. It is chemically fused to the metal. You panic. You scrape. You curse at the culinary gods. You end up serving a mangled, shredded pile of despair, and then you spend the next forty-five minutes at the sink scrubbing the pan like you are being punished for a crime you didn’t commit.
I get it. I have been there, setting off the smoke detector and aggressively scraping at ruined chicken breasts. But I am here to tell you that you do not need a culinary degree to fix this. You just need a tiny bit of high school physics, a basic understanding of thermodynamics, and a reality check about heat management.
The Dark Side of Convenience: Why We Need to Ditch Non-Stick
First, let us address the elephant in the room. When your food sticks to stainless steel, you might be tempted to just give up, throw your hands in the air, and go back to that cheap, flaking non-stick pan sitting in the back of your cabinet. Don’t you dare. As a home cook who values both time and health, I have absolutely zero patience for toxic, disposable kitchenware.
The “easy kitchen” promised by modern non-stick cookware is a chemical illusion. Those synthetic fluorinated coatings—specifically PFAS (per- and polyfluoroalkyl substances)—are quite literally known by scientists as “forever chemicals.” They do not break down in the environment, and they certainly do not break down in your body. When you heat a standard Teflon-style PTFE pan past 500°F (which happens significantly faster than you think when you are preheating an empty pan for a sear), that coating begins to aggressively degrade. It releases microscopic particles and invisible, toxic gases into your food and the air. The health risks associated with these compounds, ranging from immune system disruption to severe hormonal issues, are so documented that legislation like California’s Senate Bill 682 has actively attempted to ban PFAS in cookware entirely.
If you are finally ready for banishing toxic kitchen gear from your life, stainless steel is the ultimate, professional-grade upgrade. It is practically indestructible, it distributes heat beautifully, and it will outlive you. But it requires you to drive a manual transmission instead of an automatic. You have to actually understand what the heat is doing.
The Science of the Stick: What Exactly is Happening in Your Pan?
To beat the stick, you have to understand the stick. I am going to explain exactly why everything sticks to the metal in the first place. It is not just because your pan is “dry” or because the universe hates you. It is because of literal, microscopic chemistry.
The Microscopic Mountain Range
At a microscopic level, your smooth, shiny stainless steel pan is not smooth at all. If you looked at it under a powerful microscope, it would look like a rugged mountain range full of jagged peaks, deep valleys, and tiny porous caves. When you place protein-rich food—like chicken, steak, fish, or eggs—into a pan that is improperly heated, the heat causes the proteins in the food to denature. They unravel from their tight coils, exposing their sticky internal structures.
The Protein-Metal Bond
As these unraveled proteins sink into those microscopic metallic valleys, they do not just sit there. They actually form chemical bonds with the metal atoms—specifically the iron—in the pan. We are talking about genuine covalent bonds and Van der Waals forces. The food isn’t just resting on the pan; it is chemically reacting with it, forming a unified molecular structure. The meat becomes one with the metal. This is the “unstable band” of cooking, which occurs roughly between 160°F and 300°F. In this temperature range, your proteins are actively seeking out metal atoms to bond with, and any liquid water present on the surface of the meat acts as a glue, holding the food against the metal long enough for those chemical bonds to cement.
The Physics of Freedom: Understanding the Leidenfrost Effect
So, how do we stop this unholy union between your dinner and your cookware? We use vapor. We harness the power of the Leidenfrost effect.
Named after the 18th-century German scientist Johann Gottlob Leidenfrost, this physics principle is the absolute holy grail of stainless steel cooking. Johann discovered that when a liquid comes into contact with a surface that is significantly hotter than its boiling point, it does not just instantly evaporate into thin air. Instead, the very bottom layer of the liquid vaporizes so violently and rapidly that it creates an insulating cushion of steam.
When you apply this scientific phenomenon to your stovetop, you can make this metal actually non-stick by riding that cushion of steam. When your stainless steel pan is perfectly preheated—usually sitting in the sweet spot between 370°F and 400°F (187°C to 204°C)—the moisture on the surface of your meat instantly vaporizes the millisecond it touches the metal. This creates a microscopic, invisible barrier of steam between the food and the pan. Your meat literally hovers above those microscopic jagged peaks, completely preventing those nasty protein-metal bonds from ever having the chance to form.
The Water Drop Test: Your Foolproof Temperature Gauge
You do not need an expensive infrared laser thermometer to find this magical temperature zone, though I won’t judge you if you buy one. For the everyday home cook, mastering the water drop test is your ticket to culinary freedom. It is the cheapest, easiest, and most effective kitchen hack in existence. Here is the exact, step-by-step breakdown of how to execute it perfectly every single time.
Step 1: The Dry Preheat
Place your clean, completely dry stainless steel skillet on the stove. Turn the burner to medium heat. Do not blast it on high; stainless steel holds heat incredibly well, and blasting it will only lead to scorched oil and a smoke-filled kitchen. Let the dry pan heat up for about two to three minutes.
Step 2: The Assessment
Flick a few drops of tap water from your fingers directly into the center of the pan. Watch exactly how the water behaves. The water will tell you the future of your meal.
- The Slow Evaporation (Too Cold): If the water drops just sit there and slowly bubble away, evaporating into standard steam, your pan is below 212°F. It is entirely too cold. If you put meat in now, it will bond to the metal. Keep waiting.
- The Aggressive Sizzle (The Danger Zone): If the water hits the pan and immediately splatters, hisses loudly, and breaks into a dozen tiny, rapidly evaporating droplets, you are in the unstable band. The pan is hot, but not hot enough to trigger the Leidenfrost effect. This is where most home cooks get impatient and drop the meat in. Do not do it.
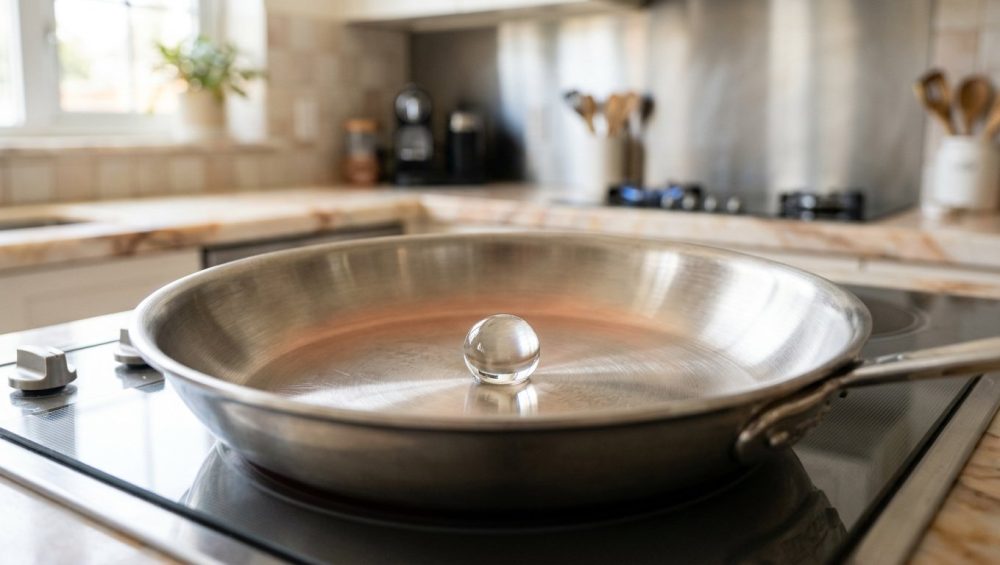
- The Mercury Ball (Perfection): When the pan hits that magical 370°F to 400°F range, the water drop will not sizzle out. Instead, it will instantly pull together into a perfect, cohesive sphere that looks exactly like a bead of liquid mercury. It will dance, glide, and skate effortlessly around the surface of the pan without evaporating. Congratulations. You have achieved the Leidenfrost effect. Your pan is ready.
- The Shattered Glass (Too Hot): If the water hits the pan and instantly shatters into dozens of tiny, hyper-speed micro-beads that zip around erratically, your pan is far too hot. Take it off the heat for a minute to let it cool down, or you will instantly burn whatever you put into it.
Pre-Game Prep: Why Moisture is the Ultimate Enemy
Now that your pan is perfectly heated, we need to talk about the food going into it. The Leidenfrost effect relies on a delicate balance of steam, but if your meat is dripping wet, you are going to ruin the physics. Surface moisture is the ultimate enemy of a good sear.
When you take a wet piece of meat and throw it into a hot pan, all that excess water has to evaporate before the temperature of the meat’s surface can exceed 212°F (the boiling point of water). While that water is boiling off, it is aggressively stealing heat energy from your pan. Your perfectly preheated 380°F skillet instantly plummets in temperature, the Leidenfrost steam barrier collapses, and the proteins eagerly bond to the metal. Furthermore, if your chicken breast turns out dry every time you cook it, it is likely because you are effectively steaming it in its own surface juices rather than searing it.
The Art of the Paper Towel
Before your protein ever gets near the stove, you must aggressively pat it dry with paper towels. I mean bone dry. Do not just dab it; press the paper towels into the meat to absorb every last drop of surface moisture.
The Magic of Dry Brining
If you want to cook like a weekend perfectionist but save time on a Tuesday, you need to start dry brining. Salt your meat generously and leave it uncovered on a wire rack in the fridge for anywhere from a few hours to overnight. The salt will draw out the moisture, the dry air of the fridge will evaporate it, and you will be left with a perfectly seasoned, completely dry surface that will sear beautifully and release effortlessly from your stainless steel pan.
Thermal Shock: The Rookie Mistake That Ruins Pans and Dinners
Even if your pan passes the water drop test with flying colors, and even if you patted your meat perfectly dry, you can still ruin everything in the final seconds before cooking. One of the most common rookie kitchen mistakes is pulling a massive, ice-cold steak directly out of a 34°F refrigerator and slamming it into a hot pan.
The Temperature Crash
When a large, freezing-cold mass hits your hot stainless steel, it acts like a heat sink. It aggressively absorbs the thermal energy of the pan. If you are using a cheaper, thin-bottomed stainless steel pan (which lacks the thermal mass of a high-quality, fully clad 3-ply or 5-ply pan), the temperature of the metal will crash instantly. You will drop right back down into the unstable protein-bonding zone, your steam barrier will vanish, and the meat will stick. To prevent this, pull your meat out of the fridge 20 to 30 minutes before cooking to take the chill off. It doesn’t need to be perfectly room temperature, but it shouldn’t feel like an ice cube.
The Warping Threat
Speaking of thermal shock, let us talk about the cleanup phase for a moment. Never, under any circumstances, take a screaming hot stainless steel pan off the stove and immediately run it under cold sink water. The rapid contraction of the metal causes irreversible structural damage. This sudden, violent temperature drop is exactly why your frying pans keep warping and wobbling on your flat glass stovetops. Let the pan cool naturally before you wash it.
The Fat Factor: When and How to Add Your Oil
Notice how we haven’t even talked about cooking oil yet? That is because the oil is the very last thing that goes into the pan before the food. The golden rule of stainless steel cooking is: Hot Pan, Cold Oil.
If you add oil to a cold pan and let them heat up together, the oil will break down, polymerize prematurely, and become a sticky, gummy mess before you even start cooking. Instead, you wait until the dry pan passes the mercury ball water drop test. Once the pan is perfectly heated, you quickly wipe out the water drop with a towel, and then you pour in your cooking fat.
Creating the Micro-Coating
When the room-temperature oil hits the 380°F pan, it immediately thins out, becoming highly viscous. It flows like water, instantly filling in all those microscopic valleys and caves in the metal that we talked about earlier. This creates a temporary, ultra-smooth patina on the surface of the pan.
Mind Your Smoke Points
Because your pan is sitting at nearly 400°F, you absolutely cannot use low-smoke-point fats like extra virgin olive oil or unclarified butter. They will instantly burn, turning acrid, smoking out your kitchen, and leaving a bitter, carcinogenic residue on your food. You must use a high-heat fat. Avocado oil, grapeseed oil, or clarified butter (ghee) are your best friends here.
And a quick note on aerosol sprays: even if you are already ruining your nonstick pans with those cheap, propellant-filled cooking sprays, do not bring them near your stainless steel. The chemical propellants (like soy lecithin) burn at very low temperatures and will bake a permanent, sticky brown film onto your beautiful cookware. Use real, liquid oil from a bottle.
The “Leave It Alone” Protocol: Mastering the Release
You have heated the pan. The water drop danced. You dried the meat. You added the high-heat oil. You gently laid the protein into the pan, away from you so the oil doesn’t splash. Now comes the hardest part of the entire process, and it is entirely psychological: Do not touch it.
The Battle of Patience
I know you want to peek. I know you want to grab your tongs and aggressively shuffle the chicken around to make sure it isn’t sticking. Stop it. Step away from the stove. When the meat first hits the pan, even with the Leidenfrost effect and the hot oil, there will be a brief period of localized sticking as the temperature regulates.
The Maillard Reaction and Natural Release
As the meat sears, it undergoes the Maillard reaction—a complex chemical reaction between amino acids and reducing sugars that gives browned food its distinctive, incredible flavor. As this crust forms, the proteins chemically alter and tighten up. Once a proper, hard crust has formed, the food will literally release itself from the pan.
I have survived my fair share of beginner cooking disasters, and ripping a beautiful, expensive steak in half because I was too impatient to wait for the crust to form is a mistake I only had to make twice.
The Nudge Test
How do you know when it is ready to flip? You perform the nudge test. Take your tongs or a spatula and give the side of the meat a very gentle nudge. If it resists, it is not ready. Do not force it. Give it another 60 seconds. When the crust is perfectly formed, the meat will slide across the stainless steel as if it were coated in Teflon.
The Aftermath: Cleaning Up and The Magic of Deglazing
Let’s say you miscalculated. Maybe your pan was a little too cold, or your meat was a little too wet, and you ended up with some brown, stuck-on bits at the bottom of your skillet after you pulled the meat out. Do not panic, and definitely do not throw the pan into the sink to soak. Those brown bits are not a mistake; they are culinary gold.
The Power of the Fond
In professional kitchens, those stuck-on caramelized protein bits are called fond (the French word for “base” or “foundation”). They are packed with incredibly concentrated, savory flavor. Instead of scrubbing them away, you are going to deglaze the pan.
Making a Pan Sauce
While the pan is still hot (but off the direct flame so you don’t start a fire), pour in a splash of liquid. This could be dry white wine, chicken broth, or even just a splash of water with a squeeze of lemon. The liquid will instantly boil and bubble up. Take a wooden spoon or a flat-edged spatula and gently scrape the bottom of the pan. The liquid will lift all of that delicious, stuck-on fond effortlessly, incorporating it into a rich, deeply flavored liquid. Let it reduce for a minute, swirl in a tablespoon of cold butter to emulsify it, and pour it over your meat.
You can stop scrubbing stainless steel pans for hours if you just learn to turn your “messes” into a pan sauce. It takes two minutes, it makes you look like an absolute professional to your dinner guests, and it practically cleans the pan for you.
Handling Polymerized Oil Stains
If you do end up with some stubborn, yellow or brown polymerized oil stains on the sides of your pan (which happens when oil is heated past its smoke point and bakes onto the metal), standard dish soap won’t cut it. Do not use harsh steel wool, which will permanently scratch the smooth finish of your pan and create more valleys for food to stick to in the future. Instead, make a paste out of water and a specialized non-abrasive stainless steel cleaner, like Bar Keepers Friend. The oxalic acid in the cleaner will melt the polymerized oil right off, restoring your pan to its original, mirror-like showroom shine with minimal elbow grease.
Conclusion: Welcome to the Big Leagues
Cooking with stainless steel does not have to be a terrifying, stress-inducing chore that ends in a ruined dinner and a ruined mood. It is simply a matter of respecting the physics of heat.
Throw out the toxic, peeling non-stick pans that are poisoning your food. Embrace the durability and the unmatched searing power of high-quality stainless steel. Remember the golden rules: pat your meat aggressively dry, utilize the water drop test to find that perfect 380°F Leidenfrost zone, add your high-heat oil only after the pan is hot, and have the patience to let the Maillard reaction do its job before you try to flip.
Once you master this heat management technique, you will never look back. Your steaks will have a steakhouse-quality crust, your chicken will be juicy and perfectly browned, and your weeknight dinners will finally taste like they were made by someone who actually knows what they are doing. Welcome to the big leagues. Now go get your pan hot.






