
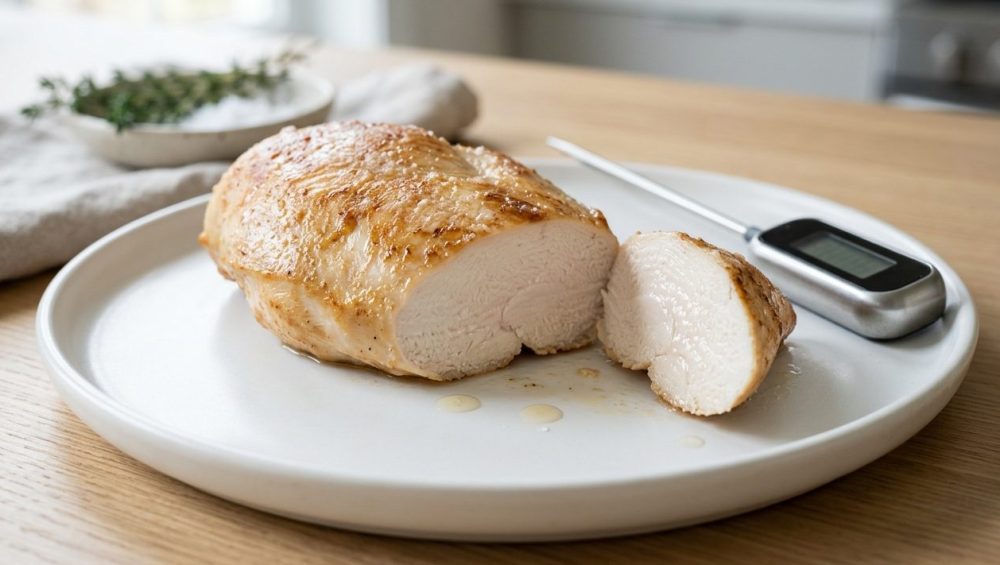
Listen, we need to have a serious talk about the most abused, misunderstood, and disrespected protein in the American culinary repertoire. You know exactly what I am talking about. It is the default weeknight savior, the meal-prep champion, and the centerpiece of countless disappointing diets. Yet, despite its universal popularity, the vast majority of home cooks are absolutely butchering its execution. If you are tired of serving dry and rubbery poultry that requires a gallon of water to swallow, you have come to the right place.
I am going to let you in on a little secret: professional chefs do not possess some magical, inaccessible talent for cooking poultry. They simply understand the fundamental food science of heat transfer, protein denaturation, and moisture retention. As a home cook, you do not need a culinary degree or a commercial kitchen to replicate these results. You just need to stop relying on outdated myths, ditch the guesswork, and start treating your ingredients with a little bit of scientific respect.
This is your definitive, no-nonsense masterclass on transforming the saddest cut of meat into the juiciest, most tender centerpiece of your culinary week. We are going to break down the exact thermodynamics of cooking lean poultry, eradicate the toxic habits ruining your meals, and equip you with foolproof, temperature-based techniques. Let us permanently eliminate the frustration of stressful weeknight dinners and learn how to actually cook like an expert.
The Anatomy of a Chicken Breast: Why It Hates You
To fix the problem, you first have to understand what you are working with. The chicken breast is biologically designed to be a nightmare for the impatient cook. It is a massive, unevenly shaped muscle that practically begs to be overcooked on one end while remaining raw on the other.
The Lean Meat Dilemma
Unlike a forgiving pork shoulder or a rich, dark-meat chicken thigh, the breast is a predominantly unworked muscle. Because chickens do not fly long distances, these pectoral muscles do not require the heavy oxygenation that produces dark, myoglobin-rich meat. More importantly, this lack of exercise means the breast contains almost zero intramuscular fat (commonly known as marbling).
Fat is a cook’s ultimate crutch. When you cook a heavily marbled steak, the melting fat acts as an internal lubricant and insulator, masking the effects of slight overcooking. The chicken breast offers no such safety net. It relies entirely on its natural water content for juiciness. The moment you expose it to excessive heat, that water evaporates, and you are left with a chalky, stringy disaster. When you are cooking lean meat, precision is not optional; it is mandatory.
Protein Denaturation Explained (Without the Boring Textbook Stuff)
Cooking is, at its core, applied chemistry and physics. When you apply heat to raw poultry, you are initiating a process called protein denaturation. Raw muscle proteins are tightly coiled, complex structures. As heat is introduced, these complex shapes begin to unfold and denature, turning the soft, translucent raw meat into a firm, opaque structure.
However, as the temperature continues to rise, these unfolded proteins begin to bond together and shrink, effectively wringing out the meat like a wet sponge. The myofibrillar proteins, which make up about 70 percent of the volume of lean meat and hold the vast majority of its water, are highly sensitive to temperature changes. Once the internal temperature crosses 150°F, the protein fibers contract violently, squeezing out their trapped moisture. If you push the meat to 165°F while it is still in the pan, you have already squeezed out the very liquid you were trying to save.
The Cardinal Sins of Cooking Poultry
Before we can build good habits, we have to aggressively tear down the bad ones. The average home kitchen is a minefield of terrible cooking advice passed down through generations. It is time to stop the madness.
The “Eyeballing It” Delusion
Put down the knife. Stop slicing your chicken open in the middle of the pan to “see if it is pink inside.” Every time you slice into a hot, actively cooking piece of meat, you are severing the muscle fibers and providing a direct escape route for the internal juices. You are literally bleeding your dinner dry. Furthermore, relying on visual cues like color or firmness is scientifically flawed. Depending on the pH of the meat and the cooking environment, poultry can remain slightly pink even when it is perfectly safe to eat, or it can turn completely white while still harboring dangerous bacteria. Cooking by sight or touch is a delusion.
The Carryover Cooking Catastrophe
This is the single biggest mistake ruining your dinners. When you remove a piece of meat from a hot skillet or oven, it does not magically stop cooking. Thanks to the Second Law of Thermodynamics, heat flows from areas of high concentration to areas of low concentration. The exterior of your seared chicken might be pushing 300°F, while the center is at 150°F. When you transfer that meat to a plate, the intense surface heat continues to travel inward, raising the internal temperature by another 5 to 10 degrees.
This phenomenon is called carryover cooking. If you leave your chicken on the heat source until the very center registers 165°F, the carryover effect will push the final resting temperature well past 175°F. You have essentially baked your protein into a state of total dehydration.
Cooking in Toxic, Peeling Pans (A Sassy Sous-Chef PSA)
I cannot, in good conscience, teach you culinary science if you are still searing your food on a chemical hazard. If you are using scratched, peeling non-stick pans from a decade ago, throw them directly into the garbage. Cooking lean proteins at the high temperatures required for a proper sear will degrade cheap Teflon, releasing toxic fumes and shedding forever chemicals into your beautiful dinner.
Furthermore, you cannot achieve a proper, flavorful crust (the Maillard reaction) on a flimsy, warped non-stick skillet. You need heavy, high-quality stainless steel, carbon steel, or cast iron to hold and distribute heat evenly. And please, for the love of all things holy, stop suffocating your high-quality cookware by spraying it with cheap cooking spray loaded with soy lecithin and chemical propellants. Use real butter, olive oil, or avocado oil. Your body and your palate will thank you.
The Holy Grail of Juicy Chicken: Dry Brining
If you want to permanently alter the trajectory of your cooking, you must embrace the magic of dry brining. Forget traditional wet brining—soaking your meat in a bucket of salt water only forces the bird to absorb tap water, diluting its natural, savory flavor and leaving you with a spongy texture. Dry brining is the superior, scientifically backed method.
What is Dry Brining and Why Does It Work?
Dry brining simply means aggressively seasoning your raw meat with Kosher salt well in advance of cooking, and letting it rest in the refrigerator. This is not just about making the food taste salty; it is a fundamental manipulation of the meat’s molecular structure. It tenderizes the protein, seasons it all the way to the core, and guarantees maximum moisture retention.
The Salt Science: Osmosis and Muscle Fibers
When you coat a chicken breast in salt, a fascinating three-step scientific reaction occurs. First, the salt draws moisture out of the meat through a process called osmosis. If you look at the meat after twenty minutes, you will see a pool of liquid forming on the surface. Second, the salt dissolves into this extracted liquid, creating a highly concentrated, natural brine.
Finally, over the next several hours, the meat reabsorbs this salty liquid deep into its cellular structure. As the salt penetrates the interior, it physically alters the myofibrillar proteins, relaxing the bundled muscle fibers and creating gaps where water can flow in and become trapped. Because the salt has partially dissolved the protein complexes, the muscle fibers are physically incapable of contracting as tightly when exposed to heat. This means that even if you accidentally overcook the bird slightly, it will hold onto its juices rather than squeezing them out into the pan.
How to Dry Brine Like a Boss (Step-by-Step)
- Pat it Dry: Remove your chicken from the packaging and dry it thoroughly with paper towels. Moisture is the enemy of a good sear.
- Salt Generously: Coat all sides of the meat with a high-quality Kosher salt. Do not use iodized table salt, which is too fine, overly metallic, and will easily over-salt your food.
- Elevate and Chill: Place the salted meat on a wire rack set inside a rimmed baking sheet. This allows air to circulate underneath.
- The Waiting Game: Leave it uncovered in the refrigerator for a minimum of 45 minutes, but ideally for 12 to 24 hours. The cold, circulating air of the fridge will entirely dry out the exterior of the meat. When you cook it, this desiccated exterior will sear beautifully, and if you are using skin-on cuts, the skin shatters like glass.
Temperature Control: Your New Best Friend
The era of guessing is over. Cooking is a science of temperatures, and if you do not know the temperature of your food, you are flying blind.
The 165°F Myth and USDA Guidelines Decoded
We have all been terrorized by the USDA’s blanket recommendation to cook all poultry to an internal temperature of 165°F. But here is the critical, scientific nuance that the government simplifies for the general public: pasteurization is not just about temperature; it is a function of both temperature and time.
The USDA states 165°F because that is the exact temperature at which a 7-log10 lethality of Salmonella (meaning 99.99999% of the bacteria are destroyed) is achieved instantly—in less than 10 seconds. However, you can achieve that exact same standard of food safety at significantly lower temperatures, provided you hold the meat at that temperature for a slightly longer duration. According to the official USDA time-temperature tables for poultry pasteurization, holding a chicken breast at 150°F for roughly 2.7 minutes, or at 155°F for just 45 to 50 seconds, results in the exact same bacterial destruction as hitting 165°F.
Why You Need a Good Instant-Read Thermometer
Because carryover cooking and resting will easily keep your chicken well above 150°F for five to ten minutes, pulling it off the heat early is not just safe—it is the mathematically proven secret to culinary perfection. But to execute this, you absolutely must invest in an accurate meat thermometer. Throw away the archaic dial thermometers that take thirty seconds to stabilize. You need a digital, instant-read probe that gives you a precise measurement in under three seconds.
The Magic Number: Pulling at 150°F to 155°F
Here is your new golden rule: Insert your thermometer horizontally into the thickest part of the breast. The moment the digital readout hits 150°F to 155°F, remove the meat from the heat source immediately. Do not second-guess it. Do not leave it in the pan “just to be safe.” Pull it, plate it, and let the residual thermal energy safely carry it to a perfectly pasteurized, unbelievably juicy finish.
Foolproof Weeknight Cooking Methods
Now that we have established the scientific ground rules, let us apply them to actual weeknight cooking. When you are exhausted after a long day, you need methods that prioritize efficiency without sacrificing quality.
The Pounding Method (Even Thickness = Even Cooking)
A natural chicken breast is shaped like a teardrop—bulbous and thick on one end, thin and tapered on the other. If you throw this asymmetrical wedge directly into a hot pan, the thin tail will turn into beef jerky before the thick center even begins to warm up.
To fix this, you must normalize the geometry of the meat. Place the chicken inside a heavy-duty zip-top bag or between two sheets of plastic wrap (this prevents raw poultry juice from aerosolizing all over your kitchen). Using a meat mallet, a heavy rolling pin, or the bottom of a cast-iron skillet, gently but firmly pound the thickest part of the breast until the entire piece of meat is an even, uniform thickness of about 3/4 of an inch. Not only does this guarantee perfectly even cooking, but it also physically tenderizes the muscle fibers and cuts your total cooking time in half.
The Cold Pan Method (Yes, Really)
If you are cooking a relatively thin or pounded chicken breast, I highly recommend you utilize the cold pan method. I know this sounds like absolute heresy, but stick with me.
Place your dry-brined chicken breast directly into a cold, dry skillet (preferably carbon steel or stainless steel). Turn the burner to medium heat. As the pan slowly heats up alongside the chicken, the gentle temperature gradient prevents the muscle fibers from going into thermal shock and contracting violently. The slow rendering process allows the meat to develop a stunning, golden-brown crust without overcooking the delicate interior. Flip it once the crust easily releases from the pan, and use your thermometer to monitor the finish. It is a stress-free, splatter-free miracle.
The Sear-and-Roast Maneuver
If you are dealing with massive, un-pounded chicken breasts, the stovetop alone will burn the exterior before the interior reaches a safe temperature. For these behemoths, you need the sear-and-roast maneuver.
Preheat your oven to 375°F. Get an oven-safe skillet ripping hot on the stove. Sear the chicken for exactly 2 to 3 minutes per side—just enough to trigger the Maillard reaction and build a deep, savory crust. Immediately transfer the entire skillet into the preheated oven. The ambient, convective heat of the oven will gently and evenly raise the internal temperature of the meat without scorching the outside. Start checking the temperature with your instant-read probe after 8 minutes.
The Resting Phase: Do Not Touch That Bird
You have dry-brined your meat. You have seared it perfectly. You pulled it off the heat at exactly 155°F. If you take a knife to it right now, you will ruin everything you just worked for.
Why Resting Meat is Non-Negotiable
When meat is exposed to high heat, the outer muscle fibers contract tightly, physically squeezing the internal moisture toward the cooler center of the breast. If you slice the meat while it is hot, that pressurized pocket of water will instantly flood out, leaving your dinner completely dry.
You must allow the meat to rest. During this resting phase, the temperature gradient begins to equalize. As the outer layers cool slightly, the tightly constricted muscle fibers relax, allowing the moisture to redistribute evenly throughout the entire cut of meat.
How Long Is Long Enough?
For a standard chicken breast, you must let it rest on your wooden cutting board for a minimum of 5 to 10 minutes. Do not tent it tightly with foil, or the trapped steam will destroy the beautiful crust you just built. Just leave it alone. Use this time to quickly deglaze your pan with a splash of wine or chicken stock to make a pan sauce, or simply pour yourself a glass of wine and breathe. Patience is the final ingredient in any great recipe.
Rescuing the Un-Rescueable: What to Do If You Messed Up Anyway
I am a realist. I know that despite your best intentions, the doorbell will ring, the dog will throw up, or you will simply get distracted by your phone, and your chicken will accidentally reach 175°F. Do not panic, and whatever you do, do not serve it as a whole, dry slab. You can still salvage the meal with a little bit of culinary triage.
Shredding and Saucing
When a chicken breast is overcooked, the muscle fibers have squeezed out their natural water, but they are still structurally intact. If you try slicing it and hacking at it with a dull knife, it will feel like chewing on cotton. Instead, grab two forks and vigorously shred the meat while it is still warm.
By pulling the muscle fibers apart, you are increasing the surface area of the meat. Now, introduce external fat and moisture. Toss the shredded chicken in a high-quality mayonnaise for a quick chicken salad, or drown it in a vibrant, acidic vinaigrette, a rich pesto, or a heavy dose of barbecue sauce. The shredded fibers will act like a mop, soaking up the external sauce and masking the lack of internal moisture.
The Broth Bath
If you absolutely must serve the chicken warm and relatively intact, slice it thinly against the grain. Slicing against the grain artificially shortens the muscle fibers, making the meat easier to chew. Lay the slices in a shallow skillet filled with a half-inch of rich, highly seasoned chicken bone broth and a pat of butter. Warm it gently over low heat for two minutes. The dry meat will absorb some of the savory liquid, and the butter will coat your palate, simulating the juiciness that the oven stole from you.
Cooking the perfect chicken breast does not require magic. It requires abandoning the outdated myths of the past, respecting the science of protein denaturation, and utilizing the tools that actually work. Dry brine your meat, manage your heat, trust your thermometer, and let it rest. Master these simple, unpretentious steps, and you will never suffer through a dry, disappointing weeknight dinner ever again. Now go preheat your skillet. You have a bird to save.






