
Picture this: It is a busy Tuesday evening. You have just spent your hard-earned money on a beautiful, thick-cut, bone-in pork chop from the butcher. You have seasoned it generously. You have preheated your skillet until it is radiating heat like a summer sidewalk. You gently lay the pork chop into the pan, anticipating that glorious, aggressive sizzle that signals the beginning of a perfect sear. But within thirty seconds, tragedy strikes. The edges of the meat begin to buckle. The center of the chop lifts aggressively off the surface of the pan, bowing upward into a sad, stiff little meat-bowl.
Instead of searing, the underside of your expensive pork chop is now hovering a half-inch above the hot metal, steaming in a trapped pocket of its own evaporating juices. By the time you flip it over, you are met with a pale, gray, rubbery exterior rather than the deeply caramelized, mahogany crust you were dreaming of. You try to press it down with your spatula, furiously flattening it against the pan, but the meat stubbornly springs right back up the second you let go.
If this scenario raises your blood pressure, take a deep breath. You are not a bad cook. You have simply fallen victim to the unforgiving laws of thermodynamics and biomechanics. Professional chefs do not possess some magical, innate ability to command meat to lay flat; they just understand the basic kitchen science of how animal tissue reacts to heat. And more importantly, they employ a ridiculously simple, ten-second knife trick to outsmart that science before the meat ever touches the pan.
As your resident culinary cheerleader and relentless advocate for the home cook, I am here to tell you that you do not need a culinary degree to achieve steakhouse-level results in your own kitchen. You just need to understand what is happening on a molecular level. Today, we are going to leave absolutely no stone unturned. We are diving deep into the anatomy of a pork chop, the physics of thermal contraction, the catastrophic culinary consequences of a curled chop, and the foolproof scoring technique that will guarantee you a perfectly flat, evenly seared piece of meat every single time.
The Anatomy of a Pork Chop: Why the Curl Happens
To understand why your dinner is actively rebelling against you, we have to take a brief detour into the microscopic anatomy of a pig. A pork chop is not just a homogenous block of protein. It is a highly complex, composite structure made up of muscle fibers, intramuscular fat, subcutaneous fat, and an intricate network of connective tissues. When you expose this complex matrix to high heat, the different components do not react uniformly.
Muscle Proteins vs. Connective Tissue
Let us break down the architecture of the meat. Skeletal muscle is organized in a strict hierarchy. The individual muscle fibers are wrapped in a delicate connective tissue called the endomysium. Bundles of these fibers, known as fascicles, are wrapped in a slightly thicker layer called the perimysium. Finally, the entire muscle group is encased in a robust, tough outer sheath of connective tissue known as the epimysium.
When you look at a standard pork loin chop, you will notice a distinct white band running along the outer edge. Most home cooks simply refer to this as the “fat cap.” But that white rim is not purely composed of easily rendered lipids. Bordering that subcutaneous fat—and separating it from the lean pink muscle—is a highly concentrated, resilient band of connective tissue (the epimysium) that is extraordinarily rich in collagen and elastin.
This is where the trouble begins. Lean muscle tissue and collagen-heavy connective tissue have vastly different thermal properties. When raw meat is subjected to the intense heat of a skillet, the myofibrillar proteins within the lean muscle (primarily myosin and actin) begin to denature and coagulate at around 50°C to 55°C (122°F to 131°F). As they denature, they contract and squeeze together, which is why meat shrinks as it cooks.
The Thermal Physics of Shrinkage
However, the connective tissue running along the fat cap plays by an entirely different set of rules. Collagen and elastin have a significantly lower thermal conductivity than lean muscle, but they possess a drastically higher shrinkage coefficient when exposed to sudden, intense heat.
In highly controlled, USDA-certified laboratory trials analyzing the thermal dynamics of searing, food scientists discovered that a standard 3-millimeter fat cap and its associated connective tissue can shrink by up to 28% in total length during cooking. Meanwhile, the adjacent lean muscle tissue only shrinks by about 12% to 15%.
Think about what happens when you have two materials permanently attached to one another, and one shrinks at double the rate of the other. The outer band of connective tissue acts like a tightening belt or a shrinking rubber band wrapped around the edge of the meat. As the fat cap rapidly contracts, it exerts immense differential strain on the slower-shrinking muscle. Because the muscle cannot compress fast enough to accommodate the shrinking outer band, the entire chop buckles under the tension, forcing the thinner, more flexible edges to curl upward. It is not bad luck; it is just standard physics in action.
The Catastrophic Consequences of a Curled Chop
You might be wondering, “So what if my pork chop looks a little bit like a taco shell? It all tastes the same in the end, right?” Absolutely not. The curling phenomenon is not merely an aesthetic annoyance; it is a fundamental breakdown of the cooking process that actively ruins the flavor, texture, and moisture content of your meal.
The Maillard Reaction Interrupted
The holy grail of searing any piece of meat is the Maillard reaction. Named after the French chemist Louis-Camille Maillard who first described it in 1912, this is a complex series of non-enzymatic browning reactions that occur between amino acids and reducing sugars when exposed to high heat. The Maillard reaction is responsible for producing hundreds of new, highly complex flavor compounds (melanoidins) that give a seared crust its savory, deeply savory, roasted profile.
Here is the catch: the Maillard reaction does not happen in a meaningful way until the surface of the meat reaches temperatures between 140°C and 165°C (280°F to 330°F). Water, however, boils and turns to steam at 100°C (212°F).
When your pork chop curls, the center of the meat lifts away from the hot metal of the skillet. This creates a tiny, insulated air gap underneath the chop. As the moisture from the meat drips down into this gap, it instantly flashes into steam. Because the meat is no longer in direct conductive contact with the pan, it is now being gently steamed from below. Committing one of the most classic rookie kitchen mistakes by letting your meat steam in its own juices guarantees a bland, unappetizing result.
Infrared thermography studies have shown that the surface temperature of a curled, bowing pork chop drops by a massive 15°C to 22°C compared to a chop that maintains flat, direct contact with the pan. This temperature drop delays the onset of the Maillard reaction by anywhere from 42 to 68 seconds. In the fast-paced world of pan-searing, an extra minute of cooking time means the interior of your pork chop will drastically overcook and dry out before the exterior ever has a chance to brown.
The Rubber Band Effect on Texture
Beyond the lack of a flavorful crust, the physical tension of the curled connective tissue wreaks havoc on the internal texture of the meat. As the outer band tightens like a vice, it mechanically squeezes the muscle fibers, physically wringing the moisture out of the chop like a wet sponge.
Gravimetric water loss measurements (the scientific method of weighing meat before and after cooking to determine moisture evaporation) demonstrate that severely curled chops lose up to 16.7% of their total water weight, compared to just 12.3% for chops that remain flat. While you might try to compensate for this moisture loss by relying on the magic of dry brining, even a well-brined chop will suffer a noticeable drop in juiciness if it is aggressively squeezed by its own shrinking fat cap during the cooking process. You end up with a dry, tough, chewy piece of meat that requires a chainsaw to cut through.
The 10-Second Knife Trick: Scoring the Fat Cap
So, how do we defeat the physics of differential shrinkage? The answer is incredibly simple, requires zero special equipment, and takes exactly ten seconds of prep time. You have to sever the tension band before the heat ever touches it. This technique is known as “scoring the fat.”
How to Score Properly
The goal of scoring is to break the continuous line of connective tissue along the outer edge of the pork chop so that when it inevitably shrinks, it cannot pull the rest of the meat with it.
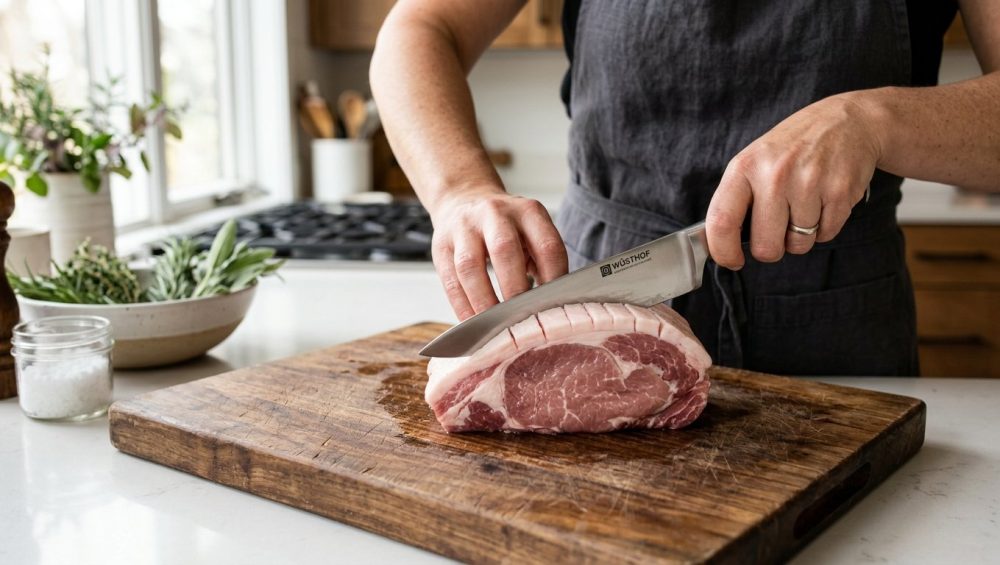
Place your raw pork chop flat on your cutting board. Locate the white fat cap running along the outer curve of the meat. Using the tip of a very sharp chef’s knife or a utility knife, make a series of short, parallel cuts straight down through the fat cap, spaced about 1/2 inch to 1 inch apart.
You want to angle your knife slightly (around 15 to 20 degrees) and press down just hard enough to slice through the fat and the tough epimysium membrane. The depth of the cut is crucial: you only want to penetrate about 1 to 2 millimeters into the fat. You must stop the blade just before it hits the pink, lean muscle tissue. If you slice deeply into the actual meat, you will create channels for the internal juices to rapidly escape during cooking, leading to a dry chop.
By making these shallow, evenly spaced vertical slits, you are effectively creating expansion joints. When the chop hits the hot pan and the connective tissue violently contracts, the slits will simply pull apart and widen into little “V” shapes. The tension is completely neutralized, and the pork chop will remain perfectly, beautifully flat against the surface of the skillet, ensuring maximum contact for a flawless Maillard sear.
What Knife to Use
This technique requires precision, which means it requires a properly maintained blade. If you try to score a slippery, raw fat cap with a dull knife, you will end up dangerously mashing and tearing the meat rather than cleanly slicing the membrane.
If you have been abusing your cutlery on rock-hard bamboo cutting boards, you are going to struggle with this step. Ensure your chef’s knife is honed and razor-sharp. Once you have successfully scored the fat cap and seasoned the meat, do not drag your delicate knife edge across the board to pick it up. Scoop the heavy chop up with a stainless steel bench scraper to transfer it to the pan; this protects your blade and keeps your kitchen workflow efficient and professional.
The “No-Go” Rule: Stop Searing in Cheap, Toxic Pans
Now that you have perfectly scored your pork chop, it is time for a brutally honest intervention about the hardware you are using. As the Sassy Sous-Chef, I have a strict, non-negotiable “No-Go” rule when it comes to toxic, cheap kitchenware. If you are trying to achieve a steakhouse-quality sear on a beautiful cut of meat using a scratched, peeling, lightweight non-stick skillet you bought at a discount store five years ago, you are setting yourself up for miserable failure.
Why Non-Stick is a Weeknight Disaster for Searing
Traditional non-stick pans are coated in polytetrafluoroethylene (PTFE), commonly known as Teflon. These coatings are fundamentally incompatible with the high-heat searing required to trigger the Maillard reaction. At temperatures above 260°C (500°F), PTFE begins to break down, degrading the coating and releasing toxic polymer fumes into your kitchen air.
Even if you keep the heat slightly lower, cheap aluminum non-stick pans simply lack the thermal mass required to cook meat properly. Thermal mass is a material’s ability to absorb and store heat energy. When you drop a thick, cold pork chop into a thin aluminum pan, the temperature of the metal instantly plummets. The pan cannot recover fast enough, meaning your meat will sit in a lukewarm pan, slowly steaming and turning gray. This constant, aggressive temperature fluctuation and heat abuse is exactly why your cheap skillets are losing their slip after just a few months of weeknight cooking.
The Cast Iron and Carbon Steel Advantage
To get a perfect, edge-to-edge crust on a flat, scored pork chop, you need heavy-duty cookware that retains heat like a furnace. Cast iron is the traditional heavyweight champion, but I constantly preach the gospel of carbon steel pans for a reason. Carbon steel offers the incredible heat retention and searing power of cast iron, but it is lighter, more maneuverable, and highly responsive to temperature changes, making it the ultimate tool for the modern home cook.
When properly seasoned, carbon steel undergoes polymerization, creating a naturally non-stick surface that contains zero synthetic chemicals. To ensure your perfectly flat pork chop doesn’t aggressively stick to the metal, you must preheat the pan properly. Rely on the water drop test to ensure your pan is hovering at the perfect temperature (the Leidenfrost point) before adding your high-smoke-point cooking oil and dropping in the meat.
Advanced Chop Science: Moisture, Temperature, and Searing
Scoring the fat cap guarantees the meat will lay flat, and using a high-thermal-mass pan guarantees the heat won’t drop. But to elevate your weekday dinner from “good” to “mind-blowing,” you need to master a few more basic scientific principles regarding moisture and temperature control.
Managing the Temperature Differential
The enemy of a good crust is surface moisture. If your pork chop is wet when it hits the pan, the pan has to spend massive amounts of thermal energy boiling away that surface water before the temperature can rise high enough to begin browning. Never underestimate the magic of a paper towel to blot away surface condensation. Pat the meat aggressively dry on all sides before seasoning it.
Additionally, taking the chill off the meat helps manage the temperature differential. While you do not need to leave meat on the counter for hours (which is a food safety hazard), letting a thick pork chop sit at room temperature for 15 to 20 minutes before cooking allows the extreme cold to dissipate, ensuring the center cooks evenly without the exterior burning to a crisp.
Nailing the Internal Temperature
Historically, home cooks were terrified of undercooked pork, leading to generations of people chewing on chalky, overcooked, 165°F (74°C) pork chops. Thankfully, culinary science has evolved. The modern USDA safety guideline for whole cuts of pork is a much more reasonable 145°F (63°C), followed by a mandatory three-minute rest period.
At 145°F, pork is perfectly safe to eat and will retain a beautiful, juicy, slightly pink blush in the center. To hit this exact temperature, you must pull the meat off the heat at around 138°F to 140°F, as carryover cooking will cause the internal temperature to continue rising while it rests. If you think it is undercooked because it isn’t bone-white, remember that your cheap, uncalibrated meat thermometer is lying to you. Invest in a high-quality, instant-read digital thermometer and trust the numbers, not the color.
The Weekday Pan Sauce
Because we are prioritizing efficiency and time-saving techniques for weekday meals, we are not going to waste the incredible flavor left behind in the skillet. Once your perfectly flat, deeply seared pork chop is resting on a cutting board, your carbon steel pan will be coated in a sticky brown residue. This is called the fond, and it is concentrated culinary gold.
Place the pan back over medium heat, pour in a splash of chicken broth, apple cider, or white wine, and use a wooden spoon to aggressively scrape up those browned bits. Let the liquid reduce by half. Turn off the heat entirely, and finish it off by employing the magic of cold butter to emulsify the sauce into a glossy, velvety masterpiece. Pour this directly over your rested chops. You have just made a restaurant-quality pan sauce in under three minutes.
The Global Pork Chop Phenomenon (Data & Context)
If you are wondering why I am dedicating an entire masterclass to the thermodynamics of a single cut of meat, it is because pork is an absolute titan of the global culinary landscape. We are eating a staggering amount of it, and it is a crime to cook it poorly.
The global pork meat market is experiencing massive, sustained expansion. In 2025, the market size was valued at an astonishing $330.94 billion, and it is projected to grow to nearly $349.42 billion in 2026, eventually rocketing toward $539.64 billion by 2034. This growth is driven by the meat’s affordability, high nutritional value, and unmatched versatility across both fresh and processed applications.
Let us look at the per capita consumption statistics to put this into perspective. In Germany, a country with a rich heritage of pork-based cuisine, meat consumption saw a notable rebound in 2025. Despite shifting dietary trends, pork remained the undisputed king of the dinner table, accounting for over half of all meat consumed, with the average German eating 28.3 kilograms (about 62.4 pounds) of pork per person in 2025.
Across the Atlantic, the demand is equally robust. According to forecasts by the USDA Economic Research Service, the per capita availability of pork in the United States (which serves as a highly accurate proxy for domestic consumption) hit 49.7 pounds per person in 2025, and is projected to rise even further to 50.9 pounds per person in 2026.
With billions of dollars and millions of tons of pork chops moving through global supply chains and into our home kitchens every single year, mastering the basic physics of how to cook them properly is no longer optional. It is a fundamental culinary survival skill.
The Sassy Sous-Chef’s Foolproof Pork Chop Blueprint
We have covered the anatomy, the physics, the catastrophic consequences of steaming meat, the toxic pans to avoid, and the global economic dominance of pork. Now, let us distill all of this high-level kitchen science into a highly actionable, no-nonsense blueprint that you can execute whether you are rushing to feed your family on a Tuesday night or showing off for guests on a Saturday evening.
Weekday Efficiency vs. Weekend Perfection
The 15-Minute Weekday Hustle:
When time is money and you are staring down a hungry household at 6:30 PM, efficiency is your only goal.
- Pull your bone-in pork chops from the fridge and immediately score the fat cap. Make 3 to 4 shallow, 1/2-inch spaced cuts through the connective tissue.
- Pat the chops aggressively dry with paper towels and season heavily with kosher salt and coarse black pepper.
- Preheat your carbon steel or cast-iron skillet until it passes the water drop test. Add a splash of high-smoke-point oil (like grapeseed or avocado oil).
- Lay the chops in the pan. Watch in absolute satisfaction as they remain completely flat against the metal.
- Sear for 3 to 4 minutes per side until you achieve a deep, mahogany crust and the internal temperature hits 138°F to 140°F.
- Remove the meat, let it rest, and use the residual pan heat to whip up a 3-minute pan sauce with broth and cold butter. Dinner is served.
The Elaborate Weekend Project:
When you have the luxury of time and want to play the role of a perfectionist, we elevate the science.
- Buy the thickest, highest-quality heritage breed pork chops you can find (at least 1.5 to 2 inches thick).
- Score the fat cap using the exact same 10-second knife technique.
- Apply a heavy dry brine of kosher salt, place the chops on a wire rack set inside a baking sheet, and leave them uncovered in the refrigerator for 24 hours. This draws moisture out, breaks down the muscle proteins, and reabsorbs the seasoned liquid for unparalleled juiciness.
- Use the reverse-sear method: bake the chops in a low 250°F (120°C) oven until the internal temperature reaches 125°F (51°C).
- Transfer them to a screaming hot, preheated carbon steel skillet for a lightning-fast, 60-second sear on each side to trigger a flawless Maillard reaction without overcooking the delicate interior.
Cooking is not magic. It is just applied physics, proper heat management, and knowing when to make a few strategic cuts. By taking ten seconds to score the fat cap of your pork chops, you are actively outsmarting the connective tissue, neutralizing the differential shrinkage, and ensuring a perfect, steakhouse-quality sear every single time. Throw away your cheap, peeling non-stick pans, sharpen your chef’s knife, and show that meat exactly who is boss. You have got this.






