
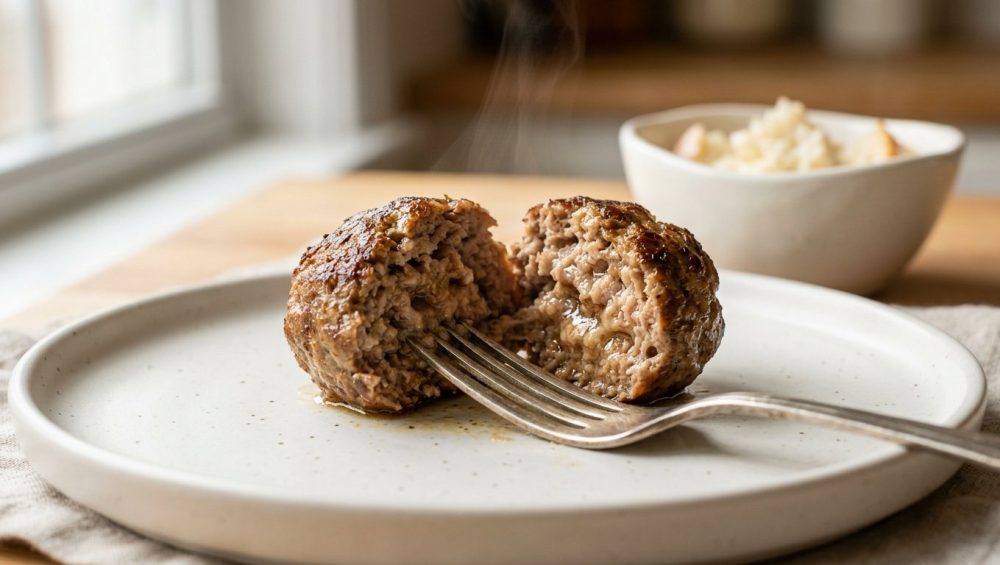
The Meatball Dilemma: Why Are We Eating Golf Balls?
Let us have a brutally honest conversation about the state of homemade meatballs. If you are reading this, chances are you have recently bitten into a meatball that possessed the structural integrity and chewiness of a Titleist golf ball. You followed a recipe, you spent your precious Tuesday evening rolling raw meat between your palms, and your reward was a dense, dry, rubbery orb of profound disappointment.
I see you, and I am here to tell you that it is not entirely your fault. You have been lied to by decades of bad culinary dogma passed down through poorly translated recipes and outdated cookbooks.
As a weekend culinary hobbyist, your time is your most valuable asset. During the week, you are hustling to get dinner on the table without losing your mind, and on the weekends, you want to produce restaurant-quality food that makes your guests weep with joy. You do not have the time or the patience to chew through tough, flavorless ground meat. You want meatballs that are impossibly tender, practically melting in your mouth, while still holding their gorgeous, round shape in a bubbling pot of marinara.
The secret to achieving this culinary nirvana does not require a degree from Le Cordon Bleu, nor does it require you to buy a commercial meat grinder. The secret to the most mind-blowing, tender meatballs of your life comes down to a fundamental understanding of food science, protein extraction, and the absolute magic of soggy bread.
The Anatomy of Ground Meat (And Why It Hates You)
To understand how to fix your meatballs, we first need to understand the temperamental nature of ground meat. When you buy a package of ground beef, pork, or veal, you are looking at millions of microscopic muscle fibers that have been violently chopped up and extruded through a steel plate.
Muscle tissue is primarily composed of water, fat, and two major contracting proteins: myosin and actin. In their raw state, these proteins are relatively relaxed. However, the moment you introduce heat, a dramatic chemical and physical reaction occurs. Starting at around 120°F (50°C), the myosin proteins begin to denature and coagulate. Think of these proteins as long, coiled-up strings of yarn. As the temperature rises, the strings uncoil, bump into one another, and frantically bind together in a tight cross-linked matrix.
As this protein matrix tightens, it acts exactly like a sponge being wrung out by a giant, invisible hand. The tightening proteins forcefully squeeze out the moisture and rendered fat trapped inside the meat. If you have ever watched a beautiful, plump hamburger patty shrink into a tiny, tough puck while sitting in a pool of its own juices, you have witnessed this protein contraction firsthand. If you overcrowd the skillet while searing, the expelled water pools rapidly, and your meat steams instead of browning, which completely ruins the texture and flavor development.
When you roll ground meat into a tight ball and subject it to the aggressive heat of an oven or a frying pan, you are essentially creating a pressurized moisture-expulsion chamber. Without an intervening force to stop those protein strands from locking together, your meatball is chemically destined to become a dry, dense brick.
The Crime of the Dry Breadcrumb
For generations, well-meaning home cooks have tried to solve the meatball binding issue by dumping handfuls of dry, dusty breadcrumbs straight out of a cardboard canister into their ground meat. This is culinary self-sabotage of the highest order.
Let us look at the physics of a dry breadcrumb. It is a dehydrated, porous starch. What do dehydrated, porous starches do when introduced to a moist environment? They wick moisture. Through capillary action, dry breadcrumbs aggressively pull water and fat away from whatever they touch. When you mix dry breadcrumbs directly into raw ground beef, they immediately begin sucking the ambient moisture out of the meat.
When the meat hits the heat and the proteins begin to contract and expel their juices, the dry breadcrumbs eagerly soak up that liquid. However, because the breadcrumbs were never properly hydrated and gelled beforehand, they do not provide any structural cushioning between the meat proteins. The proteins still cross-link tightly, the meatball still shrinks, and the breadcrumbs simply turn into gritty little pockets of trapped grease. It is the exact same infuriating scientific principle that explains why your plastic containers stay greasy after storing leftover tomato sauce; the microscopic porous structure traps the fat without integrating it.
Adding dry breadcrumbs to a meatball does not make it tender; it merely stretches the volume of the meat while ensuring the final texture is bouncy, tight, and painfully dry. We must banish the dry breadcrumb from our meatball methodology forever.
Enter the Panade: The Ultimate Meatball Savior
If dry breadcrumbs are the villain of this story, the panade is the undisputed hero. A panade (a French culinary term that roughly translates to a bread mash) is a simple paste made by soaking a starch—usually bread—in a liquid, most commonly milk, until it is completely saturated.
When you introduce a panade to your ground meat mixture, you are deploying a brilliant food science hack that fundamentally alters the way the meat cooks.
Here is exactly how the magic works: When the bread soaks in the milk, the starches in the bread hydrate and swell. When you gently fold this wet, mushy paste into your ground meat, the panade coats the individual muscle fibers. As the meatball goes into the oven or the frying pan and the temperature begins to climb, the hydrated starches undergo a process called gelatinization.
The starch granules absorb the liquid, expand massively, and burst, creating a thick, lubricating gel. This gel acts as a physical barrier—a microscopic cushion—that wedges itself between the meat’s protein strands. When the myosin and actin proteins attempt to coil up, tighten, and cross-link, they physically cannot. The starch gel prevents them from snapping together. Because the protein matrix cannot tighten, the juices and the rendered fat cannot be squeezed out of the meatball.
The result? A meatball that retains its moisture, holds its shape, and yields to the slightest pressure of a fork. It is soft, succulent, and incredibly tender. Mastering this one single technique is how you survive the kitchen and start turning out restaurant-tier food without breaking a sweat.
Building the Perfect Panade: Ingredients Matter
Not all panades are created equal. If you want perfection, you need to understand how different starches and liquids interact.
The Starch: Choosing Your Bread
The ideal bread for a panade is standard, unassuming white sandwich bread. I know, I know—we are weekend culinary warriors, and we love our artisanal, slow-fermented, wood-fired boules. But save the fancy bread for your charcuterie board.
Standard white bread has a tight, uniform crumb and a high starch content that breaks down beautifully into a smooth, homogenous paste. You must remove the crusts, as they will not hydrate at the same rate as the crumb and will leave hard, chewy lumps in your delicate meatballs.
Can you use sourdough? Yes, but the acidity and robust chew of sourdough will alter the flavor profile and require a longer soaking time. Can you use panko? Absolutely. Panko breadcrumbs are excellent because they are flaky and light, but because they are dehydrated, you must ensure they are thoroughly soaked and mashed with a fork until they reach the consistency of baby food. Before you start hacking away at a loaf of bread, make sure you are working on a heavy-duty wooden cutting board to protect the edge of your chef’s knife.
The Liquid: Dairy vs. Non-Dairy
Whole milk is the gold standard for a panade. The fat content in whole milk adds richness, while the casein proteins in the dairy help stabilize the emulsion of meat and fat. Furthermore, the natural sugars (lactose) in the milk will aid in the Maillard reaction, helping your meatballs develop a gorgeous, savory brown crust when seared.
If you want a slight tangy depth, buttermilk is a phenomenal substitute. If you are strictly dairy-free, you can use unsalted beef or chicken stock. Even water works in a pinch to hydrate the starches, though you will sacrifice the subtle sweetness and fat that dairy provides.
The Golden Ratio and Technique
The baseline rule of thumb for a perfect meatball panade is a 1:1 ratio by volume of bread to liquid. For every one pound of ground meat, you want approximately 1/2 cup of torn bread (about one standard slice, crusts removed) and 1/2 cup of whole milk.
Place the torn bread into a wide bowl, pour the milk over it, and step away. Let it soak for a minimum of 5 to 10 minutes. The bread must be completely saturated. Once soaked, get in there with a fork—or your impeccably clean hands—and mash the mixture aggressively until it forms a completely smooth, uniform paste. There should be no identifiable chunks of bread remaining. When prepping your aromatics to add to this mix, you will inevitably need a bench scraper to efficiently scoop up your massive piles of minced garlic and parsley without dulling your knife blade.
Beyond the Panade: The Unforgivable Sins of Meatball Making
The panade is your insurance policy, but it cannot save you if you commit the cardinal sins of meatball construction. If you want melt-in-your-mouth perfection, you must adhere to these strict rules.
Sin #1: Overworking the Meat
Ground meat is highly susceptible to mechanical manipulation. When you aggressively knead, squeeze, and compress ground meat, you actively extract the myosin proteins, causing them to cross-link before the meat even hits the pan. This is how sausage is made, and we are not making sausage. We want a loose, airy structure.
When combining your meat, panade, eggs, and seasonings, use your fingertips. Toss the mixture lightly, as if you are tossing a delicate salad. When forming the balls, cup them gently in your hands. Do not pack them tightly like you are making a snowball.
Sin #2: Using the Wrong Fat Content
Fat is flavor, and fat is moisture. If you buy 99% lean ground turkey and expect to produce a juicy meatball, you are living in a fantasy world. You need a minimum fat content of 20% (an 80/20 ratio).
The absolute best meatballs utilize a blend of meats to balance flavor and texture. A classic Italian-American mix is equal parts ground beef (for rich, beefy flavor), ground pork (for sweet, luscious fat), and ground veal (for an incredibly tender, gelatinous texture). If you cannot find veal, a 50/50 split of 80/20 beef and fatty ground pork is phenomenal.
Sin #3: Raw Aromatics and Poor Seasoning
Never put raw onions or raw garlic directly into your meatball mixture. Raw onions release water as they cook, which can make the meatballs spongy, and their sharp, sulfuric bite will overpower the dish. Always finely dice your aromatics and gently sweat them in olive oil until they are translucent and sweet before cooling them and adding them to the meat. If your minced garlic always burns in the skillet, you are adding it too early; let the onions cook first, then add the garlic for the last sixty seconds.
Furthermore, salt is a powerful protein extractor. It accelerates the tightening of the meat fibers. Mix your salt in at the very end, right before you shape and cook the meatballs, to prevent the mixture from curing and turning rubbery.
The “No-Go” Rule on Toxic Kitchen Gear
We need to take a brief intermission to address the equipment you are using to cook your beautiful, panade-enriched meatballs. I have zero patience for cheap, toxic kitchenware. If you are still searing your meatballs in a lightweight, scratched-up, mystery-metal non-stick pan where the Teflon coating is actively peeling off into your food, throw it in the garbage immediately.
When we talk about banishing toxic kitchen gear, we are talking about protecting your health and respecting your ingredients. Cheap non-stick pans cannot hold high heat, meaning you will never achieve a proper, crusty Maillard sear on your meatballs. Instead, the pan’s temperature will plummet the second you add the cold meat, and your meatballs will boil in their own gray, sad juices.
You need cookware with serious thermal mass. A high-quality, heavy-bottomed stainless steel skillet, a beautifully seasoned carbon steel pan, or an enameled cast-iron braiser are your only acceptable options. These materials hold heat relentlessly, allowing you to develop a deep, savory, caramelized crust on the exterior of the meatball without overcooking the delicate interior. Yes, you have to learn how to manage your heat, but properly preheating your pan is the only secret to preventing protein adhesion so your meatballs release effortlessly with a gorgeous golden-brown crust. Stop buying disposable pans and invest in gear that will outlast you.
The Foolproof Weekend Meatball Masterclass
Now that we have covered the science, the ingredients, and the mandatory equipment, here is your definitive, step-by-step masterclass for the ultimate weekend meatballs.
Step 1: Sweat the Aromatics
Finely mince one small yellow onion and three cloves of garlic. Sauté the onion in a splash of olive oil over medium heat until deeply translucent and sweet. Add the garlic for the final minute. Remove from heat and let this mixture cool completely. (Adding hot onions to raw meat will melt the fat and ruin the texture).
Step 2: Hydrate the Panade
In a large mixing bowl, tear up two slices of high-quality white sandwich bread (crusts removed). Pour 1/2 cup of whole milk over the bread. Let it sit for 10 minutes. Once hydrated, use a fork to mash the bread and milk into a completely smooth, lump-free paste.
Step 3: The Gentle Mix
To the bowl with the panade, add your cooled aromatics, 1/2 cup of freshly grated Parmigiano-Reggiano, 1/4 cup of finely chopped fresh flat-leaf parsley, 1 large beaten egg (for structural binding), 1.5 teaspoons of kosher salt, and a generous crack of black pepper. Whisk this flavor base together thoroughly.
Now, add 1 pound of 80/20 ground beef and 1/2 pound of ground pork. Using your fingertips, gently fold the meat into the wet mixture. Do not squeeze. Stop mixing the exact second the ingredients are evenly distributed.
Step 4: Shape and Sear
Using a spring-loaded ice cream scoop ensures uniform size so they cook evenly. Scoop the meat and gently roll it between wet palms to form a ball. Place them on a wire rack.
Preheat your stainless steel or cast-iron skillet over medium-high heat. Add a high-smoke-point oil. Sear the meatballs in batches—do not crowd the pan!—until they develop a deep brown crust on all sides. You are not trying to cook them through here; you are just building flavor.
Step 5: The Gentle Simmer
Transfer the beautifully browned meatballs into a wide pot of gently simmering homemade marinara sauce. Let them poach in the sauce on low heat for 45 minutes to an hour. The gentle, moist heat of the sauce will finish cooking them perfectly, while the panade inside the meatball works its magic, holding onto the moisture and preventing the proteins from seizing.
Alternatively, if you are baking them, invest in a simple oven thermometer to ensure your oven is actually at 400°F (200°C), and bake them on a heavy-duty rimmed baking sheet for 15-20 minutes. If your flimsy baking sheets keep warping and violently popping in the oven, you are going to end up with lopsided meatballs and grease fires. Buy a thick, bare aluminum half-sheet pan.
Troubleshooting Your Meatball Disasters
Even with the best science on your side, things can occasionally go sideways. Here is how to troubleshoot common meatball woes.
Why are my meatballs falling apart in the sauce?
If your meatballs are disintegrating into a gritty meat sauce, you likely committed one of three errors. First, you may have used too much panade, making the mixture too soft to hold its shape. Second, you may have skipped the egg. While the panade provides moisture and tenderness, the egg provides the vital protein structure needed to bind the meat together as it cooks. Third, you may have boiled your sauce instead of simmering it. A violent, rolling boil will physically agitate and tear delicate meatballs apart. Keep the sauce at a lazy, gentle bubble.
Why are my meatballs raw in the middle but burnt on the outside?
Your pan was entirely too hot, or your meatballs were too large. Searing should happen over medium-high heat, not maximum heat. If you are making massive, baseball-sized meatballs, you absolutely cannot rely on pan-frying to cook them through. You must sear them for color, and then finish them either in a 350°F (175°C) oven or by gently braising them in sauce until they reach an internal temperature of 160°F (71°C).
Why do my meatballs taste boring?
Under-seasoning is the hallmark of an amateur cook. Ground meat requires a heavy hand with salt, fat, and aromatics to taste like anything. The absolute best trick employed by professional chefs is the “test patty” method. Before you spend twenty minutes rolling out fifty meatballs, pinch off a tablespoon of your raw mixture. Flatten it into a tiny patty and quickly fry it in your skillet. Taste it. Does it need more salt? More parmesan? A pinch of red pepper flakes? Adjust your raw mixture accordingly. Never guess with your seasoning.
The Final Word on Tender Meatballs
Cooking phenomenal food at home does not require you to possess superhuman culinary instincts. It requires a basic understanding of how your ingredients react to heat, a refusal to use toxic, subpar equipment, and the willingness to ditch outdated advice like using dry breadcrumbs.
By embracing the science of the panade, you are taking control of the protein structures in your food. You are forcing the meat to stay tender, juicy, and light. The next time you host a weekend dinner party, and your guests bite into these impossibly soft, flavor-packed meatballs, they are going to ask you for your secret. You can smile, pour yourself another glass of wine, and tell them the truth: it is just a little bit of science, and a whole lot of soggy bread. You’ve got this. Now get into the kitchen and show that ground beef who is boss.






