Listen, we need to have a serious talk about the absolute massacre happening on your stovetop every Tuesday night. I know exactly what you are doing. You buy a beautiful, expensive piece of salmon or a perfectly marbled steak. You drop it into a stainless steel skillet, hear a satisfying sizzle, and then, three minutes later, tragedy strikes. You try to flip it, but the protein has chemically welded itself to the metal. Panic sets in. You scrape, you pry, you curse, and eventually, you are left serving a mangled, shredded pile of meat while spending the next twenty minutes aggressively scrubbing the pan in the sink.
I have been there. We have all been there. It is one of the most frustrating rookie kitchen mistakes that drives perfectly capable home cooks back into the welcoming, yet highly toxic, arms of cheap non-stick cookware. But as your resident culinary realist, I am here to tell you that you do not need a culinary degree to cook like a professional, and you certainly do not need to rely on chemical coatings that peel off into your scrambled eggs.
What you need is a basic, working understanding of thermodynamics. Specifically, you need to master the Leidenfrost effect. By understanding the precise temperature thresholds required to create a microscopic vapor barrier, you can transform an uncoated 18/10 stainless steel skillet into a naturally non-stick workhorse. This is the definitive, exhaustive masterclass on exactly how to prevent lean proteins from bonding to your cookware, saving your dinners and your sanity.
The Microscopic Battlefield: Why Proteins Stick to Stainless Steel
To understand how to stop food from sticking, we first have to understand the science of why it sticks in the first place. When you look at a high-quality stainless steel skillet, the surface appears perfectly smooth. It is shiny, sleek, and feels like glass. But if you were to look at that exact same surface under a powerful microscope, you would see a jagged landscape of microscopic valleys, crevices, and pores.
When you add food to a cold or improperly heated pan, the natural moisture and fats from the food seep down into these microscopic valleys. But the physical entrapment is only half the battle. The real enemy is chemistry.
The Chemistry of Adhesion
Food sticks to stainless steel due to the formation of chemical bonds between the molecules in your food and the metal atoms on the surface of the pan. These bonds come in two primary forms: relatively weak Van der Waals forces, and incredibly strong covalent bonds.
Protein-rich foods—like chicken breasts, fish fillets, and eggs—are particularly notorious for sticking. Why? Because proteins are complex molecules tightly folded into three-dimensional structures. When you introduce these proteins to heat, they begin to denature. This means their tightly wound structures unfold and break apart, exposing highly reactive side chains and amino groups. These exposed groups, specifically the carboxylate and polyester groups, are desperately looking for something to bond with.
Stainless steel is an alloy, and while it is less reactive than pure cast iron, it still contains plenty of iron atoms on its surface. The denatured proteins in your perfectly seasoned chicken breast find these iron atoms and form covalent complexes with them. Congratulations, you have just initiated a chemical reaction that has effectively glued your dinner to your cookware.
The Role of Moisture and Starch
It is not just protein that causes a nightmare in the skillet. As food cooks, it breaks down and releases liquids containing free amino acids, sugars, and starches. When these starches hit the pan, they absorb water, swell, and undergo gelatinization, turning into a sticky paste that settles into the pan’s surface defects.
Simultaneously, if the pan is not hot enough to rapidly evaporate this surface moisture, the food sits in a shallow pool of its own juices. This completely halts the Maillard reaction—the complex chemical process of non-enzymatic browning that creates the delicious crust on seared meats. Instead of searing, your food is steaming, ensuring that it remains pale, rubbery, and firmly attached to the metal. Learning how to manage this moisture is one of the most vital surviving kitchen disasters skills you can develop.
The Toxic Truth: Why We Are Banishing “Non-Stick” Forever
At this point, you might be thinking, “This sounds like a lot of science. I’m just going to buy a $20 non-stick pan from the supermarket.”
Absolutely not. We have a strict “no-go” rule on toxic gear in this kitchen. As someone who values efficiency for weekday meals but demands perfection on the weekends, I refuse to compromise my health or my food’s flavor for a cheap chemical shortcut.
For decades, the non-stick cookware industry has relied on synthetic chemicals known as PFAS (per- and polyfluoroalkyl substances), specifically PTFE (polytetrafluoroethylene), which is most commonly known by the brand name Teflon. These are widely referred to as “forever chemicals” because they do not break down in the environment or in the human body.
The Health Risks of PFAS and PTFE
The data surrounding these chemicals is horrifying. Up until a federal phase-out began around 2013, PTFE was manufactured using PFOA (perfluorooctanoic acid), a chemical that is currently found in the blood of 99.7 percent of Americans. Current peer-reviewed scientific studies and reports from the US Environmental Protection Agency (EPA) in 2026 have linked PFAS exposure to a terrifying laundry list of health issues. These include reproductive harm, decreased fertility, developmental delays in children, interference with natural hormones, reduced immune system efficacy, and an increased risk of prostate, kidney, and testicular cancers.
Even though PFOA was phased out, the industry simply replaced it with other PFAS chemicals, like GenX, which have similar chemical structures and present many of the exact same health concerns.
The “Teflon Flu” and Microplastics
When you heat a PTFE-coated pan past 500°F (260°C)—which can happen in mere minutes on a modern gas or induction stove—the coating begins to degrade, releasing toxic fumes. In recent years, there has been a documented increase in cases of “Teflon flu” (polymer fume fever), an illness characterized by severe flu-like symptoms caused by inhaling these chemical vapors.
Furthermore, as these cheap pans inevitably scratch and peel, they shed millions of microplastic and nanoplastic particles directly into your food. A 2025 study highlighted that cooking with scratched non-stick cookware is a primary vector for ingesting these plastics, which are linked to endocrine disruption and reproductive harm.
The Deceptive Marketing
Do not be fooled by clever marketing. A recent study by the Ecology Center found that 79% of tested non-stick cooking pans were coated with PTFE, even if the packaging proudly claimed to be “PFOA-free”. “PFOA-free” does not mean “PFAS-free”.
A high-quality, uncoated 18/10 stainless steel skillet is an investment that will literally outlive you. It is indestructible, it can go from the stovetop to a 500-degree oven, and it creates the kind of fond (the browned bits left in the pan) that forms the base of mind-blowing pan sauces. Ditching toxic cookware is one of the most simple kitchen fixes you can make for your long-term health. We are not sacrificing performance; we are simply going to use physics to our advantage.
Enter the Leidenfrost Effect: The Physics of Levitation
If we cannot rely on chemical coatings, we must rely on thermodynamics. This brings us to the hero of our story: The Leidenfrost effect.
In 1756, a German physician and theologian named Johann Gottlob Leidenfrost published a manuscript titled De Aquae Communis Nonnullis Qualitatibus Tractatus (A Tract About Some Qualities of Common Water). In this text, he described a fascinating physical phenomenon: when a liquid comes into contact with a solid surface that is significantly hotter than the liquid’s boiling point, it produces an insulating vapor layer that keeps the liquid from boiling rapidly.
How the Vapor Barrier Works
Water boils at 212°F (100°C). If you drop water onto a pan heated to 250°F (121°C), the water will simply flatten out, sizzle violently, and evaporate almost instantly.
However, if you heat that pan to a much higher specific threshold—known as the Leidenfrost point—something magical happens. For water on a stainless steel surface, this point is generally reached between 379°F (193°C) and 420°F (215°C), depending on atmospheric pressure and water mineral content.
When a water droplet hits a pan at this temperature, the very bottom of the droplet vaporizes the microsecond it touches the metal. This rapid vaporization creates a microscopic cushion of steam. Because steam is a relatively poor conductor of heat compared to direct metal contact, this vapor layer physically insulates the rest of the water droplet, preventing it from boiling away immediately. The droplet will literally levitate on its own steam, skittering and gliding across the surface of the pan like a bead of liquid mercury.
Applying the Effect to Proteins
So, how does floating water help you cook a chicken breast? The exact same physics apply to the moisture contained within your food.
When you place a piece of protein into a pan that has achieved the proper temperature, the instantaneous vaporization of the surface moisture on the meat creates a microscopic steam cushion. This vapor layer physically lifts the food a fraction of a millimeter above the microscopic crevices of the stainless steel, preventing the denaturing proteins from making direct contact with the iron atoms. No direct contact means no covalent bonds. No covalent bonds means no sticking.
You are effectively replacing a toxic chemical barrier with a temporary, naturally occurring thermodynamic barrier. Understanding this is one of the ultimate foolproof cooking secrets that will elevate your culinary game overnight.
The Masterclass: The Water Droplet Test
Knowing the science is great, but executing it on a busy Tuesday evening is another matter entirely. You need a reliable, repeatable method to gauge the temperature of your skillet without resorting to an expensive infrared thermometer. This is where the Water Droplet Test becomes your best friend.
The Protocol
- Start Dry: Place your clean, completely dry stainless steel skillet on the burner. Do not add oil yet. This is a critical rule.
- Medium Heat: Turn your burner to medium or medium-high. Never blast a stainless steel pan on maximum heat, as this will cause warping and uneven hot spots.
- The Flick: After a few minutes, wet your fingers with cold tap water and flick three to five distinct droplets into the center of the pan. Observe how the water reacts.
Reading the Results
You are looking for the Goldilocks zone. Here is how to decode the thermodynamic feedback your pan is giving you:
- Too Cold (Under 212°F / 100°C): The water droplets simply sit there in a puddle and slowly bubble. Wipe the pan dry and keep waiting.
- Almost There (212°F to ~350°F / 100°C to 176°C): The water hits the pan, sizzles violently, and evaporates into steam within one or two seconds. The pan is hot, but it has not reached the Leidenfrost point. Do not add your food yet; it will stick instantly.
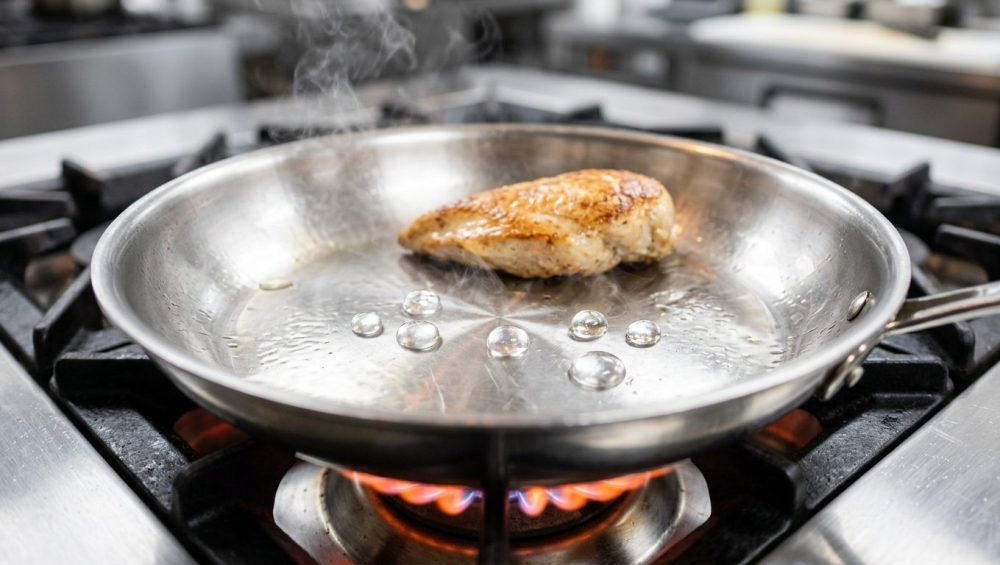
- The Sweet Spot (379°F to 420°F / 193°C to 215°C): The water droplets hit the pan and immediately pull together into tight spheres. They do not evaporate. Instead, they skitter, bounce, and glide effortlessly across the surface of the metal like air hockey pucks. They will last for several seconds before finally disappearing. You have achieved the Leidenfrost effect.
- Too Hot (Over 450°F / 232°C): If you wait too long, the pan will overheat. At this stage, the water droplets will hit the pan and explode violently into dozens of tiny, instantly vanishing micro-beads. If you add oil now, it will instantly smoke, polymerize into a sticky mess, and burn your food. Take the pan off the heat for a minute to let it cool down.
Note on Altitude and Water Quality: If you live at a high altitude (above 5,000 feet), the Leidenfrost point drops to around 365°F (185°C). Additionally, it is best to use standard tap water for this test; the dissolved minerals like calcium and magnesium actually help nucleate the rapid vaporization, making the visual cue more distinct than if you used distilled water.
The “Hot Pan, Cold Oil” Rule Explained
Once you have verified that your pan is hovering right around 400°F (204°C) using the water test, you must quickly wipe out any remaining water droplets with a dry towel. Water and hot oil are mortal enemies, and we do not want a grease fire.
Now, it is time to add your cooking fat. This sequence—heating the dry pan before adding the oil—is non-negotiable.
Why We Wait to Add the Fat
If you pour oil into a cold pan and heat them together, the oil will slowly break down as it heats up, degrading its structure before you even start cooking. More importantly, as the stainless steel heats up, the metal actually expands slightly, causing those microscopic pores and valleys we discussed earlier to open up and then tighten.
By waiting until the pan is fully heated, and then adding cold (room temperature) oil, the fat hits the hot metal and immediately drops in viscosity. It becomes incredibly thin and fluid, allowing it to instantly rush into and seal all the microscopic imperfections on the surface of the steel.
Furthermore, adding a high-smoke-point oil to a perfectly heated pan triggers a rapid process called polymerization. The heat breaks down the oil molecules, causing them to link together and form a slick, temporary patina—a microscopic, non-stick polymer layer that acts as a secondary barrier between your food and the iron atoms. Unlike the permanent seasoning on a cast iron skillet, this temporary patina will wash away with soap and water after you are done cooking.
Choosing the Right Oil
Because your pan is sitting at roughly 400°F (204°C), you cannot use delicate fats like extra virgin olive oil or whole butter. Their smoke points are too low (around 320°F to 350°F), and they will instantly burn, turning acrid and releasing free radicals.
You must use a neutral, high-smoke-point oil. Avocado oil (smoke point ~520°F), peanut oil (~450°F), or clarified butter/ghee (~450°F) are your best friends here. Add just enough to coat the bottom of the pan, swirl it around, and watch for it to shimmer. When you see faint wisps of smoke just beginning to form, it is time to drop the protein.
Step-by-Step Execution: Searing Without Tearing
We have covered the physics, the chemistry, and the setup. Now, let us walk through the actual execution of cooking a piece of protein. This methodology is exactly simple weeknight dinners material once you get the hang of it. It takes practice, but the results are professional-grade.
Step 1: Moisture is the Enemy (Prep the Protein)
The Leidenfrost effect relies on a microscopic layer of steam, but if there is too much water on the surface of your meat, it will instantly crash the temperature of your pan. When the temperature drops below the Leidenfrost point, the vapor barrier collapses, the water pools, and the proteins bond to the metal.
You must aggressively dry your protein. Take a paper towel and pat your chicken breast, fish fillet, or steak completely dry. If you have the time, salt the meat and leave it uncovered in the fridge on a wire rack for a few hours. This dry-brining process draws out surface moisture and allows it to evaporate, guaranteeing a spectacular crust.
Additionally, let your protein sit at room temperature for 15 to 20 minutes before cooking. Throwing a 34°F piece of meat directly from the fridge into a 400°F pan is a thermal shock that will plummet the surface temperature of the steel, ruining your non-stick vapor barrier.
Step 2: Heat and Test
Place your dry skillet on medium heat. Wait 2 to 3 minutes. Perform the water droplet test. When the water beads up and skates around the pan, you are ready. Wipe the water out.
Step 3: Add the Oil
Pour in 1 to 2 tablespoons of avocado or peanut oil. Swirl it to coat the entire surface. Wait 10 to 15 seconds for the oil to heat up, thin out, and begin to shimmer.
Step 4: The Drop and the Patience
Carefully lay your protein into the pan, laying it away from you so hot oil does not splash back onto your hands. You should hear an immediate, aggressive sizzle. That sound is the surface moisture vaporizing and creating your Leidenfrost cushion.
Now comes the hardest part for any home cook: Take your hands off the spatula and step away from the stove.
Do not poke it. Do not nudge it. Do not try to lift the edge to see how it looks. If you try to move the protein before the Maillard reaction has run its course, it will tear.
Step 5: The Natural Release Mechanism
Here is the beautiful secret of cooking with stainless steel: the pan will tell you when the food is ready to be flipped.
As the heat drives moisture out of the surface of the meat, the amino acids and sugars undergo the Maillard reaction, forming a complex, dehydrated crust. Once this crust is fully formed, the structure of the exterior is completely changed. It is no longer a sticky, wet matrix of reactive proteins; it is a hard, polymerized shell.
When this happens, the food will naturally release its grip on the metal. If you gently nudge the chicken breast with your tongs and it resists, it is not ready. Wait another 60 seconds. When it is ready, it will slide across the pan as easily as if it were on Teflon. Flip it, repeat on the other side, and marvel at the golden-brown perfection you just created.
Troubleshooting Your Sizzle: Why You Are Still Messing Up
If you followed the steps above and your fish still turned into a mangled disaster, do not throw the pan out the window just yet. Thermodynamics is an exact science, and human error is usually the culprit. Let us diagnose the problem so you can cure cooking anxiety once and for all.
1. You Crowded the Pan
This is the number one mistake I see. If you try to cook four massive chicken breasts in a 10-inch skillet, you are going to fail. As the meat cooks, it releases water. If the pan is crowded, that water has nowhere to evaporate. It gets trapped between the pieces of meat, creating a massive steam cloud. The trapped moisture drops the temperature of the pan below the Leidenfrost point, the vapor barrier dies, the Maillard reaction stops, and your meat boils in its own juices while permanently adhering to the steel. Always cook in batches, leaving at least an inch of space between each piece of food.
2. You Used the Wrong Heat Source
If your pan is too thin, or if your burner is too small for the pan, you will create severe hot and cold spots. The center of the pan might be at 400°F (perfect Leidenfrost territory), while the edges are sitting at 250°F. When your food hits the cold spots, it sticks. This is why investing in high-quality, fully clad stainless steel (where the heat-conductive aluminum or copper core runs all the way up the sides of the pan) is one of the essential tools every beginner needs. It ensures even thermal distribution.
3. The Pan Was Too Hot
Some people read about the Leidenfrost effect and assume “hotter is better.” False. If you heat your pan to 500°F and drop a delicate piece of white fish into it, the extreme heat will instantly incinerate the exterior of the fish before the interior even begins to warm up. Furthermore, the oil will immediately smoke and break down into bitter, carcinogenic compounds. If your water droplets explode into vapor instead of gliding smoothly, take the pan off the heat for 60 seconds before adding oil.
4. You Panicked and Moved It Too Soon
We covered this, but it bears repeating. Patience is a culinary virtue. If you try to force the flip, you will rip the protein in half. The crust must form to trigger the natural release. Trust the process. Trust the chemistry.
5. Lowering the Heat Post-Sear
Once you achieve that beautiful sear and flip the protein, you often need to lower the burner temperature. The initial high heat was required to establish the Leidenfrost vapor barrier and kickstart the Maillard reaction. But if you leave the burner on medium-high for a thick piece of chicken, the outside will burn to ash before the inside reaches a safe internal temperature. Once the crust is formed on the first side, lower the heat to medium-low to gently finish cooking the interior. The crust you already built will prevent sticking on the flip side.
The Liberation of the Home Cook
Mastering the stainless steel skillet is a rite of passage. It is the moment you transition from simply following recipes to actually understanding the mechanics of cooking. Yes, it requires a little bit of focus. Yes, you have to stand by the stove and watch water droplets dance. But the reward is absolute culinary liberation.
You will never again have to ingest microscopic flakes of toxic forever chemicals. You will never again have to throw away a scratched pan after two years of use. You will build incredible, deeply flavored pan sauces from the beautiful fond left behind by perfectly seared meats.
Cooking is not magic; it is applied physics and chemistry. By respecting the rules of thermodynamics, controlling your moisture, and utilizing the Leidenfrost effect, you can command your kitchen with the confidence of a seasoned professional. So, dry your steaks, preheat your pans, and go embrace the art of the kitchen. Your Tuesday night dinners will never be the same.


