
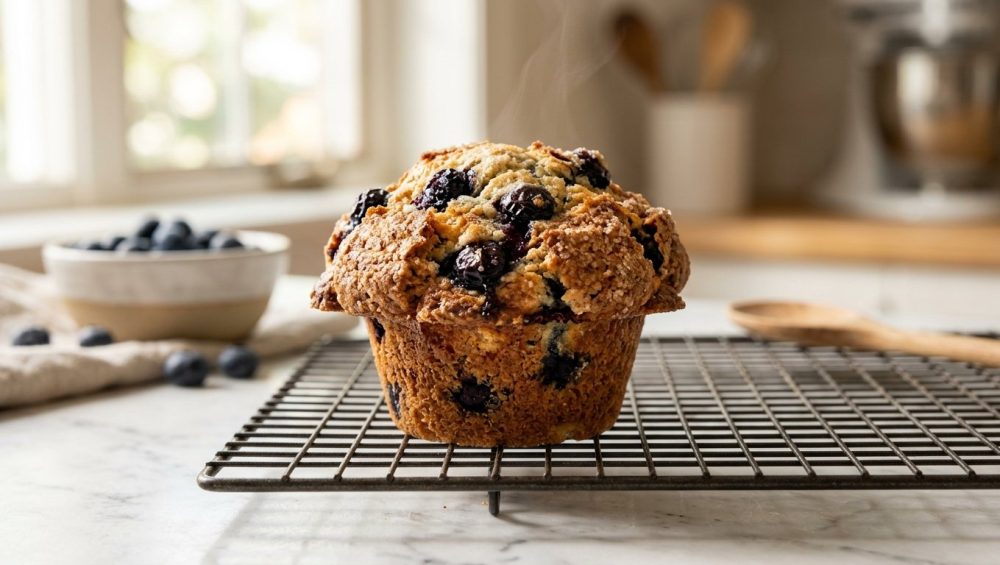
If there is one thing that unites home bakers in universal frustration, it is the tragedy of the flat-topped muffin. You know exactly what I am talking about. You spend your precious weekend morning measuring ingredients, whisking batter, and eagerly staring through the oven window, fully expecting those gorgeous, sky-high, bakery-style domes to miraculously appear. Instead, you pull out a tray of sad, squat little pucks that look more like inflated hockey disks than proper breakfast pastries. They taste fine, sure, but they lack that majestic, crusty, overflowing top that makes a bakery muffin so irresistible.
For years, you have probably blamed yourself. You assumed you overmixed the batter, or that your leavening agents were expired, or—the most common misconception of all—that commercial bakeries just have access to magical, expensive convection ovens that you could never dream of owning.
Listen to me: you do not need a culinary degree, and you certainly do not need a ten-thousand-dollar commercial oven to achieve professional results in your standard home kitchen. The brutal truth is that the vast majority of muffin recipes published in cookbooks and on the internet are setting you up for failure by giving you the wrong baking temperature. They tell you to bake your muffins at a steady 350°F from start to finish. That temperature is a lie, and it is the exact reason your muffins are spreading outward instead of springing upward.
The secret to achieving those towering, crispy-edged domes is a zero-cost, highly scientific trick called temperature staging. By simply starting your oven at a blistering 425°F for the first five to seven minutes before dropping it back down to 350°F, you can completely manipulate the thermodynamics of your batter.
Today, we are leaving the pretentious chef-speak at the door and diving deep into the actual science of oven spring. We are going to break down the chemistry of your leavening agents, the physics of batter expansion, and the absolute necessity of ditching your toxic kitchenware. Grab your whisk, because we are about to transform your weekend baking game forever.
The Science of the Dome: Understanding Oven Spring
To understand why your muffins are flat, you first need to understand a concept called “oven spring.” In the culinary world, oven spring refers to the rapid, final burst of expansion that occurs in doughs and batters during the first few minutes of baking, right before the exterior crust hardens and sets the final structure of the baked good.
When you slide a pan of muffin batter into a hot oven, three distinct physical and chemical reactions fire off simultaneously. First, the heat triggers your chemical leaveners to rapidly release carbon dioxide gas. Second, the liquid in your batter (from the milk, eggs, or water) reaches the boiling point of 212°F and begins converting into steam. Third, the proteins in the flour and eggs begin to coagulate, while the starches gelatinize, effectively building the rigid “walls” that trap those expanding gases.
The shape of your final muffin is entirely dictated by the speed at which these three things happen. This is a pure geometry and thermodynamics problem.
Why the Standard 350°F Bake Fails You
When you bake a muffin at a steady, moderate 350°F, the heat penetrates the batter slowly and gently. The carbon dioxide and steam begin to expand, but because the oven environment isn’t aggressively hot, the top surface of the muffin batter remains wet, soft, and pliable for a relatively long time.
Because the top hasn’t set into a crust, the rising gases take the path of least resistance. The batter simply spreads outward, bleeding over the edges of the tin and flattening out horizontally. By the time the temperature of the batter actually gets high enough to set the structure and lock the proteins into place, the gases have already escaped or expanded sideways. The result? A flat, uninspiring top.
The Magic of the 425°F Initial Blast
Now, let’s look at what happens when you introduce temperature staging. When you blast your batter with an initial temperature of 425°F, you completely alter the timeline of the bake.
That intense, aggressive heat immediately attacks the exposed surface of the batter. Within the first five minutes, the top layer of the muffin rapidly loses moisture and sets into a firm, flexible crust. Meanwhile, the interior of the muffin is still heating up. As the chemical leaveners and steam produce a massive volume of expanding gas inside the muffin, those gases look for a way to escape. But because the edges and the top surface have already begun to set, the batter can no longer spread outward.
The only direction left for the rapidly expanding interior to go is straight up. The internal pressure forces the setting crust to push skyward, creating that beautiful, towering dome. Once that structure is achieved—usually around the five to seven-minute mark—you must drop the oven temperature back down to 350°F. If you leave it at 425°F, the outside of the muffin will burn to a crisp before the center has a chance to bake through. Lowering the heat allows the interior crumb to finish cooking gently and evenly.
The Chemistry of Double-Acting Baking Powder
You cannot master the 425°F temperature trick without understanding the chemical engine driving it: baking powder. Specifically, double-acting baking powder.
Many home cooks mistakenly believe that baking soda and baking powder are interchangeable. They are not. Baking soda (sodium bicarbonate) is a base that requires an acidic ingredient (like buttermilk, yogurt, or lemon juice) to activate. The moment baking soda touches acid, it immediately creates carbon dioxide. It is a single, fast-acting reaction.
Baking powder, on the other hand, is a complete leavening system. It contains both the alkaline base (sodium bicarbonate) and the acidic salts needed for the reaction, buffered by a starch (usually cornstarch) to keep them from reacting in the container.
Almost all commercial baking powder sold to home consumers today is “double-acting.” This means it contains two different types of leavening acids to create a staged release of carbon dioxide.
The First Reaction: Hydration
The first reaction occurs the moment the baking powder gets wet. When you mix your dry ingredients with your wet ingredients at room temperature, the fast-acting acid (often monocalcium phosphate) dissolves and reacts with the sodium bicarbonate. This releases the first burst of carbon dioxide, creating millions of tiny, microscopic air bubbles throughout your batter. This process is called nucleation. These bubbles provide the foundational structure of your crumb.
The Second Reaction: Heat Activation
The second reaction is where the high-heat magic happens. Double-acting baking powder contains a second, slow-acting acid (such as sodium aluminum sulfate or sodium acid pyrophosphate) that will not react at room temperature. It requires a significant thermal trigger—usually around 140°F (60°C)—to dissolve and react.
When you hit your muffin batter with a 425°F oven, that thermal trigger is reached incredibly fast. The secondary acid rapidly reacts, pumping a massive second wave of carbon dioxide directly into those pre-existing nucleated bubbles. Because the heat is so high, this gas expansion is violent and rapid, perfectly coinciding with the setting of the exterior crust. If you were to bake at 350°F, this secondary reaction would happen too slowly, and the gas would gently seep out of the soft batter rather than violently pushing the dome upward.
Batter Mechanics: The Absolute Necessity of the Rest
If you want to bake like a professional, you have to stop rushing the process. One of the biggest mistakes weekend bakers make is aggressively whisking their batter and immediately throwing it into the oven. If you want maximum height and a tender, bakery-quality crumb, you must let your batter rest.
Starch Hydration Kinetics
Flour is composed of roughly 70% to 75% starch by weight. When you first mix your wet and dry ingredients, the flour is still in a largely unhydrated state. It takes time for liquid to physically penetrate the microscopic starch granules.
If you bake the batter immediately, you are sending unhydrated starches into the oven. These dry granules can rupture unevenly during baking, resulting in a coarse, crumbly, and dry texture. However, if you let the batter rest at room temperature for 15 to 30 minutes, or even better, cover it and let it rest in the refrigerator overnight, the starches have time to fully absorb the milk, eggs, and oil.
As the starches swell and hydrate, the batter undergoes a massive textural transformation. It changes from a thin, pourable liquid into a thick, robust, scoopable dough. This is critical for oven spring. A thick, highly viscous batter has the structural integrity to hold onto the carbon dioxide bubbles without letting them float to the surface and pop. Furthermore, a thick batter physically resists spreading outward in the pan, forcing all that leavening power to push vertically.
Gluten Relaxation
The other benefit of resting your batter is gluten relaxation. The moment water touches flour, two proteins (glutenin and gliadin) link together to form gluten. Mixing the batter develops these gluten strands, making them tight and elastic. If you bake the muffins while the gluten is stressed and tight, the resulting crumb will be tough and rubbery.
Allowing the batter to rest gives those overworked gluten strands time to relax and lengthen. This ensures that while the outside of your muffin gets beautifully crusty in the 425°F heat, the inside remains impossibly soft and tender. Do not skip the rest period. It is free, it requires zero effort, and it fundamentally changes the chemistry of your bake.
The “Fill to the Brim” Rule: Ditching Outdated Advice
If you have ever read the back of a boxed muffin mix or an old-school cookbook, you have likely seen the instruction to “fill the muffin cups two-thirds full.” I want you to completely erase that advice from your memory. That rule applies to cupcakes, which need a flat top so they can be easily frosted. We are making muffins, and we want domes.
To achieve a massive, bakery-style top, you must provide enough batter to actually create the overhang. You need to fill your muffin liners all the way to the top. I am talking about a heaping 6 to 8 tablespoons of batter per cup. The batter should be practically crowning over the edge of the paper liner before it even goes into the oven.
Because you have allowed your batter to rest and hydrate, it will be thick enough to sit proudly above the rim without spilling over the sides of the pan. When that initial 425°F heat hits this massive volume of thick batter, the top will crust over and erupt upward, creating that iconic, oversized muffin top that you can easily tear off and eat first (because let’s be honest, it is the best part).
The Alternating Cup Strategy
Here is a brilliant, zero-cost trick used by professional bakers: do not fill every single cavity in your muffin tin. Instead, fill every other cup in a staggered, checkerboard pattern.
By leaving the adjacent cups empty, you are doing two things. First, you are allowing the hot oven air to circulate completely around each individual muffin, ensuring rapid, even heat distribution for a faster crust set. Second, you are giving the massive muffin tops physical space to expand outward and upward without aggressively bumping into their neighbors and fusing together into a giant, misshapen loaf.
If you are using a standard 12-cup tin, you will only bake 6 muffins at a time. Yes, it requires baking in batches, but remember my philosophy: if you are going to spend your weekend baking, do it right. If you want to ensure your batches are identical, I highly recommend using a digital kitchen scale to weigh your ingredients rather than relying on inaccurate volume cups. It guarantees the precise hydration levels needed for a thick, stable batter.
The “No-Go” Rule: Ditching Toxic Teflon Bakeware
I cannot write a masterclass on high-heat baking without addressing the elephant in the room: your equipment. I have zero patience for cheap, toxic kitchenware, and if you are going to utilize the 425°F temperature staging method, we need to have a very serious conversation about the pans you are using.
If you are using a dark, scratched, peeling non-stick muffin tin that you bought for five dollars at a discount store ten years ago, you need to throw it in the trash immediately. I do not say this to be a snob; I say this because it is a legitimate health and safety hazard.
The Dangers of PFAS and High Heat
The vast majority of cheap non-stick bakeware is coated with polytetrafluoroethylene (PTFE), commonly known by the brand name Teflon. This coating is manufactured using a class of synthetic chemicals known as PFAS (per- and polyfluoroalkyl substances), often referred to as “forever chemicals” because they do not break down in the environment or in the human body.
While manufacturers claim these coatings are safe at normal cooking temperatures, the science paints a much darker picture. PTFE coatings begin to degrade and break down at temperatures above 500°F (260°C). When they degrade, they release highly toxic, invisible fumes that can cause a condition known as “polymer fume fever” in humans (and is notoriously fatal to pet birds).
You might be thinking, “But the recipe only calls for 425°F, so I’m safe!” Not necessarily. Home ovens are notoriously inaccurate. It is incredibly common for a residential oven to have extreme hot spots or to wildly overshoot its target temperature during the preheating phase. If your oven spikes to 500°F while trying to maintain that 425°F environment, your scratched, peeling non-stick pan is actively off-gassing toxic chemicals directly into the food you are about to feed your family.
Furthermore, dark non-stick coatings absorb heat much faster than light-colored metals. This means the edges and bottoms of your muffins will scorch and burn before the center has a chance to bake through.
The Safe, Professional Alternatives
You do not need toxic chemicals to prevent your muffins from sticking. You need quality materials and a bit of technique.
I strongly advocate for heavy-gauge, bare aluminum bakeware. Aluminum is an exceptional conductor of heat, meaning it heats up quickly and evenly without the extreme temperature spikes associated with thin, cheap steel. Because it is light in color, it reflects ambient heat, preventing the bottoms of your muffins from burning during that initial 425°F blast.
If you prefer not to use aluminum, look for high-quality, uncoated stainless steel pans, or heavy-duty ceramic-coated stoneware (provided the manufacturer explicitly guarantees it is free of lead, cadmium, and PFAS). Yes, you will need to use paper liners or properly grease the pan with butter, but that is a microscopic price to pay to keep forever chemicals out of your breakfast. If you are worried about your oven’s accuracy during this high-heat technique, do yourself a favor and buy a simple oven thermometer to monitor the internal temperature. It is the cheapest insurance policy you can buy for your baking.
Common Rookie Mistakes Ruining Your Rise
Even with the perfect temperature staging and the safest bakeware, there are a few common pitfalls that can sabotage your oven spring. If you are following the 425°F method and still getting flat muffins, check yourself against this list.
1. You Are Overmixing the Batter
I mentioned gluten relaxation earlier, but it bears repeating. Muffin batter is not cake batter. You should never, ever use an electric mixer to combine your wet and dry ingredients. If you want a tender crumb, you need to stir out the lumps gently by hand, and honestly, you shouldn’t even try to get all the lumps out. Use a spatula and fold the wet ingredients into the dry ingredients just until the flour disappears. It should take no more than 12 to 15 folds. If the batter looks a little lumpy and ugly, you are doing it perfectly. Overmixing develops tough gluten strands that will physically restrict the batter from rising, resulting in dense, chewy pucks.
2. Your Leavening Agents Are Dead
Baking powder loses its potency over time, especially if stored in a humid environment. If your baking powder has been sitting in the back of your pantry since the last presidential election, it is dead. The chemical salts have absorbed ambient moisture and pre-reacted in the can. To test your baking powder, drop a half-teaspoon into a small bowl of boiling water. It should immediately bubble and fizz violently. If it just sits there looking cloudy, throw it away and buy a fresh can.
3. You Are Opening the Oven Door
I know it is tempting to peek at your creations, but you must resist the urge. The magic of the 425°F blast relies on trapping a massive amount of thermodynamic energy and steam inside the oven cavity. If you open the door during the first ten minutes of baking, you instantly release all that trapped heat and steam. The temperature plummets, the crust fails to set, the steam dissipates, and the structure of your muffin collapses. Turn on the oven light and watch through the glass. Do not touch that handle until it is time to check for doneness.
4. You Are Scooping Your Flour Directly from the Bag
Baking is a science of ratios. If you are jamming a measuring cup directly into a compacted bag of flour, you are packing up to 30% more flour into that cup than the recipe intended. This throws off the hydration ratio entirely, leaving you with a dry, heavy batter that is too dense for the baking powder to lift. You must stop scooping your flour blindly. Either use a scale to weigh it in grams, or use the “spoon and level” method, gently spooning the flour into the cup and leveling it off with a knife.
The Fat Factor: Butter vs. Oil in Muffin Structure
While we are deep in the science of structure and rise, it is worth discussing the role of lipids in your batter. The type of fat you choose directly impacts the texture, flavor, and dome of your muffin.
Butter is roughly 80% butterfat and 20% water and milk solids. When you use melted butter in a muffin batter, that 20% water content contributes to the steam production during the 425°F blast, aiding in the oven spring. Furthermore, butter solidifies at room temperature, which gives the final baked muffin a slightly sturdier, tighter crumb. The obvious benefit of butter is its unbeatable, rich flavor.
Oil (such as neutral canola, vegetable, or avocado oil) is 100% fat with zero water content. Because oil remains liquid at room temperature, muffins made with oil will invariably be softer, moister, and stay fresh for days longer than butter-based muffins. The liquid fat coats the flour proteins more thoroughly, inhibiting gluten development and resulting in an incredibly tender crumb.
For the absolute best of both worlds, many professional recipes use a 50/50 split. Using half melted butter and half neutral oil gives you the rich, complex flavor and steam-assisted rise of the butter, combined with the prolonged moisture retention and tenderizing power of the oil.
The Masterclass: The Ultimate High-Domed Muffin Technique
We have covered the chemistry, the thermodynamics, the equipment, and the pitfalls. Now, let us consolidate all of this knowledge into a definitive, step-by-step masterclass technique that you can apply to almost any standard muffin recipe.
Step 1: Prep the Batter and Rest It
Whisk your dry ingredients (flour, sugar, salt, fresh double-acting baking powder) in one bowl. Whisk your wet ingredients (eggs, milk, melted fat, extracts) in another. Pour the wet into the dry and fold gently with a spatula just until the dry streaks disappear. Do not overmix. Cover the bowl with plastic wrap and let it sit at room temperature for at least 30 minutes. If you have the time, let it rest in the refrigerator overnight. Just like chilling your dough before baking cookies, resting muffin batter hydrates the starches and relaxes the gluten for a superior texture.
Step 2: Preheat Aggressively
While the batter rests, preheat your oven to 425°F (218°C). Do not just wait for the oven to beep; let it sit at 425°F for a full 15 to 20 minutes before baking to ensure the walls of the oven are fully saturated with heat. This prevents the temperature from plummeting when you open the door to put the pan in.
Step 3: Prep the Safe Bakeware
Take your heavy-gauge, bare aluminum muffin tin and line every other cup with a paper liner, creating a staggered checkerboard pattern. This allows optimal airflow. If you are dealing with sticky batters (like honey or molasses), use a plunger measuring cup to accurately portion those ingredients without leaving half of them behind in the measuring tool.
Step 4: Fill to the Brim
Using a spring-loaded cookie scoop or a large spoon, portion the thick, rested batter into the lined cups. Fill them all the way to the top. Do not be shy. You want 6 to 8 tablespoons of batter per cup. The batter should be mounded slightly over the top of the liner.
Step 5: The 425°F Blast
Place the tin on the center rack of the oven. Close the door quickly to trap the heat. Set a timer for exactly 5 to 7 minutes. During this time, the double-acting baking powder will hit its thermal trigger, the liquids will convert to steam, and the crust will set, forcing the batter to erupt upward into a massive dome.
Step 6: The 350°F Finish
When the timer goes off, do not open the oven door. Simply reach up to your control panel and reduce the temperature to 350°F (177°C). The oven will gradually cool down to the new temperature, allowing the center of the muffins to bake completely through without burning the exterior crust. Bake for an additional 15 to 18 minutes, or until a toothpick inserted into the center comes out clean.
Step 7: The Cool Down
Remove the tin from the oven. Let the muffins sit in the hot pan for exactly five minutes to stabilize their structure, then carefully transfer them to a wire cooling rack. If you leave them in the pan too long, the residual steam will condense on the bottom of the liners, leaving you with soggy bottoms.
A Note on Delicate Batters
I must add one small caveat to this masterclass. The 425°F to 350°F temperature staging method works miracles on standard, sturdy batters (like blueberry, vanilla, or basic bran). However, if you are baking a recipe with an exceptionally high sugar content, a delicate chocolate batter heavy with cocoa powder, or a muffin piled high with a buttery brown-sugar streusel topping, you need to be careful.
Sugar and cocoa powder scorch very easily at high temperatures. If you hit a delicate, high-sugar batter with 425°F, the sugars on the surface may caramelize and burn before the five minutes are up. For these specific types of delicate recipes, it is safer to bake them at a steady 375°F. You will still get a better rise than the standard 350°F, but without the risk of a bitter, burnt crust.
Final Thoughts: Reclaiming Your Kitchen
Baking does not have to be a source of stress, and you certainly do not have to settle for mediocre results just because you are cooking in a home kitchen. The culinary world is full of outdated myths and bad advice that convince home cooks they aren’t capable of greatness.
By simply understanding the thermodynamic relationship between heat, hydration, and chemical leaveners, you have unlocked the secret to bakery-quality results. You now know how to manipulate oven spring, why your batter demands a rest, and why cheap, toxic non-stick pans have no place in a serious kitchen. (Seriously, if you are also dealing with other toxic or failing gear, like when your silicone spatulas taste soapy or your glass baking dish shattered in the oven, it is time to upgrade your arsenal).
The next time you wake up on a Saturday morning craving a blueberry muffin, do not reach for your keys to drive to the local coffee shop. Grab your whisk, trust the science, crank that oven up to 425°F, and watch the magic happen. You’ve got this. If you are ready to fix the rest of your kitchen disasters, be sure to check out my essential kitchen survival guide. Now go bake something spectacular.






