Listen, we need to have a serious talk about your weekend brunch habits. I know exactly how your Sunday morning goes. You wake up feeling ambitious. You decide that today is the day you are going to conquer Eggs Benedict. You toast the English muffins, you successfully whisk together a passable hollandaise, and then you face the final boss: the poached egg. You get your water boiling, you give it a little hopeful swirl just like the celebrity chefs on television told you to, and you drop the egg in.
Instantly, disaster strikes.
Your beautiful, pristine egg explodes into a chaotic, wispy, Cthulhu-esque sea monster. The pot is suddenly filled with ghostly white tendrils of floating protein, the yolk sinks to the bottom like a sad yellow stone, and when you finally fish the tragedy out of the water three minutes later, it looks like a wet tissue. You plate it anyway, sigh heavily, and wonder why you didn’t just make toast.
I am here to tell you that it is not your fault. You have been lied to by an industry that loves to overcomplicate the simplest foods. The culinary world is packed with so-called “foolproof” poaching methods that involve creating stressful whirlpools, drowning your eggs in harsh vinegar, or wrapping them in wasteful plastic wrap. It is entirely unnecessary. You do not need a culinary degree, and you certainly do not need to decode pretentious recipe jargon to figure out how to cook breakfast.
The secret to those tight, perfectly oval, diner-style poached eggs comes down to basic biology and one incredibly cheap, strictly non-toxic piece of kitchen equipment: a fine-mesh stainless steel strainer. Today, we are going to break down the exact science of the egg white, dismantle the myths you have been taught, and equip you with a rigorous, foolproof masterclass that will permanently elevate your brunch game. Grab your coffee, and let us get to work.
The Anatomy of an Egg: Why Your Poached Eggs Look Like Sea Monsters
To understand why your poached eggs are turning into a stringy mess, we have to put on our lab coats for a minute and look at the biological architecture of a chicken egg. An egg is not just a homogenous blob of protein and water; it is a highly structured, complex system designed by nature to protect and nourish an embryo. When we cook an egg, we are manipulating that structure. If you do not understand what you are putting into the pot, you cannot control how it behaves.
The Two-Part Egg White: Thick vs. Thin Albumen
Most home cooks look at an egg white and see a single, clear, viscous liquid. This is fundamentally incorrect. The egg white—scientifically known as the albumen—is actually composed of four distinct alternating layers, but for our culinary purposes, we only care about the two primary ones: the inner thick albumen and the outer thin albumen.
The inner thick albumen (the chalaziferous layer) immediately surrounds the yolk. It is tightly bound, structurally sound, and packed with a protein called ovomucin, which gives it a jelly-like, cohesive character. This is the good stuff. This is the part of the egg white that wants to stay together, hug the yolk, and form that beautiful, plump teardrop shape when exposed to heat.
Surrounding that thick layer is the outer thin albumen. This layer is the enemy of the home cook. It is predominantly water and highly soluble proteins. It lacks the structural integrity of the thick albumen. When you crack an egg onto a flat plate, the thick albumen stands up tall and proud around the yolk, while the thin albumen spreads out rapidly into a wide, watery puddle.
When you drop an egg directly into hot water, that thin, watery albumen reacts instantly. Because it has no structural integrity, the thermal currents of the water immediately tear it away from the rest of the egg. Those gross, stringy white wisps floating around your pot? That is the outer thin albumen violently separating from the thick albumen. It is one of the most common rookie kitchen mistakes to assume the entire egg white will cook at the same rate. It will not.
The Aging Process: Why Freshness Actually Matters
You have probably heard that you need to use “fresh eggs” for poaching. This is not just a snobby farm-to-table suggestion; it is a strict biochemical requirement based on the pH levels of the egg.
When an egg is freshly laid, it contains dissolved carbon dioxide, which makes the egg white slightly acidic (around a neutral pH of 7.6). In this slightly acidic state, the proteins in the thick albumen are tightly bound together. However, eggshells are porous. As an egg sits in your refrigerator for days or weeks, that carbon dioxide slowly escapes through the microscopic pores in the shell, and ambient air enters.
As the carbon dioxide leaves, the pH of the egg white rises, becoming increasingly alkaline (sometimes reaching a pH of 9.2 or higher). This alkaline shift physically degrades the ovomucin proteins. The thick, jelly-like albumen begins to break down and liquefy, converting into more of the dreaded thin albumen.
This means that the older your egg is, the higher the ratio of thin, watery albumen to thick albumen. If you try to poach a three-week-old egg straight out of the carton, you are essentially dropping a puddle of water into a pot of water. It will disintegrate immediately. This exact same protein degradation is also why your scrambled eggs leak water onto your plate when you use old cartons. The structural integrity is simply gone.
The Great Vortex Lie: Why Traditional Poaching Advice Fails You
For decades, culinary instructors and television chefs have confidently told home cooks that the secret to a perfect poached egg is the “vortex method”. You are instructed to bring a pot of water to a boil, use a spoon to stir the water vigorously into a swirling whirlpool, and carefully drop the egg directly into the center of the cyclone.
I despise this method. It is a stressful, chaotic band-aid solution that attempts to mask the biological reality of the egg white rather than actually dealing with it.
The Problem with the Swirling Water Method
The theoretical physics behind the vortex method make sense on paper: the centrifugal force of the swirling water is supposed to wrap the loose, thin albumen tightly around the yolk before it has a chance to feather out into the pot.
Here is the brutal reality: it rarely works perfectly, and it is wildly impractical. First, the vortex often spins the egg too aggressively, causing the yolk to separate from the white entirely, leaving you with a naked, hard-cooked yolk and a separate floating mass of rubbery white. Second, it dictates that you can only cook one single egg at a time.
If you are trying to host a relaxed dinner party or a weekend brunch for four people, you need eight poached eggs. If you use the vortex method, by the time you swirl, drop, monitor, and extract the eighth egg, the first egg has been sitting on a plate getting cold and rubbery for twenty minutes. It is a wildly inefficient use of your time, and as a busy home cook, your time is your most valuable asset.
The Vinegar Myth: To Acidulate or Not?
The second piece of traditional advice is to dump a heavy splash of white vinegar into your poaching water. Unlike the vortex, this advice is actually rooted in sound, demonstrable chemistry.
Egg whites are composed of proteins (primarily ovalbumin) that are folded into complex, tightly wound molecular structures. When exposed to heat, these proteins “denature”—they unfold and then rapidly bond with one another, forming a solid, opaque matrix. This is the process of coagulation.
Adding vinegar (acetic acid) to the water forcefully lowers the pH of the cooking environment. In an acidic environment, protein denaturation happens at a much faster rate and at a slightly lower temperature. The acid essentially shocks the exterior of the egg white into coagulating instantly upon contact with the water, creating a protective “skin” that traps the rest of the egg inside before it can spread out.
So, why do I hate it? Because there is a massive culinary trade-off. While vinegar helps the egg hold its shape, it also brutally attacks the texture and flavor of the egg. The rapid, acid-induced coagulation causes the outermost layer of the egg white to become tough, chalky, and rubbery. Worse, the egg absorbs the flavor of the cooking liquid. I do not want my delicate, buttery Eggs Benedict tasting like the bottom of a pickle jar.
We need a method that removes the problematic thin albumen entirely so we do not have to rely on chaotic whirlpools or harsh chemical acids.
The Mesh Strainer Miracle: The Science of Straining
The absolute best way to solve a problem in the kitchen is to eliminate the source of the problem before you even turn on the stove. If the thin, watery albumen is what causes the wispy tentacles and the messy pot, then the logical solution is to simply get rid of the thin albumen.
This genius technique, popularized in modern culinary science by chefs like Heston Blumenthal and food science writers like J. Kenji López-Alt, bypasses the vortex entirely.
How a Simple Sieve Fixes Everything
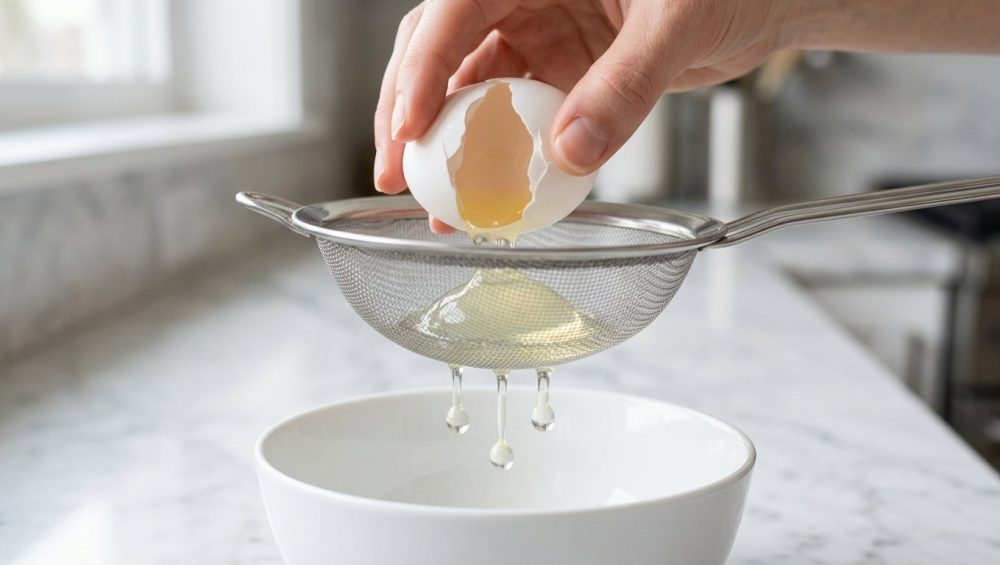
The procedure is almost insultingly simple. You crack your raw egg directly into a fine-mesh strainer suspended over a small bowl.
Because the thick, inner albumen is firmly bound by ovomucin, it will stay perfectly intact inside the basket of the strainer, cradling the yolk. Meanwhile, the problematic, watery outer albumen—which lacks structural integrity—will simply drip through the wire mesh and into the bowl below.
You may be shocked by how much liquid drains out, especially if your eggs are a few weeks old. Let it drain. Swirl the strainer gently in a circular motion to encourage the last few drops of water to fall through. What you are left with in the basket is a pristine, tight, structurally perfect egg package.
When you lower this strained egg into hot water, there is no loose liquid to feather out into the pot. The thick albumen immediately hugs the yolk, naturally forming a beautiful, tight, diner-style oval. No vortex required. No vinegar required. You can drop four, six, or eight strained eggs into a wide pot at the exact same time, allowing you to actually feed your guests simultaneously.
Choosing the Right Mesh Strainer (No Toxic Junk Allowed)
Before we get to the stove, we need to talk about your gear. You know my strict, unyielding rule: I have zero tolerance for cheap, toxic kitchenware. If you are going to invest your time in cooking, you must invest in tools that will not actively poison your food or fall apart after three washes.
When selecting a fine-mesh strainer, you must look for high-quality, uncoated 18/8 or 18/10 stainless steel. Do not buy those flimsy, dollar-store strainers with painted rims or mystery-metal mesh that begins to rust after a week. Rust and flaking paint have absolutely no business touching your raw ingredients.
Furthermore, avoid anything with a plastic or silicone rim that claims to be “heat resistant.” We are going to be lowering this strainer directly into near-boiling water. Cheap plastics will warp, degrade, and leach microplastics into your food. A solid, all-metal stainless steel strainer is one of the essential tools every beginner needs because it will last a lifetime, handle extreme heat, and remain chemically inert.
The Masterclass: Step-by-Step to Diner-Perfect Poached Eggs
We have covered the biology. We have debunked the myths. We have secured the proper, non-toxic equipment. Now, it is time to execute. This is the definitive, step-by-step masterclass for flawless poached eggs.
Step 1: The Strain and Drain
Set up your station before you even turn on the heat. Place your high-quality stainless steel mesh strainer over a small prep bowl.
Crack your egg directly into the strainer. Do not crack it into a cup first and then pour it in; the extra handling can rupture the delicate membrane surrounding the yolk. Let the egg sit in the mesh for about 30 to 45 seconds. You will immediately see the thin, watery albumen dripping through the bottom.
Gently—very gently—swirl the strainer in a small circle. This motion helps detach any stubborn strands of thin white that are clinging to the thick white. Once the dripping stops, transfer the strained egg from the mesh sieve into a small ramekin or a smooth-sided teacup.
If you are cooking for a crowd, repeat this process for every single egg, placing each strained egg into its own individual ramekin. Do not stack them in one bowl, or they will fuse together.
Step 2: Dialing in the Perfect Water Temperature
Fill a wide, shallow, heavy-bottomed stainless steel pot or sauté pan with at least three inches of water. Do not use a cheap, scratched Teflon pan. The degrading chemicals from peeling coatings are exactly what we avoid when we talk about ruining your nonstick pans. A wide stainless steel pan offers superior thermal mass, meaning the temperature won’t plummet the second you add the cold eggs.
Bring the water to a rolling boil over high heat, and then immediately reduce the heat to medium-low. You are looking for the sweet spot of poaching: the “sub-simmer”.
If you have an instant-read digital thermometer, you want the water to sit precisely between 180°F and 190°F (82°C to 88°C). If you do not have a thermometer, look at the water visually. The surface of the water should be relatively calm, with only a few tiny bubbles rising from the bottom of the pan and a very gentle quiver on the surface.
Never drop an egg into aggressively boiling water. A rolling boil creates violent thermal turbulence. The physical agitation of the violently bubbling water will tear the delicate egg white apart, regardless of whether you strained it or not. Cooking is about controlled heat transfer, not maximum heat.
Step 3: The Gentle Drop
Once your water is holding a steady 180°F to 190°F, it is time to introduce the eggs.
Bring the rim of your ramekin down so it is physically touching the surface of the hot water. Do not drop the egg from high above the pan like you are doing a cannonball into a pool. The impact will flatten the egg against the bottom of the pot.
Gently tip the ramekin and allow the egg to smoothly slide out into the water. Because we have removed the watery albumen, the thick white will immediately seize up and form a tight, protective cocoon around the yolk.
If you are cooking multiple eggs, slide them into the pan one by one, working your way around the perimeter of the pot like a clock face. This helps you remember which egg went in first so you know which one to pull out first.
Step 4: Timing is Everything
Once the eggs are in the water, do not touch them. Do not poke them, do not stir the water, and do not try to move them around. Let the heat do its job.
For a perfectly cooked poached egg—where the whites are completely opaque and set, but the yolk is thick, warm, and runny—you need exactly 3 to 4 minutes.
At the 3-minute mark, you need to extract the eggs. Do not use a wooden spoon, and do not try to balance them on a fork. You need a tool designed for the safe, delicate extraction of fragile foods from hot liquids. This is precisely why you need a stainless steel spider skimmer or a wide, slotted spoon.
Slide the skimmer gently underneath the egg and lift it straight up. The slots will allow the hot water to drain away instantly. To test for doneness, give the spoon a very gentle jiggle. The white should feel firm and springy, while the center should still wobble like a water balloon.
Before plating, lightly tap the bottom of your skimmer against a clean paper towel to absorb any residual poaching water. Nobody wants a soggy English muffin.
Troubleshooting Your Poached Eggs: What Went Wrong?
Even with the best techniques, the kitchen is a dynamic environment, and things can occasionally go sideways. If your eggs did not turn out perfectly, do not panic. Cooking is just applied physics, which means every failure has a logical, traceable cause.
The Yolk is Overcooked but the White is Runny
If you bite into your egg and find a chalky, hard-boiled yolk surrounded by a snotty, undercooked white, you have a severe temperature imbalance.
This happens when your poaching water is too cold (below 170°F). Because the water lacks the thermal energy required to rapidly coagulate the exterior proteins of the egg white, the heat slowly and steadily penetrates all the way through to the center of the egg. By the time the white finally sets, the yolk has been exposed to low heat for too long and has completely solidified. Ensure your water is strictly in that 180°F to 190°F window before dropping the eggs.
The Egg Stuck to the Bottom of the Pot
You drop the egg in, wait three minutes, and when you go to lift it out, it is fused like concrete to the bottom of your stainless steel pan. When you try to pry it up, the yolk tears, ruining the dish.
This happens for two reasons. First, you may have dropped the egg from too high up, allowing gravity to smash the raw proteins directly into the hot metal before the water could cushion it. Second, your pan might not be heated evenly. When cold proteins hit hot metal without a proper thermal barrier, they chemically bond to the microscopic pores in the steel. It is the exact same chemical adhesion principle that explains why your meat sticks to stainless steel when you fail to preheat your skillet properly.
To prevent this, ensure your water is at the proper temperature, lower the egg gently, and use a heavy-bottomed, multi-clad pan that distributes heat evenly across the entire base.
Batch Poaching and Make-Ahead Magic for Brunch Hosting
One of the greatest advantages of abandoning the vortex method is that you can finally cook for a crowd without losing your mind. If you are hosting a Sunday brunch, you do not want to be standing over a hot stove aggressively swirling water while your guests are drinking mimosas in the living room. You want to do the work ahead of time.
Yes, you can absolutely poach eggs in advance. Professional restaurant kitchens do not poach eggs to order during a Sunday brunch rush; it would be physically impossible. They use the ice bath method.
The Ice Bath Method
An hour before your guests arrive, set up your straining station and prep your eggs. Bring your water to 180°F (82°C). Right next to the stove, prepare a large mixing bowl filled with cold water and heavy handfuls of ice.
Poach your strained eggs in batches of four or five. Cook them for exactly 3 minutes. They will be slightly underdone, which is exactly what we want.
Using your slotted spider skimmer, lift the eggs out of the hot water and immediately plunge them directly into the ice bath. The freezing water causes a rapid drop in temperature, instantly halting the residual cooking process. The proteins stop coagulating, and the yolk remains perfectly liquid. It is the exact same thermal shock technique that prevents the green ring of death and is the secret to why your hard-boiled eggs refuse to peel if you skip the chilling step.
You can leave the poached eggs submerged in the cold water in the refrigerator for up to two days.
Reheating Like a Pro
When it is time to eat, your work is already done. Bring a pot of water to a gentle simmer (around 140°F to 150°F).
Take your cold, pre-poached eggs out of the fridge and gently lower them into the hot water for exactly 60 seconds. Because the eggs are already fully cooked, you are not trying to denature any more proteins; you are simply warming the yolk back up to an appetizing serving temperature.
Lift them out, tap them on a paper towel, and plate them over your toasted muffins and Canadian bacon. The entire reheating process takes one minute, leaving you plenty of time to focus on aesthetic kitchen upgrades like plating with fresh chives and a dusting of smoked paprika. Your guests will be stunned by your effortless execution, and you will actually get to sit down and enjoy the meal you cooked.
Cooking does not require magic, and it certainly does not require blind adherence to outdated, frustrating culinary myths. It requires a basic understanding of the ingredients in front of you, a refusal to use cheap, toxic tools, and the willingness to work smarter, not harder. By utilizing a simple stainless steel mesh strainer, respecting the thermodynamics of your water, and ditching the chaotic vortex, you have officially mastered the poached egg. Now, go pour yourself a mimosa. You’ve earned it.