
Let’s get one thing straight right out of the gate: you do not need a culinary degree, a pristine white chef’s coat, or a kitchen staffed by terrified line cooks to make a perfect poached egg. If you are tired of making seven rookie kitchen mistakes every time you turn on the stove, it is time to face the music and upgrade your technique. You want to recreate that glorious weekend brunch experience at home. And why wouldn’t you? The American brunch market is a staggering $52 billion industry that has grown by 23% since 2020. Going out for weekend brunch has become a massive cultural phenomenon, with Saturday service now completely rivaling Sunday volumes. But let’s be honest—waiting in line on the sidewalk for an hour just to pay twenty-five dollars for a single piece of sourdough bread topped with an egg is an absolute scam. You are a capable home cook. You can do this yourself.
But then, you actually try to poach an egg in your own kitchen. You crack it into boiling water, and instantly, disaster strikes. The egg white violently explodes into a million stringy, unappetizing wisps that look less like a luxurious breakfast and more like a bleached jellyfish caught in a boat propeller. You fish out a rubbery, waterlogged orb, poke it with a fork, and pray the yolk is still runny. It usually isn’t.
Listen to me: your failure is not a lack of innate skill. Your failure is simply a lack of understanding regarding the physical anatomy of the egg itself. Today, we are going to completely tear down the outdated, pretentious chef-speak that surrounds poached eggs. We are going to throw away the chaotic whirlpools and the heavily vinegared water. Instead, I am going to teach you the scientifically sound, foolproof magic of using a fine mesh strainer. By the end of this incredibly exhaustive masterclass, you will be churning out tight, beautifully round, restaurant-quality poached eggs in your sleep.
The Anatomy of a Raw Egg: Why You Are Failing (And It Is Not Your Fault)
If you want to master the kitchen, you have to understand your ingredients on a molecular level. An egg is not just a uniform blob of protein and fat. It is a highly complex, biological marvel. When you crack an egg into a pan and it spreads out into a watery mess, you are witnessing the natural degradation of its internal structure.
The Yolk: The Golden Center
The yolk is the absolute star of the show, containing the majority of the egg’s vitamins, minerals, and rich fat. It is encased in a fragile, transparent membrane called the vitelline membrane. When this membrane ruptures, your yolk breaks and bleeds out. The yolk’s primary job in a poached egg is to remain thoroughly insulated by the surrounding whites until you pierce it at the table, creating that rich, liquid gold sauce.
The Inner Albumen: The Good Stuff
Surrounding the yolk is the inner albumen, also known as the thick egg white. This is the structural hero of your breakfast. The egg white is composed of about 40 different distinct proteins. Ovalbumin makes up roughly 54% of this protein content, and ovotransferrin makes up about 12%. But the most important protein for our poaching purposes is a structural protein called ovomucin. Ovomucin is responsible for giving the inner albumen its tight, viscous, jelly-like structure. When you see a perfectly round, tight poached egg at a high-end café, you are looking at an egg that has successfully retained its thick inner albumen.
The Outer Albumen: The Wispy Villain
Here is where everything goes wrong for the home cook. Surrounding that tight inner ring of thick white is the outer albumen, or the thin egg white. This outermost layer is watery, loose, and severely lacks the dense ovomucin structure of the inner white. When you drop a raw egg into a pot of simmering water, it is solely this loose, watery outer albumen that immediately separates, catches the thermal currents, and spins off into those ugly, stringy white tentacles that ruin your poaching water.
Just like when your hard-boiled eggs refuse to peel, the age of the egg is the ultimate culprit behind how much watery white you have to deal with. As an egg sits in your refrigerator, moisture and carbon dioxide slowly escape through the thousands of microscopic pores in its shell. As the carbon dioxide escapes, the pH of the egg white naturally rises, becoming significantly more alkaline. This shift in pH causes the tight ovomucin protein network to actively break down and deteriorate. The older the egg, the more the thick inner albumen degrades into the thin, watery outer albumen. This is exactly why farm-fresh eggs poach beautifully right out of the shell, while three-week-old grocery store eggs turn into a stringy nightmare in the pot.
Debunking the Great Poached Egg Myths
For decades, professional chefs and television cooks have peddled absolute nonsense to home cooks regarding how to poach an egg. These “hacks” are largely designed to overcompensate for the fact that they are cooking with older eggs that contain far too much watery outer albumen. Let’s systematically destroy these myths so you can reclaim your kitchen.
Myth 1: The Vinegar Acid Bath
Every old-school cookbook will tell you to dump a heavy splash of white vinegar into your poaching water. The science behind this is technically sound, but the culinary result is atrocious. Adding acid to the water significantly lowers the pH of the cooking environment. Because egg proteins denature and coagulate much faster in an acidic environment, the vinegar forces the watery outer albumen to instantly seize up and cook the second it hits the water.
However, there are massive drawbacks to this shortcut. First, it makes your eggs taste like cheap salad dressing. Sometimes your dinner actually needs acid, but your delicate morning eggs definitely do not. Second, because the acid forces the proteins to coagulate so aggressively and rapidly, the resulting egg white becomes tough, squeaky, and rubbery instead of soft and silken. You are essentially trading a beautiful texture for a slightly less messy pot. It is a terrible trade-off.
Myth 2: The Chaotic Tornado Whirlpool
You have seen it a million times on morning television: a chef vigorously stirring a pot of boiling water to create a deep vortex, then dramatically dropping the egg directly into the center of the whirlpool. The theory is that the centripetal force of the spinning water will wrap those loose, wispy whites tightly around the yolk.
In reality, fluid dynamics are rarely that kind to the weekend home cook. If you spin the water too fast, the sheer force of the vortex will literally tear the delicate egg apart, ripping the yolk right out of the albumen. If you spin it too slowly, the egg just sinks to the bottom and the whirlpool does absolutely nothing. Furthermore, this method means you can only poach one single egg at a time. When you are trying to master simple weeknight dinners or quick morning meals, time is money. Standing over a stove spinning water for twenty minutes to feed your family is an unacceptable waste of your life.
Myth 3: The Deep-Water Drop
Another pervasive myth is that you need a massive, deep stockpot filled to the brim with water so the egg has a long, graceful fall to the bottom, supposedly forming a perfect teardrop shape on the way down. This is completely unnecessary. A standard saucepan with about three to four inches of water is more than enough. The deep-water drop just unnecessarily increases the amount of time it takes to boil the water and gives the loose whites more vertical space to feather out and make a mess.
The Magic of the Fine Mesh Strainer: A Masterclass in Filtration
If we know that the watery outer albumen is the sole cause of the wispy tentacles, and we know that vinegar ruins the texture, and we know that whirlpools are horribly inefficient, what is the actual solution?
The solution is mechanical filtration. You simply remove the problematic watery white before the egg ever touches the hot water.
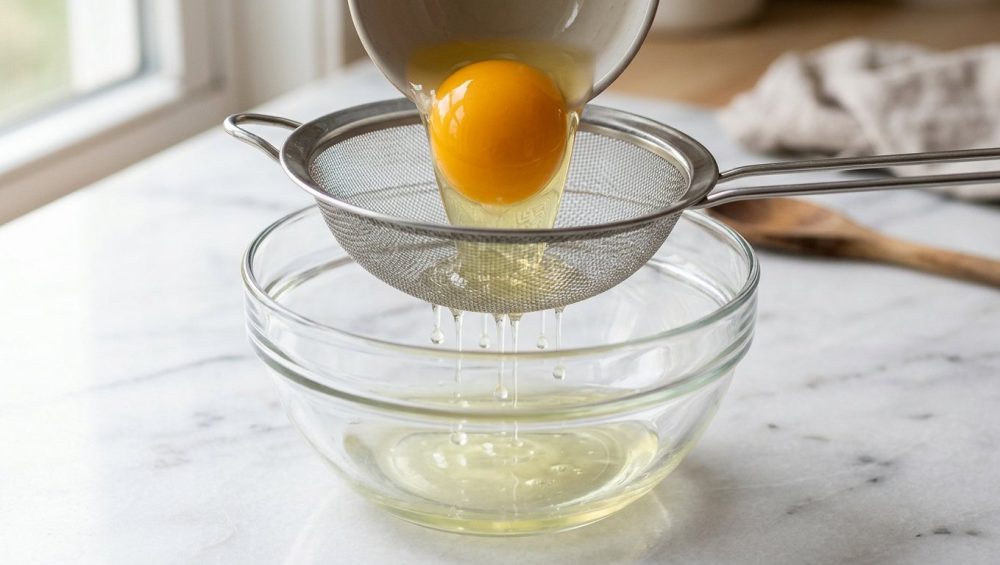
This brilliantly simple technique was championed by modern culinary scientists like Heston Blumenthal and widely popularized for the home cook by J. Kenji López-Alt. By cracking your raw egg directly into a standard fine mesh kitchen strainer, gravity does all the hard work for you. The thin, watery outer albumen effortlessly drips through the tiny holes of the mesh and falls away. Meanwhile, the thick, viscous inner albumen—held together by that robust ovomucin network—is too thick to pass through the mesh. It stays perfectly intact, cradling the yolk in a tight, cohesive package.
When you gently lower that strained egg into your simmering water, there is absolutely no loose white left to feather out. The egg immediately sets into a beautiful, tight, pristine orb. No vinegar required. No chaotic whirlpools needed.
The “No-Go” Rule on Toxic Gear
Before we move to the exact steps of the cooking process, we need to have a serious conversation about your equipment. We have talked extensively about banishing toxic kitchen gear from your home, and your strainer is absolutely no exception. I have zero patience for cheap, flimsy, mystery-metal strainers that you buy for three dollars at a discount store.
Those cheap strainers are often coated in toxic, peeling faux-metallic finishes that will flake off directly into your food when exposed to heat or friction. They rust after two trips through the dishwasher, and the mesh separates from the rim, creating a trap for deadly bacteria. You are a grown adult cooking real food. Invest in a high-quality, professional-grade 18/8 or 18/10 stainless steel fine mesh strainer. It will not rust, it will not leach chemicals into your eggs, and it will last you a lifetime. Do not compromise on the tools that touch your food.
The Step-by-Step Guide to the Perfect Poached Egg
Now that you understand the science of the egg and have secured a high-quality stainless steel strainer, it is time to execute. Follow these steps with precision, and you will never fear poaching an egg again.
Step 1: The Strain (The Most Crucial Step)
Place your fine mesh strainer over a small bowl. Crack your egg directly into the basket of the strainer. Do not aggressively shake it, as you do not want to risk piercing the yolk on the sharp wire mesh. Instead, let it sit for about thirty seconds. You will see a thin, watery liquid pooling in the bowl below. That is the enemy. That is the outer albumen.
If your egg is particularly old and stubborn, you can very gently swirl the strainer in a circular motion to encourage the watery whites to detach and fall through the mesh. Once the dripping stops, you are left with a perfectly tight package of thick albumen and yolk.
Step 2: The Gentle Simmer (Not a Rolling Boil)
Fill a wide saucepan with about three inches of water. You might have read that starting them in cold water is a myth for boiling, but for poaching, temperature control is everything. Bring the water to a rolling boil, and then immediately turn the heat down until it reaches a gentle, barely-there simmer.
Let’s look closely at the thermal dynamics of egg coagulation. Egg whites begin to thicken at 145°F (63°C) and become a tender, opaque solid at 150°F (65°C). The yolk, however, does not begin to set until 158°F (70°C). A rolling boil sits at a violent 212°F (100°C). If you drop an egg into 212°F water, the extreme heat causes the protein molecules to violently crash together, tightening their three-dimensional network so severely that all the moisture is aggressively pushed out. This results in a rubbery, overcooked white and a chalky yolk.
You want your water temperature to hover right around 180°F to 190°F. You should see tiny champagne-like bubbles rising from the bottom of the pan, but the surface of the water should be relatively calm. This gentle heat will slowly and lovingly coax the proteins into a silken, tender gel.
Step 3: The Transfer (Smooth and Low)
Do not drop the egg into the water from a high altitude like you are performing a culinary bomb drop. The impact will cause the egg to flatten out against the bottom of the pan, ruining its shape.
Instead, you can either transfer the strained egg into a small ramekin first, or simply use the strainer itself. Lower the lip of the ramekin or the strainer all the way down until it is physically touching the surface of the simmering water. Gently tip it forward, allowing the egg to effortlessly slide into the water. Because you removed the outer albumen, the egg will immediately begin to set in a beautiful, tight oval shape.
Step 4: The Timing (Science of Coagulation)
Leave the egg completely alone. Do not poke it, do not prod it, and do not swirl the water. Let the thermodynamics do the work.
For a perfectly poached egg with a fully set white and a liquid, jammy yolk, you need to cook it for exactly three to four minutes, depending on the size of the egg and the exact temperature of your simmer. At the three-minute mark, use a slotted spoon to gently lift the egg out of the water. Give it a very soft poke with your finger. The white should feel springy and firm, but the center should still yield to gentle pressure.
Carefully transfer the egg to a plate lined with a paper towel. This step is absolutely non-negotiable. Serving a poached egg straight from the water will flood your crispy toast with hot, unappetizing cooking water, completely ruining the dish. Let the paper towel wick away the excess moisture for ten seconds before plating.
Troubleshooting Common Poached Egg Disasters
Even with the strainer method, the kitchen can occasionally throw you a curveball. Here is how to diagnose and fix the most common issues that plague home cooks.
The Egg Stuck to the Bottom
If your egg immediately sinks and glues itself to the bottom of the stainless steel pan, your water was likely not quite hot enough when the egg went in, or your pan is too thin and lacks proper heat distribution. To prevent this, wait about ten seconds after dropping the egg into the water, then use a slotted spoon to very gently nudge the egg off the bottom of the pan. Once the exterior proteins have coagulated, it will float freely.
The Yolk Overcooked
If your yolk is chalky and hard, you either left the egg in the water too long, or your water was at a rapid boil rather than a gentle simmer. Remember the temperature thresholds: yolks set completely at 158°F (70°C). If the internal temperature of the egg reaches this point, the liquid gold is gone forever. If your scrambled eggs are watery, it is a similar protein issue caused by improper heat management. Always set a timer. Do not rely on your internal clock.
The Egg Tastes Like Water
Because we are not using vinegar, some people complain that their poached eggs taste a bit bland. The fix is incredibly simple: generously salt your poaching water. Just like when you are boiling pasta, the cooking water should be heavily seasoned. The salt will subtly penetrate the egg white as it cooks, enhancing the natural savory flavor of the egg without turning it rubbery like acid does.
Scaling Up: How to Poach for a Crowd Without Losing Your Mind
The mesh strainer method is brilliant, but what if you have six hungry guests waiting at the table? You cannot poach six eggs one by one and expect the first person’s food to still be hot. This method is a lifesaver when you want to host a relaxed dinner party without crying over the stove.
Enter the restaurant catering secret: the ice bath shock.
You can strain and poach a dozen eggs an hour before your guests even arrive. Poach each egg for just two and a half minutes—slightly undercooked. As soon as you pull them from the simmering water, immediately drop them into a large bowl filled with ice water. The extreme cold instantly halts the cooking process, preventing the residual heat from setting the yolk.
The eggs can sit happily in this cold water bath for hours. When you are ready to serve brunch, bring a fresh pot of water to a gentle 140°F (60°C)—which is well below the 158°F coagulation point of the yolk. Gently lower all the precooked eggs into the warm water for exactly one minute. This will heat them all the way through without cooking them a single degree further. You can pull them all out simultaneously, drain them on paper towels, and serve a flawless, hot brunch to six people at the exact same time. It is a total game-changer.
Essential Gear Check: Elevating Your Egg Game (Safely)
We have already discussed the absolute necessity of a high-quality stainless steel fine mesh strainer. But let’s do a quick audit of the rest of your poaching equipment, because using the wrong tools will sabotage even the best scientific methods.
First, your pan. You don’t want to be ruining your nonstick pans with cheap metal tools while trying to fish out an egg. I highly recommend using a heavy-bottomed, multi-clad stainless steel saucepan for poaching. It holds a steady, consistent temperature, which is critical for maintaining that delicate 180°F simmer. Do not use cheap, thin aluminum pans that create hot spots and cause the water to rapidly boil in one corner while remaining cold in another.
Second, you need the right lifting tool. A standard soup spoon will carry far too much water out of the pot, and a massive plastic spatula is far too clumsy for a delicate egg. You need a proper slotted fish turner to lift the delicate egg, or better yet, a stainless steel spider skimmer. These tools allow the water to drain away instantly while providing a wide, stable base to cradle the egg without tearing the soft, coagulated proteins.
The Final Verdict: Take Back Your Brunch
Cooking is not magic. It is just applied physics and chemistry mixed with a little bit of patience. For years, you have been told that poaching an egg is an elite culinary skill that requires chaotic whirlpools, gallons of vinegar, and the reflexes of a ninja. It is all a lie.
The stringy, messy, unappetizing white wisps that have ruined your mornings are nothing more than loose outer albumen. By simply passing your raw egg through a fine mesh strainer, you physically remove the problem before it ever hits the water. It is a breathtakingly simple, scientifically sound technique that guarantees a tight, beautifully round, restaurant-quality poached egg every single time.
So this weekend, skip the crowded cafes. Ignore the overpriced menus. Grab your stainless steel strainer, bring your water to a gentle simmer, and show your kitchen exactly who is boss. You have got this.






