The Great Boiling Water Lie
Let’s get one thing straight right out of the gate: you do not need a gargantuan, heavily sloshing stockpot of aggressively boiling water to cook a standard box of dried pasta. I know, I know. Your Italian grandmother might be rolling over in her grave, and the culinary gatekeepers are probably clutching their pearls in horror. But we are home cooks, and our weeknight time is precious. We simply do not have twenty minutes to stand around staring at a massive pot, willing it to bubble, while our stomachs aggressively demand dinner.
The traditional method—bringing four to six quarts of water to a rolling boil—is a relic of restaurant kitchens that need to constantly cycle hundreds of portions of pasta through the same vat of boiling water over the course of a dinner service. For a Tuesday night in your home kitchen? It is an abysmal waste of time, water, and energy. In fact, it is one of the main reasons people reach for the takeout menu instead of cooking. By the time that monolithic pot finally starts boiling, you could have already eaten, washed the dishes, and been halfway through an episode of your favorite show.
The solution? The cold-water frying pan trick.
What is the Frying Pan Pasta Trick?
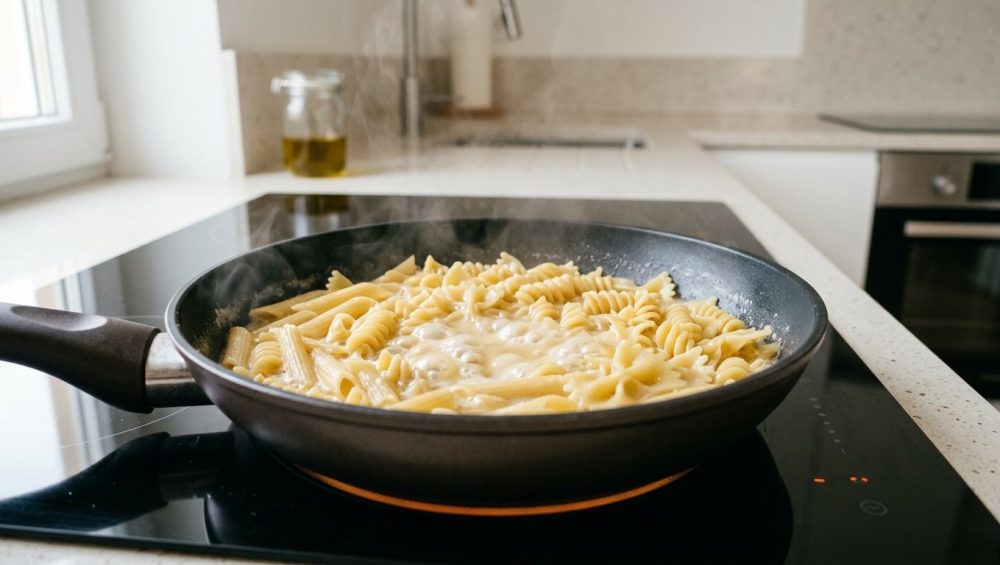
It sounds like a late-night infomercial pitch, but I promise you it is pure, unadulterated culinary science. Instead of a tall, deep pot, you use a wide, shallow skillet. Instead of boiling the water first, you add the dry pasta directly to the pan and pour in just enough cold water to submerge it. Then, you turn the heat to high.
By the time the water reaches a vigorous boil, the pasta is already half-cooked. You simply stir it occasionally until the water reduces and the pasta reaches a perfect al dente texture. The entire process takes about ten to twelve minutes from the moment you turn on the stove. No waiting. No massive pots to scrub.
But the speed isn’t even the best part. The real magic lies in the cloudy water left behind.
The Science Behind the Shortcut: Hydration vs. Gelatinization
To understand why this works—and why it doesn’t result in a clumpy, gummy disaster—we need to talk about what actually happens when dried pasta cooks. Don’t worry, I won’t bore you with a tedious chemistry lecture, but understanding the mechanical “why” behind your food is crucial to becoming a better, more confident cook.
Cooking dried pasta involves two distinct physical processes: hydration and starch gelatinization.
Phase One: Hydration
Dried pasta is essentially a brittle, starchy sponge. Before it can become tender, it needs to absorb water. It turns out that pasta does not care if the water is boiling, lukewarm, or ice-cold when it comes to hydration. It will absorb moisture regardless of the temperature. When you start with cold water in a skillet, the pasta begins hydrating immediately as the water heats up on the stove.
Phase Two: Starch Gelatinization
This is the part where heat actually matters. The starches in the pasta flour need to reach a specific temperature—usually around 140°F to 180°F (60°C to 80°C)—to swell, burst, and gelatinize. This is what transforms the rigid, hydrated dough into the soft, chewy noodle we all love.
The fear of starting with cold water usually stems from the belief that the pasta will stick together and form an impenetrable, starchy brick. And if you drop dry pasta into warm, non-boiling water, it absolutely will. But when you start with cold water, the pasta has time to hydrate before the starches reach their gelatinization temperature. By the time the water gets hot enough to make the starches sticky, the pasta has already absorbed enough water to remain separate, provided you give it a few stirs.
Food scientists and culinary legends like Harold McGee and J. Kenji López-Alt have been shouting about this method from the rooftops for years. It is not a cheap hack; it is a scientifically sound technique that simply makes more sense for the home kitchen.
The Holy Grail of Pasta: Liquid Gold
We need to talk about the byproduct of this method, because it is arguably more important than the time you save.
When you boil pasta in four quarts of water, the starches that wash off the noodles are diluted into a massive, watery abyss. If you scoop out a cup of that water to add to your sauce—as every good recipe rightly tells you to do—you are getting a very weak starch solution.
When you cook pasta in a skillet with just enough water to cover it, you are drastically reducing the volume of liquid. As the pasta cooks and the water evaporates, those starches become highly concentrated. What you are left with at the bottom of the pan is not water; it is a thick, cloudy, viscous syrup. In professional kitchens, we call this “liquid gold.”
Why Starch Matters for Your Sauce
If you have ever wondered why your homemade pasta sauces look watery, split, or slide right off the noodle into a sad puddle at the bottom of the bowl, it is because you lack an emulsifier.
Oil and water naturally hate each other. If you toss cooked pasta with olive oil, butter, or a fat-heavy sauce, the fats will stubbornly separate from the liquids. Starch is the magical mediator that forces fat and water to hold hands and form a creamy, cohesive emulsion.
The highly concentrated starchy liquid produced by the frying pan method is the ultimate emulsifier. When you vigorously toss your cooked pasta in this liquid along with your fats (butter, olive oil, cheese), it binds everything together into a glossy, restaurant-quality sauce that clings beautifully to every single noodle. It is the secret to a perfect Cacio e Pepe, a flawless Aglio e Olio, and a velvety tomato butter sauce.
The Step-by-Step Masterclass: How to Execute the Skillet Method
Alright, enough theory. Let’s get our hands dirty. This method is incredibly simple, but precision is key to nailing it every single time. Here is your foolproof guide to cooking pasta in a frying pan.
Step 1: Choose the Right Pan
You need a wide, shallow skillet or sauté pan. A 10-inch or 12-inch pan works perfectly for a standard half-pound to one-pound box of pasta. The wide surface area is crucial because it promotes rapid evaporation, which is exactly what we want to concentrate those starches.
Step 2: Add the Pasta
Lay your dry pasta flat in the pan. If you are using long noodles like spaghetti, linguine, or bucatini, they should fit perfectly across the diameter of a 12-inch skillet. If your pan is slightly too small, do not panic and do not break the pasta. Just let the ends hang over the edge for a minute; as the submerged part softens, you can gently coax the rest of the noodles into the pan. For short shapes like penne, fusilli, or macaroni, simply dump them in an even layer.
Step 3: Add Cold Water and Salt
Pour cold tap water over the pasta. You want just enough to barely submerge the noodles—usually about one to one-and-a-half quarts, depending on the pan size and pasta shape. Do not drown it.
Now, add your salt. Because we are using significantly less water than the traditional method, you need to use significantly less salt. The old adage of making your pasta water “taste like the sea” does not apply here. If you use a handful of salt in a shallow skillet, the resulting concentrated liquid will be aggressively, unpalatably salty. Start with a modest pinch—about half a teaspoon of kosher salt—and adjust your seasoning later when building the sauce.
Step 4: Crank the Heat
Turn your burner to medium-high or high heat. You want to bring that shallow pool of water to a boil as quickly as possible.
Step 5: The Crucial Stir
As the water heats up, the pasta will begin to soften. This is the only point where things can go wrong. You must stir the pasta frequently during the first few minutes to prevent the noodles from sticking to the bottom of the pan or to each other. Use a pair of tongs for long pasta or a wooden spoon for short shapes. Keep things moving until the water reaches a vigorous simmer.
Step 6: Simmer and Reduce
Once the water is bubbling, dial the heat back slightly to maintain a steady, active simmer. Continue to cook, stirring occasionally, until the pasta is al dente. This usually takes about 8 to 10 minutes from the time the water starts boiling, but trust your teeth, not the clock. Bite into a noodle to check for that perfect, slight resistance in the center.
By the time the pasta is cooked, most of the water should have evaporated or been absorbed, leaving behind a shallow pool of that glorious, starchy liquid gold.
The Gear Rant: Why Your Pan Choice is Non-Negotiable
As your trusty, sassy sous-chef, I have a strict “no-go” rule when it comes to toxic kitchen gear. I refuse to let you execute this brilliant, time-saving technique in a cheap, peeling, chemically compromised piece of garbage. We are cooking at high heat, reducing liquids, and aggressively tossing ingredients. The vessel you choose matters immensely.
The Problem with Cheap Non-Stick
If your go-to pan is a flimsy aluminum skillet coated in mystery non-stick material that has more scratches than a DJ’s vinyl collection, throw it in the trash immediately. I am dead serious.
Traditional non-stick coatings, historically made with PFAS (per- and polyfluoroalkyl substances, charmingly known as “forever chemicals”), degrade over time. When exposed to high heat or scratched by utensils, these coatings can flake off into your food and release toxic fumes into your kitchen. While regulations are finally phasing out many of these chemicals, the market is still flooded with cheap, unsafe cookware. I will never recommend it. If you want to get serious about banishing toxic kitchen gear, it starts with ditching the scratched Teflon.
Even “safer” ceramic non-stick pans have a severely limited lifespan. If you are wondering why your ceramic pan lost its non-stick properties after just six months of use, it is because the microscopic silica coating inevitably degrades under high heat and microscopic abrasions. They are simply not built for the aggressive, high-heat reduction techniques we use in professional-level home cooking. If you find that your non-stick pans keep losing their slip, it is a sign you need to upgrade your materials.
The Upgrade: Stainless Steel and Carbon Steel
If you want to cook like an expert without a culinary degree, you need to invest in the few beginner kitchen tools that actually matter. A high-quality, fully clad stainless steel skillet or a well-seasoned carbon steel pan are your best friends here.
Stainless steel is virtually indestructible. It can handle roaring high heat, aggressive metal tongs, and acidic tomato sauces without flinching. Yes, people complain about food sticking to stainless steel, but that is purely a technique issue. Once you understand the thermodynamics of your pan, achieving stick-free searing on stainless steel becomes second nature. For the frying pan pasta method, stainless steel is ideal because the cold water prevents the pasta from sticking initially, and the heavy bottom ensures even heat distribution as the liquid reduces.
Carbon steel is another phenomenal option. It heats up incredibly fast, offers a naturally non-toxic, non-stick surface once properly polymerized (seasoned), and is lightweight enough to easily toss your pasta and sauce together. Just be cautious when cooking highly acidic sauces (like heavy tomato or lemon-based sauces) for extended periods in carbon steel, as the acid can strip the seasoning.
Troubleshooting the Skillet Method
Even the most foolproof techniques require a bit of finesse. If you are trying this method for the first time and run into a roadblock, do not panic. Here is how to fix the most common issues.
The Water Evaporated Before the Pasta Cooked
This is the most common hiccup. If your heat is too high or your pan is exceptionally wide, the water might evaporate before the pasta reaches al dente. The fix is laughably simple: add more water. Keep a cup of tap water nearby and splash a little bit in if the pan starts looking dry before the noodles are tender. It is always better to start with less water and add more as needed than to drown the pasta from the beginning.
The Pasta is Clumping Together
If you are wondering why your pasta clumps into a solid, unyielding mass, it is because you neglected step five. You must stir the pasta during the first few minutes of cooking. As the starches begin to hydrate and the water heats up, a quick toss with tongs ensures that each noodle remains coated in water, preventing them from fusing together. Once the water is boiling, the agitation of the bubbles will do most of the work for you.
The Final Liquid is Too Salty
As mentioned earlier, the reduction process concentrates everything, including salt. If you salted your water like you were boiling a giant pot, your final sauce will be inedible. Always under-salt the water when using the skillet method. You can always add a pinch of flaky sea salt at the very end to perfectly balance the dish.
The Sauce is Too Thick or Gummy
That starchy liquid gold is incredibly powerful. If you let it reduce too far, it can turn into a thick, gluey paste rather than a silky sauce. If things look too tight or gummy when you are tossing your pasta with your fats and cheeses, simply splash in a little more hot water to loosen it up. The emulsion will hold, and the sauce will instantly become creamy again.
Building the Perfect Pan Sauce
Now that you have perfectly cooked pasta swimming in a shallow pool of starchy liquid gold, it is time to build a sauce. This is where you can easily turn chaotic dinners into a peaceful daily habit. The beauty of this method is that the sauce is built directly in the pan, utilizing the residual heat and the starch to create an emulsion.
The Flawless Cacio e Pepe
Cacio e Pepe (cheese and pepper) is notoriously difficult for home cooks because the cheese often clogs into a stringy, greasy mess. If you have ever raged over why your cheese sauce turns grainy, it is usually due to excessive heat and a lack of starch.
With the skillet method, it is practically foolproof. Once your spaghetti is al dente and sitting in a few tablespoons of starchy water, take the pan completely off the heat. This is crucial—boiling heat will instantly curdle the cheese. Add a generous knob of butter and a mountain of freshly ground black pepper. Toss vigorously until the butter melts into the starchy water. Then, gradually sprinkle in finely grated Pecorino Romano cheese, tossing constantly. The starch will bind the melting cheese and the water into a flawlessly smooth, glossy cream.
The 10-Minute Garlic and Oil (Aglio e Olio)
While your pasta is cooking in the skillet, thinly slice four cloves of garlic. When the pasta is about two minutes away from being done, push the noodles to one side of the pan. Add a generous glug of high-quality extra virgin olive oil to the empty side and drop in the garlic and a pinch of red pepper flakes. Let the garlic sizzle in the oil for a minute until fragrant, then vigorously toss everything together. The starchy water will emulsify with the olive oil, creating a rich, savory sauce that coats every strand. Finish with a handful of fresh parsley and a heavy squeeze of lemon juice. If you are still questioning why your dinner needs acid, that final hit of lemon will cut through the richness of the oil and elevate the entire dish.
The Creamy Tomato Butter Sauce
This is the ultimate comfort food hack. Add a cup of high-quality crushed tomatoes (passata) directly to the skillet when the pasta is about halfway cooked. Let the tomatoes reduce and concentrate alongside the starchy water. When the pasta is al dente, turn off the heat and stir in two tablespoons of cold butter. The cold butter will slowly melt into the hot, starchy tomato liquid, creating a velvety, luxurious sauce that tastes like it simmered for hours.
Frequently Asked Questions About the Skillet Method
As much as I champion this technique, I know there are always skeptics in the back row. Let’s address the most common concerns so you can confidently ditch the stockpot.
Does this work for fresh pasta?
Absolutely not. Do not even try it. Fresh pasta (the soft kind made with eggs and flour, usually found in the refrigerated section) cooks in about two to three minutes. It does not need to hydrate in the same way dried pasta does, and it contains surface flours that will turn a shallow pan of cold water into a cloudy, gluey disaster before the water even gets hot. Reserve this trick strictly for dried, boxed pasta.
What about gluten-free pasta?
Gluten-free pastas (made from corn, rice, lentils, or chickpeas) are notoriously finicky. They tend to release a massive amount of starch and can disintegrate if manhandled. While you can use the skillet method for some sturdy gluten-free brands, you need to be incredibly careful. The water will become much thicker, much faster. You will likely need to add more water throughout the cooking process and stir very gently to prevent the noodles from breaking. It requires a bit of experimentation to find the sweet spot for your specific brand.
Can I cook the sauce ingredients first, then add the dry pasta and water?
Yes! This is the foundation of the “one-pan pasta” trend that took the internet by storm a few years ago. You can absolutely sauté onions, garlic, mushrooms, or sausage in your skillet first. Once they are browned, add your dry pasta, pour in the cold water (or chicken broth for extra flavor), and proceed with the method. The pasta will absorb the flavors of the aromatics as it hydrates and cooks. It is one of the easiest ways to transform your daily meals with minimal cleanup.
Won’t the pasta taste different?
If you execute the method correctly, the pasta itself will taste exactly the same as if it were boiled in a giant pot. The texture will be identical—perfectly al dente with a satisfying chew. The only difference you will notice is that your final dish tastes significantly better because the sauce is deeply emulsified and clinging to the noodles rather than pooling at the bottom of your bowl.
Reclaim Your Weeknight
Cooking should not feel like a punishment after a long day at work. It should be an empowering, creative, and relatively swift process. The culinary world is full of rigid rules, outdated traditions, and pretentious dogma that serve only to intimidate the home cook. The idea that you must wait fifteen minutes for a massive cauldron of water to boil before you can even begin cooking your dinner is one of those outdated rules.
By understanding the simple science of hydration and starch gelatinization, you can bypass the waiting game entirely. The frying pan pasta trick is not just a shortcut; it is a technically superior method for creating restaurant-quality emulsified pan sauces in your own kitchen. It saves water, it saves energy, and most importantly, it saves your precious time.
So, the next time you are staring down a Tuesday evening with an empty stomach and a box of spaghetti, leave the stockpot in the cabinet. Grab your trusted stainless steel skillet, turn on the cold tap, and start cooking smarter. You have better things to do than watch water boil.


