
Picture this: It’s Sunday evening. You’ve spent the last two hours meticulously roasting a chicken, whisking a pan gravy until your forearm burns, and boiling a perfect pot of potatoes. You grab your trusty, old-school wire masher and go to town on those spuds, dreaming of a cloud-like side dish that will make your dinner guests weep with joy. But as you stir in your butter and milk, something horrifying happens. The potatoes seize. They become heavy, sticky, and stretch like melted mozzarella cheese. Congratulations, you haven’t made a side dish; you’ve made literal wallpaper paste.
If you’ve ever wondered why your mashed potatoes are gluey, I promise you are not alone. It is the universal heartbreak of the home kitchen. But grab a glass of wine, pull up a stool, and take a deep breath, because here is the good news: you do not need a culinary degree to fix this. You don’t need to be a pretentious, Michelin-starred chef to whip up mind-blowing, restaurant-quality potatoes on a random Tuesday night. Professional-level results are absolutely achievable in a standard home kitchen. All you need is a basic understanding of potato starch chemistry and one unsung hero of a kitchen gadget: the potato ricer.
Welcome to my definitive masterclass on achieving the ultimate mash. We are going to talk about why your current mashing technique is ruining your dinner, how to banish flimsy kitchen gear from your life forever, and exactly how we are going to fix your side dishes for good.
Welcome to Potato Anatomy 101 (Skip the Chef-Speak, Let’s Talk Science)
I know, I know. You came here for a cooking technique, not a high school chemistry lecture. But stick with me, because understanding what is actually happening inside that potato is the absolute only way to stop making glue.
The Starch Suspects: Amylose and Amylopectin
Potatoes are essentially giant, delicious starch bombs. However, potato starch granules are massive compared to the starches found in other vegetables and grains (like wheat or corn)—measuring up to 100 microns in size. Inside these giant granules, the starch is divided into two distinct types of molecules: amylose and amylopectin.
Amylopectin is a highly branched, complex molecule that makes up about 75% to 80% of the potato’s starch. It provides structure and a creamy mouthfeel. Amylose, on the other hand, makes up the remaining 20% to 25% and is a straight-chain molecule. Amylose is the culprit behind your kitchen nightmares. When amylose is released into a liquid, it acts as a powerful thickening agent. If too much of it escapes, it binds with the water and dairy in your pot, creating an incredibly sticky, cohesive, gummy network.
The Amyloplast Vaults
Inside a raw potato, these starches don’t just float around freely. They are safely locked away inside tiny cellular storage sacs called amyloplasts. As long as the starch remains inside these intact sacs, your potatoes will be light and fluffy. The entire goal of making mashed potatoes is to separate these intact sacs from one another without breaking them open.
The Boiling Point: Gelatinization
When you boil a potato, heat and water penetrate the cell walls. The amyloplast sacs absorb the hot water, swell up like little water balloons, and soften. The crystalline structure of the raw starch breaks down in a process known as starch gelatinization. The cells become incredibly fragile. If you treat them gently, they will separate beautifully into a fluffy mound. If you treat them violently, those swollen water balloons will burst, spilling their sticky amylose guts directly into your side dish.
The Mechanical Murder of the Mashed Potato
Now that we know we are dealing with microscopic, fragile balloons of starch, let’s look at the weapons you are using against them.
Why the Hand Masher is Sabotaging You
When you use a traditional wire or perforated hand masher, you are applying blunt force trauma to your food. You are crushing the potatoes against the bottom of the pot. Every time you press down with your body weight, you are tearing open those delicate, swollen amyloplasts. If you’ve ever wondered why your mashed potatoes are gummy, it is because you have physically pulverized the cells, releasing a massive wave of amylose directly into the bowl. The more you mash, the more cells you rupture, and the stickier the potatoes become.
The Electric Mixer: A Weapon of Mass Destruction
I see home cooks grab their hand mixers all the time, thinking it will save them a few minutes of arm strain on a busy Wednesday night. Please, I am begging you, stop using a hand mixer for this job. The rapidly spinning metal beaters act like tiny little whips, violently thrashing the potato cells and tearing them to shreds. What starts as a seemingly fluffy puree will turn into an elastic, sticky mess in a matter of seconds because of the sheer mechanical force being applied.
The Food Processor: The Ultimate Culinary Sin
If the hand mixer is a weapon of mass destruction, the food processor is the ultimate culinary sin. The incredibly high speed of the sharp blades completely obliterates the cell walls. The danger of the blender or food processor is that it doesn’t just mash the potato; it liquefies the cellular structure, releasing 100% of the amylose starch. You will quite literally end up with a substance that resembles wallpaper paste or melted cheese.
The Magic of Extrusion: Why the Potato Ricer Wins
So, if we can’t crush, whip, or blend our potatoes, how do we mash them? To achieve that perfect, cloud-like texture, you need a ricer.
Newtonian Physics in the Kitchen
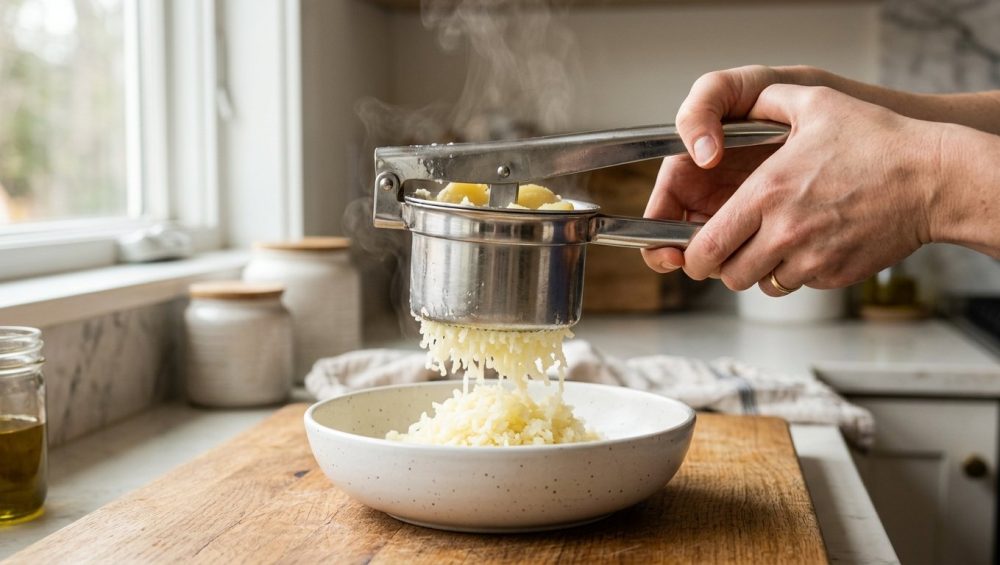
A potato ricer looks like a giant garlic press. It features a hopper (a basket) with tiny perforated holes at the bottom, and a plunger attached to a lever. Instead of crushing the potatoes against a hard surface, a ricer uses the gentle science of extrusion. When you squeeze the handles, the cooked potato is gently forced through the small holes. This sheer, directional force separates the potato cells from one another cleanly, allowing them to pass through the perforations without violently bursting the amyloplast sacs. The starch stays safely contained inside the cells.
The Fluff Factor
Because the potato is being extruded into tiny, rice-sized strands (hence the name “ricer”), it naturally incorporates a massive amount of air as it falls into your mixing bowl. This aeration is what gives riced potatoes their signature, impossibly light, cloud-like texture that a traditional masher simply cannot replicate.
The Definitive Guide to Choosing the Right Potato (Yes, It Matters)
You can have the best technique in the world, but if you buy the wrong potato, you are setting yourself up for failure. Potatoes are broadly categorized by their starch and moisture content.
The High-Starch Heroes: Russets
Russet potatoes are the undisputed kings of the mash. They have a very high starch content (specifically, a high ratio of amylose) and very low moisture. Because they are so dry and starchy, their cells naturally want to separate and fall apart when cooked. Furthermore, their low moisture content means they act like dry sponges, ready to absorb incredible amounts of butter and cream without becoming watery.
The Golden Middle Child: Yukon Golds
Yukon Gold potatoes are an all-purpose potato with a medium starch content and medium moisture. While they won’t yield a mash quite as light and airy as a Russet, they make up for it with a naturally buttery flavor and a beautifully creamy, dense texture. Many professional chefs actually prefer a 50/50 blend of Russets and Yukon Golds to get the best of both worlds: the fluffiness of the Russet and the rich flavor of the Gold.
The Waxy Offenders: Red and New Potatoes
Waxy potatoes, like red potatoes, fingerlings, and new potatoes, have high moisture and low starch. They are fantastic for roasting or potato salad because they hold their shape perfectly when boiled. However, they are terrible for mashing. Because their cells cling tightly together, they require a massive amount of mechanical force to break apart. By the time you finally force a waxy potato into a smooth puree, you have ruptured entirely too many cells, resulting in a gummy, pasty nightmare.
The “No-Go” Rule: Banishing Toxic and Flimsy Ricers
Before we talk about which ricer to buy, we need to talk about what to avoid. If you have read my blog before, you know that I have zero patience for cheap, toxic kitchen gear.
Say No to Mystery Metals and Peeling Chrome
Do not buy a $10 ricer from a discount bin. Cheap ricers are often made from low-grade “mystery metals” coated in a thin layer of chrome or tin plating. Because ricing potatoes requires a significant amount of physical pressure, that cheap plating will eventually warp, crack, and flake off directly into your hot food. You do not want to serve your family heavy metals for Thanksgiving.
The Plastic Problem
Similarly, avoid 100% plastic ricers. While they won’t rust, boiling hot potatoes will cause cheap plastics to warp and potentially leach microplastics or chemicals into your food. Furthermore, plastic levers simply do not have the tensile strength required to extrude dense root vegetables. The handles will eventually snap under pressure, usually right in the middle of preparing a holiday dinner.
Curating the Best Sturdy Stainless Steel Ricers for Everyday Use
When upgrading your kitchen arsenal, a heavy-duty stainless steel ricer is one of the smartest investments you will ever make. It will last a lifetime, it won’t rust, and it won’t bend. Based on the latest 2026 market testing, here are the absolute best models to consider.
The Overall Champion: OXO Good Grips 3-in-1 Adjustable Potato Ricer
OXO consistently dominates the kitchen gadget space for a reason. This model features a brilliant rotating dial disc that lets you switch between fine, medium, and coarse extrusion without having to keep track of loose, interchangeable plates. It is built from heavy-duty stainless steel, features their signature non-slip silicone grips to save your hands, and has a built-in resting knob so you can hook it securely over the edge of your mixing bowl.
The Ergonomic Innovator: Joseph Joseph Helix Potato Ricer
If you have arthritis, weak wrists, or simply hate the forearm workout of a traditional lever ricer, the Joseph Joseph Helix is a game-changer. Instead of squeezing two handles together, this ricer uses a horizontal twisting mechanism. By rotating the top handle like a corkscrew, it converts lateral twisting force into massive downward pressure. It requires a fraction of the grip strength of a standard ricer and easily splits into two dishwasher-safe pieces.
The Heavy-Duty Workhorse: PriorityChef Large 15oz Potato Ricer
For the home cook who regularly feeds a crowd, the PriorityChef is the ultimate value pick. Crafted from commercial-grade, rust-proof 18/10 stainless steel, this thing is built like a tank. It features a massive 15-ounce hopper, meaning you spend less time refilling it and more time ricing. The long handles provide excellent leverage, making quick work of large batches.
The Splurge-Worthy Powerhouse: Chef’n FreshForce Potato Ricer Press
If you are willing to spend a little extra for premium engineering, the Chef’n FreshForce is spectacular. It utilizes a patented dual-gear mechanism that increases your pressing power by 65% compared to standard ricers. The basket is completely removable for incredibly easy cleaning, and the heavy-duty stainless steel construction ensures it will survive decades of Sunday dinners.
The Sassy Sous-Chef’s Masterclass: Perfect Mashed Potatoes
We have the science. We have the tools. We have the right potatoes. Now, let’s execute.
Step 1: The Prep (To Peel or Not to Peel?)
Here is a brilliant weekday efficiency hack: if you are using a ricer, you actually don’t need to peel your potatoes! Simply wash your Russets, boil them whole (or cut in half if they are massive), and place them into the ricer’s hopper with the cut side facing down. As you press the lever, the fluffy potato flesh will extrude through the holes, and the tough skin will be left perfectly behind in the basket. Just pluck the skin out and load the next potato.
If you prefer to peel them, make sure you cut your potatoes into uniform 1.5 to 2-inch chunks so they cook at the exact same rate.
Step 2: The Golden Rule of Temperature
Do not boil your water first. If you drop raw potatoes into a pot of rapidly boiling water, you are setting yourself up for failure. The outside of the potato will cook instantly and turn to mush, while the inside remains rock hard. By starting in cold water, you allow the temperature of the entire potato to rise gradually and evenly from the core to the surface. Place your potatoes in a large pot, cover them with cold water by about an inch, and salt the water aggressively—it should taste like the sea.
Step 3: The Gentle Simmer
Bring the pot to a boil, but immediately lower the heat to a gentle simmer. A violent, aggressive rolling boil will bash the potatoes against each other, physically breaking them apart and causing them to become waterlogged. Simmer until a paring knife slides into the center of the largest potato chunk with absolutely zero resistance (usually 15 to 20 minutes).
Step 4: The Crucial Drying Phase
This is the step 90% of home cooks skip, and it is vital. Once the potatoes are tender, drain them in a colander. Then, immediately return the drained potatoes to the empty, hot pot and place it back on the stove over low heat for about 60 to 90 seconds. Gently shake the pot. You want the residual heat to evaporate all the excess surface moisture. Water is the enemy of fat absorption; if your potatoes are wet, they won’t absorb the butter, and your mash will be watery and bland.
Step 5: The Hot Extrusion
You must rice your potatoes immediately while they are piping hot. As potatoes cool down, their gelatinized starches undergo a chemical process called retrogradation. The crystalline structure of the starch begins to recover and harden. If you try to rice cold potatoes, they will be incredibly difficult to press and will turn gummy. Work quickly, pressing the hot potatoes directly into a warm mixing bowl.
Step 6: The Fat and Liquid Equation
Do not dump cold milk and raw butter into your hot potatoes. You will shock the starches and drop the temperature of your dish. Heat your dairy in a small saucepan first.
More importantly, the order in which you add your fats matters. Always fold your melted butter into the riced potatoes first. The butter contains lipids and casein proteins that coat the starch molecules, creating a protective barrier. Once the starch is coated in fat, it is much harder for it to interact with the water content in your milk, which prevents the potatoes from turning gluey. Gently fold the butter in with a silicone spatula (do not stir aggressively!), and then slowly fold in your warmed milk or heavy cream until you reach your desired consistency.
Follow these exact steps, and you will be rewarded with perfectly fluffy mashed potatoes every single time. No stress, no glue, just pure culinary magic.
Beyond the Mash: Unexpected Uses for Your Ricer
If you are worried about sacrificing drawer space for a “unitasker,” don’t be. A sturdy ricer is actually a multitasking powerhouse.
The Ultimate Italian Gnocchi
If you want to make light, pillowy homemade gnocchi that melt in your mouth, a ricer is absolutely mandatory. Mashing potatoes for gnocchi dough with a wire masher will result in dense, chewy, heavy dumplings.
Squeezing the Life Out of Spinach
Recipes for spinach dip or stuffed shells always call for “thawed frozen spinach, squeezed dry.” Doing this by hand with paper towels is a messy, inefficient nightmare. Simply load the thawed spinach into your ricer and press the handles. It will effortlessly extract every drop of excess water in seconds.
The Weekday Hash Brown Hack
The secret to crispy hash browns is removing the moisture from the raw, grated potatoes. Load your shredded raw potatoes into the ricer and give them a good squeeze before they hit the hot frying pan. It is the fastest way to guarantee a crispy, golden-brown crust.
Silky Smooth Baby Food and Fruit Purees
A ricer is fantastic for making homemade baby food. You can easily puree steamed carrots, peas, or sweet potatoes. It is also the perfect tool for pressing cooked apples for a rustic applesauce, or removing the skins and seeds from stewed tomatoes for a fresh, vibrant marinara sauce.
Troubleshooting Your Mash Disasters
Even with the best intentions, things can go wrong. Here is how to diagnose your potato problems.
Can You Fix Gluey Potatoes?
I am going to give it to you straight: no. Once you have ruptured the cell walls and released the amylose starch into the bowl, you cannot un-ring that bell. Adding more milk or butter will only give you a thinner, greasier paste. If you want to avoid this disaster in the future, you must stop blending them and invest in the proper tools.
However, do not throw that gluey mess in the trash! You can easily repurpose overworked potatoes. Mix them with a beaten egg, a handful of flour, and some shredded cheddar cheese, form them into patties, and pan-fry them in oil to make incredibly delicious potato croquettes. You can also use gummy mashed potatoes as a brilliant thickening agent for creamy winter soups.
Why Are My Potatoes Grainy or Lumpy?
If your riced potatoes feel grainy or have hard little lumps, it means they were undercooked. This usually happens if you didn’t cut the potatoes into uniform sizes, or if you dropped them into boiling water (causing the outside to cook while the center remained raw). Always test the thickest piece of potato with a paring knife before draining; it must offer zero resistance.
Cooking doesn’t have to be a stressful chore, and you don’t need to settle for mediocre, gluey side dishes. By understanding the basic science of your ingredients and utilizing smart, efficient, non-toxic tools, you can transform your everyday meals into something spectacular. Now go dust off that ricer, buy some Russets, and show Sunday dinner who is boss.






