
The Great Mashed Potato Tragedy: Why We Are Eating Glue
Start with a punchy hook. Everyone loves mashed potatoes until they make them at home and end up with a bowl of sticky, dense, spackle-like paste. I’ve been there. You’ve been there. We have all stood over a pot, sweating, wondering why our side dish looks more like construction adhesive than a fluffy cloud. The truth? It is not because you lack a culinary degree. It is because you are treating your delicate vegetables like a demolition project.
You see, cooking is just edible chemistry. When you blindly attack a boiled tuber with heavy machinery, you are triggering a microscopic disaster. It is the exact reason why your side dishes turn to glue the moment you try to whip them into shape. But don’t panic. Grab a glass of wine, pull up a stool, and let’s talk about how to fix this forever. We are going to banish the glue, ditch the terrible tools, and upgrade your kitchen game with the ultimate secret weapon: the stainless steel potato ricer.
The Science of Spuds: What Actually Happens When You Boil a Potato
Before we fix the problem, we need to understand the crime scene. If you want to understand the danger of the blender, you have to look at the physics of a potato.
Meet the Starch Granule: Amylose and Amylopectin
Let’s get a little nerdy, but I promise to keep it highly relevant to your dinner. Potatoes are essentially water and starch. Specifically, they contain roughly 15% to 22% dry matter by weight, and of that dry matter, a whopping 75% to 85% is pure starch.
This starch is divided into two distinct molecules: amylose and amylopectin. Amylose is a linear chain of glucose, making up about 20% to 25% of the starch, while amylopectin is a highly branched molecule that makes up the remaining 75% to 80%. Why do you care? Because these two molecules dictate whether your side dish is light and fluffy or a gummy nightmare. Amylose is responsible for that floury, dry texture we want in a mash, while amylopectin provides firmness.
The Danger Zone: Cellular Rupture and Shearing
When you drop potatoes into a pot of water and apply heat, magic happens. Above 140°F (60°C), the starch granules begin to absorb moisture and swell. This process is called gelatinization. The crystalline regions of the starch melt, and the granules become plump and fully hydrated.
By the time the internal temperature of your potato reaches between 167°F and 203°F (75°C to 95°C), those swollen granules are incredibly fragile. They are sitting there, perfectly cooked, just waiting to be gently broken apart so they can absorb delicious butter and cream.
But here is where the tragedy strikes. If you apply high mechanical shear force to these fragile, swollen cells—or if you heat them past 205°F (96°C)—the cell walls literally explode. When they rupture, they release a massive flood of amylose and amylopectin into the surrounding aqueous phase. The amylopectin, in particular, forms a highly viscous, sticky polymer network. Congratulations, you have just triggered an irreversible retrogradation cascade. You have made glue.
The Culprits: Tools That Are Ruining Your Side Dish
Now that you know the science of cellular rupture, let’s look at the weapons of mass destruction sitting in your kitchen cabinets.
The Hand Mixer: A Weapon of Mass Destruction
It is officially time to ditch the hand mixer and step away from the food processor. I know it seems like a brilliant time-saving hack. You toss your boiled potatoes into a bowl, turn on the electric beaters, and let the motor do the work. But those metal beaters are spinning at hundreds of revolutions per minute, acting like tiny machetes slashing through the fragile, swollen starch granules we just talked about. The more you mix, the more cells you rupture. The more cells you rupture, the more glue you release. Within thirty seconds, your potatoes will go from lumpy to a shiny, cohesive, sticky paste that clings to the roof of your mouth.
The Food Processor: Instant Wallpaper Paste
There is a special place in culinary hell for people who put hot potatoes into a food processor or a blender. The razor-sharp blades and extreme velocity guarantee a 100% cellular rupture rate. You will literally create a substance so elastic and dense that it could be used to bind bricks together. Never, under any circumstances, subject a cooked potato to a motorized blade.
The Standard Masher: Inconsistent and Exhausting
“But Sassy Sous-Chef,” you say, “I use a traditional hand masher!” That’s cute, but it’s still deeply flawed. A standard wire or perforated masher requires you to repeatedly crush the potatoes against the bottom of the pot. To get rid of the lumps, you have to mash the same potatoes over and over again. This repeated crushing and grinding motion creates unnecessary friction, which—you guessed it—shears the starch cells and releases glue. Plus, it is exhausting. We are making a weeknight dinner, not training for a CrossFit competition.
Enter the Hero: The Genius of a Stainless Steel Potato Ricer
The ultimate secret to fluffy mashed potatoes isn’t a secret ingredient; it’s a mechanical process. If we know that repeated friction and high shear force ruin the starch, we need a tool that processes the potato exactly once, with zero grinding. Enter the potato ricer.
What Is a Potato Ricer, Exactly?
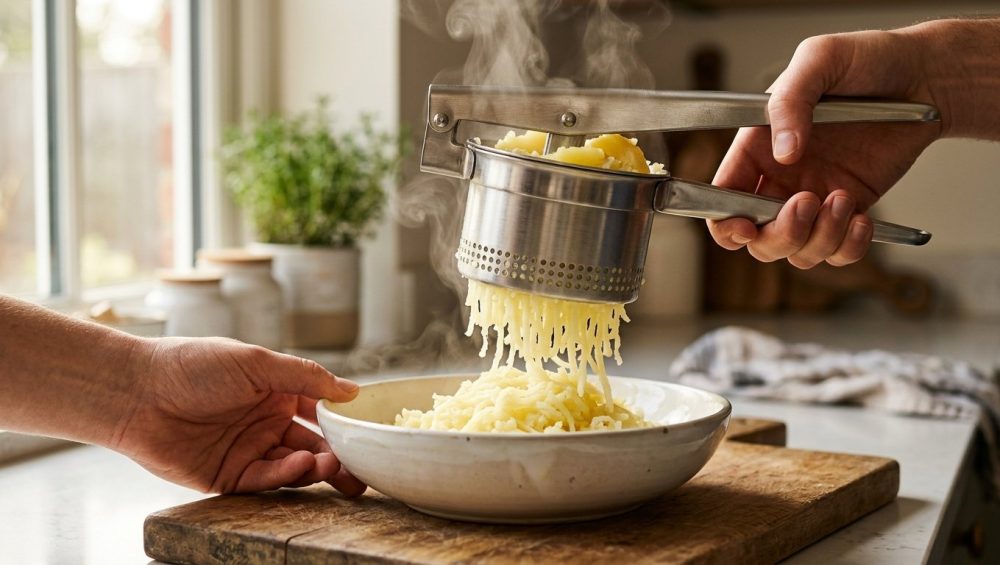
If you’ve never used one, a potato ricer looks like a giant garlic press. It consists of a hopper (a basket with tiny perforations) and a plunger attached to long handles. You place a piece of hot, boiled potato into the hopper, squeeze the handles together, and the potato is smoothly forced through the small holes. It emerges on the other side looking like long grains of rice (hence the name).
The Physics of Extrusion vs. Mashing
The genius of the ricer lies in the physics of gentle extrusion. When you press the potato through the ricer, the flesh is pushed through the holes in a single, unidirectional motion. There is no spinning blade. There is no repeated crushing against the bottom of a pot. The potato passes through the grate one time, leaving the delicate cell walls entirely intact.
Because the potato is extruded into tiny, rice-like strands, you are also maximizing the surface area. When you fold in your melted butter and warm cream, the liquid coats the massive surface area evenly and instantly, without requiring any vigorous stirring. The result is a texture so light, airy, and cloud-like that it will completely change your standard for home cooking.
Why Material Matters: The “No-Go” Rule on Toxic and Flimsy Gear
As your resident culinary truth-teller, I have a strict, zero-tolerance policy for toxic kitchen gear in my house. When you go out to buy your new best friend, the potato ricer, you are going to see a lot of cheap plastic models on the market. Do not buy them. I repeat: step away from the plastic.
The Perils of Plastic and Mystery Metals
First of all, plastic ricers are flimsy. You are applying a significant amount of leverage to squeeze a solid tuber through tiny holes. A $9 plastic handle is going to snap under pressure, likely sending a projectile of hot potato across your kitchen.
But more importantly, we need to talk about health and safety. You are taking screaming hot potatoes—often hovering around 200°F—and pressing them forcefully against a plastic surface. The scientific community has been sounding the alarm on this for years. When plastic kitchen utensils are exposed to high heat and mechanical stress, they rapidly degrade, releasing secondary microplastics and nanoplastics directly into your food.
In fact, a landmark 2025 study published in The New England Journal of Medicine linked elevated concentrations of polyethylene and PVC microplastics in arterial plaque to a significantly greater risk of severe cardiovascular events. Furthermore, the German Federal Institute for Risk Assessment (BfR) has explicitly warned that components of plastic utensils can migrate into food, noting that consuming as little as 90 micrograms of plastic from cooking utensils poses significant health risks. Black plastic utensils are particularly insidious, as studies have shown they are often manufactured from recycled electronic waste and can contain highly toxic flame retardants, like bromine, and heavy metals.
Just as you wouldn’t use cheap, peeling silicone spatulas that leach chemicals into your hot pans, you absolutely must not use a plastic ricer to extrude your family’s dinner.
The Stainless Steel Advantage: Safe, Durable, and Efficient
You need a 100% food-grade stainless steel ricer. Stainless steel is chemically inert, meaning it will not react with acidic foods, it will not melt, and it will never leach endocrine-disrupting microplastics into your meal. It provides the rigid structural integrity required to easily press through tough root vegetables without bending or snapping. Yes, it might cost you $30 instead of $10, but it is a buy-it-for-life tool that will outlast you. Quality equipment is an investment in your health and your sanity.
The Masterclass: How to Make Foolproof, Cloud-Like Mashed Potatoes
Alright, you have the science, you understand the pitfalls, and you have your shiny new stainless steel ricer. It is time for the masterclass. Let’s walk through the definitive, step-by-step process for achieving absolute perfection.
Step 1: Choosing the Right Potato (Anatomy of a Russet vs. Yukon Gold)
You cannot make great art with terrible materials. The variety of potato you choose dictates the final texture.
The Russet (High Starch): Idaho russet potatoes are the gold standard for mashing. They average about 21% solids to 79% water content. Because they are incredibly high in starch (specifically amylose) and low in moisture, their cells expand and separate easily during cooking. While russets make phenomenal baked potatoes, their high starch content also makes them the undisputed king of the mash, yielding the fluffiest, lightest texture possible.
The Yukon Gold (Medium Starch): If you prefer a slightly creamier, richer, and more buttery texture, the Yukon Gold is your best friend. Developed in the 1960s by crossbreeding a russet with a waxy yellow South American potato, the Yukon Gold offers a beautiful balance of starch and moisture. They rice beautifully and have a naturally sweet, buttery flavor.
The Red Potato (Low Starch / Waxy): Do not use red potatoes for traditional fluffy mashed potatoes. They are low in starch and high in moisture. While they hold their shape beautifully in soups or potato salads, trying to rice and mash them will result in a dense, heavy, and somewhat watery side dish.
Step 2: The Art of the Boil (Hint: Start Cold)
The absolute magic of starting in cold water cannot be overstated when boiling tubers.
If you drop your potatoes into a pot of rapidly boiling water, you create a massive thermal gradient. The exterior of the potato immediately shoots up to 212°F (100°C), while the interior remains cold. By the time the center of the potato is tender, the exterior has been violently overcooked. The outer starch granules will have completely ruptured, turning into a waterlogged, mushy mess that will ruin your final dish.
Instead, place your uniform-sized potato chunks into a pot and cover them with cold water. Add a generous handful of salt (the water should taste like the sea). Bring the pot to a gentle simmer—not a violent, rolling boil—and cook until a paring knife slides into the center with zero resistance.
Step 3: The Drying Phase (Crucial but Forgotten)
This is the step that 90% of home cooks skip, and it is a fatal error. Water is the enemy of fat absorption. If your potatoes are waterlogged, they will not absorb the butter and cream properly, and they will taste bland and watery.
Once the potatoes are fork-tender, drain them thoroughly in a colander. Then, immediately return the hot potatoes to the empty cooking pot and place it back on the stove over low heat for about 1 to 2 minutes. Gently shake the pot. You will see steam rising from the potatoes as the residual surface moisture evaporates. You want the potatoes to look dry and slightly chalky on the outside.
Step 4: Ricing Like a Pro
Timing is everything. You must rice your potatoes while they are screaming hot. As potatoes cool, the gelatinized starch begins to undergo retrogradation—the starch molecules start to realign and crystallize, making the potato firm and waxy. If you try to rice a lukewarm potato, it will require immense physical effort, and the texture will be lumpy and dense.
Working quickly, load the hot potato chunks into the hopper of your stainless steel ricer and press them through into a large, warm mixing bowl. Do not let the riced potatoes pile up too high and compress themselves; let them fall gently into a light, snowy mound.
Step 5: Folding, Not Stirring (The Fat Equation)
Now that you have a bowl of perfectly riced, intact starch granules, you must treat them with respect.
Rule #1: Fat goes first. You can melt your butter gently in your stainless steel pans before folding it in. Pour the hot, melted butter over the riced potatoes first. Gently fold it in with a rubber spatula. Do not stir vigorously. The fat coats the starch molecules, lubricating them and creating a protective barrier that prevents them from linking together and forming glue.
Rule #2: Warm your dairy. Never pour cold milk or cold heavy cream directly from the refrigerator into your hot potatoes. Cold dairy shocks the hot starch matrix, causing rapid, uneven hydration and a sudden drop in temperature that leads to a gummy texture. Heat your cream or milk to about 120°F (49°C) before gently folding it into the butter-coated potatoes.
Fold just until the liquid is absorbed. Stop immediately. Taste for salt, add a dash of white pepper if you like, and serve immediately.
Time is Money: Weeknight Hacks for Effortless Riced Potatoes
I know what you are thinking. “This sounds amazing for a lazy Sunday, but I don’t have time to painstakingly peel and chop potatoes on a Tuesday night.”
I hear you. As a busy professional, I rigorously prioritize efficiency. Here is the ultimate weeknight hack that will blow your mind: You don’t have to peel the potatoes.
Yes, you read that correctly. Wash your russet or Yukon Gold potatoes thoroughly. Cut them in half around the equator. Boil them with the skins on. When they are tender and dried, place the potato half into the hopper of your stainless steel ricer with the cut side facing down (towards the holes).
When you squeeze the handles, the ricer will extrude the soft, cooked potato flesh perfectly through the perforations, while the tough skin will remain trapped inside the hopper! You simply open the ricer, pull out the empty skin with a pair of tongs, discard it, and load the next half.
This single hack saves you 15 to 20 minutes of tedious peeling and reduces your prep time to almost zero. You wouldn’t serve soggy roasted veggies to your guests, so don’t serve them a dense, gummy paste either—especially when achieving perfection is this fast and effortless.
Beyond the Spud: What Else Can Your Stainless Steel Ricer Do?
A good kitchen tool should never be a unitasker. While your stainless steel ricer is the undisputed champion of mashed potatoes, it is actually a highly versatile piece of equipment that will earn its keep in your culinary arsenal.
Flawless Gnocchi: Traditional Italian gnocchi requires an incredibly dry, airy potato base. If you mash the potatoes with a hand masher, the dough will become heavy, requiring more flour, which results in tough, chewy dumplings. Ricing the hot potatoes guarantees light, pillowy gnocchi every single time.
Squeezing Spinach: If you have ever tried to make a spinach dip or a ricotta filling, you know the struggle of wringing out thawed frozen spinach. Your hands get freezing cold, and you can never get all the water out. Load the thawed spinach into your ricer and squeeze. The leverage of the handles exerts massive pressure, easily expelling every drop of excess water in seconds.
Rustic Tomato Sauce: Want to make a quick, fresh tomato sauce without pulling out the food mill? Boil some fresh tomatoes until the skins split, then run them through the ricer. The flesh and juice will press through the holes, while the skins and larger seeds will stay behind in the hopper.
Homemade Baby Food: If you want to make healthy, preservative-free purees for your little ones, the ricer makes quick work of steamed carrots, sweet potatoes, apples, and peas, yielding a perfectly smooth texture without the need to clean a complicated blender.
Final Thoughts: Reclaiming Your Kitchen Confidence
Cooking should not be a source of stress, and you certainly should not be intimidated by a root vegetable. The difference between a frustrating kitchen disaster and a restaurant-quality meal rarely comes down to raw talent. It almost always comes down to understanding the basic science of your ingredients and utilizing the right tools for the job.
By tossing out that awful hand mixer, respecting the fragile nature of swollen starch granules, and investing in a high-quality stainless steel potato ricer, you are instantly elevating your culinary game. You are protecting your family from toxic microplastics, saving precious time on weeknights, and guaranteeing that your side dishes will always be the star of the dinner table.
So, go forth and conquer the kitchen. Buy the ricer, start your potatoes in cold water, and get ready to serve the lightest, fluffiest, most mind-blowing mashed potatoes of your life. You’ve got this, and I’ll be right here cheering you on.






