Listen, on a Tuesday evening at 6:30 PM, I am the undisputed queen of the twenty-minute survival meal. If a recipe dares to suggest that I slowly caramelize onions or gently braise a cut of meat while my inbox is still aggressively pinging, that recipe goes straight into the recycling bin. Weekdays are for ruthless efficiency, clever shortcuts, and getting a nutritious dinner on the table before exhaustion completely takes over.
But the weekend? The weekend is sacred.
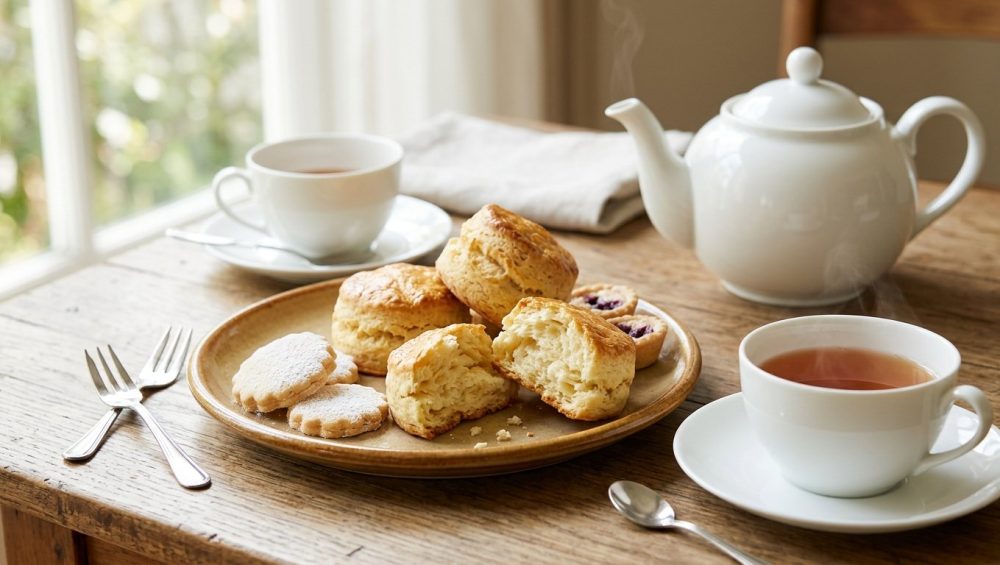
The weekend is when we get to slow down, breathe, and engage in the kind of deliberate, perfectionist culinary projects that remind us why we actually love being in the kitchen. There is perhaps no better weekend project than hosting a proper, mindful afternoon tea. It is an intentional pause in a chaotic world, a chance to gather friends around a table, pour something warm, and serve a platter of freshly baked, impossibly flaky scones.
Unfortunately, this idyllic vision usually comes crashing down the moment you pull your baking sheet out of the oven and realize you have inadvertently baked a batch of weaponized hockey pucks.
If you have ever bitten into a homemade scone only to find it dense, heavy, and tough enough to break a window, you are not alone. Scones are notoriously finicky, but not because they require a culinary degree or years of professional pastry experience. They fail because baking is an unforgiving science, and when we ignore the fundamental laws of thermodynamics and chemistry, the dough fights back.
Today, we are stripping away the pretentious pastry-chef jargon and diving deep into the exact mechanics of why your pastries are failing. We are going to master the precise science of gluten development, temperature control, and chemical leavening so you can confidently curate an elegant, stress-free tea time.
The Anatomy of a Hockey Puck: Why Your Scones Keep Failing
To fix a ruined pastry, we first have to understand exactly how we ruined it. A perfect scone should be a study in contrasts: a crisp, golden-brown exterior that shatters slightly when you bite into it, giving way to a wildly tender, steaming, flaky interior. When you end up with a dense, heavy lump that tastes like sweetened drywall, one of two catastrophic errors has occurred.
The Gluten Trap: Overworking the Dough
The single most common reason your scones turn out tough is that you treated them like bread.
Wheat flour contains two crucial proteins: gliadin and glutenin. When these proteins are dry, they just sit there, minding their own business. But the second you introduce a liquid (like buttermilk or heavy cream) and apply physical agitation (stirring, kneading, or mixing), these proteins link together to form an elastic, microscopic web called gluten.
In a loaf of sourdough bread, a strong gluten network is exactly what you want. It provides the chewy structure that traps yeast gases and allows the bread to rise. In a delicate pastry, however, strong gluten is your absolute worst enemy. The more you mix, stir, and knead your scone dough, the tighter and more restrictive that elastic web becomes. When you put an overworked dough into the oven, the leavening agents struggle to push against that rigid gluten structure, resulting in a flat, dense, and unpleasantly chewy final product.
The Butter Breakdown: Temperature is Everything
If gluten is the first villain in our story, warm butter is the second. In the world of pastry, temperature control is not a suggestion; it is a rigid, uncompromising law of physics.
Butter is essentially an emulsion consisting of roughly 80 percent milkfat, 16 percent water, and a small percentage of milk solids. Like water, butter physically shifts its form across a spectrum of temperatures. At 35°F to 40°F (2°C to 4°C), butter is solid, hard, and cold. Around 68°F to 72°F, it enters a “plastic” state where it is soft and malleable. By the time it hits 80°F to 85°F, it begins to melt completely.
For a scone to achieve its signature flaky layers, the butter must remain firmly in that 35°F to 40°F solid state from the moment it leaves your fridge until the exact second it enters a hot oven. When solid, cold chunks of butter are suspended in your dough, they act as tiny, delayed-release steam bombs. As the heat of the oven finally melts the fat, the 16 percent water content rapidly vaporizes into steam. This sudden burst of steam violently pushes the layers of dough apart, creating beautiful, airy pockets.
If your butter warms up and softens on your kitchen counter—or melts from the heat of your hands while you are mixing—it will prematurely coat the flour particles. Instead of creating distinct steam pockets, the fat simply absorbs into the dough, yielding a heavy, greasy, cookie-like texture.
The Science of Scone Supremacy: A Masterclass in Mechanics
Now that we know exactly how to ruin a scone, let’s talk about how to engineer a perfect one. You do not need magic to bake like a professional; you just need to understand your ingredients on a molecular level.
Flour Power: Choosing Your Canvas Wisely
Not all flours are created equal, and the type of flour you pull from your pantry will dictate the texture of your final bake. Flours are categorized by their protein content, which directly correlates to their gluten-forming potential.
Bread flour sits at the top of the spectrum with a massive 12 to 16 percent protein content, designed for maximum chew. Standard all-purpose (AP) flour hovers right in the middle, typically containing 10 to 12 percent protein. While you can absolutely make a decent scone with AP flour, the true secret to an ethereally tender crumb is pastry flour.
Pastry flour is milled from soft wheat and contains a highly specific 8 to 9 percent protein content. This lower protein level acts as a built-in insurance policy against overworking your dough; with fewer proteins available to link up, your risk of accidentally creating a tough gluten network drops significantly. If you cannot find dedicated pastry flour at your local market, you can easily hack your own by measuring out one cup of all-purpose flour, removing two tablespoons of it, and replacing those two tablespoons with pure cornstarch. The cornstarch dilutes the overall protein concentration, mimicking the tenderizing effect of commercial pastry flour.
The Leavening Lift: Baking Powder Dynamics
Because we are deliberately preventing gluten development, our dough lacks the structural elasticity to trap slow-fermenting yeast gases. Instead, we must rely on chemical leavening to force the dough to rise quickly. Enter baking powder.
Baking powder is a complete, self-contained leavening engine. Unlike baking soda—which is purely alkaline (sodium bicarbonate) and requires you to add an external acid to trigger a reaction—baking powder contains both the alkaline base and a powdered weak acid. To prevent these two chemicals from reacting prematurely in the tin, manufacturers add a buffer, usually cornstarch, to absorb ambient moisture.
Modern baking powder is “double-acting,” a brilliant piece of 1860s food technology patented by Eben Norton Horsford. This means it releases carbon dioxide gas in two distinct phases. The first reaction occurs the moment the powder gets wet, creating initial bubbles that aerate the raw dough. The second, much larger reaction is triggered by the heat of the oven, forcing the dough to rapidly expand before the starches and proteins fully set.
However, baking powder is highly volatile and degrades over time. If your tin has been sitting in the back of your pantry since the last presidential election, it is completely inert. Just like when your naturally aging spices turn into hard bricks and lose all their essential oils, dead baking powder will leave you with flat, lifeless pastries. Always test your powder by dropping a spoonful into hot water; if it doesn’t immediately fizz and bubble like a science fair volcano, throw it away.
The Liquid Equation: Finding the Hydration Sweet Spot
The liquid you choose to bind your dry ingredients together plays a massive role in both flavor and texture. Heavy cream is a classic choice, providing a rich, luxurious mouthfeel due to its high fat content. However, my personal preference for scones will always be cold, thick buttermilk.
Buttermilk brings a complex, tangy flavor profile that perfectly balances the sweetness of the pastry, but its real value lies in its acidity. The lactic acid in buttermilk actively weakens and tenderizes gluten strands, providing yet another layer of insurance against a tough crumb. Furthermore, if you pair buttermilk with a tiny pinch of supplemental baking soda, the acid-base reaction creates an immediate, violent burst of carbon dioxide bubbles, lifting the dough even higher.
Essential Gear for the Serious (But Snarky) Scone Baker
I have said it before, and I will aggressively say it again: you cannot execute high-level culinary techniques using cheap, toxic, or flimsy equipment. If you want bakery-quality results, you need to set your kitchen up for success.
Ditch the Toxic and Flimsy Baking Sheets
Your baking sheet is the primary conductor of heat between the oven and your pastry. If you are using a paper-thin, grocery-store-aisle baking sheet, you are doomed from the start. Thin metal heats unevenly, creating chaotic hot spots that will burn the bottoms of your scones before the insides are fully baked. If your cheap baking sheets keep warping with a loud, terrifying “POP” the second your oven hits 400 degrees, throw them directly into the recycling bin.
Invest in heavy-gauge, bare aluminum half-sheet pans. They possess the thermal mass required to distribute heat evenly and gently. Furthermore, avoid cheap, peeling non-stick coatings. Line your heavy-duty pans with unbleached parchment paper or a high-quality, platinum-grade silicone baking mat. And please, buy a reputable brand; if your silicone spatulas taste like soap because they are leaching cheap chemical fillers into your food, a bargain-bin baking mat will absolutely ruin the flavor of your delicate pastries.
The Unsung Heroes: Bench Scrapers and Pastry Blenders
Remember our golden rule about butter temperature? Your hands are essentially 98.6-degree meat heaters. If you use your bare fingers to rub the butter into the flour, you are actively melting the fat and destroying your chances of a flaky rise.
To keep your body heat far away from the dough, you need the right tools. A dedicated wire pastry blender is fantastic for cutting fat into flour, but the real champion of the pastry kitchen is a trusty bench scraper. A stainless steel bench scraper allows you to chop butter, fold dough, and lift sticky pastries without ever making skin contact. And while we are discussing sharp metal tools, ensure you are working on a solid, edge-grain wood or high-density plastic surface. If you are still chopping ingredients on a rock-hard bamboo board that is actively ruining your knives, it is time for an upgrade.
Weighing vs. Measuring: The Kitchen Scale Mandate
If you are scooping your flour with a measuring cup, you are guessing. Depending on how densely packed the flour is inside your bag, a single “cup” can weigh anywhere from 100 grams to 150 grams. That is a 50 percent margin of error in your dry ingredients, which will completely destroy your hydration ratios. Buy a digital kitchen scale. Weigh your flour, weigh your sugar, weigh your liquids. Precision is the difference between an amateur baker and a master.
The Step-by-Step Blueprint for Tender, Flaky Perfection
We have the science, and we have the gear. Now, let’s walk through the actual execution. This is your stress-free blueprint for building the perfect dough.
Step 1: The Deep Freeze (Prepping the Fat)
Do not just use cold butter from the fridge; use butter from the freezer. Place your sticks of butter in the freezer for at least thirty minutes before you begin baking. The absolute best way to incorporate rock-hard fat into your flour without using your warm hands is to grate your frozen butter using the large holes of a standard stainless steel box grater. This creates perfectly uniform, ice-cold ribbons of fat that will distribute evenly throughout your dry ingredients in seconds. Once grated, put the bowl of butter ribbons back into the freezer while you prep the rest of your station.
Step 2: The Dry Mix and Aeration
In a large, wide mixing bowl, combine your weighed pastry flour, baking powder, sugar, and salt. Use a balloon whisk to vigorously aerate the mixture for a full thirty seconds. You are not just mixing; you are dismantling microscopic clumps of baking powder. If leavening agents are not perfectly distributed, you will end up with localized, bitter-tasting metallic spots in your baked scones.
Step 3: The “Cut In” (Fraisage for Home Cooks)
Retrieve your frozen butter ribbons and toss them into the dry ingredients. Using your bench scraper or a pastry blender, quickly toss the butter until every single ribbon is thoroughly coated in flour. You want the mixture to resemble coarse, sandy gravel with distinct, visible pea-sized lumps of fat remaining. Do not overmix. Those visible lumps are your future steam pockets.
Step 4: The Gentle Fold
Make a well in the center of your dry ingredients and pour in your cold buttermilk (or heavy cream). Using a silicone spatula, gently fold the mixture together. Do not stir in aggressive circles. Scrape the bottom of the bowl and fold the dry flour over the wet ingredients until a shaggy, messy dough just barely begins to form.
Turn this shaggy mess out onto a lightly floured surface. Using your bench scraper, push the loose scraps into a rough rectangle. Now, we borrow a lamination technique from croissant making: the letter fold. Fold the right third of the dough over the center, then fold the left third over that, exactly like folding a business letter. Flatten it gently with your hands, turn it 90 degrees, and repeat the fold one more time. This brilliant, low-effort technique stacks the butter and dough into distinct horizontal strata, virtually guaranteeing towering, flaky layers without requiring you to knead the dough and trigger the gluten trap.
Step 5: The Chill and the Bake
Using a sharp knife or your bench scraper, press straight down to cut your dough into triangles or rounds. Never twist the cutter; twisting seals the edges of the dough and prevents the scone from rising straight up.
Transfer your cut scones to your heavy-duty, parchment-lined baking sheet. Now, walk away. Place the entire baking sheet into the refrigerator for at least 20 to 30 minutes. The power of chilling dough cannot be overstated; this resting period allows the flour to fully hydrate, relaxes any minimal gluten you accidentally agitated, and ensures the butter is completely solid before it hits the heat.
Preheat your oven to 400°F (200°C). When the chill is complete, brush the tops (and only the tops, not the sides) of the scones with heavy cream for a gorgeous Maillard-reaction browning, and bake them on your heavy aluminum pan. Do not attempt to bake these in a glass casserole dish unless you want a terrifying lesson in thermal shock and a stark reminder of why your glass baking dish shattered the last time you subjected it to high, dry heat. Bake until aggressively golden brown and towering.
Curating the Mindful Afternoon Tea (Without Losing Your Mind)
Your scones are baking, your kitchen smells like a Parisian patisserie, and the hard work is officially over. Now, we transition from the chaotic prep phase to the actual goal of the weekend: slowing down and being present.
Shifting from Prep to Present
The concept of a mindful tea ritual is not a modern wellness invention; it is an ancient practice. In the 9th century, Buddhist monks introduced tea to Japan, utilizing the beverage’s mild stimulation to maintain alertness during long meditation sessions. This evolved into the formal Japanese Chanoyu tea ceremony, a beautiful practice rooted in Zen Buddhism that emphasizes harmony, respect, and a profound awareness of the present moment.
Centuries later, in the 1840s, Anna Maria Russell, the Duchess of Bedford, popularized the English afternoon tea. Frustrated by the long, hungry gap between a light lunch and a late 8:00 PM dinner, she began requesting a tray of tea, bread, and butter in the late afternoon. It quickly evolved into a cherished social event, a daily forced pause in an increasingly industrialized world.
Whether you lean toward the Zen mindfulness of a Japanese ceremony or the indulgent elegance of a British high society spread, the core philosophy remains the same. This is about hosting mindful gatherings where the host actually gets to sit down, sip their drink, and connect with their guests, rather than sweating over a hot stove while everyone else has fun.
The Art of the Steep: Tea Pairings for Scones
You have just baked a rich, buttery, complex pastry. You cannot serve it with a dusty bag of generic supermarket tea that tastes like floor sweepings.
Because scones are naturally heavy on dairy fat, you need a tea with enough astringency and tannic structure to cut through the richness and cleanse the palate. A high-quality black tea is the traditional and most effective choice. An Assam tea offers a robust, malty backbone that stands up beautifully to sweet jams, while a classic Earl Grey provides bright, citrusy notes of bergamot oil that perfectly slice through the heavy butter.
Brew your tea with intention. Bring fresh, filtered water to a rolling boil (212°F for black tea), warm your teapot first by swirling a splash of hot water inside and discarding it, and steep your loose-leaf tea for precisely three to five minutes.
Accompaniments: Clotted Cream, Jams, and Lemon Curd
A scone is merely a highly engineered delivery vehicle for the toppings. You will need a high-quality, tart fruit preserve (raspberry or blackcurrant are vastly superior to cloyingly sweet strawberry), perhaps a sharp, bright lemon curd, and the absolute non-negotiable crown jewel of afternoon tea: clotted cream.
If you are unfamiliar with clotted cream, prepare to have your life changed. Originating in the historic counties of Devon and Cornwall, clotted cream is a radically thick, luxurious dairy product. The method of clotting cream is believed to have been introduced by Phoenician settlers around 2,000 years ago as a way to preserve buffalo milk. It is traditionally made by gently heating rich, unpasteurized cow’s milk in shallow pans to around 80°C to 90°C, then cooling it rapidly. This thermal shock forces the butterfat to rise to the surface and form incredible, nutty, golden “clots”.
The resulting cream boasts a staggering 55 to 64 percent butterfat content. For context, standard American heavy whipping cream maxes out around 36 percent, and pure butter sits at 80 percent. Clotted cream exists in a magical, textural middle ground—it is richer and denser than whipped cream, but softer, sweeter, and more spreadable than butter. Smear a thick layer of it onto a warm, split scone, top it with a dollop of tart jam, and you will instantly understand why empires were built around the tea trade.
Troubleshooting the Tea Table: Quick Fixes for Common Scone Disasters
Even with a flawless blueprint, the kitchen can occasionally throw you a curveball. If your scones didn’t emerge from the oven looking like they belong in a magazine, consult this quick diagnostic guide before you try your next batch.
They Spread Instead of Rising
If your scones melted into flat, sad puddles that look more like cookies than towering pastries, your butter got too warm before it hit the oven. You either over-handled the dough with your warm hands, skipped the crucial 30-minute chilling step in the refrigerator, or your kitchen was simply too hot. Next time, freeze your butter, use a bench scraper, and enforce a strict chilling period. Alternatively, your baking powder may have expired, leaving the dough without the chemical propulsion needed to fight gravity.
They Burned on the Bottom
If the tops are pale but the bottoms are scorched black, your equipment betrayed you. You either used a thin, dark-coated baking sheet that absorbed and transferred heat too aggressively, or your oven is running wildly hot. Oven dials are notoriously inaccurate suggestions. Just like you know your meat thermometer is lying if it’s a cheap, uncalibrated grocery store impulse buy, your oven’s internal thermostat is likely off by 15 to 20 degrees. Buy an inexpensive, analog oven thermometer that hangs on the rack so you can monitor the true ambient temperature of your baking environment.
They Taste Like Flour (or Soap)
If your scones have a powdery, raw flour taste, you likely packed your measuring cups too densely and threw off the hydration ratio. Buy a scale. If they taste unpleasantly metallic or bitter, your baking powder wasn’t whisked thoroughly into the dry ingredients, resulting in concentrated chemical pockets. And if they taste distinctly like artificial lavender or dish soap, congratulations: you baked them on a cheap, degraded silicone mat that has absorbed the flavor of your dishwasher detergent. Throw the mat away and use parchment paper.
Conclusion: Reclaiming Your Weekend (One Pastry at a Time)
Baking is not magic, and it is certainly not a talent reserved for those with professional culinary degrees. It is simply a series of observable, repeatable scientific reactions. When you respect the delicate nature of gluten, fiercely guard the temperature of your butter, and utilize the explosive power of fresh chemical leavening, you completely eliminate the guesswork from the equation.
You spend five days a week rushing, optimizing, and surviving. Let your weekend be different. Buy the good butter, weigh your flour, and embrace the slow, analog beauty of cutting fat into dough. Brew a proper pot of loose-leaf tea, set out the clotted cream, and invite your favorite people over to share the results. You have conquered the science of the pastry; now, it is time to sit down, take a breath, and finally enjoy the art of the afternoon.