
The Anatomy of a Breading Disaster
Let me paint a picture that is probably all too familiar to you. You have spent your precious weekend afternoon meticulously preparing a beautiful pork cutlet. You dredged it, you dipped it, you coated it in an absolute mountain of panko breadcrumbs, and you gently lowered it into a pan of hot oil. You felt like an absolute culinary genius. But then, tragedy strikes. The moment you flip the meat, the entire crust detaches in one solid, greasy sheet. You are left staring at a pale, naked piece of pork sitting next to a hollow, floating shell of fried breading.
If your breading always falls off the minute it hits the hot oil, I need you to understand something very important: you are not cursed by the culinary gods, and you do not need a professional culinary degree to fix this. You are simply ignoring the fundamental laws of food science.
Cooking, especially frying, is a ruthless game of moisture control and thermal dynamics. When you attempt a dish like Tonkatsu—the iconic, shatteringly crisp Japanese breaded pork cutlet—you cannot just wing it. You cannot skip steps because you are feeling lazy, and you certainly cannot rush the process. But here is the good news: mastering the perfect, skin-tight breading is entirely achievable in a standard home kitchen. Once you understand the underlying chemistry of why breading adheres to protein, you will never serve a patchy, bald piece of fried meat again.
Furthermore, we are going to take this highly methodical, seemingly messy process and turn it into the ultimate weekend culinary project. We are going to transform the standard breading procedure into a mindful, interactive Katsu night that you can share with your friends. Pour yourself a glass of wine, roll up your sleeves, and let’s dive into the definitive, no-nonsense masterclass on achieving the crispiest, most perfectly adhered Tonkatsu of your life.
The Physics of Failure: Why Your Crust Bails on You
To understand how to make breading stick, you first have to understand why it falls off. The enemy of adhesion is moisture. Raw meat is essentially a sponge filled with water. When you drop a piece of raw pork into a pan of oil heated to 320°F (160°C), the moisture on the surface of the meat rapidly rapidly turns into steam. Steam expands. If you have slapped a layer of heavy breadcrumbs directly onto wet meat, that expanding steam has nowhere to go. It builds up pressure between the protein and the crust, eventually blowing the breading right off the surface of the meat like a blown head gasket in a car.
To prevent this catastrophic structural failure, professional kitchens rely on a rigid, non-negotiable protocol known as the Standard Breading Procedure (SBP). This is a three-step method designed to create a chemical and physical bond between the wet meat and the dry exterior.
Step One: The Primer (Flour)
Before you even look at the flour, you must aggressively pat your meat completely dry with paper towels. I cannot stress this enough. If you start with a wet piece of meat, you have already lost the battle. Once the surface is dry, the meat is dredged in a fine layer of all-purpose flour. The flour acts as a primer, much like painting a wall. The proteins and starches in the flour absorb the microscopic layer of residual surface moisture on the pork, creating a dry, tacky surface that the egg wash can actually cling to.
Step Two: The Glue (Egg Wash)
Next comes the egg wash. Whole eggs are whisked together until the yolks and whites are completely homogenized. The egg provides the vital protein structure that will coagulate and harden when exposed to the heat of the fryer, essentially shrink-wrapping the crust onto the pork. A brilliant trick used by seasoned chefs is to add a tiny splash of neutral oil or a teaspoon of water to the beaten eggs. This slightly thins the viscosity of the egg wash, preventing thick, gloppy strands of egg white from pulling the flour off the meat.
Step Three: The Armor (Panko)
Finally, the meat goes into the breadcrumbs. For Tonkatsu, standard fine breadcrumbs are an absolute insult to the dish. You must use panko. We will discuss the specific magic of panko later, but for now, understand that this step requires physical force. You cannot just lightly toss the pork in the crumbs; you must aggressively press the panko into the egg-washed surface to ensure maximum physical contact.
When dealing with the inevitable messy fallout of the Standard Breading Procedure on your countertops, you will absolutely need a bench scraper to cleanly gather up the stray flour and hardened bits of egg batter. Do not try to wipe wet dough with a sponge unless you enjoy ruining your cleaning supplies.
The Secret Weapon You Are Ignoring: Starch Hydration
Here is the single biggest rookie mistake that ruins perfectly good Katsu: going straight from the breading station into the deep fryer. If you take away only one piece of advice from this entire masterclass, let it be this. You must let your breaded meat rest.
When you coat the pork in flour, egg, and panko, the ingredients are merely sitting on top of one another. They have not yet formed a unified structure. By placing the breaded cutlets on a wire rack and letting them rest at room temperature for 15 to 20 minutes, you are allowing a critical chemical process to occur: starch hydration.
During this resting period, the starches in the flour dredge slowly absorb the moisture from the egg wash and the residual moisture from the meat. As the flour hydrates, it swells and transforms from a powdery dust into a sticky, gel-like paste. This paste acts as a heavy-duty culinary superglue, permanently bonding the protein network of the meat to the structural network of the panko. Furthermore, this resting period allows the gluten strands in the flour to relax, preventing the crust from shrinking and tearing when it hits the hot oil.
If you skip this 15-minute rest, the flour remains dry and powdery underneath the egg. When the steam builds up during frying, that dry powder acts like a slip-and-slide, and your beautiful panko crust will slide right off. Have a little patience. Use those 15 minutes to clean your prep station, pour another drink, and get your frying oil up to temperature.
Pork Prep: Pounding, Seasoning, and Scoring
You cannot build a magnificent house on a terrible foundation, and you cannot make mind-blowing Tonkatsu with a poorly prepped piece of meat. The traditional cut for this dish is a boneless pork loin (ro-su) or pork tenderloin (hire). You want a piece of meat that is about half an inch to three-quarters of an inch thick. If it is too thin, it will dry out before the crust browns. If it is too thick, the crust will burn before the interior reaches a safe temperature.
The Art of Tenderizing
Pork loin is a relatively lean muscle, and it can be notoriously tough if mishandled. Place your pork chops inside a heavy-duty plastic zip-top bag (to prevent cross-contamination and to keep raw meat juices from flying across your kitchen) and gently pound them with the flat side of a meat mallet or a heavy skillet. You are not trying to obliterate the meat into a paper-thin schnitzel; you are simply aiming for an even, uniform thickness so that the meat cooks at the exact same rate from edge to edge.
Defeating the Connective Tissue
Take a close look at a pork loin chop. You will notice a distinct band of white fat and connective tissue running along the outer edge. This connective tissue shrinks rapidly when exposed to high heat. If you don’t snip that connective tissue, your pork chops curl up into angry little bowls the second they hit the hot oil. A curled pork chop cooks unevenly, leaving you with raw spots in the center and burnt edges on the outside. Take a sharp knife and make small, vertical slits through that band of fat every inch or so along the perimeter. This severs the tension of the tissue, ensuring the cutlet lays perfectly flat in the pan.
Aggressive Seasoning
Do not rely on the tonkatsu sauce to provide all the flavor. You must season the raw meat aggressively with kosher salt and freshly cracked black pepper on both sides before you begin the breading process. The salt not only enhances the flavor of the pork but also draws out a microscopic amount of surface moisture, which actually helps the initial flour dredge adhere better.
The Panko Predicament: Not All Crumbs Are Created Equal
If you attempt to make Tonkatsu using those sandy, pulverized breadcrumbs from a cardboard canister that have been sitting in your pantry since 2019, I will personally come to your kitchen and confiscate your cookware. Tonkatsu demands panko.
Panko breadcrumbs are a marvel of Japanese food engineering. Unlike Western breadcrumbs, which are made from baked bread that is toasted and crushed, authentic panko is made from crustless dough that is baked using an electrical current (joule baking). This highly specialized process cooks the bread without ever forming a hard brown crust, resulting in a pure white loaf that is then ground into large, airy, jagged slivers. Because panko flakes are so light and porous, they absorb less oil during frying and provide a shatteringly crisp texture that stays crunchy long after it leaves the pan.
The Hydration Spritz Trick
Here is a brilliant, advanced technique used by high-end Tonkatsu chefs in Tokyo. Commercially available panko in Western supermarkets is usually sold completely dry. Dry panko is highly susceptible to burning in hot oil before the thick pork chop has time to cook through. To counteract this, chefs will take a clean spray bottle filled with fresh water and give the dry panko a very light, gentle spritz before dredging the meat.
You are not trying to turn the breadcrumbs into a soggy mush; you are just taking the dry, brittle edge off the flakes. This slight rehydration mimics the texture of “Nama Panko” (fresh panko) used in Japan. The added moisture slows down the browning process in the fryer, giving you a wider margin of error and resulting in a lighter, fluffier, golden-blonde crust rather than a dark, heavy, oily one.
A Brutally Honest Rant on Toxic Gear
We need to have a serious conversation about the equipment you are using to fry your food. I have zero patience for the normalization of cheap, disposable kitchenware, and I absolutely despise toxic cooking gear.
You might wonder why your non-stick pans keep losing their slick coating after just a few months of use. The answer is usually thermal abuse. The vast majority of standard non-stick skillets are coated with polytetrafluoroethylene (PTFE), commonly known as Teflon. PTFE is a fantastic material for gently scrambling eggs on low heat, but it has absolutely no business being used as a deep-frying vessel.
When PTFE is heated above 500°F (260°C), the chemical bonds in the polymer begin to break down and degrade. This degradation releases invisible, odorless, and highly toxic fluoropolymer fumes into the air. Inhaling these fumes causes a documented medical condition known as “polymer fume fever” or “Teflon flu,” which presents with severe chills, headaches, and fever-like symptoms.
“But Sassy Sous-Chef,” you say, “I am only frying my Tonkatsu at 320°F! That is well below the danger zone!”
That is mathematically true for the oil, but it is completely false for the pan itself. Cheap non-stick pans are usually made from thin, highly conductive aluminum. When you place a thin aluminum pan over a high output gas or induction burner to heat up a large volume of oil, the localized temperature of the metal at the bottom of the pan can easily and rapidly spike past 500°F before the oil itself reaches frying temperature. You are actively poisoning your kitchen environment and destroying the chemical integrity of your cookware.
If you want to fry food safely and effectively, you must use cookware with high thermal mass. A heavy enameled cast iron Dutch oven, a bare cast iron skillet, or a thick, multi-clad stainless steel sauté pan are your only acceptable options. These materials absorb heat slowly and distribute it evenly, preventing dangerous localized hot spots and maintaining a rock-solid, stable oil temperature when you drop the cold meat into the pan.
Frying Dynamics: Mastering the Thermal Chaos
Deep frying is not a passive activity; it requires your undivided attention and a respect for thermodynamics.
The Oil
Choose a neutral cooking oil with a high smoke point. Peanut oil, canola oil, sunflower oil, or rice bran oil are all excellent choices. Do not use extra virgin olive oil or unrefined oils, as their low smoke points will cause them to burn and impart a bitter, acrid flavor to your beautiful Katsu. Fill your heavy skillet or Dutch oven with enough oil to come about halfway up the side of the pork chops—usually about an inch of oil is plenty for a shallow fry.
The Temperature
Temperature control is the difference between a greasy, soggy sponge and a crisp, heavenly cutlet. For Tonkatsu, the optimal frying temperature is between 320°F and 340°F (160°C – 170°C). This is slightly lower than the standard 350°F used for fried chicken. The lower temperature is crucial because the thick layer of panko is highly prone to scorching. Frying at 320°F allows the heat to gently penetrate the thick pork chop, cooking the interior to a juicy, safe temperature at the exact same time the exterior achieves a perfect golden brown.
If you think your meat thermometer is lying to you when it comes to checking oil temps, it is likely because you are using a cheap bi-metal dial thermometer that takes thirty seconds to register a change. Invest in a high-quality, instant-read digital thermometer and clip it to the side of your pan.
The Execution
Carefully lower the rested, breaded pork chops into the hot oil, laying them away from your body so that any accidental splashes of 320-degree oil go toward the back of the stove, not onto your shirt. Do not overcrowd the pan. Dropping cold meat into hot oil causes an immediate drop in temperature. If you cram four giant pork chops into a single skillet, the oil temperature will plummet to 250°F, and the crust will absorb the oil rather than repelling it. Fry in batches if necessary.
Fry the cutlets for about 3 to 4 minutes per side. You are looking for a deep, rich, golden-brown color. The internal temperature of the pork should reach 135°F to 140°F (57°C – 60°C); carryover cooking will bring it up to a perfectly safe and juicy 145°F (63°C) as it rests.
Engineering the Mindful Katsu Dinner Party
Now that we have established the rigorous science and safety protocols, let’s talk about the experience. Cooking should not be a solitary, stressful chore where you are banished to the kitchen while your friends drink wine in the living room. It is entirely possible to host a relaxed dinner party where your guests actually participate in the cooking process without setting your kitchen on fire.
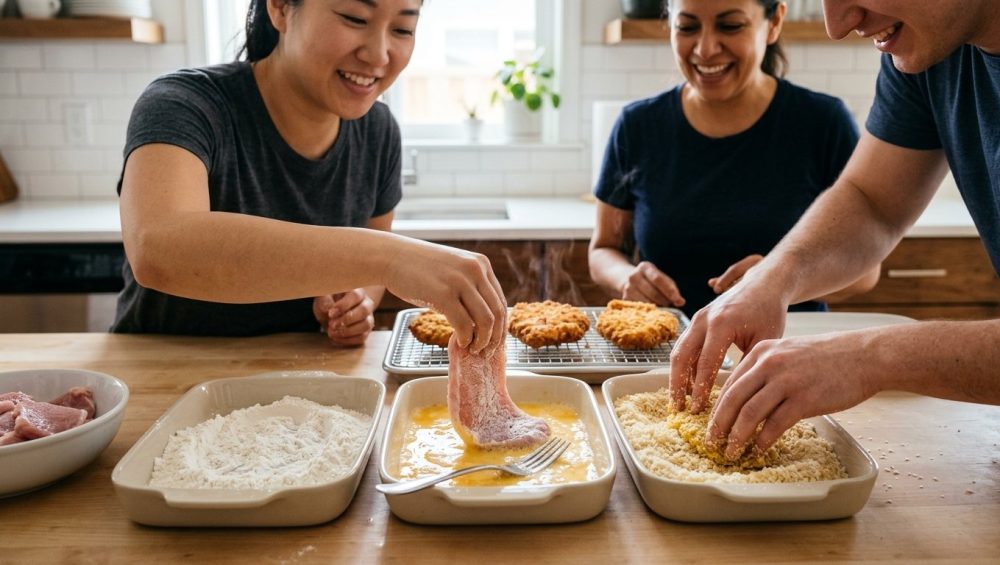
A DIY Katsu night is the perfect format for a mindful, communal gathering. The Standard Breading Procedure is inherently modular. You can set up a beautiful, organized assembly line on your kitchen island or dining table.
The Station Setup
Create three distinct zones using wide, shallow dishes (pie plates or rimmed baking sheets work perfectly).
- Zone 1: The seasoned flour.
- Zone 2: The beaten egg wash (with your secret splash of oil).
- Zone 3: The lightly spritzed panko.
Assign your guests to different stations. One person is the “Flour Dusting Specialist,” another is the “Egg Wash Manager,” and another is the “Panko Presser.” This forces everyone to put down their phones, wash their hands, and engage in a tactile, sensory experience. It transforms the tedious prep work into a collaborative, conversational activity.
As the host, your job is to manage the frying station. You are the gatekeeper of the hot oil. While your guests are happily breading the meat and letting it rest on the wire racks to achieve that crucial starch hydration, you can manage the stove, pour the drinks, and supervise the chaos. This division of labor eliminates the bottleneck of one person doing all the work, ensuring that the food is prepped efficiently and the atmosphere remains lively.
The Holy Trinity of Sides: Cabbage, Rice, and Sauce
A massive piece of fried pork is incredibly rich and heavy. In Japanese cuisine, balance is everything. Tonkatsu is never served in isolation; it requires a specific supporting cast to cut through the fat and refresh the palate.
The Cabbage
The traditional accompaniment to Tonkatsu is a mountain of raw, finely shredded green cabbage. The crisp, watery, slightly peppery crunch of the raw cabbage acts as a structural and flavor contrast to the heavy, oily meat. It is practically a palate cleanser.
Before you even think about slicing that cabbage, consider why your kitchen knives get dull so quickly in the first place—usually, it’s because you’re scraping the sharp edge aggressively across the cutting board to move ingredients. Use the spine of the knife, or better yet, your bench scraper. You need a razor-sharp blade to shave the cabbage into translucent, hair-like strands. If your knife is dull, you will end up with thick, unappetizing chunks. Soak the shredded cabbage in a bowl of ice water for ten minutes before serving; this shocks the cells and makes the cabbage incredibly crisp. Drain it thoroughly in a salad spinner.
The Sauce
Tonkatsu sauce is a thick, dark, sweet, and savory condiment that is essentially a complex Japanese take on Worcestershire sauce mixed with fruit puree. You can buy excellent bottled versions (like the iconic Bull-Dog brand), but making a quick homemade version is incredibly easy and impressive. Whisk together ketchup, Worcestershire sauce, oyster sauce, a splash of soy sauce, and a pinch of sugar. The acidity of the ketchup and Worcestershire cuts right through the fried exterior of the pork, providing a tangy brightness that elevates the entire dish.
The Rice
Serve the Katsu with perfectly steamed, premium short-grain Japanese rice. The sticky, starchy texture of the rice absorbs the savory Tonkatsu sauce and provides a neutral, comforting base for the meal.
The Aftermath: Cooling, Draining, and Cleaning
The way you handle your food after it leaves the hot oil is just as important as how you cook it. When you pull that gorgeous, golden-brown Tonkatsu out of the skillet, your immediate instinct might be to drop it onto a plate lined with paper towels. Stop right there.
The reason your fried food gets soggy is that you are draining it on a flat pile of paper towels, trapping the residual heat and steam directly underneath the crust. The paper towel absorbs the surface oil, but it also creates a humid microclimate that instantly ruins the crispness of the panko on the bottom of the cutlet.
You must transfer the fried pork to a stainless steel wire cooling rack set over a baking sheet. This allows air to circulate a full 360 degrees around the meat, letting the excess oil drip away while allowing the steam to escape harmlessly into the air. If you want to be a true perfectionist, lean the cutlets vertically against the edge of the wire rack so that the oil drains completely off the flat surfaces. Let the meat rest for at least five minutes before slicing. This allows the internal juices to redistribute. If you slice it immediately, the juices will flood out, making the bottom of your crust soggy and leaving the meat dry.
When it comes time to clean up, do not pour hot oil down your sink drain unless you want to spend your next weekend paying a plumber. Let the oil cool completely, strain it through a fine-mesh sieve or a coffee filter to remove the burnt panko bits, and store it in a sealed glass jar for future frying.
And please, stop ruining your cast iron by soaking it in the sink for three days. While the pan is still slightly warm, wipe out the excess oil with a paper towel, wash it gently with warm water and a drop of dish soap, dry it thoroughly on the stove, and rub a microscopic drop of fresh oil into the cooking surface to protect the seasoning.
If you happen to have any leftover Tonkatsu, store it in glass containers. Otherwise, your plastic containers stay greasy for all of eternity, and nobody wants their leftover rice tasting like yesterday’s frying oil. Reheat leftovers in an air fryer or a 400°F oven on a wire rack—never in the microwave, which will turn your hard-earned crust into a rubbery nightmare.
By respecting the science of starch hydration, utilizing the correct heavy-duty equipment, and turning the mechanical process into a shared, mindful experience, you have completely conquered the art of the breaded cutlet. You have banished the curse of the falling crust, protected your kitchen from toxic fumes, and hosted an unforgettable dinner party. Now, grab a sharp knife, slice that perfectly adhered Katsu into thick strips, and listen to the glorious, shattering crunch of culinary victory.






