
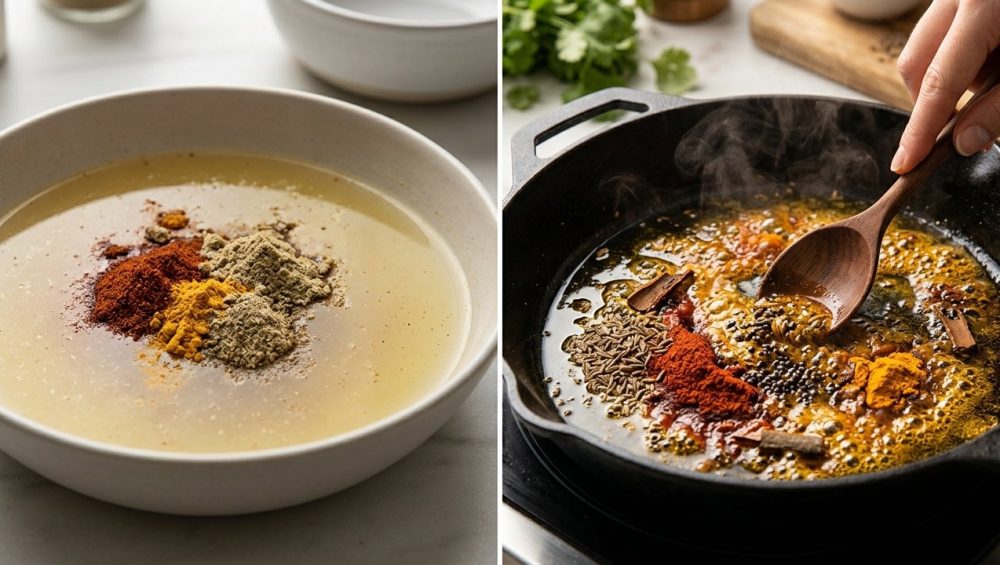
Listen up, weekend warriors. We need to have a serious, brutally honest conversation about the sad, neglected state of your spice cabinet. You have probably spent a small fortune on those little glass jars of cumin, coriander, smoked paprika, and cardamom. You watch cooking shows where professional chefs effortlessly sprinkle a pinch of this and a dash of that, creating culinary magic that leaves diners speechless. But when you try to replicate it in your own kitchen, you are left frustrated, wondering why your dinner tastes boring and entirely one-dimensional.
You do what most home cooks do: you dump a tablespoon of expensive, imported chili powder directly into a simmering pot of watery soup or a bubbling tomato sauce, expecting a fireworks display of flavor. Instead, you get a dusty, gritty, muted profile that tastes more like a damp basement than a Michelin-starred meal.
Why does restaurant food taste so incredibly vibrant, complex, and layered, while your home-cooked curries and stews taste like boiled sadness? I will tell you the secret right now, and I promise you that it does not require a culinary degree, a massive trust fund, or a pretentious sous-vide machine taking up half your counter space. The secret is a technique so fundamental, so scientifically brilliant, and yet so ridiculously simple that it will instantly elevate your everyday meals from mediocre to mind-blowing.
It is called blooming.
If you are currently adding raw, dry spices directly to watery liquids, you are essentially throwing your hard-earned money directly into the garbage disposal. You are locking away the vast majority of the flavor potential inside those little seeds, barks, and powders. Today, we are going to fix that. We are going to translate the complex food science of fat-soluble flavor compounds into a simple, actionable technique that you can use tonight. Grab a glass of wine, pull up a stool, and let’s get to work.
What the Heck is “Blooming” Anyway?
Let us start with the absolute basics. Blooming—also known in various global culinary traditions as tempering, tadka, chhonk, or sofrito—is the process of briefly frying whole or ground spices in hot fat (like cooking oil, butter, lard, or ghee) before or after you cook the rest of your dish.
It is not just a quaint, old-world tradition or an optional recipe suggestion; it is a required chemical reaction. When you drop spices into hot oil, the intense heat and the lipid fat work together in perfect harmony to extract the essential oils and volatile aromatic compounds locked inside the rigid plant cells. The oil acts as a carrier vehicle, pulling those flavors out of the spice and distributing them evenly, coating every single ingredient in your entire dish.
Think of a spice as a tiny, heavily armored vault of flavor. If you drop that vault into a pot of boiling water, the water might dissolve the thin sugar coating on the outside, but the vault itself remains stubbornly locked. If you drop that same vault into hot oil, the heat literally blows the doors off the hinges, and the fat rushes in to carry the precious treasure away.
There is a distinct, scientific difference between dry toasting and blooming. Dry toasting (heating spices in a dry skillet without any fat) is a fantastic technique for altering the flavor profile of whole spices before you grind them. It triggers the Maillard reaction, creating nutty, roasted, complex notes. However, without fat, those newly formed aromatic compounds have nowhere to go but up into the air. That is exactly why your kitchen smells amazing when you dry-toast, but your food still lacks depth. Blooming captures those highly volatile compounds in a liquid lipid base, ensuring they end up resting on your palate, not just getting sucked into your stove’s exhaust fan.
The Food Science: Why Water is the Ultimate Enemy of Flavor
I promised you we would not use pretentious chef-speak, but we do need to put on our lab coats for just a minute. Understanding the basic chemistry of your food is the ultimate power move for a home cook. Once you know exactly why something works on a molecular level, you never have to blindly follow a recipe again. You become the master of your kitchen.
Essential Oils and Volatile Compounds
Spices are derived from the seeds, bark, roots, and pods of plants. Their intense flavor and aroma come from complex organic molecules called volatile aromatic compounds. These include terpenes (which give rosemary, citrus, and coriander their piney, bright, top-end notes), phenols (responsible for the warm, heavy, spicy kick of cloves, cinnamon, and thyme), and aldehydes (the green, fresh, sharp scents).
Here is the most critical piece of food science you will learn today, and it will change the way you cook forever: the vast majority of these aromatic compounds are non-polar.
In chemistry, there is a golden, unbreakable rule: “like dissolves like.” Water is a highly polar solvent. Fat is a non-polar solvent. Therefore, the non-polar flavor compounds in your spices will absolutely refuse to dissolve in water. If you throw raw cumin into a watery lentil soup, the water simply cannot penetrate the hydrophobic (water-fearing) barriers of the spice. The flavor remains trapped inside the cellular structure.
Furthermore, if your pantry management is so chaotic that your spices turn into hard bricks due to ambient humidity, no amount of blooming will save them. Moisture is the enemy of spice longevity on the shelf, just as water is the enemy of flavor extraction in the pan.
The Magic of the Lipid Carrier
When you heat spices in oil, the high temperature (usually sitting between 300°F and 375°F) breaks down the rigid, fibrous cellular walls of the plant material. Simultaneously, the hot fat rushes in and acts as a highly efficient solvent, aggressively extracting those lipid-soluble (fat-soluble) compounds.
The fat then transforms into a master flavor carrier. When you subsequently add this highly infused, aromatic oil to your soup, curry, or pan sauce, the oil physically coats the other ingredients and eventually coats your palate, delivering a massive, sustained payload of flavor to your taste buds. This is why a dish bloomed in oil tastes rich, rounded, and infinite, while a dish seasoned directly in water tastes hollow, dusty, and fleeting.
The Maillard Reaction for Spices
In addition to chemical extraction, the high heat of the oil triggers the Maillard reaction. Yes, the exact same chemical process of browning amino acids and reducing sugars that makes a deeply seared ribeye steak taste incredible also happens to spices. Sugars and proteins within the tiny seeds undergo rapid, complex chemical changes, creating entirely new, deeper, and more savory flavor molecules that simply did not exist in the raw spice. You are literally inventing new flavors in your pan.
A Quick Detour: The Gear You Need (And the Toxic Junk to Trash)
Before we start throwing hot oil around the kitchen, we need to have a very serious conversation about your cookware. As your sassy, protective sous-chef, I have absolutely zero patience for cheap, peeling, toxic kitchenware. If you are trying to execute a precision high-heat technique like blooming in a scratched-up, ten-dollar mystery metal pan that you bought at a discount store five years ago, I need you to stop right now.
You cannot achieve culinary greatness while actively poisoning your family with flaking polytetrafluoroethylene (PTFE) and forever chemicals. I am deeply, unapologetically passionate about banishing toxic kitchen gear from the home kitchen. It is a strict, non-negotiable rule in my house, and it should be in yours, too.
The Problem with Cheap Non-Stick
Blooming requires precise, responsive temperature control, often pushing the cooking oil to 350°F or higher. Cheap non-stick pans are notoriously terrible at heat distribution, creating massive hot spots that will scorch your delicate spices in a fraction of a second. Worse, high heat degrades the chemical coating, releasing toxic fumes and microscopic plastic particles directly into your beautifully crafted meal.
Furthermore, using aerosolized chemical propellants from a can is a surefire method for ruining your nonstick pans forever. These sprays leave a sticky, polymerized residue that permanently destroys the pan’s surface and imparts a rancid, synthetic flavor to your beautifully bloomed spices. Do not do it.
The Tools of the Trade
For proper blooming, you need heavy, durable cookware with excellent thermal mass and rapid conductivity. You want a pan that holds its heat steadily so that when you drop room-temperature spices into the hot oil, the temperature does not violently plummet.
First, a high-quality, fully clad stainless steel skillet is your absolute best friend. It is completely non-reactive, holds heat beautifully, and its light-colored metallic surface allows you to easily monitor the color of your spices as they toast, preventing them from burning.
Second, for the more advanced weekend culinary hobbyist, taking the time to understand the thermodynamics of carbon steel is an absolute game-changer. These pans offer the incredible heat retention of cast iron combined with the slick, natural release of a well-seasoned wok, making them perfect for rapid, high-heat blooming techniques like stir-frying.
Finally, cast iron or enameled cast iron is incredible for heat retention. However, be extremely cautious with bare cast iron if you plan to immediately deglaze your bloomed spices with highly acidic ingredients like crushed tomatoes, wine, or vinegar. If your tomato sauce tastes metallic, it is because the acid literally stripped the seasoning off your reactive pan and leached iron into your food. Stick to enameled cast iron or stainless steel for acidic builds.
Whole vs. Ground Spices: The Rules of Engagement
Not all spices are created equal, and treating them all exactly the same is a rookie mistake that will inevitably end in a bitter, smoky disaster. The technique for blooming whole spices is drastically different from the technique for blooming ground spices. It all comes down to a fundamental physics concept called the surface-area-to-volume ratio.
Blooming Whole Spices
Whole spices—like robust cumin seeds, tiny mustard seeds, green cardamom pods, thick cinnamon sticks, and star anise—have their aromatic compounds safely locked deep inside their intact cellular structures. They are tough, robust, and can withstand significantly higher temperatures and much longer cooking times.
Because they have a relatively low surface area exposed directly to the hot oil, they release their flavors slowly, steadily, and safely. You can (and should) bloom whole spices at a higher temperature (around 350°F to 375°F) for anywhere from 30 seconds to a full two minutes. You will know they are ready when they begin to visibly swell, change to a darker color, and aggressively scent the entire room. Mustard seeds will literally pop and splutter like tiny, delicious firecrackers.
Blooming Ground Spices
Ground spices are a completely different animal entirely. When a whole spice is pulverized into a fine powder, its cellular walls are completely shattered, and its surface-area-to-volume ratio increases exponentially. This means the volatile oils are completely exposed and ready to release instantly into the fat.
It also means they will burn to a crisp in the blink of an eye.
If you drop ground paprika, turmeric, or cumin powder into 375°F oil, it will turn black, acrid, and unbelievably bitter in less than three seconds. Ground spices require a much lower temperature (around 275°F to 300°F) and a drastically shorter blooming time—usually just 10 to 30 seconds max.
Pro-Tip: If you want the absolute best, restaurant-quality flavor, buy your spices whole. Pre-ground spices lose their volatile oils to oxidation as they sit under fluorescent lights on supermarket shelves for months. Investing in a true burr pepper grinder or a dedicated electric spice mill to grind your whole spices fresh right before blooming will yield results that will absolutely blow your mind.
How to Bloom Spices Like a Pro (Without Burning Your House Down)
Alright, it is time to put theory into practice. Here is your definitive, exhaustively detailed, step-by-step masterclass on executing the perfect bloom.
Step 1: Prep Your Mise en Place
“Mise en place” is a fancy French culinary term for “everything in its place,” and it is the single most important habit you can possibly develop in the home kitchen. Because blooming happens in a matter of mere seconds, you absolutely do not have time to be frantically rummaging through your pantry looking for the ground coriander while your expensive cumin seeds are turning to charcoal on the stove.
Measure out all your spices into small glass pinch bowls before you even think about turning on the heat. Furthermore, have your “arresting” ingredients fully prepped and ready to go. You need to be able to immediately drop the temperature of the pan the exact second the spices are perfectly toasted. This is usually done by adding your wet aromatics (like diced onions, minced garlic, or grated ginger) or a liquid (like chicken broth, coconut milk, or crushed tomatoes).
Step 2: Choose the Right Fat
You need a fat with a sufficiently high smoke point. Butter is undeniably delicious, but the milk solids in it will burn and turn bitter at the temperatures required for a good, vigorous bloom.
- Ghee (Clarified Butter): The absolute gold standard for blooming, especially in traditional Indian cuisine. The milk solids have been meticulously removed, giving it a massive smoke point (450°F) while retaining a rich, deeply nutty, buttery flavor.
- Neutral Oils: Avocado oil, grapeseed oil, or refined peanut oil are excellent, versatile choices because they have very high smoke points and will not compete with or mask the flavor of your expensive spices.
- Coconut Oil: Fantastic for South Asian and Southeast Asian dishes, adding a subtle, tropical sweetness that pairs beautifully with earthy mustard seeds and fresh curry leaves.
- Olive Oil: Use with extreme caution. Extra virgin olive oil has a low smoke point and a very strong, peppery flavor. It is great for gently blooming garlic and red pepper flakes over medium-low heat for a rustic Italian pasta dish, but terrible for high-heat, aggressive applications.
Step 3: Heat Control is Everything
Place your heavy-bottomed stainless steel or carbon steel skillet over medium heat. Add your chosen fat. Do not crank the burner to high; you want a controlled, steady, predictable heat.
How do you know when the oil is ready? Drop a single cumin or mustard seed into the pan. If it sits there and does absolutely nothing, the oil is too cold. If it instantly turns black and smokes aggressively, the oil is way too hot. If it immediately begins to sizzle, dance around the pan, and release tiny bubbles, you are in the perfect Goldilocks zone.
Step 4: The Sizzle and the Smell Test
Add your whole spices first. Stir constantly to ensure even exposure to the heat. And please, if your wooden spoons keep cracking and splintering from age and water damage, throw them out immediately and buy a high-quality, flat-edged silicone or dense hardwood spatula. You do not want to serve your dinner guests a side of splinters in their curry.
Watch the spices closely like a hawk. You are looking for a slight darkening in color and a profound, unmistakable change in aroma. The smell should shift rapidly from raw and dusty to deeply fragrant, nutty, and mouth-watering.
If you are using ground spices in the same dish, add them only in the last 15 to 30 seconds of the blooming process. Pull the pan entirely off the heat if you have to; the residual heat of the hot oil is often more than enough to bloom ground powders safely without scorching them.
Step 5: Arrest the Cooking Process
The second you smell that perfect, toasted aroma, you must stop the cooking process immediately to prevent burning. Instantly toss in your diced onions, a splash of broth, or your crushed tomatoes. The high water content in these wet ingredients will instantly crash the temperature of the oil, locking in the perfect flavor profile and saving your spices from a bitter, tragic death.
Global Techniques: How the World Blooms Spices
This technique is not a localized, niche phenomenon; it is a universal culinary truth discovered independently by brilliant cooks and cultures all over the globe.
The Indian Tadka (or Chhonk)
In Indian cooking, blooming is elevated to an absolute art form. A tadka can be done at the beginning of a dish to build a deep flavor foundation, or at the very end as a dramatic finishing touch (a technique specifically called tempering). Hot ghee is infused with mustard seeds, cumin, dried red chilies, asafoetida (hing), and fresh curry leaves, then poured dramatically over a pot of humble dal. The loud, sizzling sound as the hot oil hits the wet lentils is the literal heartbeat of Indian cuisine.
The Latin American Sofrito
While often thought of as just sautéing wet aromatics, a proper, traditional sofrito relies heavily on the exact same principles of blooming. Annatto seeds (achiote) are frequently bloomed in hot oil or lard to extract their vibrant red-orange color and earthy flavor before the onions, garlic, and peppers are added to the pan.
The Middle Eastern and North African Base
Dishes like shakshuka or complex tagines rely on blooming heavily spiced blends like Ras el Hanout or Harissa paste in olive oil before adding tomatoes or braising meats. This crucial step is exactly what gives these dishes their characteristic warmth, depth, and complexity.
The Italian Aglio e Olio
Even the simplest, most rustic Italian dishes rely entirely on this science. Spaghetti aglio e olio is nothing more than garlic and red pepper flakes gently bloomed in high-quality olive oil. The fat extracts the allicin from the garlic and the capsaicin from the chili, creating a sauce that is infinitely greater than the sum of its parts.
Weeknight Shortcuts: Blooming for the Busy Cook
I get it. You are a busy professional. You come home exhausted, the dog needs walking, the kids are screaming, and the idea of meticulously monitoring mustard seeds with a stopwatch feels like way too much work. My core philosophy is that time is money, and we need to rigorously prioritize efficiency during the week so we can afford to be absolute perfectionists on the weekend.
You can absolutely master simple weeknight dinners without sacrificing the massive flavor boost of blooming. Here are my favorite, battle-tested shortcuts:
- The “Clear the Center” Hack: If you are browning ground meat or sautéing onions and suddenly realize you forgot to bloom your spices first, do not panic. Push all the ingredients to the outer edges of the pan, creating a clear, empty circle in the hot center. Add a tiny splash of oil to the clearing, drop your spices directly in, and let them sizzle for 30 seconds before mixing everything back together. It is not perfect, but it is infinitely better than dumping raw spices into the wet mix.
- Batch-Make Spiced Oils: Spend 15 minutes on a lazy Sunday blooming a massive batch of your favorite spices in a neutral oil. Let it cool completely, strain out the solids (or leave them in for added texture), and store it in a sealed glass jar in the fridge. Now you have a potent, ready-to-use flavor bomb to drizzle over roasted vegetables, scrambled eggs, or soups all week long, with zero extra effort.
- The Microwave Cheat: Yes, I said it. You can actually bloom spices in the microwave. Place a few tablespoons of oil and your spices in a microwave-safe glass bowl. Heat in short 15-second bursts, stirring in between, until intensely fragrant. It lacks the romance of a sizzling skillet, but on a chaotic Tuesday night, it gets the job done safely and effectively.
Troubleshooting: How to Save Burnt Spices (and Other Disasters)
Even the most experienced home cooks mess this up occasionally. Here is exactly how to handle the inevitable bumps in the road when you are learning to master high-heat extraction.
Disaster 1: You Burnt the Spices
They turned black, the smoke alarm is screaming, and your kitchen smells like a tire fire.
The Fix: Throw them away immediately. Do not try to save them. Do not add onions and hope the flavor magically dilutes. Burnt spices release incredibly bitter, acrid carbon compounds that will permanently ruin your entire dish. Wash the pan, open a window, and start over. Spices are relatively cheap; ruining two pounds of expensive meat because you were too stubborn to start over is a culinary tragedy.
Disaster 2: The Oil Was Too Cold
You dropped the spices in, and they just sank to the bottom and sat there like sad, wet sand.
The Fix: Be patient. Turn the heat up slightly and wait. The spices will eventually bloom as the oil comes up to temperature, but you risk them absorbing too much oil and becoming greasy. Next time, use the single-seed test before committing the whole batch to the pan.
Disaster 3: The Spices Clumped Together
You added ground spices to the oil, and they immediately formed a stubborn, unmixable paste that stuck to the pan.
The Fix: You either did not use enough oil, or there was hidden moisture in your pan. Ground spices act like a dry sponge. Ensure your pan is bone dry before adding oil, and use enough fat to create a fluid, moving suspension. You can try whisking vigorously, but if the paste burns, you have to start over.
Your Blueprint for Flavor Domination
Cooking is not magic, and it is not an exclusive club for people with fancy degrees. It is applied physics and chemistry, wrapped in culture, history, and a whole lot of love. By understanding the simple science of fat-soluble flavor compounds, you have just unlocked a tool that will fundamentally change the way you approach food forever.
You do not need to be a professional chef to make mind-blowing meals. You just need to respect the ingredients, understand the technique, and refuse to settle for mediocre, watery flavors ever again. The next time you reach for that jar of cumin, I want you to remember that you hold a tiny, armored vault of potential in your hands. Treat it with the respect it deserves. Give it heat. Give it fat. Let it bloom.
Welcome to the beautiful, empowering, and endlessly delicious art of the kitchen. Now get off your phone, get into the kitchen, and go make something spectacular. And for the love of all things culinary, throw away that peeling, toxic Teflon pan before I come over there and do it for you.






