
Picture this: It is a beautiful Saturday afternoon. You have gathered your friends, iced down the beverages, and promised everyone a restaurant-quality meal. You carefully form your ground beef into wide, beautiful, perfectly flat disks. You place them onto the hot grill or skillet, anticipating the sizzle of a culinary masterpiece. But then, tragedy strikes. As the intense heat hits the meat, those wide, elegant disks begin to violently contract. The edges pull inward, the center aggressively domes upward, and within minutes, you are no longer cooking a hamburger. You are cooking a meatball. A tough, dry, aggressively spherical meatball that refuses to sit flat on a bun and sends your carefully curated toppings sliding right off onto the plate.
I have zero patience for the “golf ball burger.” It is a culinary tragedy that happens in backyards and kitchens every single weekend, and it is entirely preventable. You do not need a culinary degree to fix this, nor do you need to rely on expensive restaurant equipment. You can easily achieve steakhouse-level perfection without ordering takeout, provided you understand a little basic thermodynamics and protein chemistry.
We are going to break down exactly why your meat is rebelling against you, how to prep your patties to defy physics, and why your choice of cookware might be secretly ruining your dinner. Grab a beverage, put on your apron, and let’s get to work.
The Thermodynamics of the Shrink: Why Your Meat is Rebelling
To stop your burgers from puffing up, you first have to understand what is happening on a microscopic level when raw meat meets high heat. Cooking is not just about making food hot; it is a complex series of chemical reactions and structural transformations. When you apply heat to ground beef, you are initiating a dramatic sequence of protein denaturation.
The Actin and Myosin Squeeze
Meat is essentially muscle, and muscle is primarily composed of water, fat, and two major myofibrillar proteins: myosin and actin. According to meat science, these proteins are highly sensitive to thermal changes. Myosin begins to denature and unfold at relatively low temperatures, typically between 104°F and 122°F. As the internal temperature of your patty climbs, actin gets in on the action, denaturing aggressively between 150°F and 163°F.
What does this mean for your patty? As these proteins denature, they violently contract. Research shows that muscle fibers shrink transversely (across their width) at around 122°F to 149°F, and longitudinally (lengthwise) at 158°F to 167°F. Because the outside edges of your burger are exposed to the heat source first, they cook and contract long before the center does.
Imagine pulling a belt tightly around the waist of a down jacket. The edges squeeze inward, forcing the raw, expanding mass in the center to bulge upward. The moisture and rendering fat inside the patty are pushed toward the path of least resistance—the top center—causing the meat to swell. The result? You watch helplessly as your beautiful, wide patties shrink into thick pucks right before your eyes.
The Fat Factor: Why Lean Meat is a Rookie Mistake
One of the most common mistakes home cooks make is trying to create a “healthy” burger by purchasing 90/10 or even 95/5 lean ground beef. If you take away one piece of advice from this masterclass, let it be this: lean ground beef has absolutely no business being formed into a hamburger.
Biological Lubrication and Moisture Retention
Fats do much more than just provide flavor; they play a critical structural role during the cooking process. Specifically, fats like oleic acid act as essential “biological lubricants” within the interfibrillar spaces of the meat. They physically get in the way of those contracting proteins. When you use a blend with adequate fat—the industry standard is 80/20 (80% lean meat to 20% fat)—the rendering lipids lubricate the muscle fibers, preventing them from binding too tightly to one another as they denature.
When you use ultra-lean meat, there is nothing to stop the proteins from interlocking tightly. The contraction is severe, the moisture is squeezed out rapidly, and the patty domes up aggressively. Lean meat doesn’t shrink less; it actually shrinks more awkwardly because it lacks the internal lubrication required to hold its shape. Stick to 80/20 ground chuck for the perfect balance of structural integrity, juiciness, and flavor.
The Sassy Sous-Chef’s Mandatory Rant: Banishing Toxic Cookware
Before we talk about shaping the meat, we need to have a serious talk about your skillet. If you are cooking burgers indoors rather than on an outdoor grill, you need screaming high heat to trigger the Maillard reaction (that beautiful, crusty, brown exterior). And if you are trying to do this in a cheap, scratched, lightweight Teflon pan, I am officially staging an intervention.
The “No-Go” Rule on Chemical Coatings
I have a strict, uncompromising rule when it comes to toxic gear. When you are serious about banishing toxic kitchen gear, the first thing that goes in the trash is that flimsy non-stick pan. Polytetrafluoroethylene (PTFE) coatings are simply not designed for the aggressive heat required to sear a burger. When heated past 500°F—a temperature easily reached when preheating a pan for a hard sear—these coatings begin to break down and off-gas toxic fumes.
Furthermore, these cheap aluminum pans lack the thermal mass required to maintain heat. The moment you drop a cold, half-pound patty into a lightweight pan, the temperature plummets. Instead of searing, your meat ends up boiling in its own juices. And let’s be honest, those chemical coatings start losing their slip after just a few months of use anyway, leaving you with a peeling, toxic mess.
Embracing High Thermal Mass
If you want to cook a burger that stays flat and develops a steakhouse crust, you need heavy metals. I am talking about thick cast iron or heavy-gauge carbon steel pans. These materials absorb heat, hold onto it, and violently transfer it to the meat the second it makes contact. When properly seasoned and preheated, the polymerized oil layer makes them actually non-stick without any of the peeling chemical nightmares. Invest in good, safe cookware; your health and your hamburgers will thank you.
Actionable Solution #1: Handle with Care (And Stop Salting Too Early)
The way you handle the raw ground beef straight out of the package will dictate how it behaves in the pan. Most weekend warriors treat ground beef like a stress ball, aggressively kneading, mashing, and packing it into incredibly dense pucks. This is a catastrophic error.
The Dangers of Mechanical Overworking
When you overwork ground beef, you are physically cross-linking the myosin proteins before the heat even hits them. You are essentially pre-binding the meat. Furthermore, the heat from your hands begins to melt the delicate fat pockets. By the time this dense, overworked patty hits the pan, the proteins are already so tightly woven that the heat causes them to seize up immediately, resulting in a tough, rubbery, domed meatball.
Instead, use the “gentle fold” technique. Break the ground meat apart lightly with your fingertips, form it into a loose ball, and gently press it into a patty shape. You want the meat to barely hold together. Those little air pockets and loose crevices inside the patty are exactly what will catch the rendering fat and keep the burger tender.
The Chemistry of Salt Timing
Then there is the seasoning issue. One of the most destructive mistakes you can make is salting ground beef too early in the prep process. Salt is a powerful solvent for meat proteins. If you mix salt directly into the ground beef or salt the patties and let them sit in the fridge, the salt will dissolve the myosin. The dissolved proteins will link together, turning your loose, tender ground beef into a sticky, bouncy sausage. Always wait to salt your burgers until the exact moment before they hit the heat.
Actionable Solution #2: The Thumbprint Method
Now we arrive at the most famous, scientifically validated structural hack in the burger-making world: the thumbprint method. This is how you pre-compensate for the inevitable protein contraction.
The Physical Mechanics of the Dimple
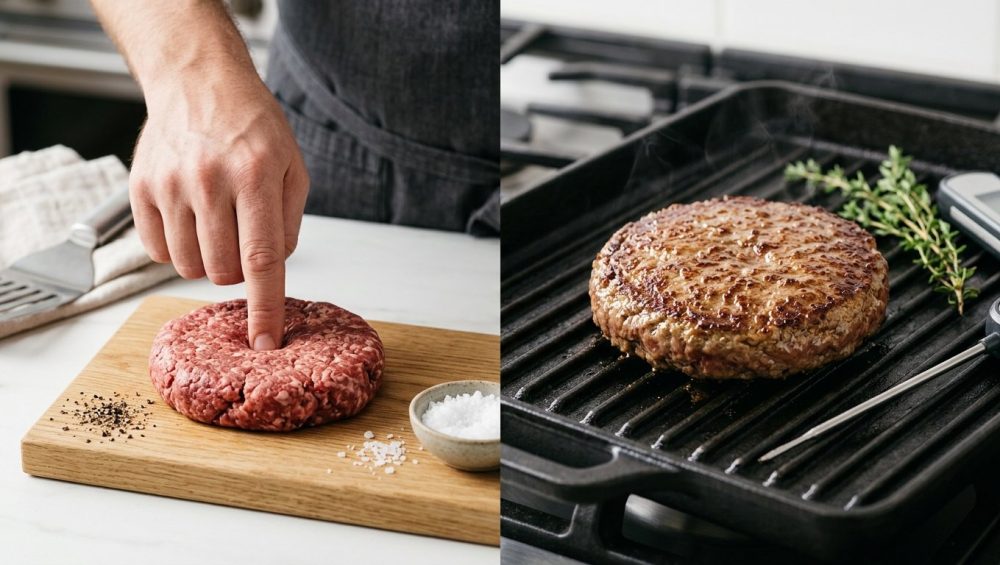
Because we know that the edges of the burger will cook and contract first, forcing the center upward, we can outsmart the meat by removing volume from the center before cooking. Once you have gently formed your patty (making it slightly wider than your bun, as it will shrink in diameter), press your thumb or the back of a spoon directly into the center of the meat.
You do not want a shallow, timid little smudge. You want a pronounced divot. Press down until the center is about half the thickness of the edges. It should look like a shallow meat bowl.
Why It Reinflates
According to culinary experts and meat scientists, when you push a big dimple into the center of the patty, the divot structurally “reinflates” as the meat contracts. As the outer belt of the burger tightens and squeezes the center, the meat has empty space to expand into. Instead of forming a massive dome, the divot fills in, rising up to meet the level of the edges. The result is a patty that finishes cooking with a perfectly flat, uniform surface, ready to securely hold your cheese, tomatoes, and sauces.
Actionable Solution #3: Heat Control and Searing Mechanics
Your prep work is flawless. You have your 80/20 beef, you handled it gently, you salted it at the last second, and you pressed a perfect thumbprint into the center. Now, you must execute the cook without ruining all your hard work.
Preventing the Steam Trap
If you crowd a pan with four massive, fridge-cold patties, the ambient temperature of the metal plummets. As the meat begins to release its moisture, the water has nowhere to evaporate. It pools around the base of the burgers, and suddenly your ground beef steams instead of frying. Steamed meat turns gray, rubbery, and puffs up because it cooks slowly and unevenly, allowing the proteins to contract without forming a stabilizing crust.
To achieve a perfect sear, you need a dry surface and ripping high heat. Pat the exterior of your burgers dry with a paper towel before placing them in the pan. Give them plenty of room to breathe—if you are using a standard 10-inch skillet, do not cook more than two patties at a time. The high heat will trigger the Maillard reaction, locking the exterior structure into a rigid, crispy crust that actively resists the doming effect.
The Smashburger Alternative
If you absolutely despise the thumbprint method and want a foolproof way to prevent doming, you can bypass the traditional thick patty altogether and embrace the smashburger.
The smashburger technique relies on brute force to overcome protein contraction. You start with a loose, unseasoned ball of cold ground beef. You place it onto a screaming hot, dry cast iron or carbon steel surface. Immediately, you use a heavy, rigid spatula (and perhaps a second spatula for leverage) to smash the meat down until it is incredibly thin—about a quarter of an inch thick.
Because the meat is smashed so thinly against the blistering hot metal, the proteins cook and set almost instantaneously. The Maillard crust forms so rapidly that the meat structurally locks into place before the proteins have a chance to contract and dome. The result is a highly textured, deeply browned, perfectly flat patty. Just remember: you must smash the meat within the first 30 seconds of cooking. If you wait until the fat begins to render, smashing will just squeeze all the juices out into the pan, leaving you with dry meat.
Actionable Solution #4: Temperature Tracking and The Carryover Effect
The final hurdle in your quest for the perfect burger is knowing exactly when to pull it off the heat. Overcooked meat is tough meat, and the longer the proteins are exposed to heat, the tighter they squeeze, expelling their juices and exacerbating the doming effect.
Trust the Science, Not Your Eyes
Visual cues are entirely deceptive when it comes to ground beef. The color of the juices running clear or the exterior looking charred tells you absolutely nothing about the internal temperature. Furthermore, constantly cutting your burgers open to check the inside is a cardinal sin—you are creating an escape hatch for all the rendering fat and moisture you worked so hard to retain.
If you constantly second-guess yourself and feel like your meat thermometer is lying, it is time to invest in a high-quality, instant-read digital thermometer and calibrate it properly in ice water. For a safe, juicy medium burger, you want to pull the meat off the heat when it registers around 155°F in the exact center.
The Importance of Resting
Do not immediately throw that hot patty onto a bun. You must account for carryover cooking. The residual heat trapped inside the meat will continue to cook the burger, raising the internal temperature by another 5 degrees after it leaves the pan.
More importantly, resting the meat allows the violently bubbling juices to calm down and redistribute throughout the protein matrix. If you bite into a burger straight off the griddle, all that liquid will flood out onto your plate (and your hands), leaving the last few bites of the burger dry and sad. Let the patties rest on a wire rack for three to five minutes. This allows the protein fibers to relax slightly, solidifying the flat shape and trapping the moisture inside where it belongs.
Conclusion: Reclaiming Your Kitchen
Cooking a phenomenal, restaurant-quality hamburger at home does not require magic, and it certainly does not require you to endure the “golf ball” effect ever again. It simply requires you to respect the ingredients and understand the thermodynamics at play.
By utilizing an 80/20 fat ratio to keep the proteins lubricated, ditching your toxic cookware for high-heat metals, handling the meat gently, salting only at the last second, and employing the brilliant thumbprint method, you are taking complete control of the cooking process. You are no longer at the mercy of contracting myofibrillar proteins. You are the master of your kitchen, and you are about to serve the flattest, juiciest, most perfectly crusted burgers your friends have ever tasted. Now get in there, heat up that heavy skillet, and show that ground beef who is boss.






