
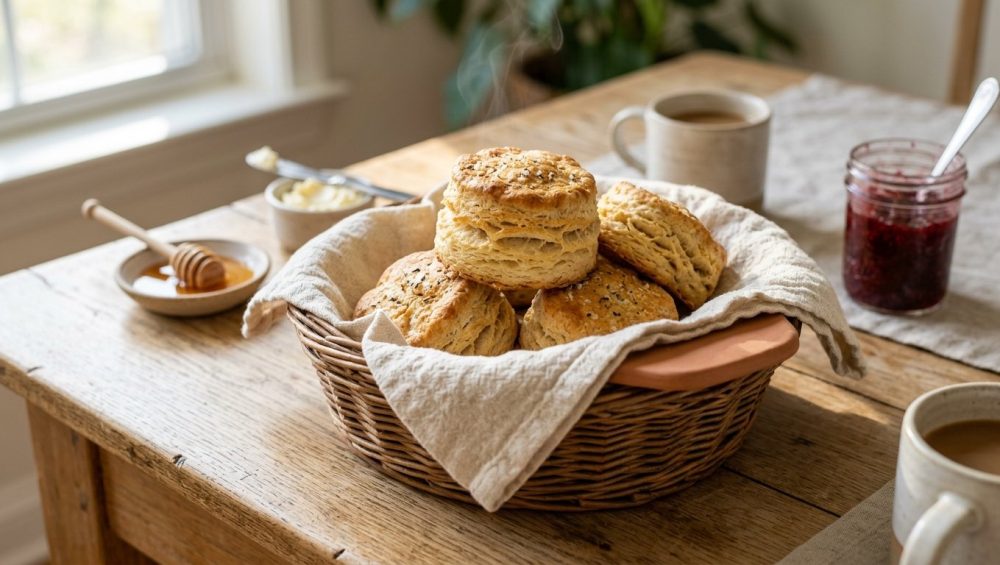
You spent your entire Saturday morning covered in flour, meticulously folding dough to create the perfect, sky-high, Southern-style biscuits. You pulled them out of the oven, and they looked like golden, flaky clouds of buttery perfection. You felt like a culinary genius. But fast forward forty-five minutes to when your brunch guests actually sit down to eat, and those glorious clouds have miraculously transformed into dense, room-temperature hockey pucks.
What gives?
Welcome to the incredibly frustrating reality of hosting a weekend brunch. You can have the best recipe in the world, use the most expensive European butter, and execute your folds with the precision of a Swiss watchmaker, but if you do not understand the science of how to hold your baked goods before serving, you are setting yourself up for failure.
We are going to skip the pretentious chef-speak and dive straight into the cold, hard culinary science of why your biscuits turn into rocks, and exactly how you can prevent it. As a home cook, you do not need a massive commercial warming cabinet to pull off a flawless, interactive DIY brunch. You just need a basic understanding of thermodynamics, a few clever tools, and a zero-tolerance policy for toxic kitchen gear.
The Biscuit Bar Dilemma: Why Good Carbs Go Bad
If you have ever tried to host a relaxed dinner party or a weekend brunch, you already know that timing is the single most stressful part of the entire endeavor.
The Brunch Host’s Nightmare
Brunch is a logistical nightmare masqueraking as a leisurely weekend activity. You are simultaneously trying to fry bacon, poach eggs, brew coffee, and bake biscuits. Because biscuits are incredibly sensitive to time and temperature, they have a lifespan of about fifteen minutes out of the oven before their quality begins to rapidly decline.
If you bake them too early, they die on the countertop while you are busy scrambling eggs. If you wait to bake them until your guests arrive, you are trapped in the kitchen, frantically pulling hot pans out of the oven instead of actually enjoying the gathering you worked so hard to plan. The solution that most weekend hobbyists land on is the DIY Biscuit Bar—a beautiful, interactive spread where guests can build their own biscuit sandwiches with various jams, butters, and proteins.
It is a brilliant concept that saves you from plating individual meals, but it introduces a massive bottleneck: how do you keep a large batch of biscuits warm, flaky, and tender for an hour or more while people graze?
The Culinary Science of Stale Biscuits: Starch Retrogradation Explained
To solve the problem, you have to understand the enemy. Your biscuits are not drying out simply because they are sitting in the open air. There is a microscopic chemical war happening inside your baked goods the second they leave the heat of your oven.
What is Starch Retrogradation?
Flour is packed with starch molecules, primarily amylose and amylopectin. When you mix your biscuit dough and put it into a hot oven, the heat and moisture cause these starch granules to swell, absorb water, and burst. This process, known as starch gelatinization, is what gives a freshly baked biscuit its incredibly soft, fluffy, and tender interior crumb.
However, this gelatinized state is temporary. The absolute second your biscuits start to cool down, those starch molecules begin to realign and return to their original, rigid crystalline structure. As they recrystallize, they physically squeeze out the water they absorbed during baking. This process is called starch retrogradation, and it is the exact scientific reason why bread goes stale so fast.
Retrogradation is a relentless process. It happens in bread, cakes, and cookies, but it is especially noticeable in biscuits because they rely so heavily on a delicate balance of fat, steam, and tender crumb to maintain their appeal. When a biscuit retrogrades, the interior network stiffens, and the texture turns from pillowy to crumbly and dense.
The Role of Moisture Migration
As if starch retrogradation was not bad enough, you also have to battle moisture migration. Remember that water being squeezed out of the recrystallizing starches? It has to go somewhere.
In a freshly baked biscuit, the moisture is concentrated in the fluffy center, while the crust is dry and crispy. As the biscuit cools, the moisture migrates outward from the center to the crust, seeking equilibrium. The result is a double-edged sword of culinary disappointment: the inside of the biscuit becomes parched and crumbly, while the outside crust absorbs that migrating water and turns leathery and chewy.
This moisture migration is the primary culprit behind why your biscuits are tough to bite through an hour after they come out of the oven. You are no longer biting into a crisp exterior and a soft interior; you are gnawing on a uniformly dense, leathery puck of stale dough.
The Temperature Trap: Why Your Holding Strategy is Ruining Your Hard Work
So, how do we stop starch retrogradation and moisture migration? By controlling the temperature. But unfortunately, the most common methods home cooks use to keep their food warm are actually accelerating the staling process or ruining the food entirely.
The Danger Zone (and Not Just the FDA Kind)
Starch retrogradation is heavily temperature-dependent. It occurs most rapidly at cool room temperatures and inside the refrigerator. This is why putting bread in the fridge is the absolute fastest way to ruin it—the cold temperature supercharges the recrystallization of the starches.
To keep the starches relaxed and in their gelatinized state, you must hold the biscuits at a temperature above 140°F (60°C). At this temperature, the starches remain soft, and moisture migration is significantly slowed down. But you cannot simply blast them with heat, or you will dry them out through evaporation. You need gentle, consistent, radiant heat.
Sabotage by Plastic and Cheap Metals
When weekend hosts realize they need to keep their food warm, they often turn to the worst possible equipment: cheap, synthetic chafing dishes, flimsy foil pans, or peeling non-stick electric warming trays.
Let’s get one thing straight: I have a strict “no-go” rule when it comes to toxic, low-quality kitchenware. Heating up cheap plastics or scratched Teflon-coated warming trays and letting your beautiful, handcrafted food sit on them is a culinary crime. Not only are you risking the leaching of forever chemicals (PFAS) and microplastics into your food, but these materials are also terrible at regulating gentle heat.
Cheap metal warming trays create aggressive hot spots. They will scorch the bottoms of your biscuits, turning the base into an impenetrable rock while the tops remain lukewarm. Furthermore, if you trap your biscuits inside a plastic container to “keep them warm,” you are creating an impermeable moisture barrier. The steam escaping from the hot biscuits will hit the plastic lid, condense into water droplets, and rain right back down onto your food, turning your flaky crusts into a soggy, mushy mess.
If you are serious about your food, you need to start banishing toxic kitchen gear from your home immediately. There is a much better, safer, and more effective way to hold your baked goods.
Building the Ultimate Mindful Biscuit Bar: A Thermodynamic Masterclass
To execute a flawless, stress-free biscuit bar where your baked goods stay warm, flaky, and safe to eat for over an hour, we are going to rely on ancient technology that out-performs modern plastic every single time: thermal mass and natural fibers.
Ceramic Thermal Stones: Your New Secret Weapon
The absolute best way to keep baked goods warm without drying them out or scorching the bottoms is by utilizing a ceramic or terracotta warming stone. These unglazed clay stones are designed to be heated in your oven alongside your biscuits.
Because ceramic is a dense material with high specific heat capacity, it absorbs thermal energy slowly and releases it slowly. When you place a heated ceramic stone at the base of a bread basket, it acts as a gentle, radiant radiator. It does not have the aggressive thermal conductivity of a cheap aluminum pan, which means it will not burn the bottom of your biscuits. Instead, it provides a steady, ambient heat of around 140°F to 150°F that envelops the biscuits, keeping the internal starches relaxed and preventing retrogradation.
This is the exact same principle used in high-end bakeries and professional kitchens. By utilizing a simple, inexpensive ceramic stone, you are bringing professional-level thermal control into your home kitchen.
Breathable Cotton Linens: The Humidity Regulators
The ceramic stone provides the heat, but you still have to manage the humidity. As we established, trapping all the steam will result in soggy biscuits, but leaving them completely exposed to the air will cause them to dry out and turn hard.
The secret is to wrap the biscuits in a thick, 100% natural cotton or linen towel. Synthetic fabrics like polyester will not work—they do not breathe properly and can melt or release microplastics when exposed to the heat of the ceramic stone.
Natural cotton acts as a perfect humidity regulator. It is tightly woven enough to trap the radiant heat coming from the ceramic stone, creating a cozy microclimate inside your serving basket. However, it is also breathable enough to allow excess steam to pass through the fibers and escape into the air. This prevents condensation from building up, ensuring that the crust of your biscuits stays perfectly crisp while the interior stays moist and fluffy.
Choosing Safe, Non-Toxic Serving Ware
The final component of your holding strategy is the vessel itself. Ditch the plastic tubs and the mystery-metal chafing dishes. You want to use natural, safe serving ware like a tightly woven kaisa grass basket, a natural wicker basket, or a thick wooden bowl.
These natural materials act as excellent insulators. They will not conduct the heat away from the ceramic stone (like a metal bowl would), and they provide a beautiful, rustic aesthetic that elevates your brunch from a chaotic kitchen counter to a curated, mindful gathering.
Step-by-Step Guide to a Stress-Free Biscuit Bar Setup
Now that you understand the science of starch retrogradation and the thermodynamics of ceramic stones, let’s put it into practice. Here is your exact, step-by-step game plan for executing a flawless weekend biscuit bar.
The Prep: Baking and Immediate Transfer
Before you even think about holding the biscuits, you have to bake them correctly. A dense biscuit will just become a warm, dense biscuit. To ensure maximum flakiness, you should always grate your frozen butter into your dry ingredients. This creates thin, even shards of fat that melt in the oven, creating pockets of steam that lift the dough into distinct layers.
Furthermore, make sure you are measuring your flour by weight with a digital scale. If you are blindly scooping your flour directly out of the bag with a measuring cup, you are packing up to 30% more flour into your dough than the recipe calls for, guaranteeing a heavy, dry result.
- Preheat the Stone: Place your clean ceramic warming stone into the oven while it preheats for your biscuits. Let the stone soak up the heat for at least 20 to 30 minutes.
- Bake: Bake your biscuits according to your recipe until they are highly puffed and deeply golden brown.
- The Towel Setup: While the biscuits are in their final five minutes of baking, take your woven serving basket and drape a clean, thick, 100% cotton towel inside it, leaving plenty of overhang on the sides.
The Holding Zone: Assembling the Basket
- Transfer the Stone: Using oven mitts, carefully remove the hot ceramic stone from the oven. Place it directly into the bottom of the basket, resting it on top of the center of the cotton towel.
- The Buffer: Fold a small section of the cotton towel over the hot stone, or place a second, smaller cotton napkin on top of it. You do not want the biscuits sitting in direct, bare contact with the 400°F stone, or the bottoms will over-bake. The layer of cotton acts as a thermal buffer, diffusing the heat perfectly.
- Load the Biscuits: The second the biscuits come out of the oven, brush them with melted butter, and immediately transfer them into the basket, stacking them gently on top of the buffered ceramic stone.
- Wrap and Seal: Fold the overhanging edges of the cotton towel securely over the top of the biscuits, tucking them in to create a fully enclosed, warm, breathable fabric pouch.
By executing this transfer immediately, you trap the residual heat of the biscuits and pair it with the radiant heat of the stone, halting starch retrogradation in its tracks.
The Spread: Curating Condiments and Toppings
With your biscuits safely insulated and actively kept warm by the thermal stone, you have just bought yourself at least an hour of stress-free hosting time. You can now step away from the oven, pour yourself a mimosa, and set up the rest of your biscuit bar.
Because the biscuits are the star of the show, keep the toppings high-quality but simple to execute. A mindful biscuit bar should include:
- Sweet: A high-quality local honey, a tart berry jam, and a compound cinnamon-maple butter.
- Savory: Pimento cheese (made from scratch, not the neon orange stuff in the plastic tub), thinly sliced country ham, and a whipped herb butter.
- Texture: A small bowl of flaky Maldon sea salt for guests to sprinkle over their buttered biscuits.
Troubleshooting Biscuit Bar Disasters
Even with the best intentions, things can occasionally go sideways. If you find yourself facing a biscuit emergency, here is how to diagnose the scientific failure.
“My Biscuits Are Sweating!”
If you open your basket and find that the tops of your biscuits are soggy, gummy, or wet, you have a humidity problem. This means the steam escaping from the hot biscuits was trapped and condensed back into water.
The Fix: You likely used a towel with synthetic fibers (like a polyester blend) that does not breathe, or you placed a lid over the basket. Always use 100% natural cotton or linen, and never cover your holding basket with plastic wrap, aluminum foil, or a tight-fitting lid.
“They Turned Hard Anyway!”
If your biscuits still turned into crumbly hockey pucks after thirty minutes, you suffered a catastrophic temperature drop.
The Fix: Your ceramic stone may not have been heated long enough to absorb sufficient thermal mass. Make sure it sits in a hot oven for at least 20 to 30 minutes. Alternatively, you may have left the biscuits sitting on the cooling rack for too long before transferring them to the basket. Starch retrogradation begins the moment the temperature drops; you must transfer them immediately.
Finally, if your biscuits were dense and hard before they even went into the basket, you have a dough problem. Overworking the dough, melting the butter with warm hands, or using dull cutters is why your biscuits stay flat and dense. Also, ensure your equipment isn’t sabotaging you; if your cheap baking sheets keep warping in the oven, your biscuits will bake unevenly, leaving some raw and others burnt to a crisp.
Reclaiming Your Weekend: Brunch Without the Burnout
You do not need a culinary degree to make mind-blowing food, and you certainly do not need to spend your entire weekend stressed out in the kitchen while your friends are having fun in the dining room.
By understanding the basic science of starch retrogradation and moisture migration, you can outsmart your baked goods. Utilizing a simple ceramic warming stone and a breathable cotton towel allows you to effortlessly control the thermodynamics of your food, keeping your biscuits warm, flaky, and tender for hours.
Stop relying on toxic plastic containers and cheap metal warming trays. Invest in high-quality, safe, natural materials, and let the science do the heavy lifting for you. Now go preheat your oven, grate your butter, and reclaim your weekend brunch.






