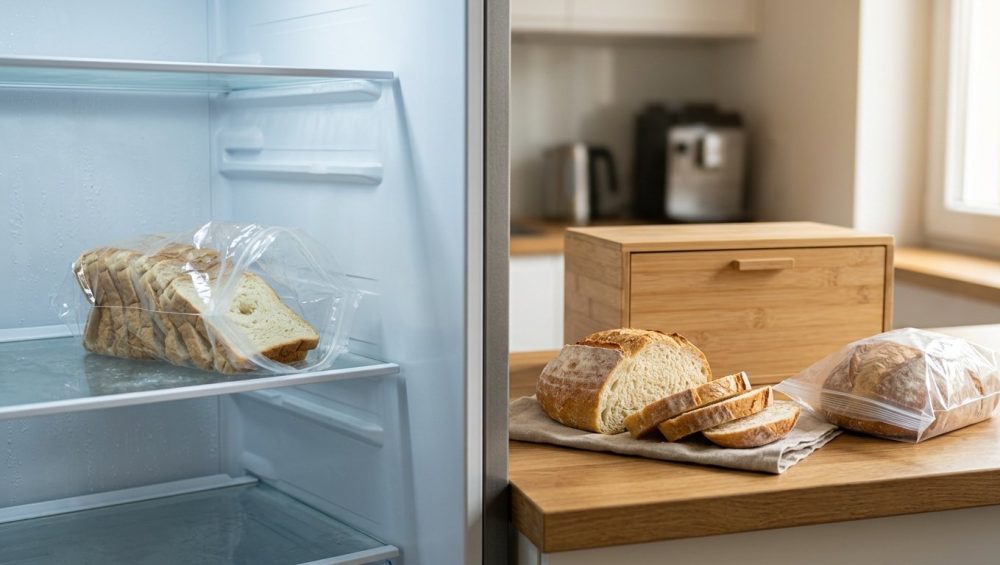
Listen up, weekend culinary warriors. We need to have a serious, uncompromising talk about a crime being committed in kitchens all across the globe on a daily basis. Picture this: you just spent your hard-earned money at the local artisan bakery, bringing home a gorgeous, crackling, naturally leavened sourdough loaf. Or perhaps you spent your entire weekend lovingly mixing, folding, proofing, and baking a rustic boule from scratch. You slice into it, enjoy a heavenly piece with salted butter, and then—panic sets in. You worry about it going bad before you can finish it. So, driven by a misguided sense of preservation, you do the unthinkable. You wrap it up and shove it straight into the refrigerator.
I get it. You think you are extending its life. You think you are being a responsible, budget-conscious adult. But as your resident Sassy Sous-Chef, I am here to deliver some tough culinary love: putting your bread in the fridge is a one-way ticket to Stale City. It is one of those classic rookie kitchen mistakes that completely destroys the integrity of your food. We are going to dive deep into the fascinating, slightly nerdy food science of why the chilly environment of your refrigerator actually accelerates the staling process. I am going to give you the definitive, no-nonsense masterclass on how to correctly store your baked goods, preserve their texture, and ensure you never have to chew on a cold, rubbery slice of wheat ever again.
The Anatomy of a Loaf: What is Bread, Really?
To truly understand why the refrigerator is the ultimate enemy of your beautiful baguette, we first have to understand what bread actually is on a molecular level. At its core, bread is a miracle of basic chemistry and thermodynamics. You take four humble ingredients—flour, water, yeast, and salt—and through the magic of biological fermentation and intense heat, you create a complex, sponge-like structure that has been the staple of human existence for millennia.
But let’s zoom in closely on the flour. Wheat flour is absolutely packed with starch. Starch is essentially a complex carbohydrate made up of two distinct types of glucose polymers: amylose and amylopectin.
Amylose is a straight, linear chain of glucose molecules. It is relatively simple in its structure. Amylopectin, on the other hand, is a massive, highly branched, bushy molecule. When these starches are sitting quietly in a bag of raw flour in your pantry, they are tightly packed into hard, microscopic granules. In this raw state, they are rigid, unyielding, and completely inedible.
When you mix that flour with water and begin to knead it, two things happen. First, you start developing gluten, the protein network that gives the bread its elastic, structural web. Second, the starch granules begin to hydrate. But the real structural magic happens when that wet dough hits the scorching hot environment of your oven.
This brings us to a beautiful, transformative process called gelatinization. As the internal temperature of the dough rises above 140°F (60°C), those hard starch granules absorb the surrounding water and swell up like microscopic water balloons. Eventually, they burst, releasing their amylose and amylopectin chains, which tangle together into a soft, flexible, highly hydrated gel. This gelatinized starch network is exactly what gives a freshly baked loaf of bread its tender, squishy, heavenly crumb.
But here is the catch that every home cook needs to memorize: that gel state is inherently unstable. The very moment the bread comes out of the oven and begins to cool down on your wire rack, a molecular countdown clock starts ticking. The starches immediately want to return to their natural, rigid state.
Starch Retrogradation: The Science of Staling
Forget everything you thought you knew about bread simply “drying out” on the counter. Yes, moisture evaporation plays a minor role in a loaf becoming hard, but the primary villain in the story of stale bread is a relentless chemical process known as starch retrogradation.
As your freshly baked bread cools, those swollen, tangled starch molecules—specifically the highly branched amylopectin molecules—start to slowly reorganize themselves. They attempt to return to their original, rigid, crystalline structure. As they recrystallize, they forcefully squeeze out the water that they absorbed during the baking process. This expelled water migrates outward through the crumb and toward the crust. This internal moisture migration is the exact reason why a stale loaf of bread often features a leathery, unpleasantly soft crust combined with a dry, crumbly, brick-like interior.
Now, why am I giving you a collegiate-level chemistry lesson? Because temperature is the absolute master of this recrystallization process, and you need to understand the thermodynamics of your kitchen.
According to peer-reviewed food science calorimetry trials and extensive agricultural research, the rate of starch retrogradation is not a flat, linear curve. The process involves nucleation and propagation phases, which occur most rapidly at temperatures just above the starch’s glass transition temperature. In plain English: the recrystallization peaks dramatically at temperatures between -8°C and 8°C (18°F and 46°F).
Do you know what appliance in your kitchen operates exactly within that range, typically sitting at an average of 2.3°C to 4°C? Your refrigerator.
By putting your bread in the fridge, you are placing it in the exact optimal thermal danger zone for starch crystallization. Studies have consistently shown that bread stored at refrigerator temperatures will undergo retrogradation up to six times faster than bread stored at standard room temperature. Let me repeat that for the folks in the back who are still stubbornly clinging to their crisper drawers: the fridge makes your bread go stale six times faster. It is the absolute worst place you could possibly store a baked good. When you finally understand this, you start to look at your daily habits differently. You realize that to eliminate kitchen chaos, you have to work in harmony with the science of your ingredients, rather than fighting against them.
The Refrigerator Delusion: Why We Think Cold Equals Fresh
So, if the science is so overwhelmingly clear, why do so many of us habitually toss our sandwich loaves and artisan boules into the fridge? It comes down to a fundamental, culturally ingrained misunderstanding of food preservation. From a young age, we are conditioned to believe that cold equals fresh. We put our milk, our raw meat, our leafy greens, and our leftovers in the refrigerator to stop them from rotting. It is a biological safety net.
And to be fair to the fridge-truthers out there, the refrigerator does successfully inhibit the growth of mold. Mold is a microscopic fungus that thrives in warm, humid, dark environments. Bread, which is full of accessible carbohydrates and retains up to 40% water by weight, is essentially an all-you-can-eat luxury buffet for airborne mold spores. By chilling the bread down to 4°C, you drastically slow down the reproductive cycle of those spores, preventing those fuzzy green patches from forming.
But here is the brutal, undeniable trade-off: you are sacrificing texture, flavor, and joy for the sake of mere longevity. You might prevent a fungal colony from appearing on day four, but by day two, the bread will taste like a dense kitchen sponge that was left out in the desert sun. You are trading visual mold for an accelerated, chemically-induced staleness that renders the food practically inedible anyway.
This is where you have to decide what kind of eating experience you actually want in your life. Are you willing to eat dry, crumbly, flavorless toast just because it technically hasn’t spoiled? I didn’t think so. As passionate home cooks, we deserve better than mediocrity. We need an essential kitchen survival guide approach to storage that preserves both the safety and the high-quality texture of our food. We must separate the rules for raw perishables from the rules for baked starches.
The Freezer: The Ultimate Time Machine for Bread
If the refrigerator is a bread graveyard, the freezer is a magical culinary time machine. Remember how I said starch retrogradation peaks between -8°C and 8°C? Well, once you drop the temperature well below freezing—your standard home freezer sits around -18°C (0°F)—the molecular movement within the bread essentially stops. The residual water inside the crumb freezes into microscopic ice crystals, and the amylopectin starch molecules are locked firmly in place. Retrogradation is halted in its tracks.
Freezing is the absolute best, most scientifically sound way to preserve bread for anything longer than three days. But, as with everything in the kitchen, there is a right way to do this and a disastrously wrong way.
The Art of Pre-Slicing
First and foremost, never freeze a whole, unsliced loaf of bread unless you are hosting a dinner party and plan to thaw and consume the entire thing in one single sitting. Always, always slice your bread before freezing it. This simple step allows you to pull out exactly what you need, slice by slice, without subjecting the rest of the loaf to a destructive freeze-thaw cycle. Every time bread thaws and refreezes, the ice crystals melt and reform, severely damaging the delicate gluten structure and accelerating moisture loss.
The “No-Go” Rule on Toxic Gear
Second, we need to have a serious conversation about wrapping. Freezer burn is a very real threat, and it happens when moisture sublimates (evaporates directly from ice to vapor) from the surface of the food into the dry, circulating air of the freezer. To prevent this, you need a completely airtight seal.
This brings me to one of my biggest pet peeves. Stop wrapping your beautiful, organic, naturally leavened sourdough in cheap, flimsy, single-use plastic wrap that leaches mystery chemicals and endocrine disruptors into your food. I am fiercely passionate about banishing toxic kitchen gear from our homes. Flimsy plastics are terrible for your health, they are terrible for the environment, and they are terrible for your bread. Furthermore, if you just throw a loaf into a cheap, heavily used plastic tub, you will quickly find out why your plastic containers stay greasy and absorb weird, lingering freezer odors from last month’s chili.
Instead, wrap your slices tightly in unbleached parchment paper or natural beeswax wraps, and then place them into a high-quality, food-grade platinum silicone freezer bag. Silicone is non-toxic, infinitely reusable, temperature-stable, and provides an impenetrable barrier against freezer burn.
The Thawing Protocol
When you are ready to eat, do not let the bread thaw slowly on the counter. Slow thawing forces the bread to slowly pass back through that 8°C to -8°C danger zone, triggering retrogradation all over again. Instead, take the frozen slice and pop it directly into a hot toaster or a preheated oven. The intense, immediate heat will rapidly thaw the bread, melt the ice crystals back into water, and re-gelatinize the starches, returning the slice to its former glory in mere minutes.
The Room Temperature Revival: Countertop Storage Mastered
If you plan to eat your bread within two to three days (which, let’s be honest, is highly likely if it’s a good loaf), the kitchen countertop is exactly where it belongs. Room temperature—typically around 20°C to 22°C (68°F to 72°F)—is warm enough to keep starch retrogradation at a slow, manageable crawl. However, leaving it on the counter does introduce the dual threats of mold growth and rapid moisture evaporation.
This is where the microclimate of your storage environment matters immensely. Leaving a loaf completely exposed to the open air will turn it into a giant, tooth-shattering crouton in under 12 hours. Conversely, sealing it tightly in an airtight plastic bag will trap all the expelled moisture inside. This creates a humid, swampy microclimate that will destroy the crust’s texture and spawn mold faster than a high school biology experiment.
The Science of the Bread Box
The ultimate solution is a proper bread box. And no, a bread box is not just a cute, retro aesthetic choice for your vintage kitchen Pinterest board; it is a scientifically sound storage vessel designed to manipulate humidity. A well-designed bread box creates the perfect balance of moisture retention and airflow. It traps just enough ambient moisture to keep the crumb soft and pliable, but allows enough air circulation to keep the crust crisp and prevent fungal spores from taking root.
But be warned: not all bread boxes are created equal. Avoid cheap, completely unventilated plastic boxes, which act as mold incubators. Likewise, be cautious with unglazed wooden boxes in highly humid climates, as the porous wood can absorb moisture, swell, and harbor bacteria.
Instead, opt for a micro-ventilated ceramic, stoneware, or high-quality enameled steel bread box. Ceramic and stoneware are particularly excellent materials because they possess high thermal mass. This means they resist rapid temperature fluctuations in your kitchen, keeping the internal environment incredibly stable. They also naturally regulate humidity without becoming waterlogged.
To maintain a permanently organized kitchen, designate a cool, dry, dark corner of your counter specifically for your bread box. Keep it far away from the heat of the stove, the moisture of the dishwasher, or direct sunlight. If you live in a tropical or highly humid climate, you can wipe the interior of a ceramic bread box with a little diluted white vinegar once a week; the slight acidity naturally inhibits mold spores from germinating.
For crusty artisan loaves, store them cut-side down directly on a wooden cutting board inside the bread box. This simple physical barrier protects the exposed crumb from drying out while allowing the hard crust to breathe naturally.
How to Resurrect “Dead” Bread: The Reheating Hack
Let’s say you messed up. We all do it. You left a baguette on the counter without wrapping it, or a well-meaning family member accidentally left your sourdough in the fridge overnight. It is now a rock-hard weapon. Do you throw it away? Absolutely not. Just as I teach people how to take wilted, sad produce and bring them back to life with ice baths, I am going to teach you how to resurrect dead bread using the power of thermodynamics.
Because starch retrogradation is a physical crystallization process, it is actually reversible under the right conditions. To break those rigid amylopectin crystals apart, you need two things: moisture and intense heat. Specifically, you need to heat the internal crumb of the bread to at least 60°C (140°F), which is the precise melting point of the crystallized starch.
Here is the ultimate culinary hack: Take your stale, uncut loaf and run it directly under the kitchen faucet. Yes, you heard me correctly. Turn on the cold water and get the crust completely wet. Do not submerge it or soak the exposed crumb, but give the exterior crust a thorough, generous splashing.
Next, place the wet loaf directly onto the center rack of an oven preheated to 350°F (175°C). Or, if you are tired of wondering why your baking sheets keep warping under high heat, place the bread directly onto a preheated, heavy-duty ceramic baking stone. Bake it for 5 to 10 minutes, depending on the size of the loaf.
What happens inside the oven is pure thermodynamic magic. The water on the exterior crust rapidly turns to steam. This steam penetrates the hardened, crystallized interior of the loaf. The high ambient heat melts the starch crystals, and the injected steam provides the necessary moisture for the starch molecules to re-gelatinize. As the water evaporates from the exterior, the crust crisps back up to a beautiful golden crunch, while the inside becomes hot, soft, and steamy. It is a near-perfect restoration of the bread’s original glory.
When Bread is Beyond the Veil
However, a word of caution: this trick only works once, and it only works if the bread still retains a tiny fraction of its internal moisture. If the bread is truly ancient, completely dehydrated, and devoid of any structural integrity, the oven trick won’t save it.
At that point, you pivot. A resourceful home cook never wastes good ingredients. You slice that brick up, toss it with high-quality olive oil, crushed garlic, and sea salt, and bake it into the best croutons you’ve ever had. You pulse it in a food processor to create rustic, crunchy breadcrumbs for topping macaroni and cheese. You soak thick slices in a rich, vanilla-scented egg custard overnight for a decadent weekend French toast casserole. Stale bread is not trash; it is merely an ingredient waiting for a new purpose.
Different Breads, Different Rules
While the golden rule of “no fridge” applies universally across the board, it is incredibly important to note that not all breads stale at the exact same rate. The specific ingredients incorporated into your dough drastically affect the retrogradation timeline. If you are serious about mastering modern recipes, you need to understand how fats, sugars, acids, and commercial additives interact with starch molecules.
Lean Doughs vs. Enriched Doughs
Lean doughs, like traditional French baguettes, Italian ciabatta, or rustic peasant loaves, contain only the four basic elements: flour, water, yeast, and salt. Because they completely lack fat and sugar, they stale incredibly quickly—often turning hard within 24 hours of baking. These breads are ephemeral by design; they are meant to be purchased (or baked) and consumed on the exact same day.
Enriched doughs, such as French brioche, Jewish challah, or Japanese milk bread, tell a different story. These doughs contain generous amounts of butter, eggs, milk, and sugar. The lipids (fats) and natural emulsifiers found in egg yolks physically coat the starch molecules, lubricating them and significantly slowing down their ability to link together and crystallize. Furthermore, sugar is highly hygroscopic, meaning it actively attracts and holds onto environmental water, preventing the crumb from drying out. Therefore, a rich, buttery brioche will stay soft and tender on your counter for several days longer than a lean, skinny baguette.
The Magic of Sourdough and Tangzhong
Then there is the king of the counter: sourdough. Authentic sourdough undergoes a long, slow, wild fermentation process that produces significant amounts of lactic and acetic acids. These organic acids do more than just give the bread its signature, mouth-watering tang; they naturally lower the pH of the bread, which inhibits mold growth, and they chemically interfere with the starch retrogradation process. A well-baked, highly hydrated sourdough loaf can easily last four to five days on the counter if stored properly.
Advanced bakers also utilize techniques like the Asian Tangzhong or Yudane methods. By pre-cooking a small portion of the flour and water into a thick paste before adding it to the main dough, bakers force an early gelatinization of the starches. This allows the dough to hold significantly more moisture, resulting in a cloud-like bread that resists staling for days on end.
The Supermarket Exception
Finally, we must acknowledge commercial supermarket bread. You know the kind—those perfectly square, pre-sliced, squishy white loaves that come in a plastic bag. These breads are heavily engineered in laboratories. They are pumped full of artificial dough conditioners, vital wheat gluten, commercial emulsifiers, and chemical preservatives specifically designed to forcibly halt retrogradation and prevent mold.
A loaf of commercial white bread will survive a nuclear apocalypse on your counter. But honestly, if you are reading this blog and care about the craft of cooking, I hope you are aiming for something a little higher quality than bread with a shelf life of three months. Just like you wouldn’t use cheap, chemical-laden aerosol sprays, knowing full well they are ruining your nonstick pans, you shouldn’t subject your body to heavily processed, artificial bread when vastly superior, natural options exist.
The Final Verdict
Cooking and eating well doesn’t require a pretentious degree from a fancy culinary institute; it just requires a basic, practical understanding of how your food actually works. Starch retrogradation might sound like intimidating, textbook scientific jargon, but it really just boils down to one simple, unbreakable rule: keep your bread out of the cold danger zone.
Stop sacrificing the beautiful texture of your baked goods to the cold, dry, flavor-sapping abyss of the refrigerator. Invest in a proper, breathable ceramic or stoneware bread box for your short-term countertop storage. Utilize the freezing power of your freezer for the long haul, making sure to slice your bread first and wrap it in non-toxic, airtight materials. Treat your ingredients with the respect they deserve, ditch the flimsy plastic wraps, and remember that even when a loaf seems lost to the sands of time, a little heat and steam can perform absolute miracles.
Now get out of here, go buy (or bake) a decent, crusty loaf of sourdough, and keep it on the counter exactly where it belongs. Your sandwiches, your morning toast, and your palate will thank you.


