
Look, we need to have a serious heart-to-heart about your Tuesday night dinners. You get home from work, you’re exhausted, and you just want to cook a simple, healthy meal without resorting to ordering a twenty-dollar burrito on a delivery app. You pull out that gorgeous, heavy-bottomed stainless steel skillet you bought to feel like a “real adult.” You drop a beautiful chicken breast into the pan. Five minutes later, you try to flip it, and it feels like the meat has been permanently welded to the metal by a commercial blowtorch. You panic, you scrape frantically with a spatula, and you end up with a shredded, unappetizing pile of poultry while the smoke detector screams the song of its people.
Sound familiar? I’ve been there. I learned to cook by trial, error, and setting off the fire alarm so many times that my neighbors thought I was running a localized arson ring. But here is the brutal truth: your pan isn’t broken, and you aren’t a bad cook. You just haven’t learned the secret stovetop handshake yet.
As your resident sassy sous-chef, I firmly believe that anyone can cook like an absolute expert in a standard home kitchen without a pretentious culinary degree. Weekday cooking is all about efficiency—because time is money—but that doesn’t mean we compromise on quality. Today, we are going to master the single most important technique in stovetop cooking. We are going to talk about the Leidenfrost effect, the molecular chemistry of your cookware, and how a single droplet of tap water can completely revolutionize your culinary life.
The Toxic Truth About “Non-Stick” Cookware
Before we dive into the glorious physics of stainless steel, I know exactly what some of you are thinking. “Why on earth would I bother learning a scientific water test when I can just use my trusty non-stick pan?”
Stop right there. We have a strict “no-go” rule on toxic gear in this kitchen, and it is time to face the music about your peeling, scratched-up Teflon skillet.
What Are PFAS and Why Should You Care?
If you are serious about banishing toxic kitchen gear from your home, you have to understand the enemy. Traditional non-stick coatings are made using PFAS (per- and polyfluoroalkyl substances). These are a family of over 14,000 synthetic chemicals that the industry affectionately refers to as “forever chemicals” because they simply do not break down in the environment—or in your body.
For decades, we were told these pans were perfectly safe as long as we didn’t overheat them. But the science has aggressively caught up. A landmark study from February 2026 recently linked PFAS exposure to accelerated biological aging at the cellular level, on top of previously established links to hormone disruption, thyroid dysfunction, and reduced fertility. Every time you aggressively scrape that cheap non-stick pan with a metal fork, you are essentially garnishing your scrambled eggs with microscopic toxic flakes.
The 2026 Reality of Teflon and “Green” Coatings
You might proudly point out that your new pan says “PFOA-Free” on the label. Congratulations, you fell for marketing jargon. While PFOA was phased out, manufacturers simply swapped it for other PFAS compounds like PTFE (polytetrafluoroethylene). In fact, recent data shows that a staggering 79% of non-stick pans currently in use still rely on PFAS-based coatings.
The regulatory landscape is finally shifting, but it’s a mess. While the European Union is currently on track to implement a universal PFAS restriction by 2027 (which includes the PTFE coatings used in cookware), corporate lobbying in the United States successfully vetoed a major bill in California in 2025 that would have banned PFAS in cookware entirely. Furthermore, even if you try to baby these delicate pans, the hidden danger of aerosol cooking sprays will rapidly degrade the coating, leaving a sticky, polymerized residue that ruins the pan’s slip anyway.
Why Stainless Steel is the Ultimate Kitchen Workhorse
This brings us to stainless steel. It is practically indestructible. It doesn’t off-gas toxic fumes into your kitchen. It can go from the stovetop directly into a blazing hot oven. It builds incredible flavor through browning. It is the definitive choice for weekend culinary hobbyists who want to achieve restaurant-quality sears, and it is equally perfect for a rushed 20-minute weeknight meal once you know how to use it. But unlike chemical coatings, stainless steel requires you to actually understand what is happening in your pan.
The Science of Sticking: Why Your Food Hates You
To stop your food from sticking, you have to understand why it sticks in the first place. I promise not to use too much pretentious chef-speak, but we do need to put on our lab coats for a minute.
Microscopic Mountains and Valleys
To the naked eye, a high-quality stainless steel skillet looks perfectly smooth and polished. But if you were to look at that exact same surface under a powerful microscope, it would look like a rugged, jagged mountain range full of hills, valleys, and deep pores.
When you place a stainless steel pan on a burner, the heat causes the metal to undergo thermal expansion. Those microscopic pores and valleys actually expand and shift as the pan heats up. If you throw a cold, wet piece of food into a pan that hasn’t been properly preheated, those expanding pores act like tiny little mechanical jaws, gripping the food and refusing to let go.
The Chemistry of Protein Bonds
It gets worse. The sticking isn’t just a mechanical grip; it is a literal chemical reaction. Protein-rich foods (like chicken, fish, and eggs) are the worst offenders. When cold proteins hit a lukewarm metal surface, the proteins denature—meaning their intricate three-dimensional structures unwind. As they unfold, they expose highly reactive amino groups and side chains.
Because the pan isn’t hot enough to instantly sear the exterior of the food, these exposed protein chains reach out and form strong chemical bonds—specifically Van der Waals forces and covalent bonds—directly with the iron atoms in the stainless steel. Your food is literally fusing with the cookware at a molecular level. This is exactly why your chicken always turns out dry when you try to pry it off the metal; you are tearing the moisture-retaining crust right off the meat, leaving it behind as a burnt offering to the kitchen gods.
Temperature: The Invisible Culprit
The root cause of all this mechanical gripping and chemical bonding comes down to one single variable: temperature. If the pan is too cold, the proteins bond to the metal. If the pan is too hot, the cooking oil instantly burns, the outside of the food turns to charcoal, and then it sticks anyway. You have to find the Goldilocks zone, and you can’t do it by just hovering your hand over the pan and guessing.
Enter the Leidenfrost Effect (The Magic Water Drop Test)
This is where science swoops in to save your Tuesday night dinner. The solution to your sticky woes is a physics phenomenon known as the Leidenfrost effect.
Who is Leidenfrost and Why is He in My Kitchen?
Johann Gottlob Leidenfrost was an 18th-century German doctor and theologian who, in 1756, documented a fascinating observation about water droplets on highly heated surfaces. While he probably wasn’t trying to perfectly sear a ribeye steak, his discovery is the ultimate hack for modern home cooks.
The Physics of the Vapor Barrier
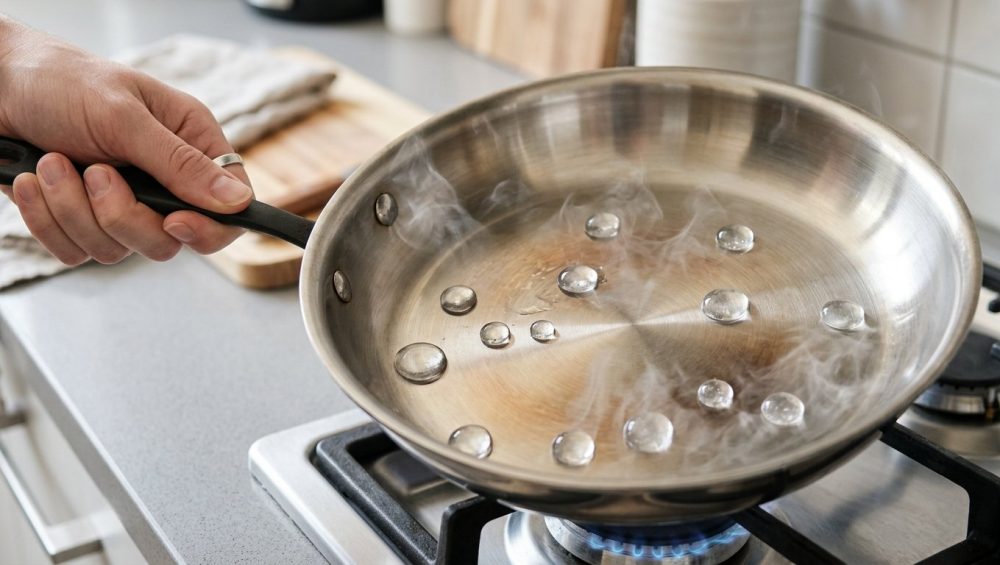
The Leidenfrost effect occurs when a liquid comes into contact with a surface that is significantly hotter than the liquid’s boiling point. When a drop of water hits a properly heated stainless steel pan, the very bottom of the water droplet vaporizes instantly. This micro-explosion of steam creates an insulating vapor barrier between the hot metal and the rest of the water droplet.
Because steam is a poor conductor of heat, this vapor layer protects the rest of the water from boiling away immediately. Instead of sizzling into nothingness, the water droplet holds its shape and glides effortlessly around the pan like a bead of liquid mercury. Harnessing the magic of the water drop is the only way to visually confirm that your pan has reached the exact thermodynamic state required to repel proteins.
Temperature Thresholds: Hitting the Sweet Spot
Thanks to modern smart-cookware testing, we know exactly what temperatures trigger these reactions.
- At 175°C (347°F): The pan is too cold. The water drop will just sit there, aggressively bubble, and evaporate.
- At 200°C (392°F): You are getting closer, but it’s still too low. The water will mostly evaporate while forming a few tiny, short-lived beads.
- At 225°C (437°F): The sweet spot. The Leidenfrost effect fully kicks in. The water forms distinct, free-flowing islands that dance and glide across the surface without evaporating.
When your pan hits this magical 225°C threshold, the same vapor-barrier physics will apply to the natural moisture in your food. When the food hits the pan, the moisture on its surface will instantly turn to steam, lifting the food microscopic fractions of a millimeter away from the metal, preventing those nasty covalent bonds from forming.
Step-by-Step: How to Perform the Water Drop Test Perfectly Every Time
Now that you understand the “why,” let’s execute the “how.” This process takes less than three minutes and will save you twenty minutes of scrubbing later. Remember, time is money.
Step 1: The Dry Preheat
Place your clean, completely dry stainless steel skillet on the stove over medium heat. Do not add oil yet! This is a massive rookie mistake. If you heat the oil from cold, it will break down, smoke, and polymerize before the pan ever reaches the correct temperature. Just like with baking, preheating the pan changes everything when it comes to stovetop cooking. Let it sit completely empty for about 2 to 3 minutes.
Step 2: The Droplet Dance (Reading the Water)
After a couple of minutes, wet your fingers under the tap and flick a few drops of water into the center of the pan. You are looking for a very specific reaction.
Step 3: Evaporation vs. Sizzling vs. The Mercury Ball
Observe the water closely:
- If it sits and aggressively bubbles away: The pan is too cold. Wipe it dry and wait another 60 seconds.
- If it shatters into a million tiny, violent micro-droplets: The pan is way too hot. Take it off the heat for a minute to let it cool down.
- If it immediately forms a perfect bead that glides around the pan like an air hockey puck: Congratulations, you have achieved the Leidenfrost effect. Your pan is perfectly preheated.
Step 4: Adding the Fat
Once you see the mercury ball, take a paper towel and quickly wipe the water droplet out of the pan (do not leave water in the pan, or it will violently spatter when you add oil). Now, immediately pour in your cooking oil.
Why do we add oil now? Because hot oil is significantly less viscous than cold oil. When it hits the hot pan, it immediately thins out and flows beautifully, seeping into all those microscopic expanded valleys we talked about earlier. This combination of heat and fat is what makes your pan actually non-stick without any toxic chemicals. You will know the oil is ready when it shimmers and you see slight dimpling on the surface.
Step 5: Introducing the Food (And Walking Away)
Carefully place your food into the pan. You should hear a robust, immediate sizzle. That sound is the moisture on the surface of the food instantly turning into steam, creating that protective barrier.
Now, here is the hardest step for weekend culinary hobbyists: Step away from the stove. Do not poke it. Do not prod it. Do not attempt to lift it with your spatula to “check the color.” Let the heat do its job.
The Temperature Nuances: When Good Heat Goes Bad
Even with the water drop test, things can go sideways if you don’t manage your heat source properly.
The “Too Cold” Catastrophe
If you get impatient and add your food before the pan hits the Leidenfrost threshold, the pan’s temperature will plummet. The steam barrier will fail to form, and the proteins will sink into the microscopic pores of the steel and bond with the iron. You will be left scraping mush off the bottom of the pan.
The “Too Hot” Hazard
Conversely, some home cooks think that if hot is good, blazing hot must be better. False. If your pan is sitting at 260°C (500°F) and you add a standard cooking oil, the oil will instantly exceed its smoke point. It will break down, taste acrid, and polymerize into a sticky, impossible-to-clean yellow lacquer. Furthermore, this excessive heat is exactly why your scrambled eggs turn out rubbery and brown instead of soft and fluffy. You want controlled, medium-high heat, not a volcanic eruption.
Adjusting for Your Stove Type (Gas, Electric, Induction)
You must also account for your equipment.
- Gas Stoves: Highly responsive. Once you hit the Leidenfrost point and add your food, you may need to slightly lower the flame to maintain a steady temperature without burning the oil.
- Electric Coil/Glass Top: These hold onto heat like a grudge. They take longer to preheat, but once they are hot, they stay hot. If your pan gets too hot during the water test, you may need to physically move the skillet to a cool burner to drop the temp.
- Induction: Induction is terrifyingly fast. You can hit the Leidenfrost point in under 60 seconds. Do not walk away while preheating an induction cooktop, or you will warp your pan.
The Anatomy of a Perfect Sear
When you execute this technique flawlessly, you unlock the holy grail of cooking: the perfect sear.
The Maillard Reaction Explained
That beautiful, golden-brown crust on a seared steak or a crispy piece of tofu isn’t just “burnt” food; it is the Maillard reaction. This is a complex chemical reaction between amino acids and reducing sugars that occurs rapidly around 140°C to 165°C (280°F to 330°F). It creates hundreds of new, complex flavor compounds that make food taste incredibly savory and delicious.
Why Patience is Your Best Ingredient
Here is the secret the pros know: food will naturally release itself from stainless steel when it is ready. When the food first hits the pan, even with the Leidenfrost steam barrier, there is a minor initial grip as the raw proteins hit the hot oil. But as the Maillard reaction occurs, the exterior of the food dehydrates and forms a rigid, polymerized crust.
The Natural Release: Trusting the Process
Once that crust is fully formed, the chemical bonds physically break, and the food will literally let go of the pan. You should be able to slide a spatula under a piece of chicken with zero resistance. If you feel resistance, the crust hasn’t formed yet. Put the spatula down and wait another 60 seconds. If you force it, this is why your fish fillets always fall apart in the skillet. Patience is mandatory.
Troubleshooting Common Water Drop Test Failures
Even with the best intentions, things can go wrong. Let’s troubleshoot the most common rookie mistakes.
“My Water Droplet Split into a Million Pieces!”
If you flick water into the pan and it sounds like a firecracker, instantly shattering into dozens of tiny, frantic beads that shoot over the edges of the skillet, your pan is way too hot. The vapor pressure was so violent that it blew the water droplet apart. Take the pan off the heat entirely for 60 to 90 seconds, place it back on a lower heat setting, and test again.
“I Added Oil and It Immediately Smoked!”
You either misread the water test and the pan was too hot, or you used the wrong fat. If you drop butter or extra virgin olive oil (which have very low smoke points) into a 225°C pan, the dairy solids and unrefined particles will burn instantly. For high-heat searing, you must use a high-smoke-point fat like avocado oil, grapeseed oil, or clarified butter (ghee).
“The Pan Was Ready, but My Meat Still Stuck!”
This is the most heartbreaking failure. You did the water test perfectly. The oil shimmered. You added the steak… and it stuck. Why? Because your meat was wet.
If you take a chicken breast straight out of a vacuum-sealed plastic package and throw it into a hot pan, the massive amount of surface water will instantly drop the temperature of the pan, killing the Leidenfrost effect and essentially boiling the meat in its own juices. If you want to prevent food from sticking, you must pat your proteins completely dry with a paper towel before they ever go near the stove.
Beyond the Sear: What to Do When Food Does Stick
Let’s say you messed up. You got distracted by a text message, the pan was too cold, and your pork chop is now clinging to the steel for dear life. Do not panic. We can fix this, and we can make it delicious.
The Beauty of the Fond
When proteins stick and brown on the bottom of a stainless steel pan, they form a sticky, caramelized glaze known in French culinary terms as fond (which literally translates to “base” or “foundation”). In a non-stick pan, this fond never forms. In stainless steel, this fond is the foundation of the best sauces you will ever eat.
Deglazing Like a Pro
To rescue your pan (and your dinner), remove the meat and set it aside on a plate. Put the hot pan back on the burner and pour in a splash of liquid—wine, chicken broth, or even just water. The liquid will aggressively boil and release a cloud of fragrant steam. Take a wooden spoon and gently scrape the bottom of the pan.
The liquid acts as a solvent, instantly dissolving those stubborn, caramelized protein bonds and lifting them off the metal. This process of turning burnt bits into sauce is the hallmark of a skilled home cook. Let the liquid reduce by half, swirl in a tablespoon of cold butter, and you suddenly have a restaurant-quality pan sauce that covers up any mistakes you made during the searing process.
Cleaning Up the Mess (Without Ruining Your Pan)
If you have truly burned something beyond recognition—say, a sugary marinade that turned into black carbon—step away from the abrasive steel wool. You will scratch the beautiful finish of your pan. Instead, fill the pan with an inch of water, add a generous scoop of baking soda, and bring it to a simmer on the stove for ten minutes. The heat and the alkalinity of the baking soda will break down the polymerized carbon, allowing you to wipe it away with a soft sponge.
Conclusion: Embracing the Stainless Steel Lifestyle
Transitioning away from toxic, disposable non-stick pans can feel incredibly intimidating. It requires you to be present, to pay attention to temperature, and to trust the science of cooking rather than relying on a chemical crutch.
But once you master the water drop test, your entire approach to cooking will change. You will stop fearing your stainless steel skillet and start viewing it as the most powerful, versatile tool in your kitchen arsenal. You will achieve golden, crispy sears on your Tuesday night chicken thighs, your weekend dinner party steaks will look like they came out of a Michelin-starred kitchen, and you will never have to worry about feeding your family microscopic flakes of peeling Teflon ever again.
So, dry your proteins, preheat that steel, flick that water, and watch the magic happen. You’ve got this.






