
The Acrid Smell of Defeat: Why We Need to Talk About Garlic
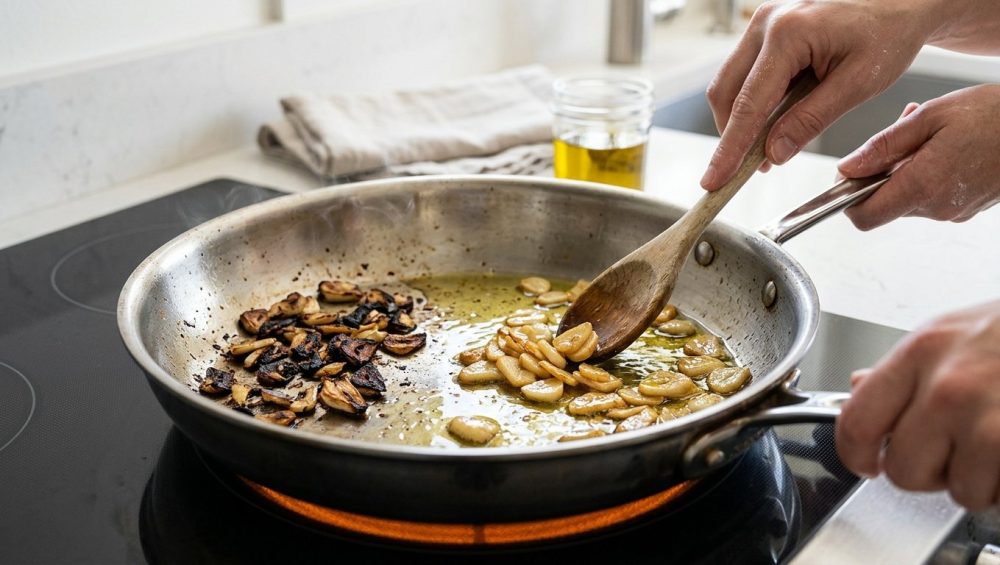
We have all been there. It is a busy Tuesday night, you are exhausted from work, and you just want to throw together a quick pasta sauce or a simple stir-fry. You chop up your aromatics, toss them into a hot skillet, and within thirty seconds, a pungent, acrid cloud of smoke hits your nostrils. Your beautiful minced garlic has transformed from fragrant, golden little flavor bombs into bitter, blackened specks of charcoal. You try to convince yourself it will taste fine once you add the tomatoes or the soy sauce, but deep down, you know the truth. The dinner is ruined before it even really began.
As a home cook who learned the ropes by setting off the smoke detector more times than I care to admit, I am here to tell you that burning your garlic is not a personal failure. It is a thermodynamic inevitability caused by bad recipes, terrible pan choices, and a fundamental misunderstanding of culinary science. You do not need a pretentious culinary degree to cook like an expert, but you do need to understand the basic chemistry of your ingredients. We are going to completely deconstruct the humble garlic clove, debunk the biggest lies recipe writers tell you, and teach you the exact heat management techniques required to achieve a perfectly toasted, sweet, and savory aromatic base.
Time is money, especially on a weeknight, and we do not have time to waste throwing out scorched ingredients. Let us get down to the science of the sizzle and fix your flavor base once and for all.
The Anatomy of a Clove: A Chemical Breakdown
To understand why garlic burns with such frustrating speed, we have to look at what it is actually made of. Garlic is not just a flavor enhancer; it is a highly volatile, complex botanical structure that reacts violently to heat and physical disruption.
The Sugar Trap: Fructans and Fructose
Unlike most savory vegetables that we toss into our skillets, garlic is absolutely loaded with sugar. Specifically, garlic contains incredibly high levels of fructans—a type of polymer made up of fructose molecules. Scientific analyses have shown that the fructan content in raw garlic can range anywhere from 9.8% to a staggering 17.4% by weight.
Why does this matter? Because sugar browns, and it browns incredibly fast. When you expose these high concentrations of fructose chains to direct heat, they rapidly break down and caramelize. While a gentle caramelization brings out the mellow, sweet notes we love in roasted garlic, the sheer volume of sugar means that the window between “perfectly golden” and “acrid carbon” is exceptionally narrow.
The Thermal Buffer: Water Content
The second critical factor is moisture. Water acts as a natural thermal buffer in cooking. As long as water is evaporating from an ingredient, the surface temperature of that ingredient struggles to rise significantly above the boiling point of water (212°F or 100°C). This evaporative cooling protects the food from burning.
Here is the kicker: garlic has a surprisingly low water content for a fresh vegetable, sitting at only about 59% moisture. Because there is so little water to evaporate, minced garlic loses its protective thermal buffer almost instantly upon hitting a hot pan. Once that minimal moisture flashes off as steam, the temperature of the garlic spikes rapidly, dragging those abundant sugars straight into the danger zone.
The Pungency Factor: Allicin and Enzyme Reactions
Garlic’s signature bite and aroma do not actually exist inside an intact clove. Instead, the clove contains an amino acid called alliin and an enzyme called alliinase, which are kept strictly separated in different parts of the plant’s cells. When you slice, smash, or mince the garlic, you rupture those cell walls, allowing the enzyme and the amino acid to mix. This chemical reaction produces allicin, the highly reactive, sulfur-containing compound responsible for garlic’s pungent smell and sharp taste.
Allicin is incredibly sensitive to temperature. Research shows that allicin begins to decompose rapidly when exposed to heat, particularly accelerating once temperatures cross 140°F (60°C). If you blast your garlic with high heat immediately, you are not just burning the sugars; you are violently degrading the complex sulfur compounds into bitter, pyrolyzed byproducts before they even have a chance to properly infuse your cooking oil.
The Great Recipe Lie: Why Onions and Garlic Are Not Equals
If I had a dollar for every published recipe that casually instructs the reader to “add the diced onions and minced garlic to the pan and sauté for five to seven minutes,” I could retire to the French Riviera. It is the most pervasive, destructive lie in modern culinary writing, and it sets up weekend culinary hobbyists for absolute failure.
Let us look at the thermodynamics of this disastrous instruction. As we established, garlic is roughly 59% water and packed with fast-burning sugars. Onions, on the other hand, are approximately 89% water. They are essentially little aquatic sponges masquerading as root vegetables.
When you drop diced onions into a hot skillet, they immediately begin to release a massive amount of water. This water drops the ambient temperature of the pan and creates a localized steam bath. If you throw your minced garlic into the pan at the exact same time, one of two things will happen, depending on your heat level:
- The Steam Trap: If your heat is medium-low, the garlic will simply boil in the onion’s expelled juices. You will never achieve that beautiful, golden, toasted garlic flavor because the Maillard reaction cannot occur in a puddle of onion water. You end up with boiled, flabby garlic.
- The Scorched Earth: If your heat is medium-high to high, the tiny fragments of garlic will fry and carbonize against the hot metal long before the dense, water-logged onions even begin to turn translucent.
Garlic and onions are not equals, and they demand completely different cooking times. If you simply stop adding garlic first, or even at the same time as your dense aromatics, you will instantly eliminate the vast majority of the bitter flavors plaguing your weeknight dinners.
The Science of the Sizzle: Maillard Reaction vs. Pyrolysis
To master your kitchen, you must understand the fine line between browning and burning. When we cook garlic, we are chasing the Maillard reaction. Named after French chemist Louis Camille Maillard, this is the complex chemical reaction between amino acids and reducing sugars that gives browned food its incredibly savory, distinctive flavor.
The Maillard reaction typically kicks into high gear between 280°F and 330°F (140°C to 165°C). This is the absolute sweet spot for aromatics. When garlic hits this temperature range, its high fructan content caramelizes beautifully, and the harsh, raw bite of the allicin mellows into a rich, nutty, and profoundly savory profile.
However, because garlic is chopped so finely and contains so little water, it rockets through this ideal temperature window at terrifying speed. If your pan is too hot, the garlic blows right past the 330°F (165°C) mark and hits 300°F to 350°F (149°C to 176°C) in a matter of seconds. At this stage, the Maillard reaction terminates, and a new chemical process takes over: pyrolysis.
Pyrolysis is the thermal decomposition of materials at elevated temperatures. In layman’s terms? It is burning. When garlic undergoes pyrolysis, its complex sulfur polymers carbonize, and the sugars break down into highly bitter compounds like furfural. There is no coming back from pyrolysis. Once the garlic turns dark brown or black, the chemical structure is permanently altered, and no amount of tomato sauce or heavy cream will hide the acrid taste.
The “No-Go” Rule: Why Your Pan Is Probably Ruining Your Garlic
As your Sassy Sous-Chef, I have a strict, non-negotiable rule in my kitchen: I absolutely despise cheap, toxic kitchenware. If you are trying to execute precise heat management on a flimsy, warped, peeling non-stick pan you bought for ten dollars five years ago, you are fighting a losing battle.
Traditional non-stick pans are coated with PTFE (polytetrafluoroethylene), which belongs to a class of chemicals known as PFAS. These pans are terrible for toasting garlic for several reasons. First, cheap aluminum non-stick pans have terrible thermal mass. They heat up unevenly, creating aggressive hot spots that will scorch half of your minced garlic while the other half remains raw.
More importantly, they are a massive health hazard when used for high-heat searing. At temperatures above 500°F (260°C), PTFE coatings begin to physically break down, releasing toxic fluorocarbon gases into your kitchen air. Inhaling these fumes can cause a condition literally known in the medical field as “Polymer Fume Fever,” which mimics severe flu symptoms. Furthermore, if you are regularly coating these toxic pans with aerosol cooking spray, you are just baking a sticky, polymerized layer of soy lecithin onto the surface, which ruins the pan’s slip and causes delicate ingredients like garlic to stick and burn even faster.
The Professional Upgrade: Safe, High-Conductivity Metals
If you want professional results, you need to use the materials the professionals use: carbon steel, cast iron, or multiclad stainless steel.
Carbon steel is an absolute powerhouse. It boasts a thermal conductivity of roughly 54 W/m-K, meaning it responds to changes in heat incredibly well. If you see your garlic getting too dark and you drop the burner temperature, a carbon steel pan will react quickly, helping you save the dish.
Multiclad stainless steel is another phenomenal option. While pure stainless steel is actually a poor conductor of heat (around 15 W/m-K), high-quality pans sandwich a thick core of highly conductive aluminum or copper between layers of steel. This gives you a brilliant, bright cooking surface that makes it incredibly easy to monitor the exact color of your toasting garlic.
Many home cooks fear stainless steel because they think everything will stick to it. I promise you, you can make a bare metal skillet actually non-stick simply by managing your thermodynamics. All you have to do is preheat the dry pan and perform the water drop test. When a drop of water beads up and glides across the surface like mercury (the Leidenfrost effect), the pan is at the perfect temperature to add your oil, creating a naturally slick surface that will treat your garlic with the respect it deserves.
Prep Matters: Mincing, Slicing, and Smashing
We cannot talk about cooking garlic without talking about how you process it on the cutting board. The physical method you use to break down the clove directly dictates how fast it will cook and how intensely it will flavor your oil. Remember the alliin and alliinase enzyme reaction we discussed earlier? The more physical damage you do to the clove, the more cell walls you rupture, and the more allicin is produced.
The Smash
If you take a whole peeled clove, lay the flat of your knife over it, and give it a firm whack with the heel of your hand, you create minimal cellular damage. A smashed clove will gently infuse your cooking oil with a sweet, mellow garlic flavor. Because the physical mass of the clove remains largely intact, it has a much smaller surface-area-to-volume ratio. This means it can withstand several minutes of heat without burning, making it perfect for flavoring the oil before searing a steak or building a slow-simmered Sunday sauce. You can simply fish the browned clove out before serving.
The Slice
Slicing garlic creates moderate cellular damage. You will get a more pronounced garlic flavor than a whole smashed clove, but the slices are still thick enough to survive a minute or two in the pan. Sliced garlic is iconic in dishes like classic Aglio e Olio, where the garlic is the star of the show and needs to hold its structural integrity.
The Mince (And the Tool You Need to Throw Away)
Mincing garlic with a knife creates extensive cellular damage, releasing a highly pungent aroma and ensuring the garlic melts beautifully into sauces and stir-fries. However, because the pieces are so incredibly small, their surface area is maximized, meaning they will cook—and burn—in a matter of seconds.
If you want a clean mince, you must use a sharp chef’s knife. If you are hacking away at your aromatics with a dull knife, you are essentially bludgeoning the garlic, squeezing out its juices, and creating a bruised, uneven mess that will cook unpredictably.
And this brings me to my next absolute “No-Go.” Put down the garlic press. I am begging you. A press does not cut; it violently extrudes and crushes every single cell wall simultaneously. This triggers a massive, instantaneous release of alliinase, resulting in an overwhelmingly aggressive, almost metallic raw flavor. Worse, it turns the garlic into a wet, fibrous, stringy paste. When this wet paste hits hot oil, the tiny fibers burn almost instantaneously, guaranteeing a bitter meal.
Take the extra sixty seconds to mince by hand. Be kind to your knives while you do it; avoid hard glass or bamboo cutting boards, which contain high levels of silica that will rapidly dull your blade’s edge.
The Masterclass: How to Actually Cook Garlic Without Burning It
Now that we understand the chemistry, the thermodynamics, and the prep, it is time to actually cook. Depending on what you are making, there are two definitive, foolproof methods for cooking minced garlic to absolute perfection.
Method 1: The Cold Oil Start
This is my favorite technique for dishes where garlic is the primary flavor profile, such as garlic butter pasta, shrimp scampi, or certain stir-fries.
Do not preheat your pan. Instead, place your freshly minced garlic into a completely cold skillet. Pour your cold cooking oil or add your cold butter directly over the garlic. Turn the burner to medium-low heat.
As the pan gradually comes up to temperature, the garlic slowly warms up alongside the fat. This gentle temperature incline allows the allicin and essential oils to deeply infuse into the fat before the water content evaporates and the Maillard reaction begins. You will see tiny bubbles begin to form around the minced pieces. Keep a silicone spatula moving continuously. The moment the garlic turns a pale, sandy blonde color, immediately add your next ingredient—whether that is a splash of white wine, a handful of shrimp, or a scoop of pasta water. The addition of a cold or room-temperature ingredient will instantly drop the temperature of the pan, halting the cooking process and locking in that perfect, sweet, toasted flavor.
Method 2: The Late Addition
This is the required technique for soups, stews, curries, and heavy sauces where garlic is part of a larger aromatic base (like a mirepoix or the holy trinity).
Start by sautéing your high-water-content vegetables first. Add your onions, carrots, celery, and bell peppers to the hot oiled pan. Cook them over medium heat until the onions are fully translucent and the bulk of their water has evaporated.
Once the heavy vegetables are fully cooked and softened, use your spatula to push them to the outer edges of the pan, creating a clear, hot circle in the direct center. Add a tiny drop of fresh oil to this center clearing, and drop your minced garlic directly into the oil. Let it sizzle vigorously for exactly 30 to 45 seconds. The moment you can smell that fragrant, mouth-watering garlic aroma hitting the air, immediately toss the garlic together with the rest of the vegetables. The residual moisture from the onions will cool the garlic down, preventing it from burning while allowing it to release its full aromatic potential into the dish.
Once your garlic is perfectly prepped on the board, use a bench scraper to cleanly scoop it up and transfer it to the pan. Never drag the sharp edge of your knife across the board to scoop ingredients, as this will roll the edge of the blade and ruin your knife.
The Weekday Rescue: What to Do When the Garlic Burns
I am a realist. We all get distracted. Maybe the dog barked, maybe your phone rang, or maybe you just looked away for five seconds too long. You turn back to the stove, and your garlic is dark brown and smells like a tire fire.
What do you do?
If it is a Tuesday night and you are trying to get dinner on the table, you need to hear the hard truth: you must throw it out. I know it hurts to waste ingredients, but time is money, and trying to salvage heavily carbonized garlic is a fool’s errand. The pyrolyzed fructans and sulfur compounds will infect every single other ingredient you add to that pan. If you pour a $15 jar of crushed San Marzano tomatoes over burnt garlic, you have not saved the garlic; you have just ruined $15 worth of tomatoes. Take the pan off the heat, wipe it out with a paper towel, and start over. It will cost you exactly one clove of garlic, a splash of oil, and two minutes of your time.
If the garlic is not fully black, but just a shade darker than you wanted (a deep, dark tan), you can sometimes rescue the flavor profile. Immediately dump a cold liquid into the pan—broth, wine, or even a splash of water. This rapid deglazing drops the temperature of the metal instantly, stopping the pyrolysis in its tracks. To counteract the slight bitterness that has developed, add a hit of acid. A squeeze of fresh lemon juice or a dash of white wine vinegar can neutralize the acrid alkaline notes and bring the flavor base back into balance.
When you are doing your weekend meal prep, be mindful of how you store any extra minced garlic. Never store pungent alliums in plastic containers. The porous nature of the plastic will absorb the volatile sulfur compounds, and no amount of dish soap will ever get that smell out. Always store prepped garlic in an airtight glass jar in the refrigerator, and try to use it within 48 hours before the allicin completely breaks down and loses its potency.
Advanced Garlic Maneuvers for the Weekend
When the weekend rolls around and you have the luxury of time, you can step away from the frantic, high-heat weeknight stir-fries and explore techniques that treat garlic with the slow, methodical respect it deserves.
One of the most transformative things you can do in a home kitchen is make garlic confit. Confit simply means to cook something slowly submerged in fat. By taking whole, peeled cloves of garlic, submerging them in high-quality olive oil, and baking them in a low oven (around 250°F or 120°C) for two hours, you completely bypass the risk of burning. The low, steady heat gently breaks down the cellular structure without ever triggering the harsh Maillard reaction or pyrolysis. The result is a jar of incredibly soft, spreadable, sweet garlic cloves that taste like culinary gold, alongside a byproduct of deeply infused garlic oil that you can use all week long.
Another brilliant weekend technique is to pair your garlic with your dry spices. Many home cooks make the mistake of sprinkling dry spices (like cumin, coriander, or paprika) into a wet, simmering sauce, where they just turn muddy. Instead, try adding your dry spices to the pan during that crucial 30-second window when you are sautéing your minced garlic in the hot oil. Combining the aromatics and blooming them in oil simultaneously unlocks the fat-soluble flavor compounds in the spices while the garlic toasts, creating an incredibly complex, restaurant-quality flavor base that will elevate any curry, chili, or stew.
The Sassy Sous-Chef’s Final Verdict
Cooking is not magic. It is just applied physics and chemistry with a dash of intuition. You do not need a Michelin star to make mind-blowing food in a standard home kitchen; you just need to stop blindly following bad recipe instructions that set you up to fail.
Garlic is a diva. It is high in sugar, low in water, and packed with volatile compounds that demand your full attention. Treat it with respect, manage your pan temperatures, upgrade your cookware, and never, ever drop it into a hot skillet at the same time as an onion. Master these simple rules, and you will never have to suffer through the acrid smell of burnt garlic again. Now get back in the kitchen, grab a fresh clove, and show that skillet who is actually in charge.






