
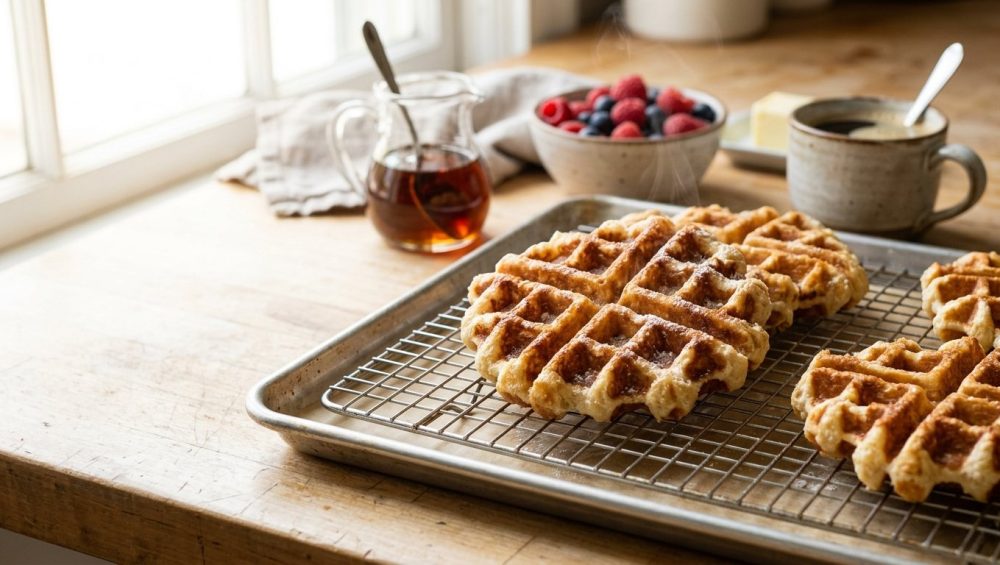
We have all experienced the exact same Sunday morning culinary tragedy. You have successfully gathered your closest friends for a weekend brunch. You spent the last forty-five minutes diligently whisking egg whites, melting butter, and standing over a hot waffle iron like a glorified, unpaid short-order cook. You finally pull the last, gloriously golden-brown waffle from the iron. It is structurally flawless. It is shatteringly crisp. You proudly stack it on a plate with its brethren, carry the towering masterpiece to the dining table, and begin pouring the mimosas.
But five minutes later, the betrayal occurs. The satisfying crunch is entirely gone. The structural integrity has vanished into thin air. What was once a beautifully textured, crispy exterior has rapidly devolved into a floppy, sad, spongy disk that absorbs maple syrup like a cheap paper towel.
It is the exact same culinary heartbreak you feel when your pancakes stay raw in the middle—you followed the recipe to the letter, you put in the physical labor, but the unforgiving physics of the kitchen completely betrayed you.
Here is the brutal, honest truth about this beloved breakfast food: Waffles are incredibly volatile. By their very chemical nature, they are designed to be eaten a la minute (immediately out of the pan). But as a home cook and a weekend host, you simply do not have the luxury of serving your guests one by one while you stand alone in the kitchen, isolated from your own party. You want to eat with your friends. You want to enjoy the gathering you worked so hard to put together.
The good news? You absolutely can. You do not need a culinary degree, a commercial kitchen, or a personal sous-chef to hack the system. You just need a fundamental understanding of thermodynamics, a few clever oven-holding techniques, and a strict, zero-tolerance policy for toxic kitchenware. Let’s fix your brunch game once and for all, and teach you how to serve a massive batch of flawlessly crispy waffles to a crowd.
The Thermodynamics of a Soggy Waffle
To defeat the enemy, you must first understand it. Why does a perfectly crisp waffle turn to absolute mush the moment it hits a serving plate?
It all comes down to the science of moisture migration, starch gelatinization, and the relentless power of steam.
When you pour liquid batter onto a preheated iron, a beautiful scientific phenomenon known as the Maillard reaction occurs. The intense, direct heat rapidly dehydrates the outermost layer of the batter, causing the amino acids and reducing sugars to brown and caramelize. This creates the rigid, flavorful, crispy crust that we all crave. However, while the outside is dehydrating into a crust, the interior of the waffle is doing something entirely different. The inside is essentially steaming itself, transforming the wet flour and eggs into a soft, moist, cake-like crumb.
When you finally remove the finished waffle from the iron, that interior crumb is still piping hot and packed with residual moisture. Because heat rises and expands, that interior moisture desperately wants to escape the waffle in the form of steam.
If you place that hot waffle directly onto a room-temperature, flat ceramic plate, or a wooden cutting board, the escaping steam hits the impermeable, cooler surface of the plate. Because the steam has nowhere else to go, it cools rapidly and condenses instantly into liquid water. Because your waffle is now resting in a microscopic puddle of its own condensation, the dehydrated, crispy bottom crust acts exactly like a dry sponge. It immediately reabsorbs that liquid water. Within sixty seconds, your crispy exterior is completely ruined.
Furthermore, the absolute worst thing you can possibly do is stack your freshly cooked waffles on top of one another. Stacking creates a multi-level steam trap. The heat from the bottom waffle rises and steams the waffle above it, while the top waffle physically traps the heat of the bottom one. You are effectively building a custom, high-humidity sauna for your food.
To preserve the crunch, we have to give the steam a permanent escape route. This is where you discover the absolute magic of a wire rack. Elevating the hot pastry allows dry air to circulate 360 degrees around the food, permitting the interior steam to dissipate harmlessly into the atmosphere rather than pooling underneath the crust.
The Oven-Holding Masterclass
Knowing that trapped steam is the enemy is only half the battle. If you simply leave your freshly cooked waffles on a wire cooling rack on the kitchen counter, they will indeed stay crispy, but they will also become ice cold in about ten minutes. And let’s be honest: cold, stiff waffles are just as depressing as hot, soggy ones.
The ultimate solution is precise thermal management: holding the waffles in the oven until you are ready to serve the entire batch. But you cannot just toss them onto the oven racks willy-nilly and hope for the best.
The Essential Hardware Setup
You need two specific pieces of equipment for this to work: a heavy-duty rimmed baking sheet (commonly known as a half-sheet pan) and a stainless steel wire cooling rack that fits snugly inside of it. Do not use a flimsy, thin, supermarket-brand baking tray. Invest in a commercial-grade, heavy-gauge aluminum pan, because cheap baking sheets warp violently under temperature changes. A warped pan will pop loudly in the oven, potentially sending your precious food sliding around or bouncing off the rack.
Place the wire rack inside the heavy baking sheet. As you pull each finished waffle from the iron, immediately transfer it to the wire rack. Arrange them in a single, uncrowded layer. I will say it again for the people in the back: absolutely no stacking.
Dialing in the Exact Temperature
Preheat your oven to exactly 200°F (95°C). Why 200°F? It is the undisputed culinary sweet spot for holding baked goods. It is hot enough to keep the food at a highly palatable serving temperature and well above the bacterial danger zone, but it is low enough that it will not continue to actively bake the interior crumb. If you set the oven to 250°F or 300°F, you will slowly dehydrate the moisture out of the center until they turn into giant, unchewable breakfast croutons. If you set it to 150°F, they will cool down too much and the starches will begin to firm up and taste stale.
However, standard home ovens are notoriously inaccurate. Your digital display might proudly say 200°F, but the actual ambient temperature inside the cavity could easily be 170°F or 230°F. Do not just blindly trust the digital dial on your appliance; this is exactly why you need a simple oven thermometer hanging from the center rack to verify the true ambient temperature of the cavity.
If your oven has a convection setting (a built-in fan that aggressively circulates the hot air), turn it on immediately. Convection is a waffle’s best friend. The circulating air gently whisks away any escaping moisture from the surface of the food, maintaining a perfectly dry environment that locks in the exterior crunch while holding the interior soft, warm, and fluffy.
Batter Chemistry 101: Engineering Crispiness From the Start
You can have the most scientifically sound oven-holding strategy in the world, but if your batter is fundamentally flawed, you will still end up with a mediocre brunch. You cannot save a batter that is destined to be soggy. Achieving professional-level crispness requires a bit of food science and ingredient engineering.
The Secret Power of Cornstarch
Standard all-purpose flour is great, and it forms the backbone of most recipes, but it contains gluten. Gluten provides necessary structure, but too much gluten makes a baked good chewy, dense, and bready rather than light and crisp. To hack this structural issue, replace 20% of your all-purpose flour with pure cornstarch (or rice flour, if you prefer). Cornstarch is entirely gluten-free and acts as a powerful crisping agent. It absorbs moisture efficiently and sets rapidly under high heat, giving you that glass-like, shatteringly crisp exterior that defines a restaurant-quality waffle.
The Fat Debate: Butter vs. Oil
I love butter. You love butter. We all love butter. It provides an unmatched, rich, nutty flavor that makes weekend breakfasts feel indulgent. But butter is not pure fat; it contains about 15% to 20% water, and as we have already established, water creates steam, and steam is our known enemy.
Neutral oils (like avocado oil, canola oil, or grapeseed oil), on the other hand, are 100% pure liquid fat. Oil coats the flour proteins much more effectively than butter does, which actively inhibits gluten formation and essentially “fries” the outside of the batter when it hits the hot iron.
For the ultimate hybrid approach, use a 50/50 split of melted butter and neutral oil in your batter. You get the rich, complex flavor of the dairy, combined with the superior crisping and frying power of the oil.
Precision is Non-Negotiable
Baking is a hard science, and volumetric measurements (like measuring cups and tablespoons) are the absolute enemy of consistency in the kitchen. A single cup of flour can weigh anywhere from 100 grams to 150 grams depending on how aggressively you scoop it out of the bag. If you are still scooping flour with a plastic measuring cup, please stop immediately. You need a digital kitchen scale to ensure your hydration ratios are perfectly balanced every single time you cook. Weighing your ingredients in grams guarantees that your batter is never too wet (which causes sogginess) or too dry (which causes density).
The Importance of the Rest Period
Once you mix your wet and dry ingredients together, you must walk away and let the batter rest at room temperature for 10 to 15 minutes. This crucial resting phase allows the starches in the flour to fully hydrate and gives the agitated gluten strands time to relax, ensuring a tender interior.
However, do not let it sit for much longer than 15 minutes if your recipe relies heavily on baking powder. Your chemical leavening agents need that initial blast of high heat from the iron to activate properly and create those fluffy interior air pockets. If the batter sits on the counter for an hour, the chemical reaction will completely burn out before the batter ever hits the cooking surface, leaving you with flat, dense hockey pucks.
The “No-Go” Rule: Banishing Toxic Waffle Irons
Now, let’s have a very serious, no-nonsense talk about your kitchen equipment. I have absolutely zero patience for cheap, peeling, toxic kitchenware. I am incredibly passionate about banishing toxic kitchen gear from your home, and electric waffle makers are historically some of the worst offenders on the consumer market.
The Hidden Danger of “Forever Chemicals”
For decades, the standard consumer waffle iron has been coated in PTFE (Polytetrafluoroethylene), which is most commonly known by the brand name Teflon. Historically, these coatings relied heavily on PFOA or other PFAS (per- and polyfluoroalkyl substances), which are notoriously dubbed “forever chemicals” because they simply do not break down in the environment or in the human body.
When traditional non-stick coatings are heated to high temperatures—which is exactly what a waffle iron is designed to do—they can begin to rapidly degrade, outgas toxic fumes, and eventually flake directly into your food. If your current waffle iron has a black, synthetic coating that is scratched, peeling, or exposing the bare metal underneath, unplug it and throw it in the trash immediately. You cannot salvage it, and you should not be feeding your family microscopic plastic flakes for breakfast.
The Safe Alternatives: Ceramic and Cast Iron
You do not have to sacrifice a convenient, non-stick cooking experience to cook safely. The culinary industry has made massive strides in recent years, and you have two excellent, completely safe options for a modern 2026 kitchen:
- Ceramic-Coated Waffle Makers: Modern ceramic coatings (like those utilized by brands such as GreenPan, Presto Ceramic, or Dash) are derived from natural silicon dioxide (sand) and are completely free of PFAS, PTFE, PFOA, lead, and cadmium. They offer a brilliant, slick surface that releases food effortlessly and wipes clean in seconds with a damp cloth. They are the perfect plug-and-play option for the health-conscious home cook.
- Traditional Seasoned Cast Iron: If you want a rugged appliance that will literally outlive you and your children, go old-school with a seasoned cast-iron waffle maker (like those manufactured by Rome Industries or vintage Lodge models). These robust tools sit directly on your gas or induction stovetop. Yes, they require a bit of practice to manage the heat output, and you have to maintain the polymerized oil seasoning, but they hold heat like a thermal battery and produce a profoundly superior, deeply browned crust that electric models simply cannot match. Plus, they contain zero synthetic chemicals.
A Strict Warning on Cooking Sprays
Whatever safe, non-toxic iron you choose to buy, you must treat it properly to maintain its lifespan. Furthermore, never use those commercial aerosol cooking sprays on your waffle maker. These pressurized aerosol cans contain chemical propellants and emulsifiers (like soy lecithin) that burn at much lower temperatures than the cooking oil itself.
Under the high, direct heat of the iron, these additives polymerize into a sticky, invisible, impossible-to-remove residue. Over time, this stubborn residue builds up and completely destroys the non-stick properties of your expensive ceramic iron, causing your batter to tear and stick permanently. Instead, use a silicone pastry brush to lightly coat your iron with pure melted butter or a high-smoke-point liquid oil.
Designing the Ultimate Interactive Brunch Bar
Now that we have the food science and the equipment locked down, let’s talk about the actual party.
According to recent 2026 market intelligence reports on home entertaining, the brunch landscape has shifted drastically over the last few years. Consumers are rapidly moving away from rigid, formal, sit-down meals in favor of “snackification” and flexible, experience-driven eating occasions. Today’s guests want interactive, lower-stress environments where they can customize their own plates, while modern hosts are actively seeking solutions that minimize their time trapped in the kitchen.
This is exactly why the communal grazing model is taking over the culinary world. Setting up a mindful waffle bar allows your guests to curate their own unique culinary experience while you actually get to sit down, sip your coffee, and enjoy the beautiful gathering you worked so hard to put together.
Zoning Your Station for Success
To prevent awkward traffic jams in your kitchen or dining room, you need to arrange your brunch bar in a logical, flowing progression. Think of it like a highly aesthetic, gourmet assembly line.
- Zone 1: The Foundation (The Waffles). This is where your oven-held, perfectly crispy waffles live. Keep them on the wire rack in the warm oven until the exact moment you announce that food is ready, then transfer the entire sheet pan to a heat-safe trivet at the very start of the buffet line.
- Zone 2: The Spreads. Room temperature is absolutely critical here. Nobody wants to tear their beautiful, delicate waffle apart trying to spread rock-hard, refrigerator-cold butter. Set out beautifully swirled, softened cultured butter, whipped cream cheese, mascarpone, or fresh ricotta.
- Zone 3: The Liquids. Here is a pro-tip that separates the amateurs from the experts: warm your syrup! Pouring ice-cold maple syrup over a hot waffle instantly drops the temperature of the dish and encourages sogginess. Gently warm your pure maple syrup (never use the fake, artificially flavored high-fructose corn syrup stuff) in a small saucepan before serving. Offer elegant alternatives like warmed local honey or a quick, vibrant berry compote.
- Zone 4: The Crunch. Texture is everything in a well-composed dish. Provide small, aesthetic bowls of toasted pecans, sliced almonds, cacao nibs, or toasted coconut flakes to add an extra dimension of crunch.
- Zone 5: The Savory Pivot. A truly great brunch balances the sweet with the savory. According to 2026 culinary forecasts, comfort foods and “sweet and spicy” flavor profiles (like spicy maple) are heavily dominating restaurant menus right now. Offer thick-cut crispy bacon, a platter of high-quality fried chicken, perfectly poached eggs, or even a jar of artisanal chili crisp for those guests who want to take their meal in a savory, umami-rich direction.
Workflow and Timing for the Weekend Host
If you want to truly master the art of effortless hosting, you have to stop acting like a panicked line cook and start acting like a general. A stress-free, joyful brunch is won or lost in the 24 hours before the doorbell ever rings.
The Night Before
Do not leave everything for the morning of the event. You will inevitably run out of time and start sweating before your guests even arrive. The night before your brunch, measure and whisk all your dry ingredients (flour, cornstarch, baking powder, salt, sugar) into a large bowl. Cover it tightly and leave it on the counter.
Next, prep your toppings. Cook your bacon in the oven, let it cool, and store it in the fridge (you can flash-reheat it in the oven for three minutes the next morning). Make your berry compote, toast your nuts, and set out your serving bowls, plates, and utensils on the dining table. Take your butter out of the fridge so it can soften perfectly overnight.
The Morning Of
An hour before your guests are scheduled to arrive, preheat your oven to 200°F (95°C) and set up your heavy-duty sheet pan and wire rack. Plug in your non-toxic ceramic or preheat your cast-iron waffle maker and let it heat up fully.
Whisk your wet ingredients (milk, eggs, melted butter, oil, vanilla extract) together in a separate jug, then fold them gently into the dry ingredients. Remember, do not overmix! Small lumps of flour are perfectly fine; overmixing develops the gluten and leads to tough, rubbery results. Let the batter rest for 10 to 15 minutes.
The Execution Phase
Put on a great weekend playlist, pour yourself a large cup of coffee, and start churning out the food. As each one finishes, transfer it immediately to the wire rack in the oven. Because you aren’t distracted by frying bacon, setting the table, or chopping fruit, you can focus entirely on the soothing, repetitive rhythm of the waffle iron.
By the time your guests walk through the door, your kitchen counters are clean, the waffle iron is turned off and cooling, and you have a massive batch of piping hot, perfectly crispy waffles waiting patiently in the oven.
The Final Bite
Hosting a weekend brunch should never feel like a punishment, and your carefully prepared food should not degrade into mush before it even hits the dining table. By understanding the simple thermodynamics of escaping steam, utilizing a basic wire cooling rack, holding your food at the proper temperature, and upgrading to safe, non-toxic equipment, you can completely transform your weekend gatherings.
You do not need a professional commercial kitchen or a culinary degree to pull this off. You just need a little bit of strategic prep, a dash of food science, and the confidence to let your guests serve themselves. Now go preheat that oven, mix up a batch of batter, and pour yourself a well-deserved mimosa. You’ve got this.






